
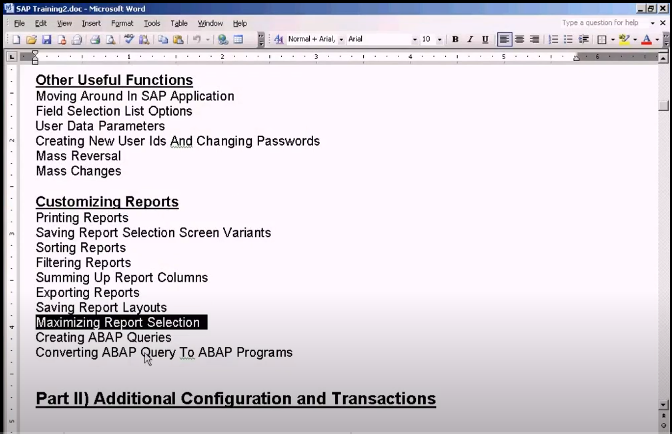
Maximizing Report Selection
Okay, now we will see the next topic, which is maximizing report selection.
Thank you for reading this post, don't forget to subscribe!
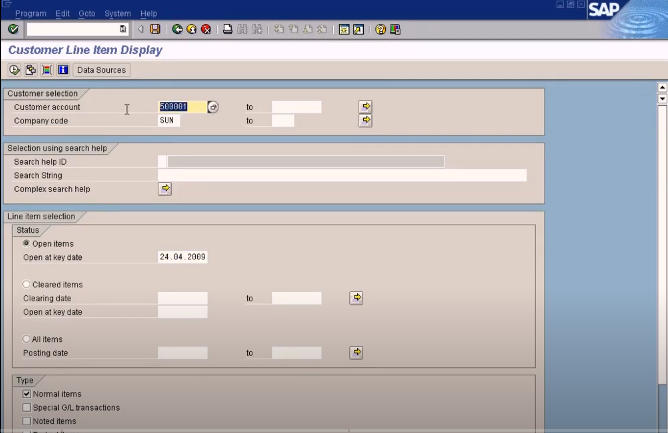
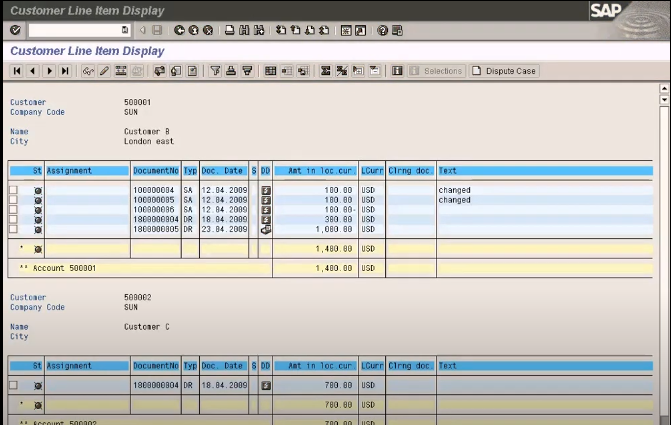
In any report selection screen, this is a report selection screen right here, you will see these buttons here which will allow you to maximize the report selection. Maximizing means you can select more than what is available in this screen. So these are the fields available by default in the selection screen. It is not limited to this only.
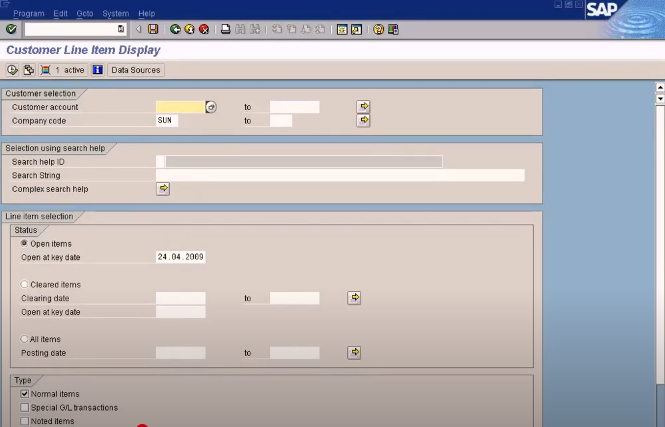
For example, if you want to see the customer account, all the Great Britain based customer account, you need to enter the UK country code somewhere, because if you want to see only the report for customers based in UK, so how are we going to do that? You see this sign here, dynamic selections, click on that. Let me just collapse this so that I can see what are the groups available. You have various groups of fields available. These are the field groups. You have customer master field groups, company code field group, and document field group. Let’s check what is inside each of it.
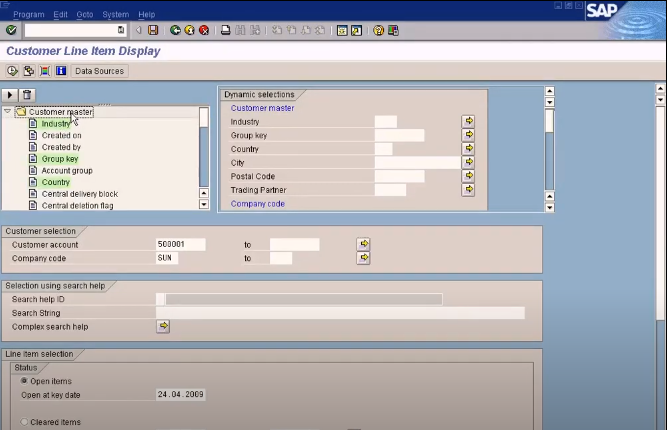
In a customer master field group, all the fields available in the customer master will be displayed, so you can filter by any of these fields. Remember, I told you I want to filter by country code of the customer, so what you have to do is, the fields which are highlighted in green means it’s already selected here. It’s available. The one that is not having the green shading is not selected yet, so I am going to select it. Just double-click to select it. The spelling is wrong here. It should be country code. It’s not county code. So if you double-click, it will be gone. If I double-click again, it will be selected here, country code. If I double-click once again, it will be gone. Ok. Let’s filter by country code, which is Great Britain. The ISO standard country code for UK is Great Britain. This is county code, I think. Let me check the country code then. Okay. Great Britain. Oh, country is already there. Oh, sorry, country is already here. The one that I selected is county code, so just remove it. Country is already here. Let me just remove it. So, you see the country is not available, right? So in order to select the country, you select the country code now. See, all the country codes are listed, so look for Great Britain. So over here, you cannot find UK, UK is not the ISO standard for country codes. It is GB, so I selected country code, GB, for customer master area. What I do after this is just select, you can also filter using other fields, but I’m not going to do that. I want to copy selected. Alright, now you can X. You must click this in order to select the dynamic selection. You must click this, otherwise it won’t be. See this, once you do that, it says one is active, one field is active, which means that you’re putting filter criteria for one field under the dynamic selection, then you can execute now.
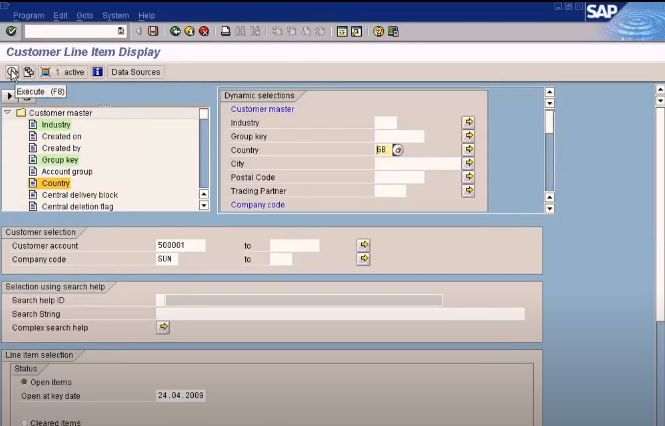
This customer is indeed the Great Britain based customer, therefore you can see the listing here. You can also remove this so that you can select all the customers based in Great Britain. See, both of them are based in Great Britain. So to confirm this, let’s go to customer master.
There’s already a session open, right? Let me go there. Choose FD03 to display customer master. Okay, see this, country code for this customer, GB. Let me select the 50002. It’s also GB, therefore, it’s being selected here. So if I change it to US, let me just change it to US, what will happen? US-based customers in the United States. See, no items selected because there are no customers based in the US.
Alright, so it’s a very powerful tool, so I’m going to remove this. Let me go to other groups and collapse this. Similarly, you can use enterprise structure fields, the company code. This is the general area of the customer master. All these fields are available in the general area of customer master. These fields are available in the company code area of the customer master. Remember the customer master has got two main areas, which is general area and the other one is company code area, so these fields are available in the company code area in terms of payment. Let me select all the customers, which just got a term of payment off 0002. I am going to copy this, one active. I got 50001. Sun Company will be this. Payment code, 5002. Customer code does not have a payment term of 0002. Let us come confirm that. 5002, I go to payment terms, company code area. It doesn’t have terms of payment, so if I go to 50001, just go to payment term 0002, so that’s why it’s being displayed here.
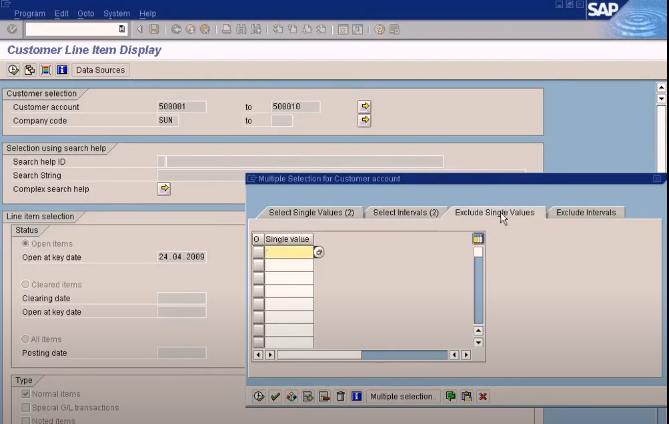
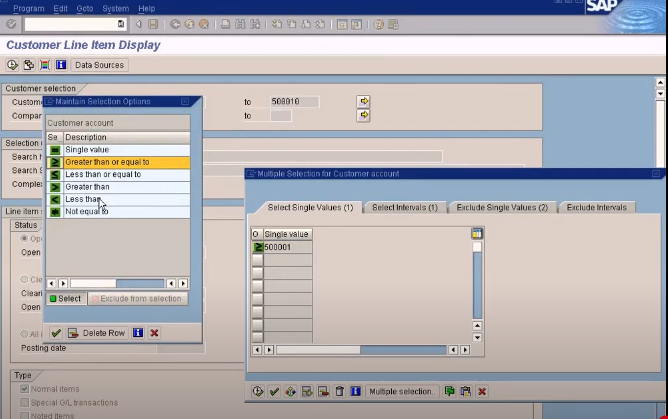
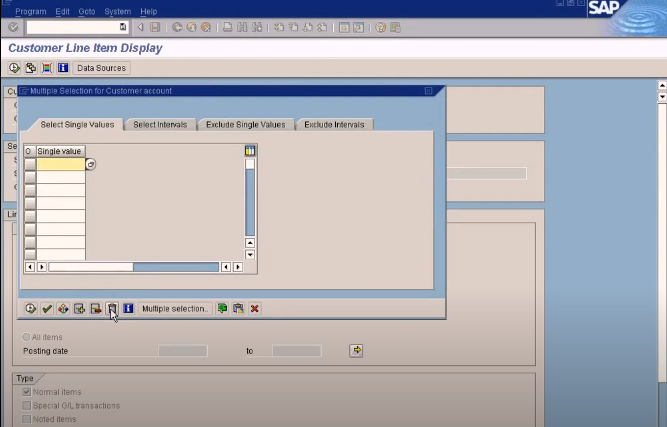
Okay. Now one more thing, let me just delete this, I’m not going to use this. Let me go here, select that, delete. I should be able to delete. Just clear it. Once you press this delete button, it’s supposed to delete the field values entered in terms of payment. See, it’s gone. So now, if we click again, it will be collapsed, so I want to explain about this multiple selections. What does this mean? Here, you know that you can select a range for the customer like this. It will display a range of customer master.

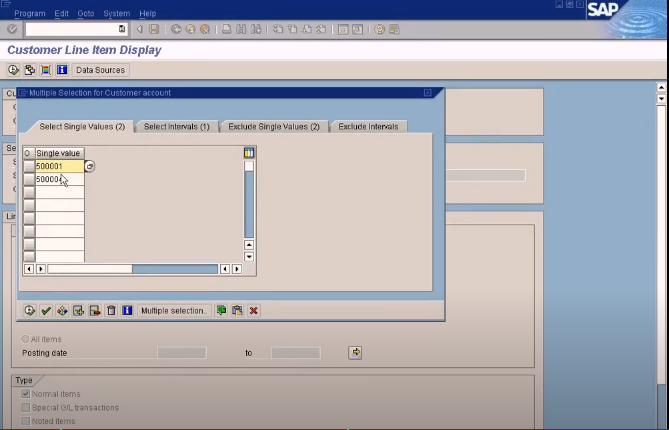
We have this. You will select 50001, 5002. This is the range. What is this field for, this button’s for? You click here, you can actually enter single values, which means that if you don’t want to specify a range, if I do like this, then you’ll select all the customers in this range, 1 to 10, but I want to select only 50008 and 50002, for example. How am I going to do that?

You have to enter single values, something like this, 50002, and 50008. So if you enter like this, and click okay, you will select only the customers, which is 50002 and 50008, and anything between 50002 and 50008 will not be selected because this is not a range. We are entering only single values, individual values. It’s not a range, alright, so it’s different from this. Here, the system will interpret this as a range, here, it will not. Then intervals, this is the same thing like this. This is range. But if you want to enter more intervals like 50005, and then, here if you want to enter up to 7 to 10, this means that I have two intervals, which I cannot do here. I can enter only one interval here. But if I use this tab here, I can enter two intervals. It will select all the customers within this range, 1 to 5, and also, 7 to 10. Will it select 6? No. 50006 does not fall in either of this interval. That’s excluded.
Now, this one is excluding the single customer. If I put 50001, that means it’ll not be selected because that’s why it says exclude single values. This is including, this is excluding. You may put the range here. Okay. I want to put this range, but I don’t want to select 50003, so what do you do? You just put here 3. So you’ll select all the records, all the customers within this range, but it’ll exclude this. You can also exclude more than one. You can exclude more than one like this. This is the same thing, but this is by interval base, but it will exclude anything that is false in this range. It will not be shown in the report, so it’s a very powerful tool. You can also specify interval outside range using this. Here, let me go here, greater than equal to single values. You can specify something like this, anything greater than 50001, I just specify that, and then, choose greater and equal to. You see this sign here, so anything more than this customer range will be selected, so you have a range of options. Less than, not equal to. You’ll select something like excluding. This is something like you put this in to exclude single values. You’ll not select this record, but you’ll select all the other customers.
This is multiple selections. It’s a normal screen. Okay. Now you look at this, import from text file. Okay, let me create a text file. I will put 50001, 50002, 50003. I’m going to save this as Customers.
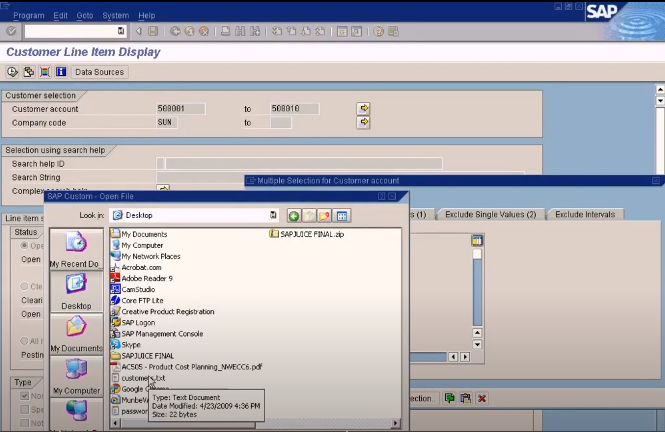
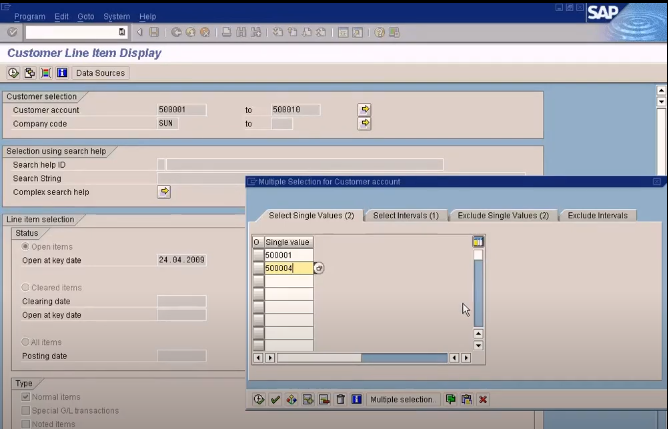
Now what I’m going to do, if I have a text file there, in my hard disk, I can import the values from there. I’m going to choose the customers. See, it’s imported from the customers text file. That’s the function of this. Or, if we have this in the clipboard, let me copy that in the clipboard. I’m going to copy these two. I’m going to press edit, copy, so it’s in the clipboard. Let me delete this, delete this, then I choose upload from clipboard. Oh, in the clipboard, there are more than this, 50001, 50002. The things in the clipboard have more values than this. Let me just delete this. If I paste, so let me see how many values I have. Okay. Now, in the clipboard, there are only two, then upload from clipboard. See, I can see only 5 0001 and 50004 because these are the two customers in the clipboard.
Okay. I think that’s about it. There’s one more thing you can do. Let me just delete this. I don’t even have to use this. I just come here. I just copy CTRL+C, and then, I can come and paste it here. CTRL+V is for paste. See, I don’t even have to use this. As we paste it in that way, it’s similar to uploading it from the clipboard.
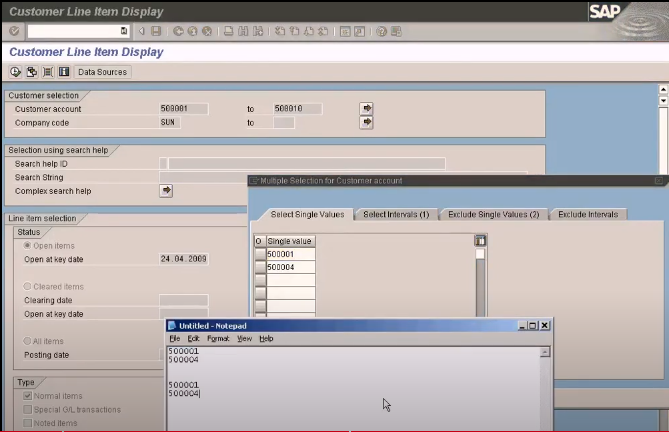
If you want to copy this range from here, you cannot select, right? So what you do, you press CTRL+Y. One more time, you have to press CTRL Key and Y. CTRL Key and Y. See, the cursor has turned to a cross mark, using that, you can highlight like this, then you can copy. Right-click on the selected block and copy. Now, I come here. I can even paste it. See, it’s copied from there.
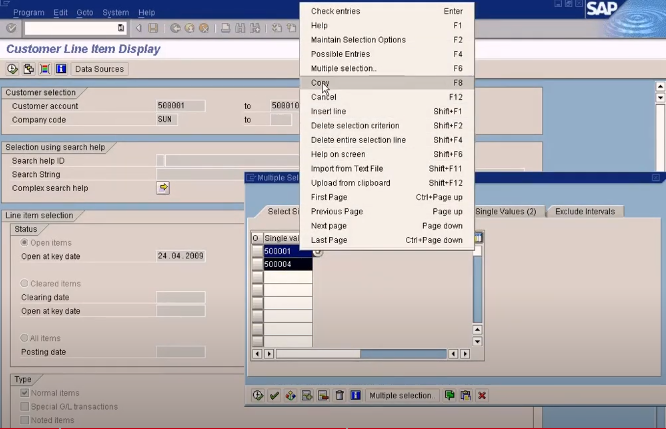
When you have some selections inside, this will turn into green. You see the green sign here, below the arrow mark, it means there are some selections inside. Here, there are no selections, that’s why there’s no green mark. It’s only one selection here, this entered here. So if you want to delete all the selections, just press this delete button, everything will be deleted, so the green mark will be gone. Alright.
You may watch the full course on the following YouTube link
https://www.youtube.com/watch?v=p6ZA0Ia2JSg&list=PLN17Nn94liux88cwVwqbiRQQo1qK4sOdQ&index=53