
Fixed Assets: Creation of Material Master, Vendor Master
Hello everyone! In today’s session, we will learn about fixed assets. Now before moving ahead with this session, let us summarize what we have learnt from our previous session which was on bank and cash transactions and bank reconciliation process. Under bank and cash transactions, we have seen cash journals, automatic payment programs and how to print the checks, how to reprint the checks, how to do the voiding checks, then how to do the customer payments and the vendor payments. And under bank reconciliation process, we have seen how to follow a fixed procedure for the bank reconciliation, how to check the errors if there are any in the cash payments, how to use the split icon in the bank reconciliation for the bank statement, how to upload an excel file in the system, and how to upload the multicash format excel file in a system. So these are the topics which we have covered in our previous session.
Thank you for reading this post, don't forget to subscribe!Under this fixed assets we will be covering on how to create a material master, how to create a vendor master, creation of an internal order, how to do the budgeting of the internal order, how to create a purchase order, how to release a purchase order, then we will see about goods receipt, in voice verification, settlement of the internal order, then how to create asset master, settlement of CWIP to the main asset, and final settlement of CWIP to the main asset. Then we’ll see what is depreciation run, what is asset sale with customer and asset sale without customer. Then we’ll see what are sale of assets, assets scrapping, asset transfer, and asset revaluation. And last we’ll see impairment of asset. So this is the course content for this particular session.

Now first, we’ll see creation of a material master. Now here for material master creation, we use a transaction code called MM01. Now let us see how we do that.

Now first, material code sample, we use transaction code MM01. And there we’ll provide the values like material number that is our example is asset. So we will use asset as it is our material. Then we’ll have to provide the industry sector, that is mechanical engine and we have to provide a material type to it. Now after providing these details, we’ll click the select views button. After we click on the select views button, we will get a screen where we have to select the views.

So, here we will select the views as basic data 1, basic data 2, purchasing, foreign trade import, purchase order text. Then we will select general plant data storage 1, general plant data storage 2, accounting 1, and accounting 2. And we’ll click on this continue button. So these are the fields which we need to select for that particular material that is asset.
Then we’ll click on the organizational levels button. Here we’ll have to provide the plant number and the storage location. So here we have provided the plant as 1320 and our storage location is Main. Then we’ll click on this continue icon. After that, we’ll get a screen where we have to maintain the material asset details.

So here we’ll give the basic unit of measure and a material group to it. So our base unit of measure is EA and the material group is BPM. So that was our basic data. Now we will go to the next tab where we have to provide the purchasing details.

So here the basic unit of measure is EA and our purchasing group is AO2 So this is the purchasing group details. Now next we will go to the foreign trade import tab and we will provide the excise data in this tab.

So we have to provide a chapter ID. Then we have to provide the Valid From date. Then we have to select a material type over here and our currency rate. That is INR. Now after this, we’ll go to the next step. That is plant data or storage 1 tab.
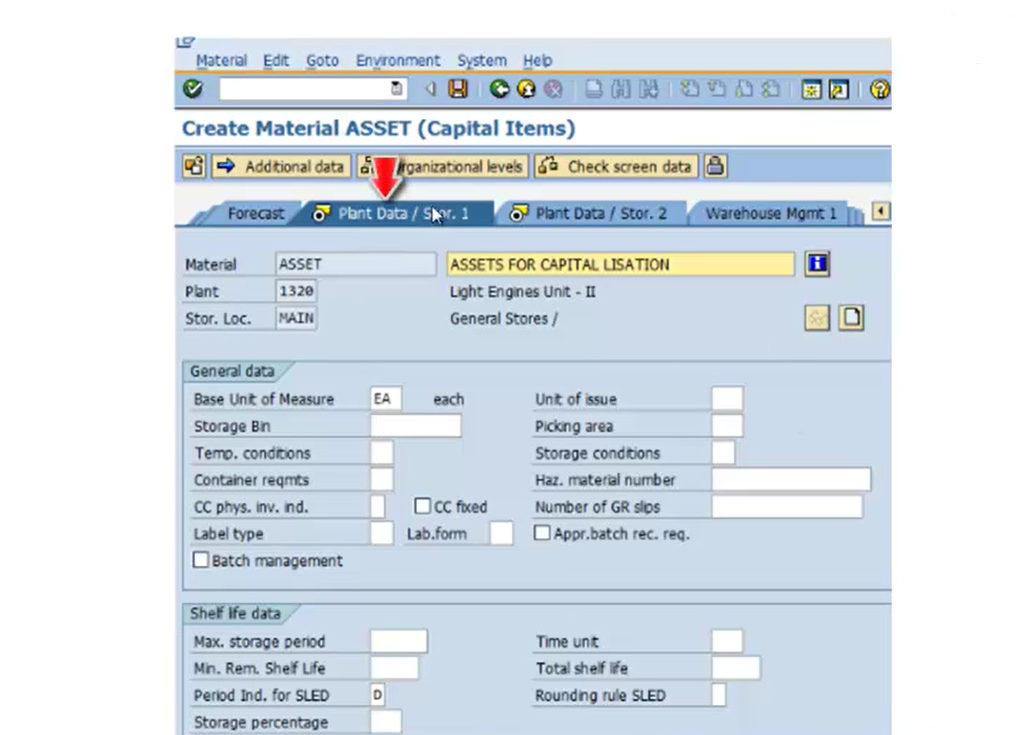
Now these tabs are the tabs which we have selected in our initial screens. Now here we will have to provide the basic unit of measure and period indication for selection. So here we have given the selection as deal So after maintaining the plant data storage 1 we will have to maintain the plant data storage 2.
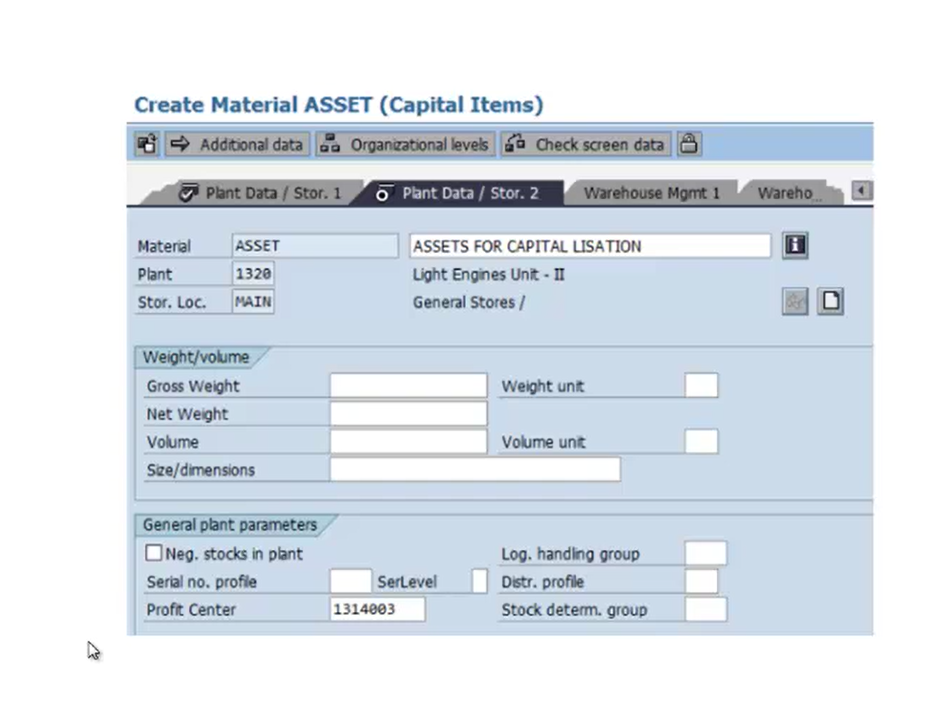
So here we will provide the profit center number.

Then we have to provide the accounting details. So here we will provide the general data and the valuation data, that is valuation class, price control and price unit. So after maintaining all this data for that material, we will save this material data. And once we click on the save button, we will get a message stating that “Material ASSET is created”. So our material name was ASSET and that material is created. So this is how we create material data.
Next we’ll see Vendor Master. We all know how to create a vendor master, but here we’ll have some extension over the creation of a vendor master data. The transaction code is XK01. Now here once we enter the transaction code XK01, we will get a screen where we have to provide the vendor number, the company code, purchasing org details.
 So after this, we will click on the enter button. Now once we click on the enter button, we’ll get a screen where we have to maintain the purchasing data, that is the currency, the terms of payment, encoderms details, and the schema details.

So here our schema is Domestic Schema. So after providing these details, on the next screen, we’ll have to maintain the CIN details, that is excise duty details.

So here we’ll click on the CIN details tab for maintaining these values or we can go with the J1ID transaction code for maintaining these details.

So for maintaining the excise details by J1ID code, we will select the radio button as vendor excise details for maintaining the excise status, then we will click on this change icon. And after clicking on the change icon, we’ll click on the new entries button.

So under that new entries button we will maintain these details. Here we have to provide the vendor number and excise indicator number. After providing these details, we’ll click on the Save button for maintaining the CIN details. So this is a vendor master creation.
Next we will see how to create internal order. So here the transaction code is KO01. Let us see how to create an internal order.

So here under this screen, we have to provide the order type that is 1100. After providing the order type, we’ll click on the master data tab.
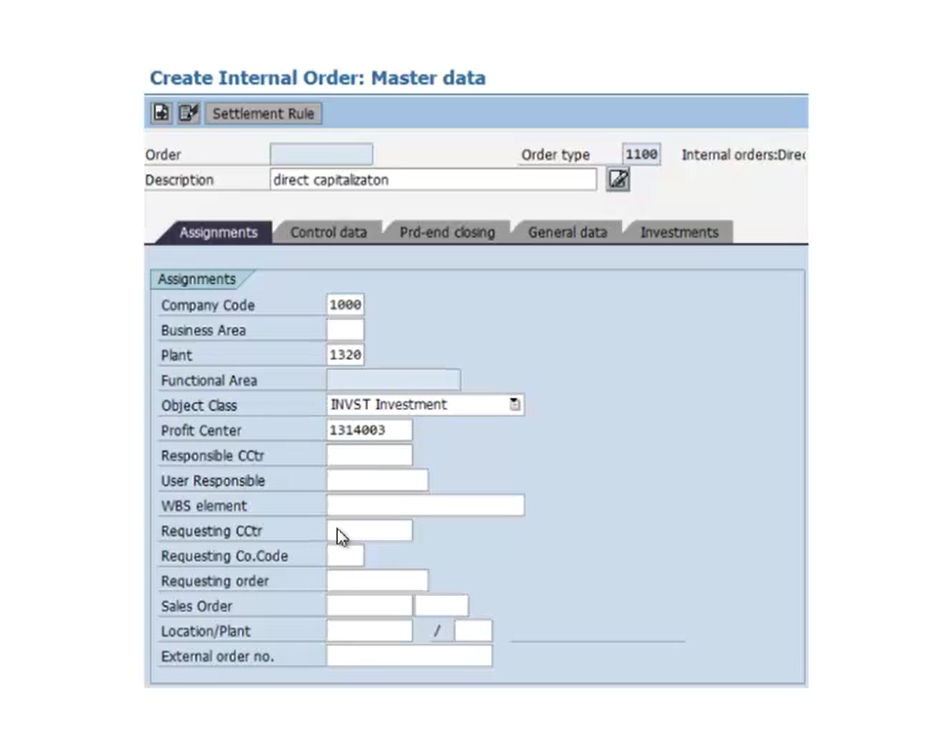
Now under the master data tab, we’ll get a screen where we have to provide the details for assignments, control data and general data. So under assignments, we’ll give the company code and the plan data details and a profit center to it Then, next under control data, we have to provide the currency details that is INR.

Now after providing these details, we will click on the save button. And once we click on the save button and all the internal data has been created, the order will be created stating a message that order was created with a number this. So this is the document number which is generated for this particular internal order.
Now to check that order, we will go to CWIP. A system creates internally one CWIP asset for viewing the asset master. So for that we will go to transaction code KO03 and we’ll provide the order number over there. And then after providing the order number, we will click on the master data tab. Once you click on the master data tab, you will get a screen where it will display the internal order details.

So under that in the menu bar, we will go to extras and click on asset under construction tab.

Under asset under construction, tab we’ll get a detail where it will give the CWIP details. So here we’ll click on the above selection and the asset number will be this. For this particular asset, this is the master data displayed.
Next we will see budgeting of the internal order. Now after creation of the internal order, we need to share the budget for that particular internal order. So the transaction code is KO22.
 So here under KO22 we have to provide the order number which we have created in the previous example. And then we have to provide an order type to it. Now, either we can provide order number or order type, or we can use both of the details for providing the budget to that internal order. Then we have to provide a currency to it, so our currency is INR and we’ll click on the original budget button. After that we will get a screen where it will give you the annual overview of the budget.

So here we’ll have to provide the annual values for this particular period. So after maintaining this budget details, we’ll click on the save button. And once we click on the save button it will generate a message stating that a document number was posted for this particular budget. This is how we do the budgeting of the internal order.
Next, we will see how to create a purchase order. So for creation of the purchase order, we will use a transaction code called ME21N.