

FICO Configuration
So first of all, we have done define company, define company code. And the 3rd step, assign company code to company. So, step number 4, define business area. I’m going to define business area. Business areas, whatever we have defined, Hyderabad, Bangalore, Chennai, and even my plant area also, in order to capture the expenses, I’m defining it as a business area. So, go to new entries. Type DRBN, that is doctor Doc. Reddy labs group, Bangalore. Then description, Bangalore and DRL. So, because this Bangalore belongs to doctor Reddy labs group. Similarly, I’m suffixing Doctor in front of every business area. DRHY, I’m defining. Right. Hyderabad DRL. This is because the same client will be used by several people. So, for that purpose, I’m doing this. And, write a DRCH, Chennai DRL.
Thank you for reading this post, don't forget to subscribe!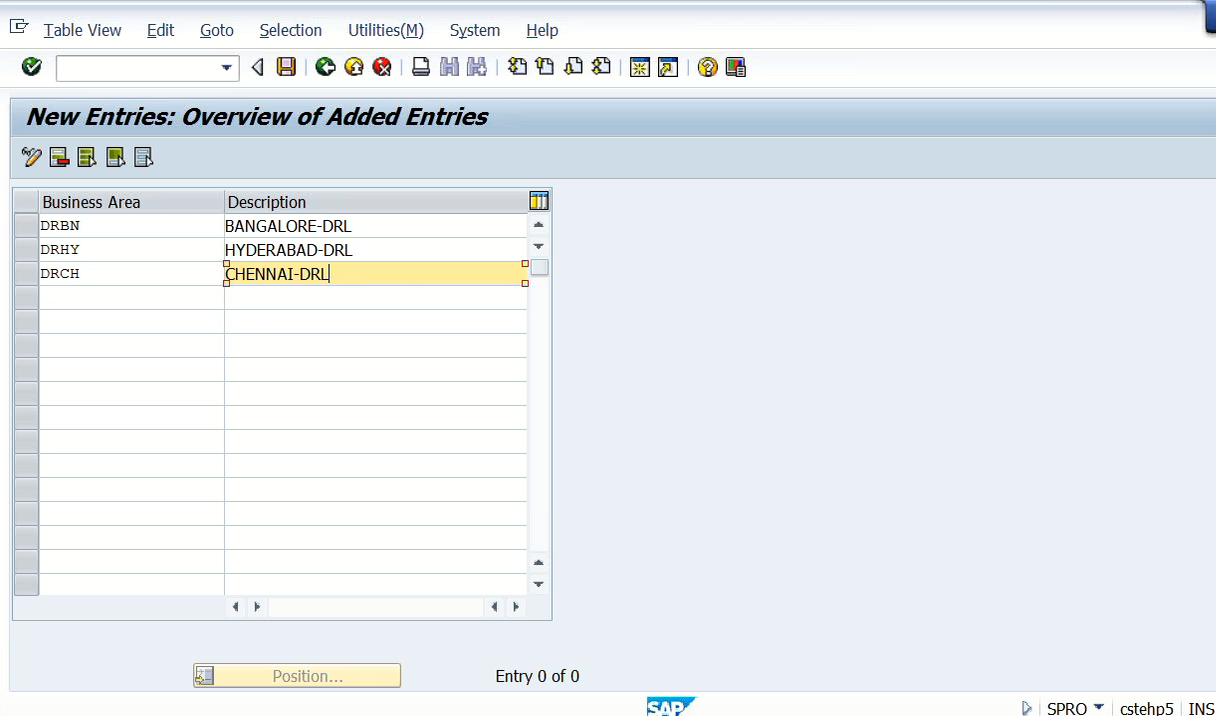
Like this, we can define any number of business areas for your Business areas. So, we have completed the first 4 steps.
Then coming to chart of accounts, Define chart of accounts, assign chart of accounts to company code, define account group, and define return earnings account. These 4, I have to define again. Organization structure is defined from enterprise structure onwards. Now general ledger accounting, etc., I’m going to go from Financial Accounting, General Ledger Accounting, Master Data, GL Accounts, Preparations, Edit Chart of Accounts.
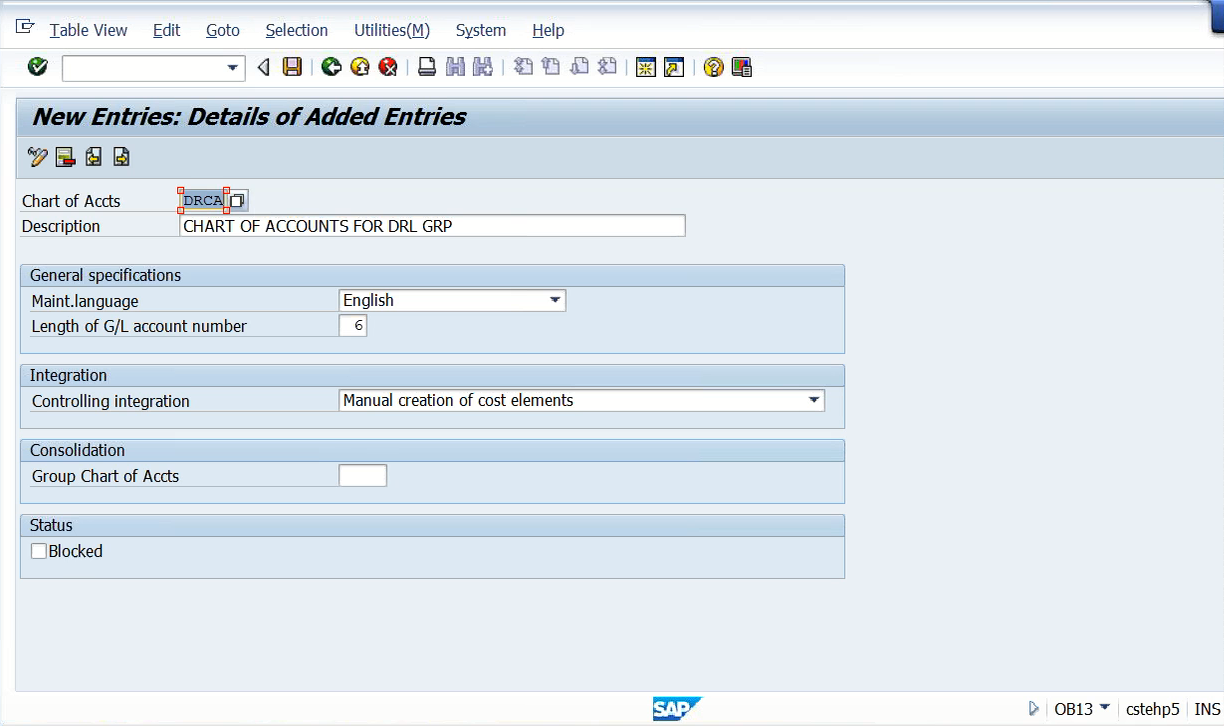
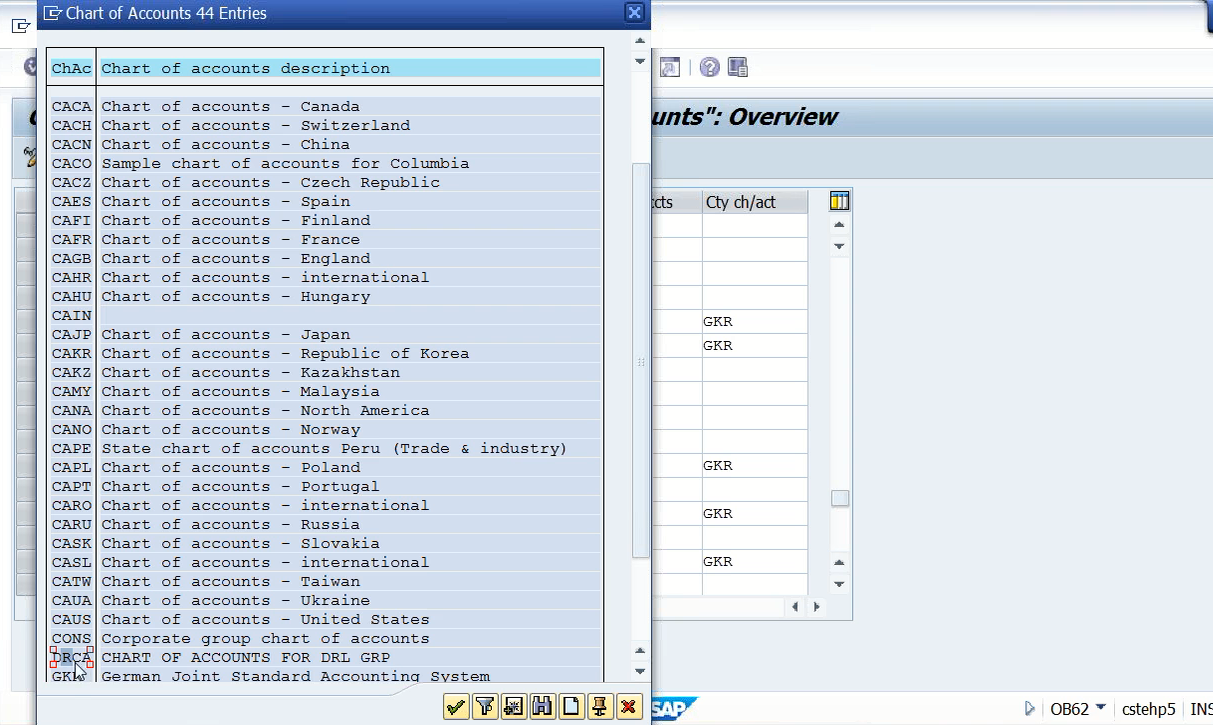
Then we go to New entries. DRCA, that is Doc Red Labs, chart of accounts. Here I’m going to select english as maintain language. Now length of GL account, here maximum you can use is 10 digits. But what I have decided to use 6 digits for our company code. Then coming to integration, controlling integration, that is manual creation of cast elements. We’ll discuss these things when we go to the controlling area, not now immediately. Next is group chart of account that also we’ll discuss later. Now only 4 things we have discussed that we have defined here, DRCA and the description part and English and 6 digits, only these 4. This is sufficient. And then we have to save it. Once you save, it will be graded out.
Then assign company code to chart of accounts. So, whatever our company code, we have to tell the system this company code is linked to this chart of accounts. That is what we need to do now. Click on position. Go to our DRLB, our company code DRLB.
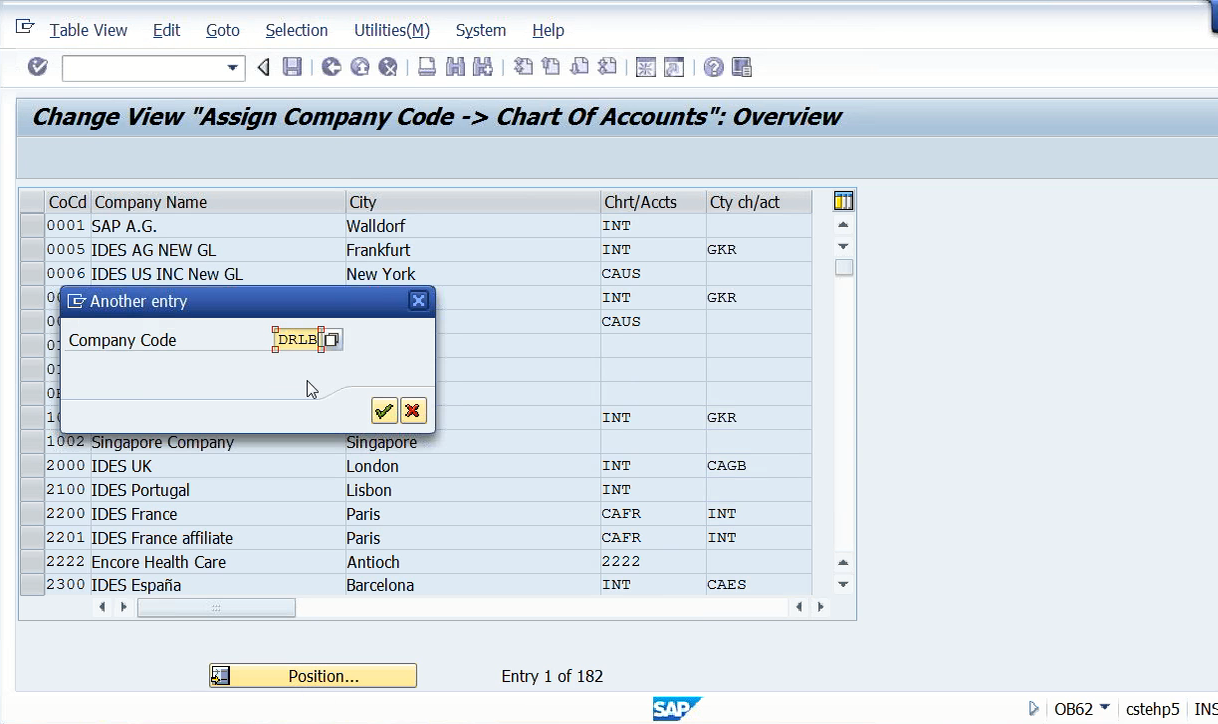
Press enter. So, this will be seen.
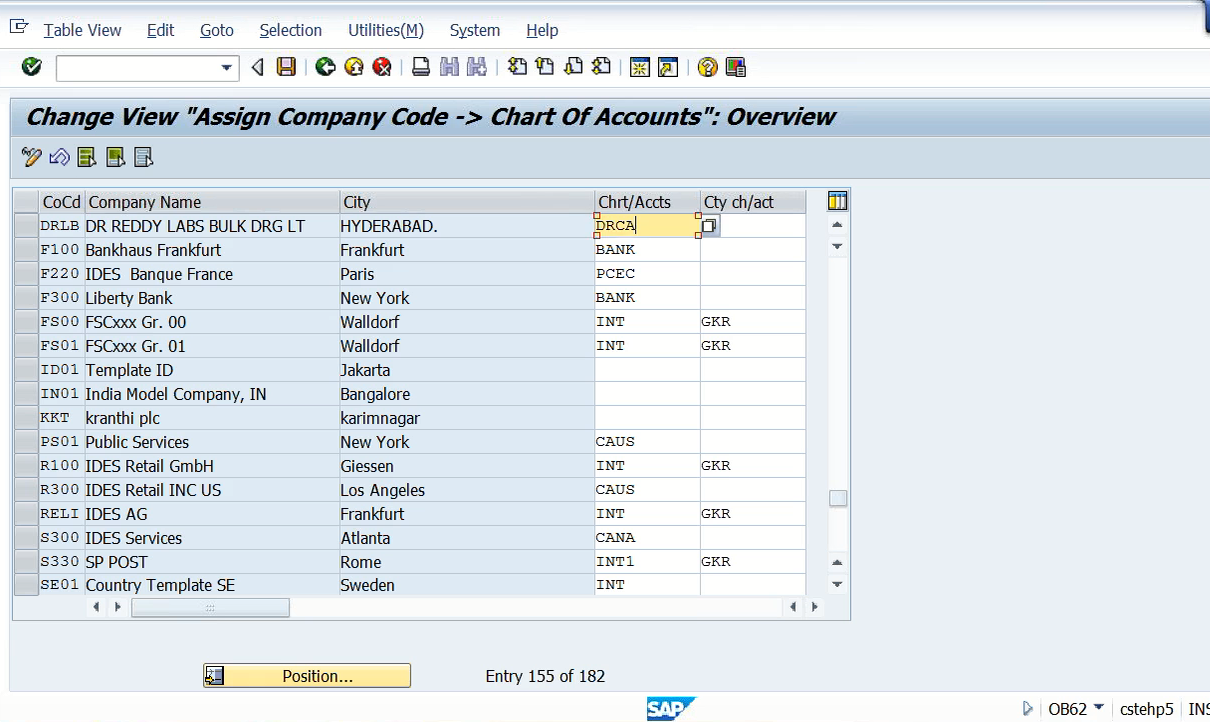
Now against that against doctor Reddy Labs bulk drugs, I have to assign the chart of accounts. The chart of accounts sees whatever you have defined there, the chart of accounts is visible now. I can just assign here. So, chapter account name is DRCA. Here it is available in the list. Double click on it.
It will come to the previous screen, then save it. Now all those things are going to be saved in and I’m going to create a Doc Reddy labs request number.
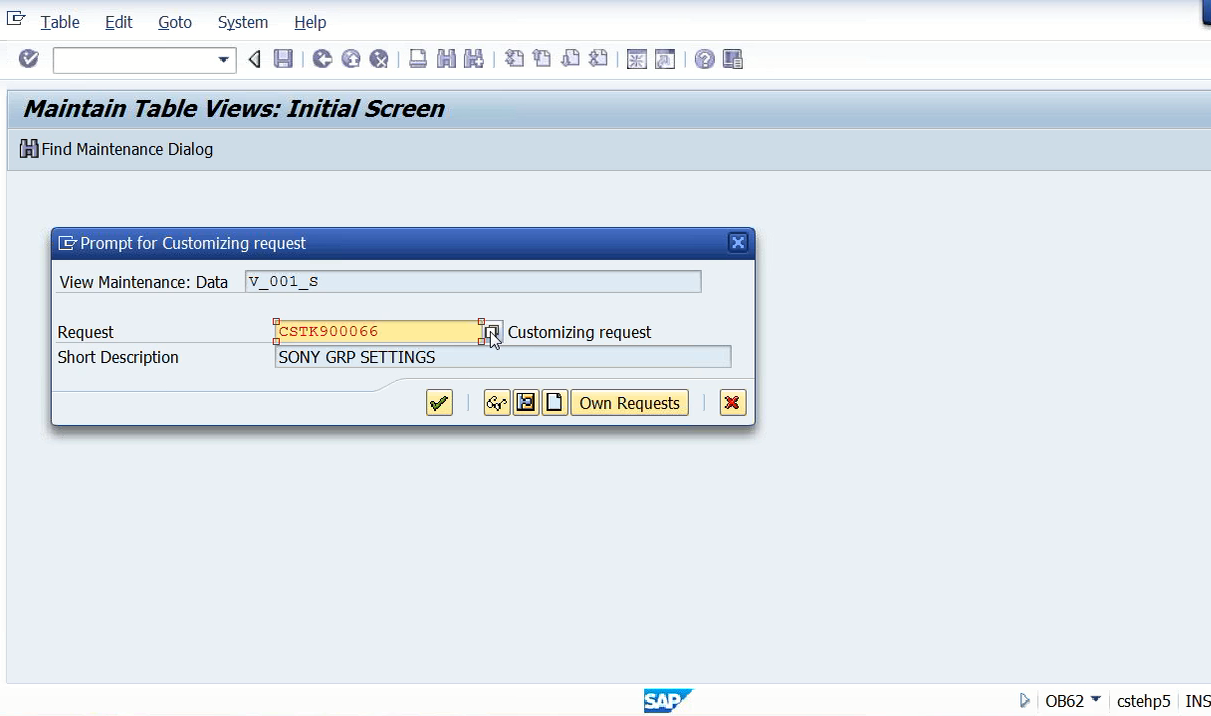
So, this request number is going to be used for the purpose of transporting data from one landscape to another landscape. It’s from one server to another server or one client to 2 other clients. So Doc Reddy lamp, DRL group configuration settings. I have created one request number. I have taken this. But in the beginning, you ignore this. Maybe because this is going to be used only to transport or to transfer the configuration settings from one client to another client. I’ll explain the landscape afterwards. Right now, doc Reddy Labs and the chart of accounts are linked to each other.
Next, we define account group. Go to new entries. And here, since I have used a chart of account to DRL, the same thing I can copy and paste the total group.
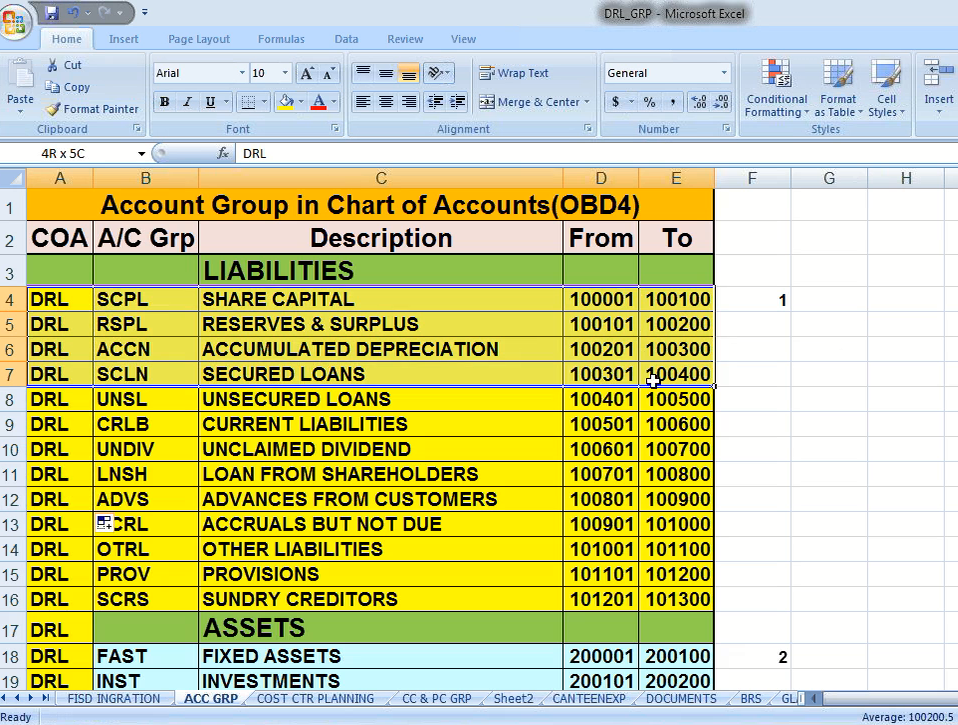
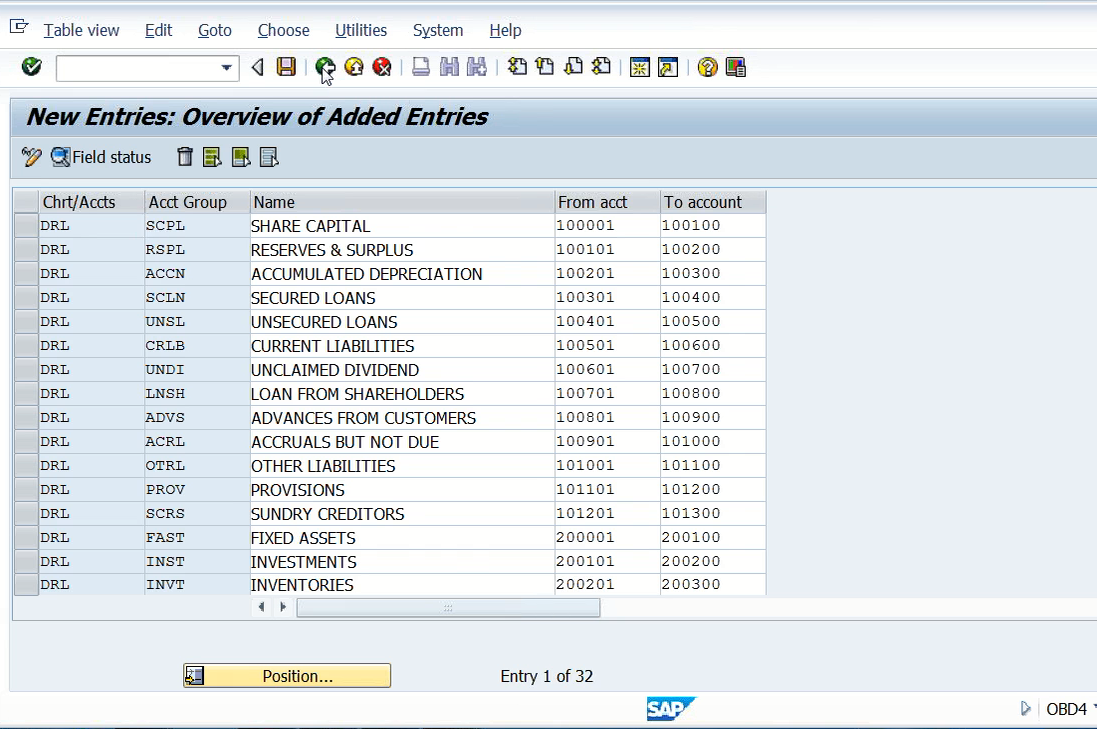
You can also enter it manually but better to copy onto an excel sheet and paste here, that will be easier. So generally, we even in real time scenario, we keep this account group like this and we’ll be copying paste in the projects. But here, here I have taken the gap of 100 numbers. Say, 3 lakh 1 to 3 lakh 100. But in the real scenario, what I’m doing, I’m taking 1,000 numbers because the number of accounts may be more. So that’s why I’ll be taking 1,000 numbers there in the real scenario. Like this, the total account group can be copied and pasted in this table. So that is step number 7.
Now step number 8, define retained earnings account.
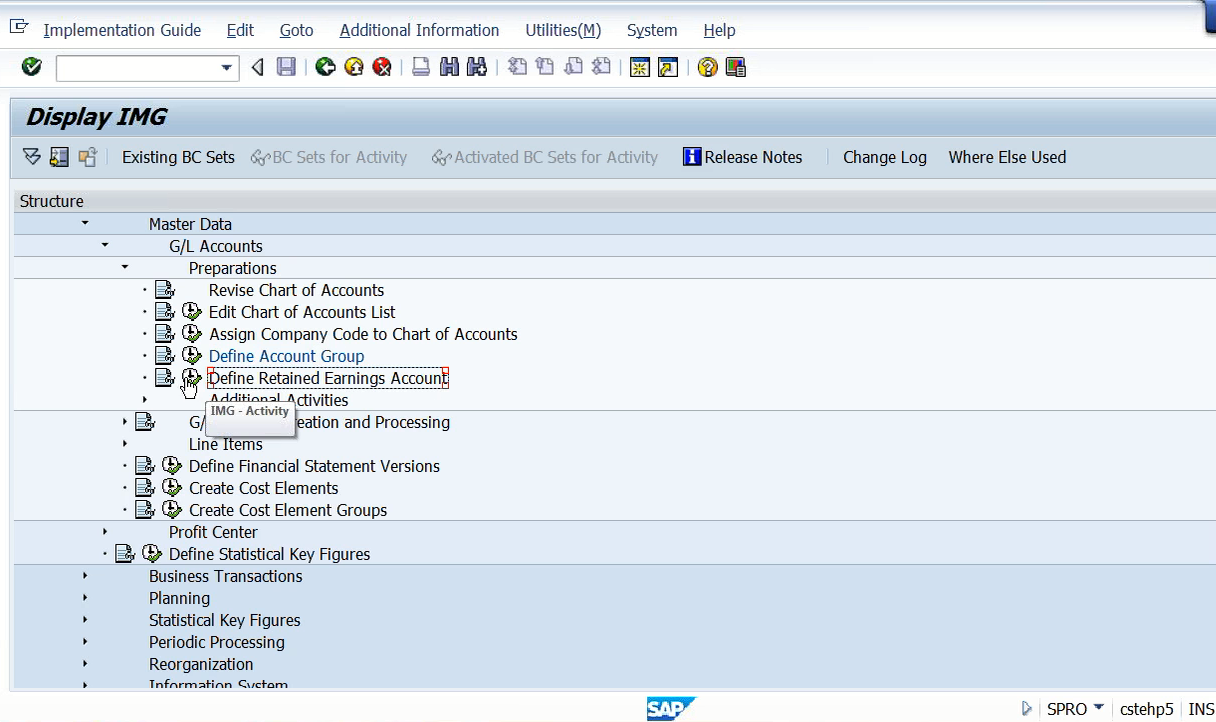
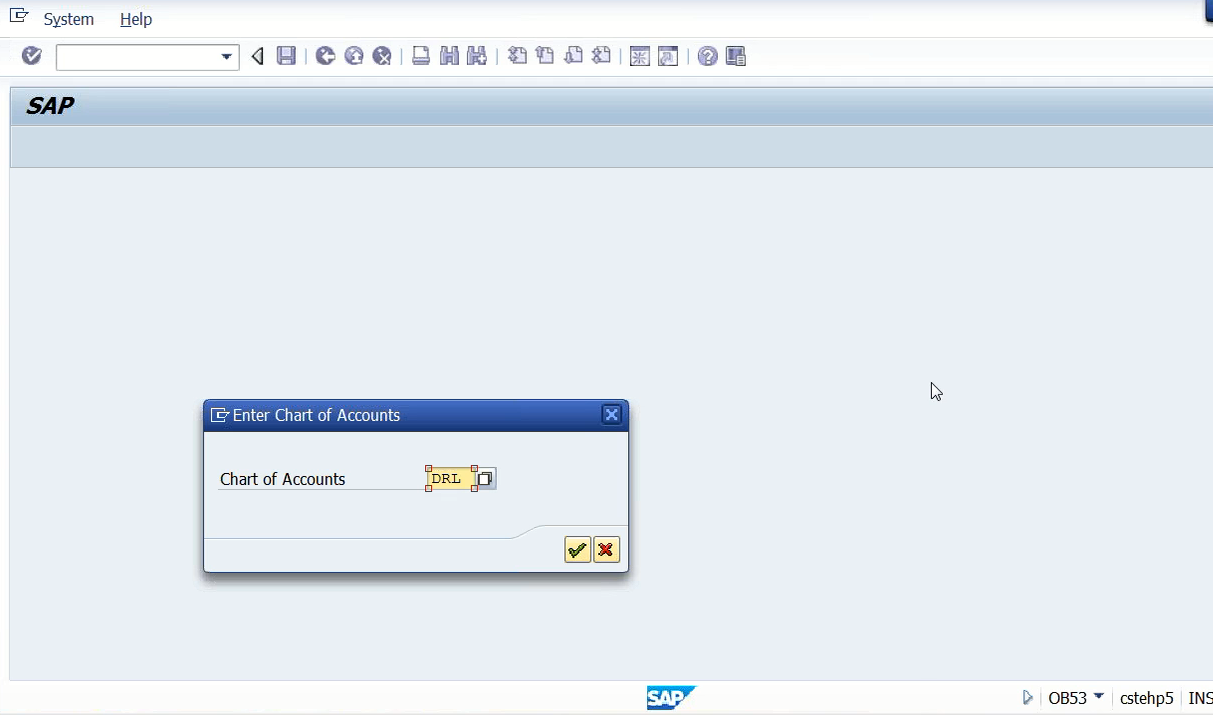
So defined retained earnings account means what is the retained earnings number. Now it’ll ask what your chart of accounts is. Say DRL.
Profit and loss account statement x, X is equal to my results and surplus first number because retained earnings is nothing but the profits that are retained in the business. I have to tell the system which account I’m going to use for the purpose of posting my retained earnings account. So I’m going to use 1 lakh 1 lakh 1, being because returned earnings account is part and parcel of results and surplus.
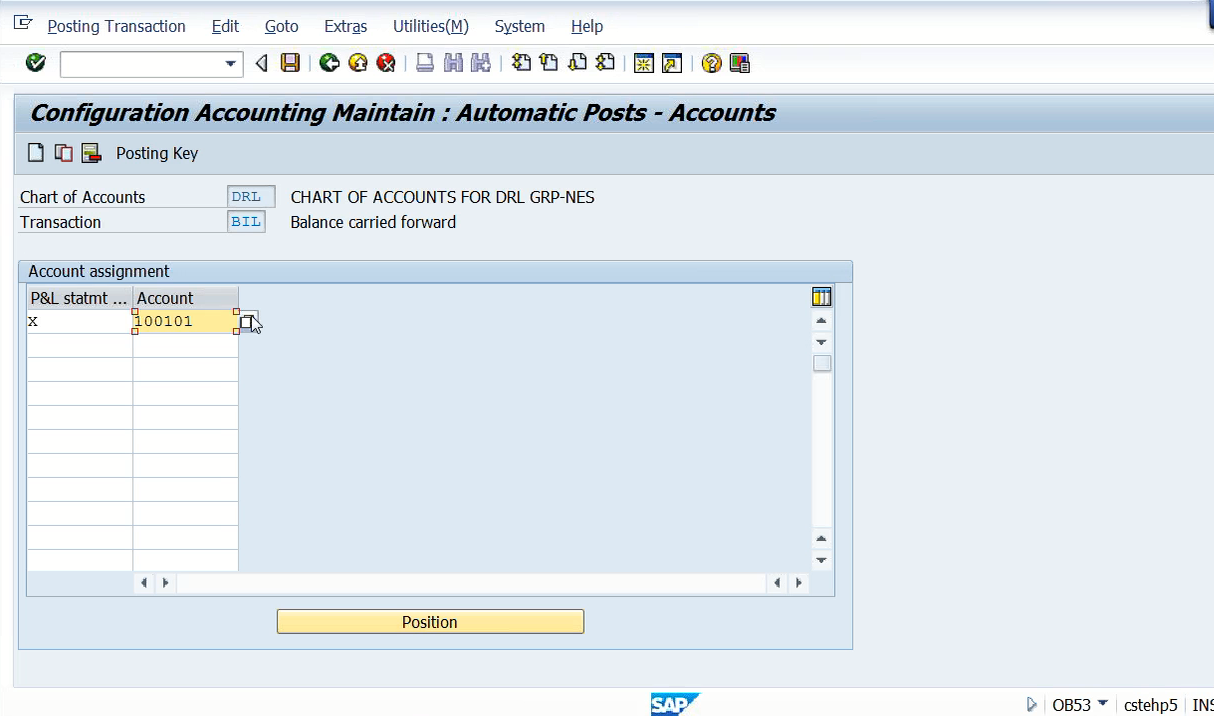
So, first number, I’m allotting for retained earnings. So, but here, I’m telling the system,x. X means I can prepare 2, 3, or any number of P & L accounts. In real scenario, if it is required, you can prepare 2 profit and loss accounts for 1 company code. especially in case of funds where there are grants from the central government, etc., they will ask us to prepare a profit and loss account and balance sheet for the separate grants separately. In such case, we can define x, y, z. If it is x, the profit is going to be stored in this account. If y, another account.
So here I’m telling the system that since I have only one account, x is going to be posted, that is return running is going to be posted to this account. And once you save it, system will give you a message stating that account 10101 not created in the chart of accounts. Yes. We have not yet created this GL account at all. So we’ll create it when we go to the easy access screen. Once we complete all 21 settings, then we’ll create this account. But don’t stop here. Just ignore the warning and go ahead. So now we have completed 8 steps. Now the 9th step is nothing but Financial year, that is defined fiscal year variant, assign fiscal year variant to the company code. So here for step number 9, Define fiscal year variant. So where we are going to define it is under Financial Accounting and Global Settings, Ledgers, Fiscal Year and Posting Periods, Maintain Fiscal Year Variant. Just go here, and here you’ll find a big table.
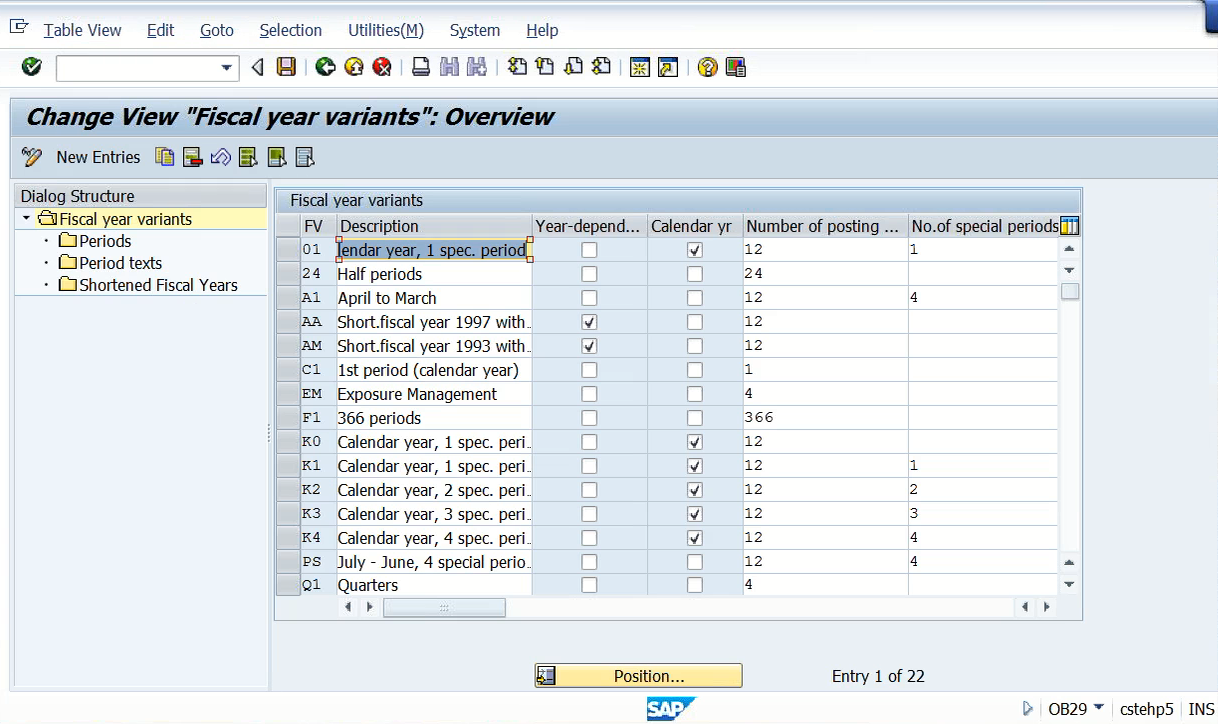
The T code is OB29. This is critical table, don’t make any changes. Even if accidentally any changes are made, come out without saving.
So here, I told you about K4 and V3. K4, calendar year for special periods. Special periods are going to be used for the purpose of finalization of accounts. And here the calendar year box is checked. Don’t remove this. And at the same time for v 3, there is no check. Don’t check this box. If you check this, it will become a calendar year. So April to March, 12 posting periods and 4 normal period. 4 special periods, 12 normal periods. And if you want to see how this has been defined, just select V3, double click on periods. So it will give you it’ll show you the table.

Here, it takes that this is the calendar year, first of all. 1st month, 2nd month, 3rd month, that is January, February, March, April, like that. Number of days in the month are given here. And, so this is calendar year. Now since ours is V3 that is April to March, this has been redefined. So redefined with, say, April 1st period, May 2nd period, June 3rd period. Like that, it has been redefined. When it has been redefined, now, say, up to period 9, it will be falling under up to that is say, for example, if it is a 2013. So up to 31st March 2013, that it is in the current year. And year shift is given. Year shift is made as 0 here. But when coming to January, February, March, they’ll be falling under next year. In case if you are to here, of course, this is general statement. This is not mentioned for which year. For any year, this is the same setting. And, January, February, March are nothing but they’ll be falling under next year. See, if you observe here in the image below, April to December are falling under 31st, December 2013. But January, February, March are falling under 2014 fiscal year.
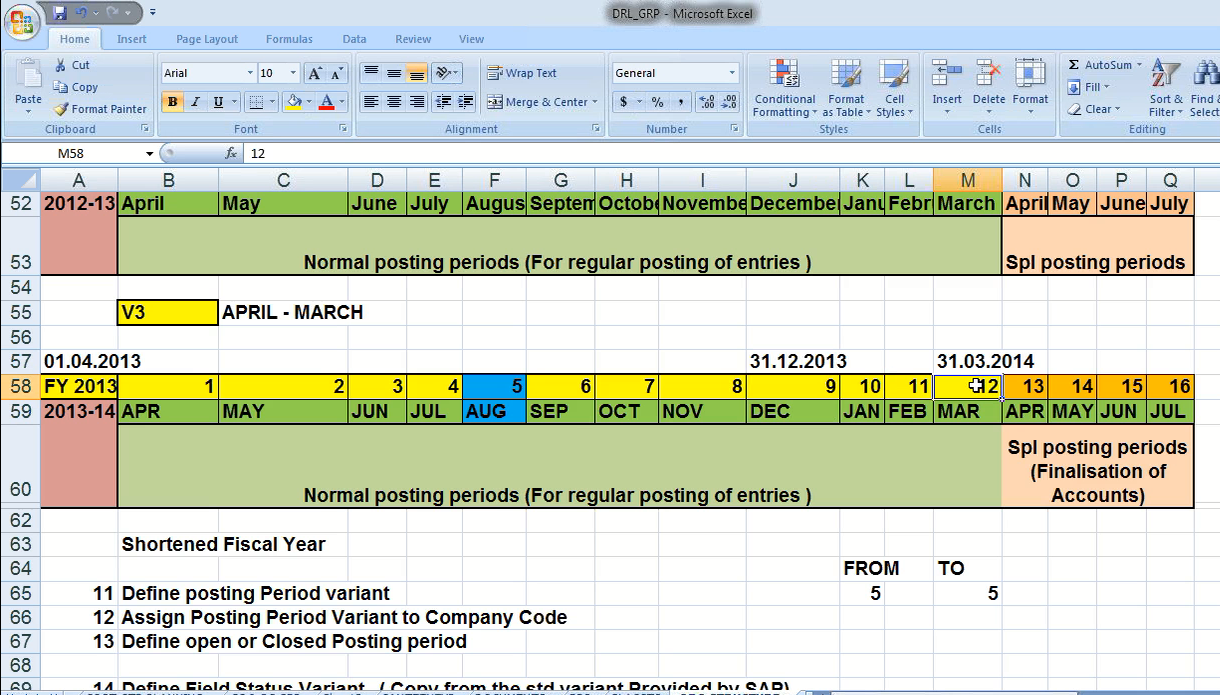
So, to bring them back and equate with this this year, so in the year shift, it has given, like, minus 1. You can understand 2014-1 is equal to 2013. So, to make uniformity of the number of months, this has been defined like this.
Then assign company code to fiscal year variant. Now what are the fiscal year variant that we have identified? That should be linked to our company code. See. DRL, I want to use V3 for this. Then save.
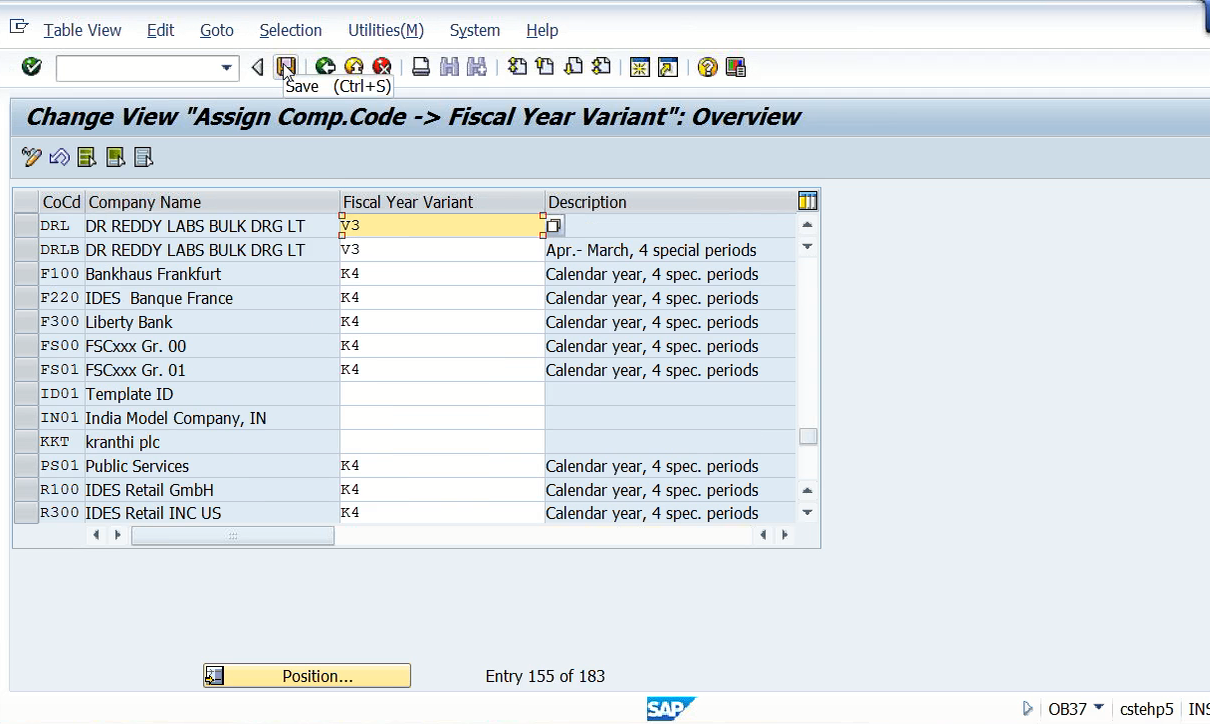
Where there are gaps, the system will ask you to fill it up. Just ignore and, go out. Save it. So we have identified fiscal year and assigned it here.
Then posting periods. Posting period is nothing but so define posting period variant, assign posting period variant, define open or close posting periods. So that is the period which is going to be open. Say, generally, 99% of the cases, current period is going to be kept open. So, this feature is going to be defined in 3 steps. So step number 1, define variance for the open posting period. Click on this, then New entries. I’m going to create some variant. So, I say DRPP, Doctor Reddy Labs posting period variant. So, what I will do is doctor posting period variant. Say I say DRPP.
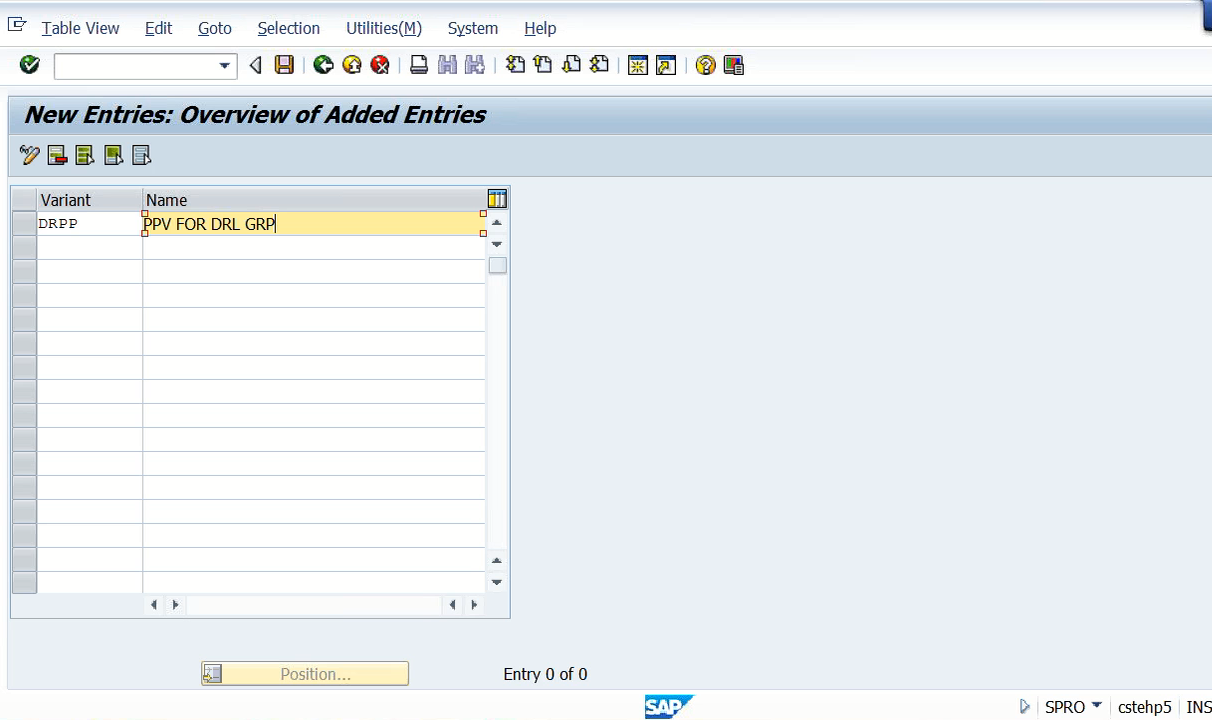
So, posting period variant for DRPP I have taken. Some variant I’ve created. I can take X, Y, Z or anything. But to correlate with the name of the group or company, I’m defining with the DRPP.
Now assign variant to company code. Now whatever the DRPV that I have defined, that should be linked to the company code first. Company code is a DRL. So I’ll assign DRL and DRPP, that is linking company code and the posting period variant. Now what is DRPP that I need to define now? Then open and close posting period. Here just go to new entries. Now I’m going to define what is meant by DRPP. Say DRPP. Here from period 1 of 2013 to period 12 of 2013 will be kept open. If I say 1 to 12, I’m telling the system to keep all periods open or I can say 5, 5. Then in such case only 50 periods will be kept open. Then here I’m taking say 13 periods 2, 13 periods of 2013 to 16 periods of 2013 are also open.

That is these are all special period. So special periods, we need not bother. But this period, this fiscal year, I need to bother about which period is going to be kept open. Right. For the sake of some practice, we are going to do some experiments. I’ll take 1st period to 12. This means this is going to be open. Periods are open up to 12. And this rule is going to be applicable to all types of accounts. Valid for all types of accounts. All account type means what are the other account types? Other account types are nothing but assets, customers, vendors, materials, GL accounts like that. Different types of accounts are there. So, if I take plus, this will be applicable for all the account types.
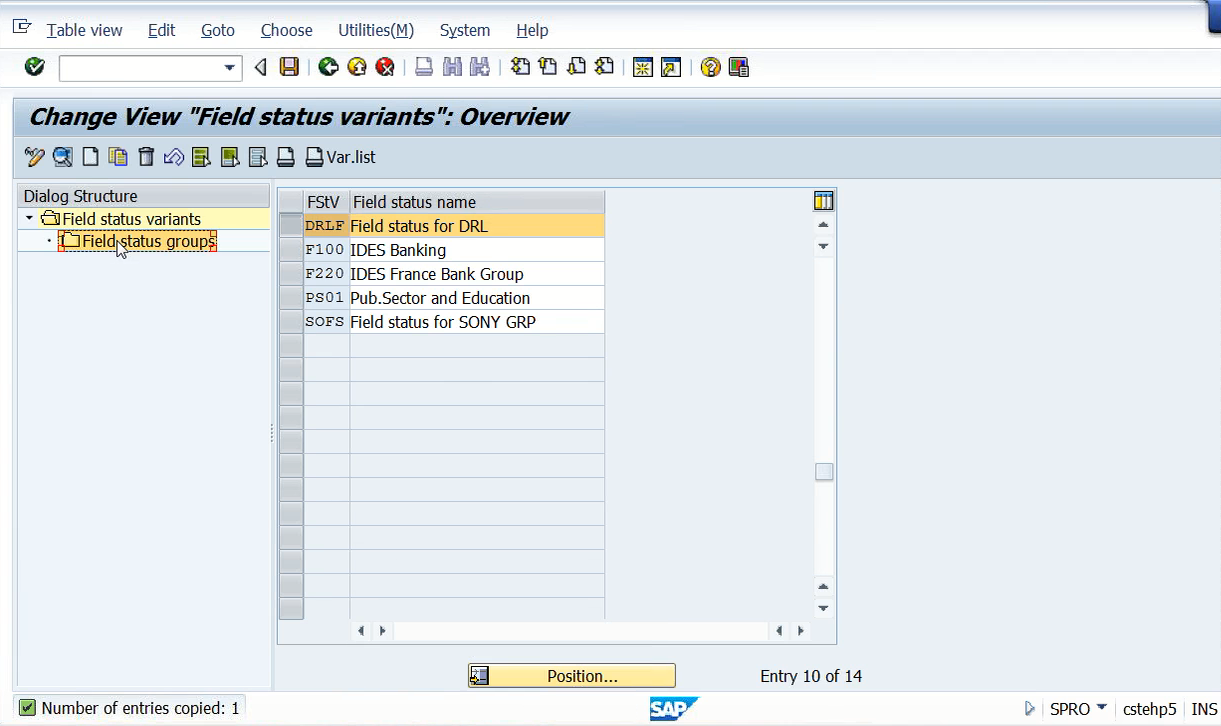
Next step, step number 14. Define field status variant. So define field status variant means we have to copy the field status variant from the standard provided by SAP and assign it to the complete code. So, field status variant, we have discussed previously that if we are posting telephone expenses account data to bank and accounting entry. So, I want a few fields optional, few fields mandatory, and few fields suppressed. So, what to suppress, how we have to require it, how to make it mandatory field, how we are going to make it optional? All those things, we can decide here. How we decide that we’ll see. Come back to the path and select Define field Status valiant.
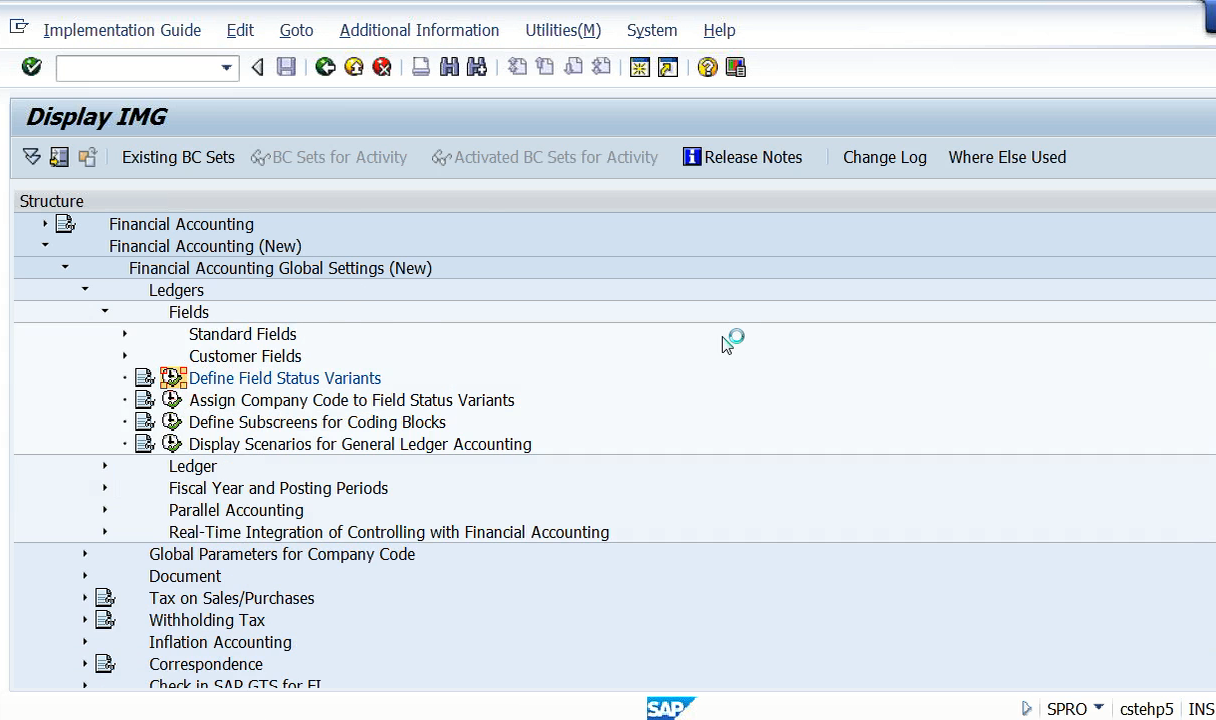
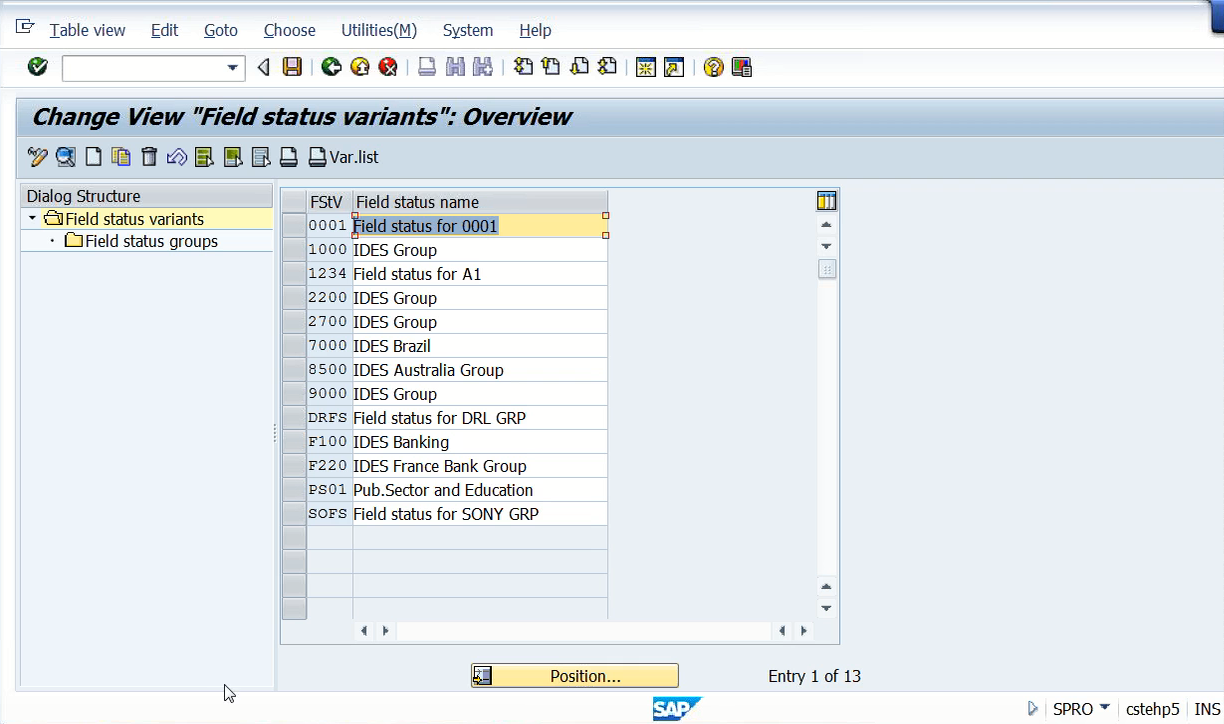
Here, 0001 is the standard one. What is the standard 0001? Let us see here. Select. Double click on field list as groups. Here, around 41 groups are there. Group 1, group 3, group 4, group 5, 6, 7, 8. Like this up to you can say 72.
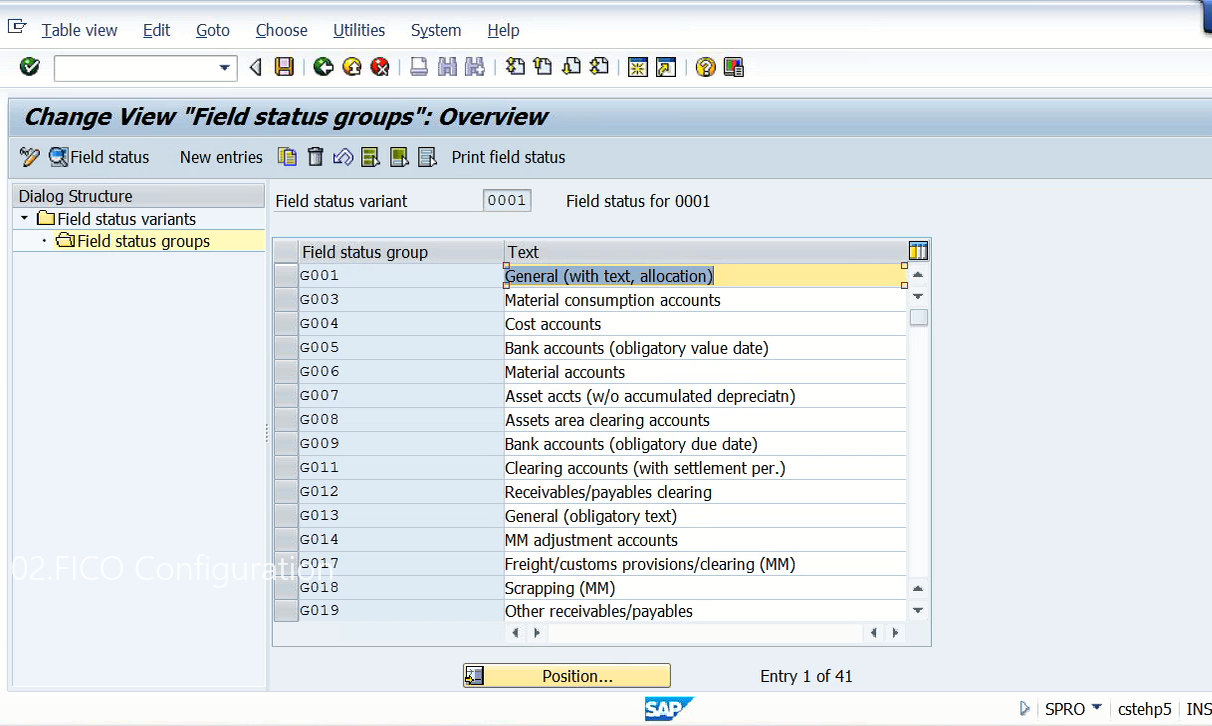
But some numbers will be missing in the middle. Yes. 71 +172. Right. But, now some numbers are missing in the middle. That’s why all numbers will be coming within 41 only. So, 41 groups are available. Now let us see what group is number 1. Group 1 is nothing but general (with text, allocation). This will be used for the purpose of posting of some general ledger entries. If you double click here, you can see you’ll find again so many fields.
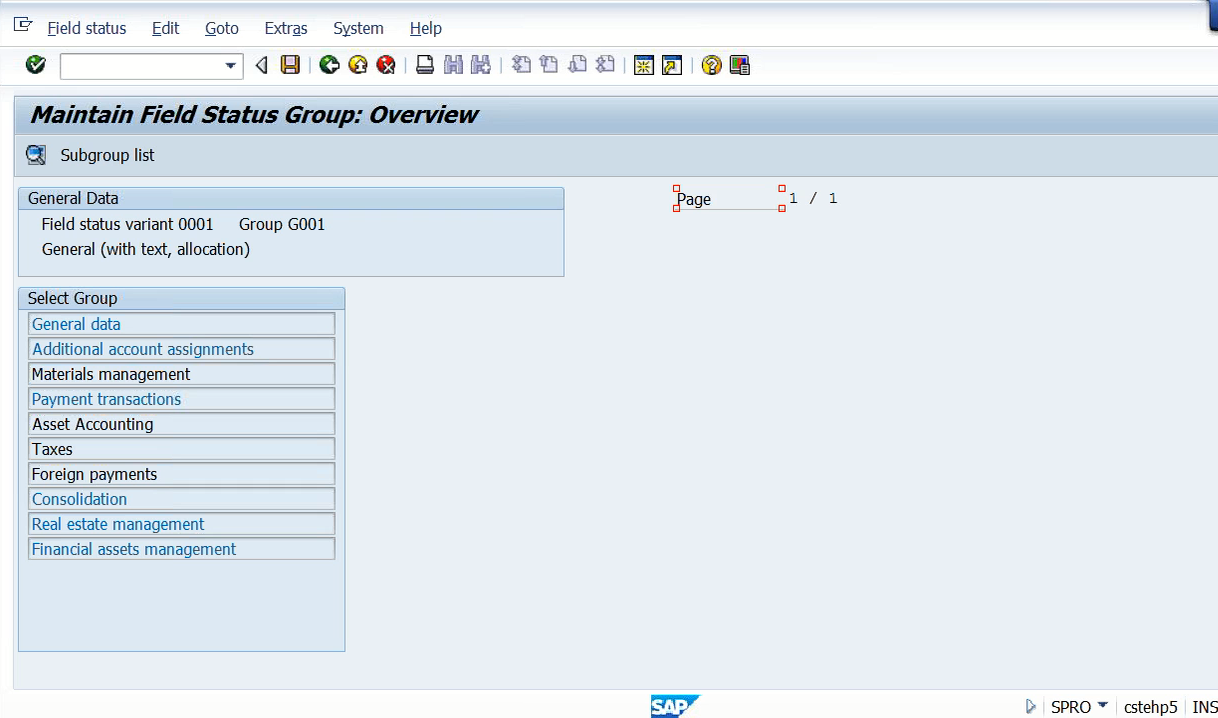
All these fields, you’ll understand once we post an accounting entry, and I’ll show you the relevant fields. And, double click on general data.
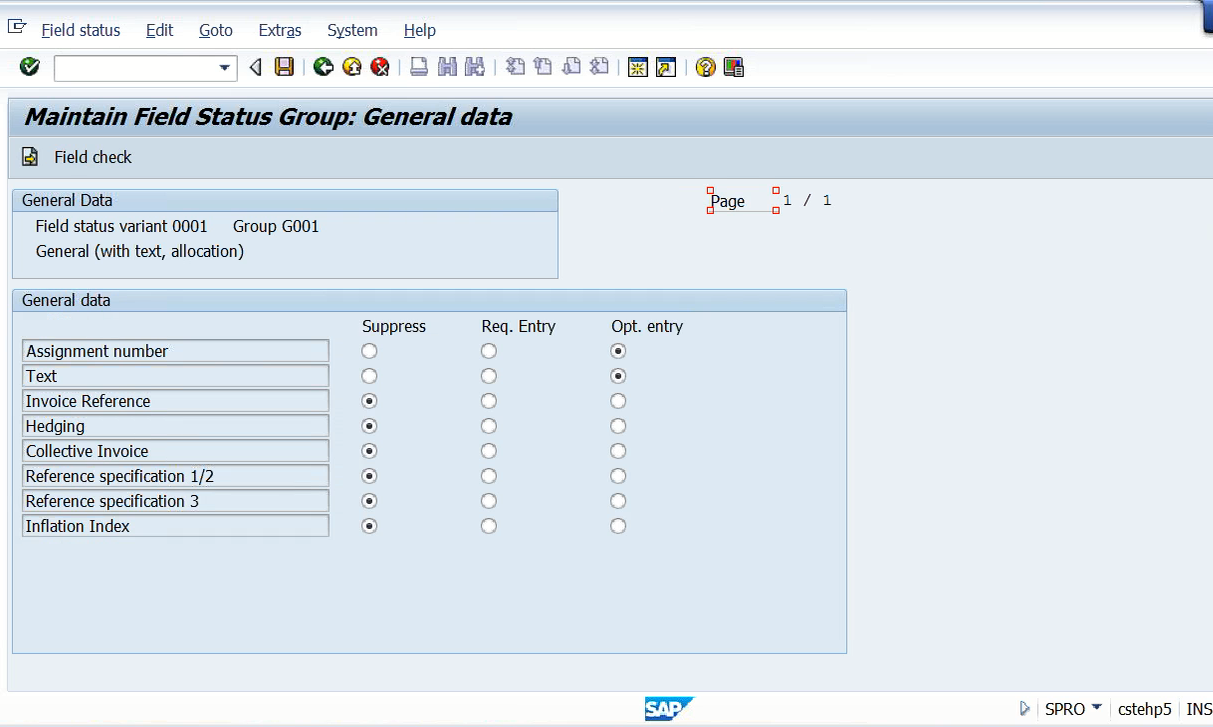
See here, text optional entry. Business area optional entry. But in the standard 10001, they made it optional. But I want required entry. But don’t make changes here. Let’s copy this and changes will be made according to your requirement. Come out. 0001 is the standard. SAP says that copy 0001 and change your name and don’t make changes in the standard settings because standard should be kept intact. So, in order to copy this one, let us select this field completely. It’ll be yellow. Click on copy as, then change the name. Say, DRL. DRL field status variant for because I’ve already used DRF as field status.So I’ll say DRL. Press enter. Click on copy all. Means all 41 groups I want the system to copy. So 41 groups are copied. So DRLF has been created here.
Now select this. Double click on field status groups. So, all the groups are here in the DRLF. Double click on G001. Make what the changes that you want. See general data, I want text required entry. Come back. I want additional account assignments, Business area required entry. Like that, what are the fields you want to make required entry or optional entry we can do that here Right. Depending upon the requirement, say, business area wise, I want to generate the reports. So, unless I make it a required entry, end users will not enter the data. Why I’m doing this? I’m fixing up the end user. So, without entering the business area and text, he cannot save the document. So how it functions? I’ll show you later once we post an accounting entry. Right. So, save.
So similarly, what we do, G005 is going to be used for the bank accounts, and G004 will be used for cost accounts and material consumption accounts. G006 is for material accounts. Like that depending upon the nature of the account, fields are given. And all these fields are whatever the changes that are required, even that are made. Say for example, if you take G004, here, see all these cost center related fields are kept to mandate. So, depending upon the nature of the account, we assign a respective group. This we’ll see how we have to assign by nature. We can assign it to different types of GL accounts. When we create a GL account, I’ll show you. So, we have created one DRLF. To assign company code to field status variant. Now click on that, type DRL. and fill DRLF. This is what we have created. Now what are the parameters that we have defined in this group? Now all will be applicable to this company code. So, define field status variant and assign field status variant into company code.
Then coming to define document type and number ranges. So, for the purpose of posting my accounting entries, I need document. So, the document number range I need to define here. Again, note: Don’t define any new documents because all standard documents are provided by SAP. There is no necessity for us to define document types again. So financial accounting, Financial accounting and global settings. Document, document, document types, Define document types for interview. OBA7 is the document T code. Execute this. Now the standard document for GL accounting is called SA. Even here I told you we use SA for GL document. DR, DZ, DG are going to be used for the purpose of customer related documents. So, let us first define SA. Let us choose SA here, SA GL account document. Now for this I need to define number range. Double click here. And, don’t change this number range to 01.
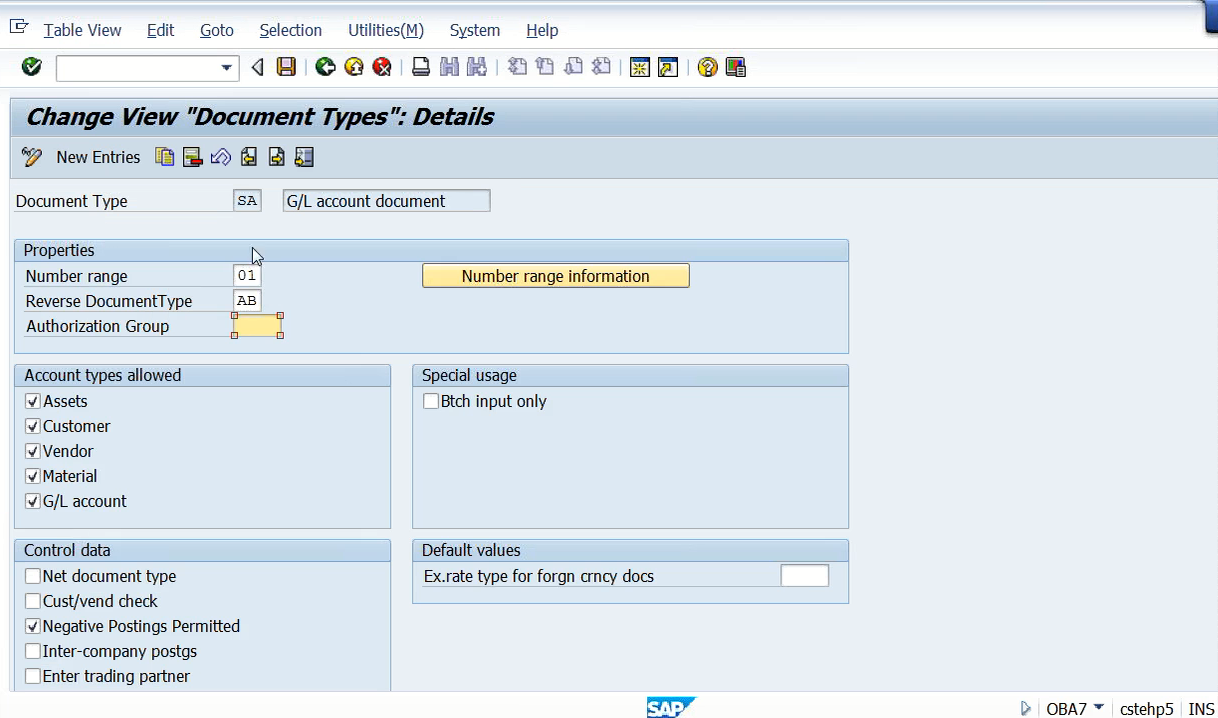
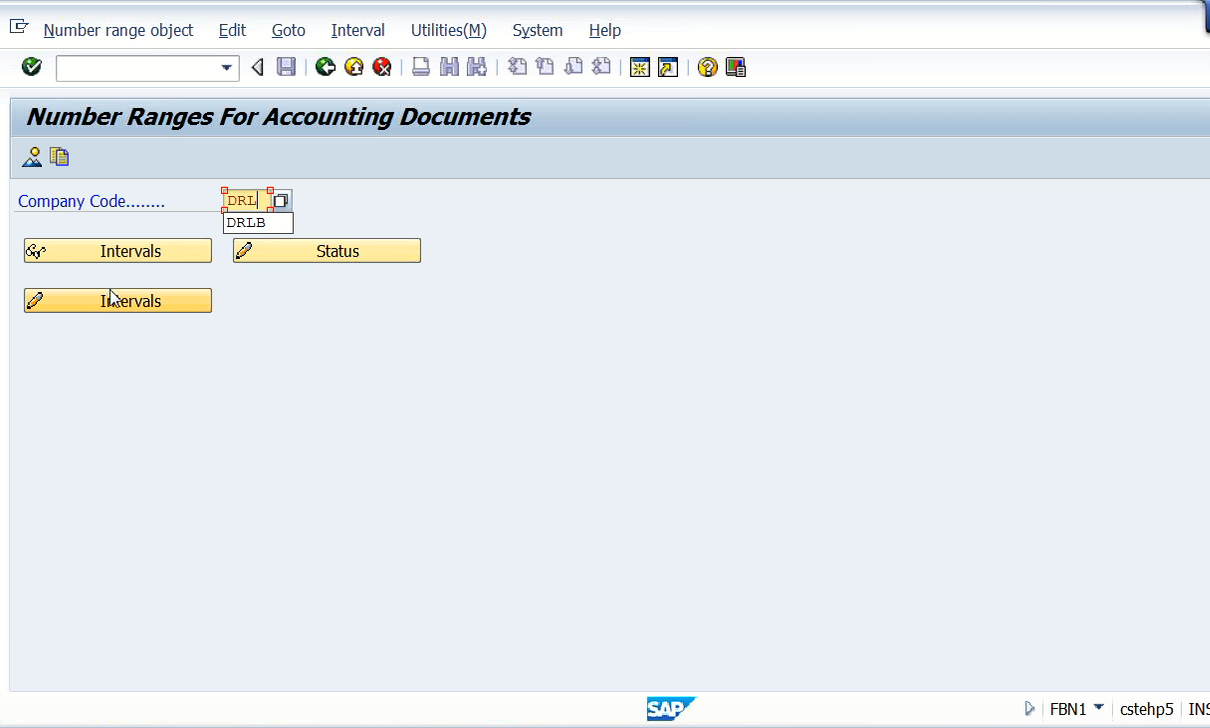
And here you can see account types allowed, Assets, customer, vendor, material, GL account. This means with this document, I can post accounting entries with reference to assets, customers, vendor, material, GL account. Everything I can use. So that is my main purpose. Now this document type is high level, and any company code can use these document types. When it is reversed, system uses document type AB. Just like SA, this is another document type that also uses the same number range. And click on numbering information. I’m taking my company code DRL. Here, intervals display. This is status. This is creation of intervals. Click on this interval button.
Then here, the system has asked us to create 1 number range for 2013 from number 1 to 1 lakh.
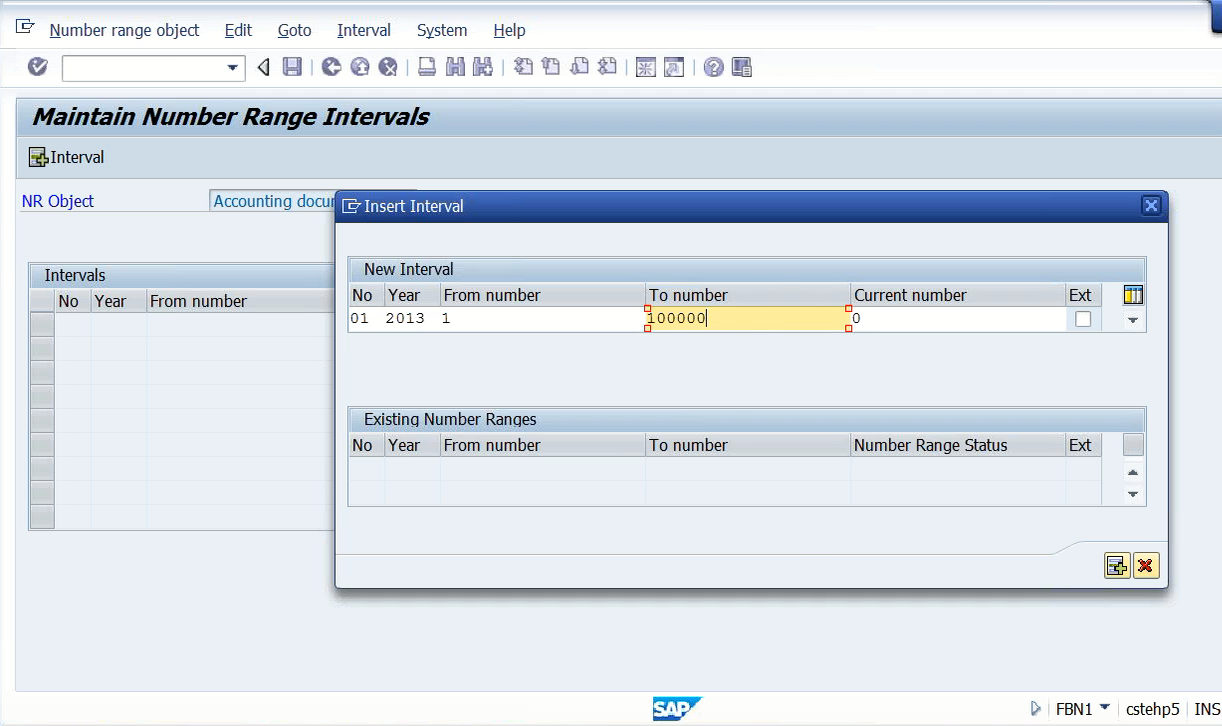
So that means what are the GL account documents I’m posting, system takes 1, 2, 3, 4 up to 1 lakh. And it will show the current number. So every year, I need to make changes. But here I’m taking 1 lakh. Save it. Once you save, system will give you one message

So, for the time being, ignore this message because for all other things, system has generated one request number. But for number range, it generates one warning message. Even that also I’ll tell you that is also related to the transportation of number ranges from one server to another server. So, for this, we need to discuss about the landscape that we’ll see later. So, I’ve created only one document type now. One document type and number ranges just come out.
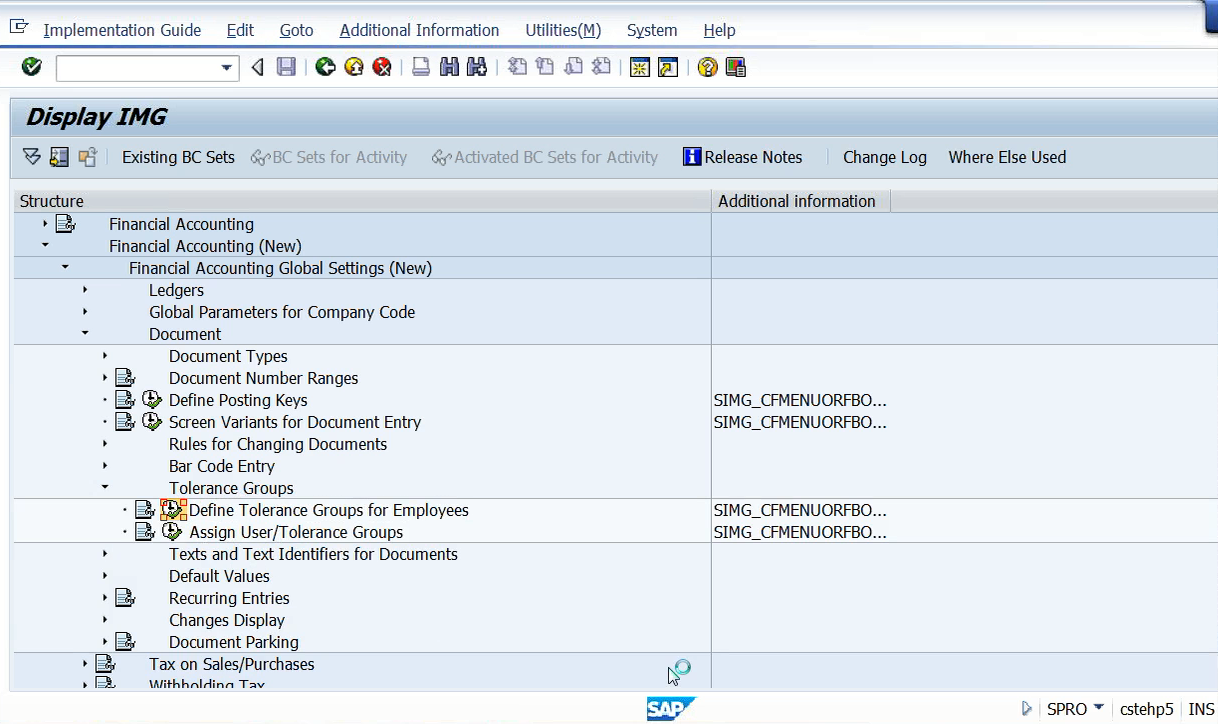
So now step number 17. Tolerance groups for employees and assign tolerance groups to users. Tolerance group means nothing but authorization limit. Say what I’m going to do. Say document, tolerance groups, define tolerance groups for employees.
Go to new entries. Say for example, DRAM, doc Reddy labs assistant manager, DRAFM. So, I’m taking doctor Reddy Labs assistant manager, Company code to DRL. And here I’m making say 5 lakhs. So not 5 lakhs. EFM can post up to 10 lakhs. Say up to 10 lakhs. System picks up the currency.
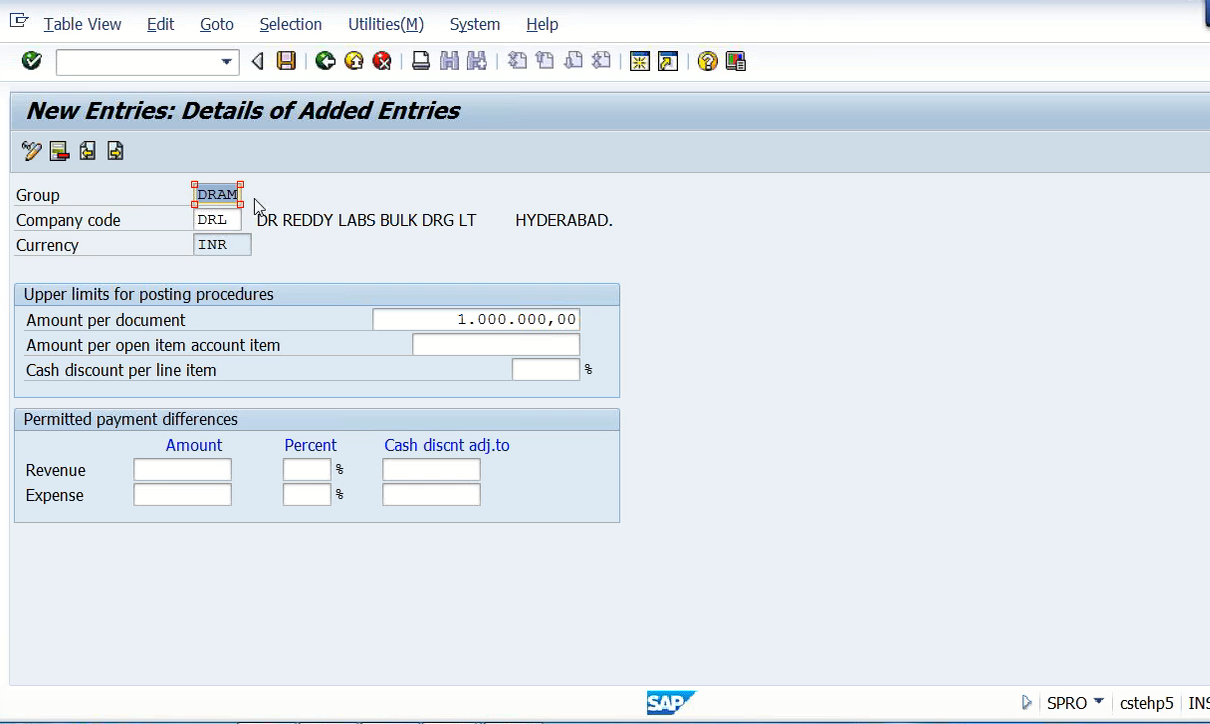
We’ll see Permitted payment differences later, not now. And this is the amount per account item. For accounts receivable and accounts payable, the authorization limits will be set here, and the discount can be given. So here, we’ll set up the percentage here. Alright. Even these 2, we’ll see when we go to the accounts receivable section. Now save it. So DRAM is my tolerance group. Company Is DRL.
Now Assign user to the tolerance group. Assign user to the tolerance group means, say for example I am logging with my user ID. What I’m going to do is save my user ID, Anand and click DRAM from the list.
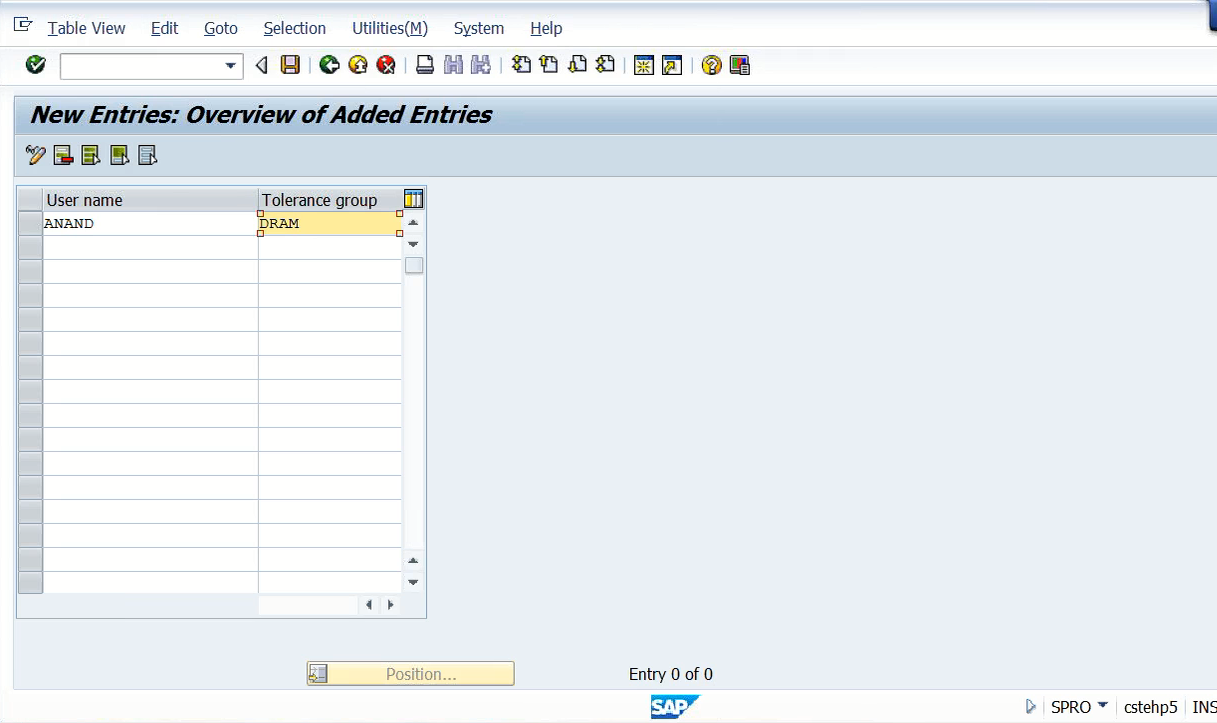
So that now for my user ID, now I can post up to only 10 lakhs. More than 10 lakhs system will not allow me. Save it. So like this, we’ll assign the user codes for everybody. Say, AO, 5 lakhs, AFM, 10 lakhs, FM, 25 lakhs, GMF. So, like this, we’ll define it in this table. So, assign users. Now the major steps are over.
Then finally, define tax procedure, assign tax procedure. This is only a formal step. I need not do this. That is not required generally because, all the ones one tax procedure is there, that is sufficient. But anyhow, let me define one tax procedure. Actually, the percentages, rates, etc, we’ll be defined later when we go to the accounts receivable and accounts payable. Double click on define procedures. Here, this is only a formal step, even if you don’t create it, system will allow me because already standard one tax facility is already there. And I just go to new entries. Say DRL tax, tax procedure for DRL India. Then assign country to calculation procedure. This is not assign company code. So, what are the tax procedure that we have defined that should be linked to the country. Now say country India. Against India, one tax process is there, DRL tax.
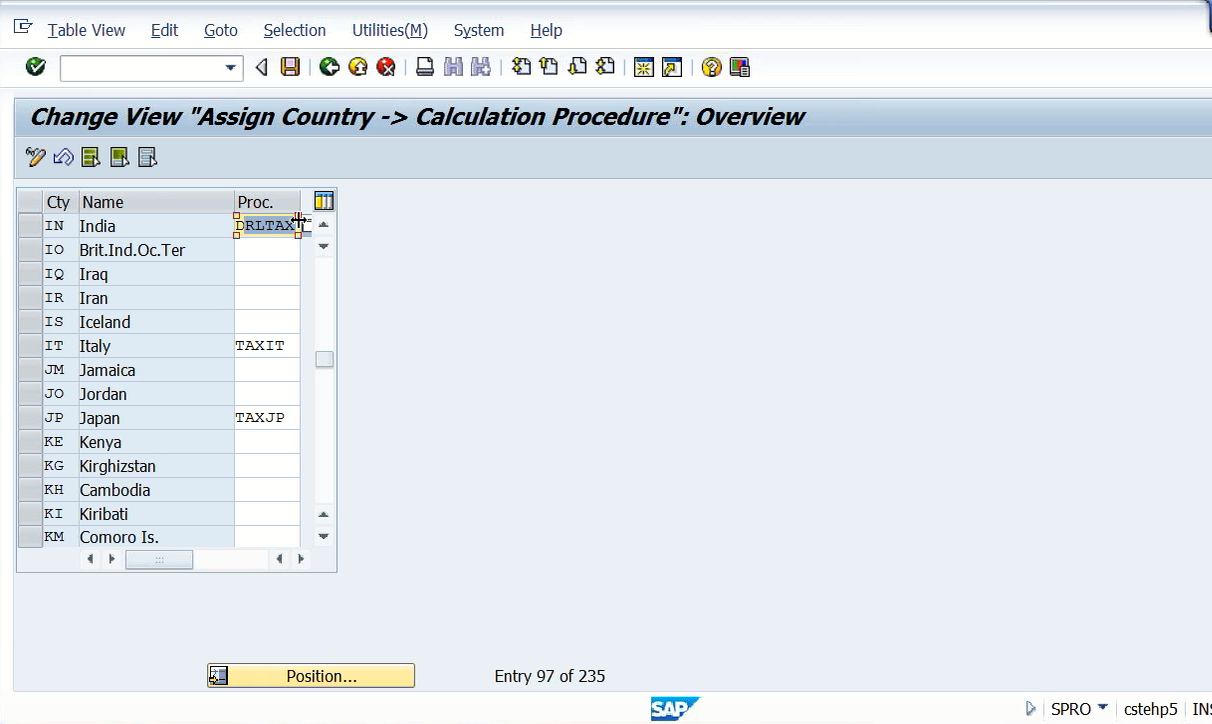
So now, right, this procedure is linked to the country India. But anyhow, we have not yet defined any percentages. So that’s why we cannot calculate any tax now.
Then coming to last and final step. That is define global parameters. So, what is meant by define global parameters? Let us see here.
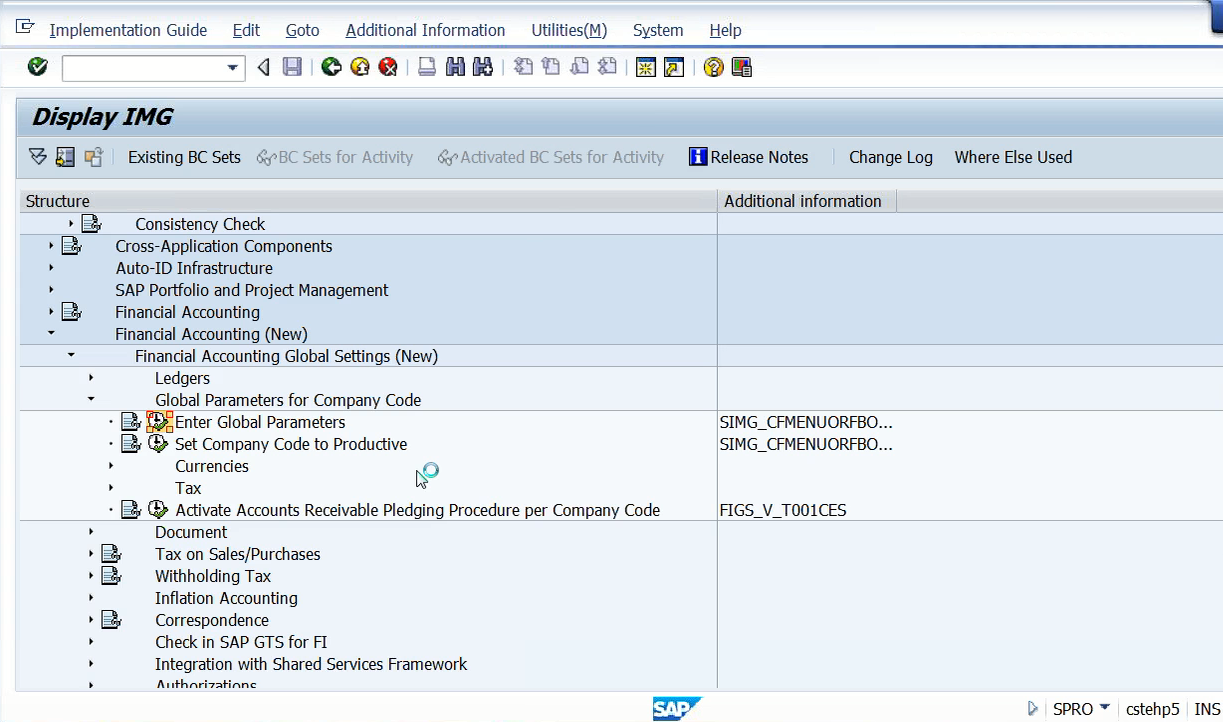
Define global parameters. Here, click on this. Click on version. Go to our company code. Double click. Now you can see the total picture.
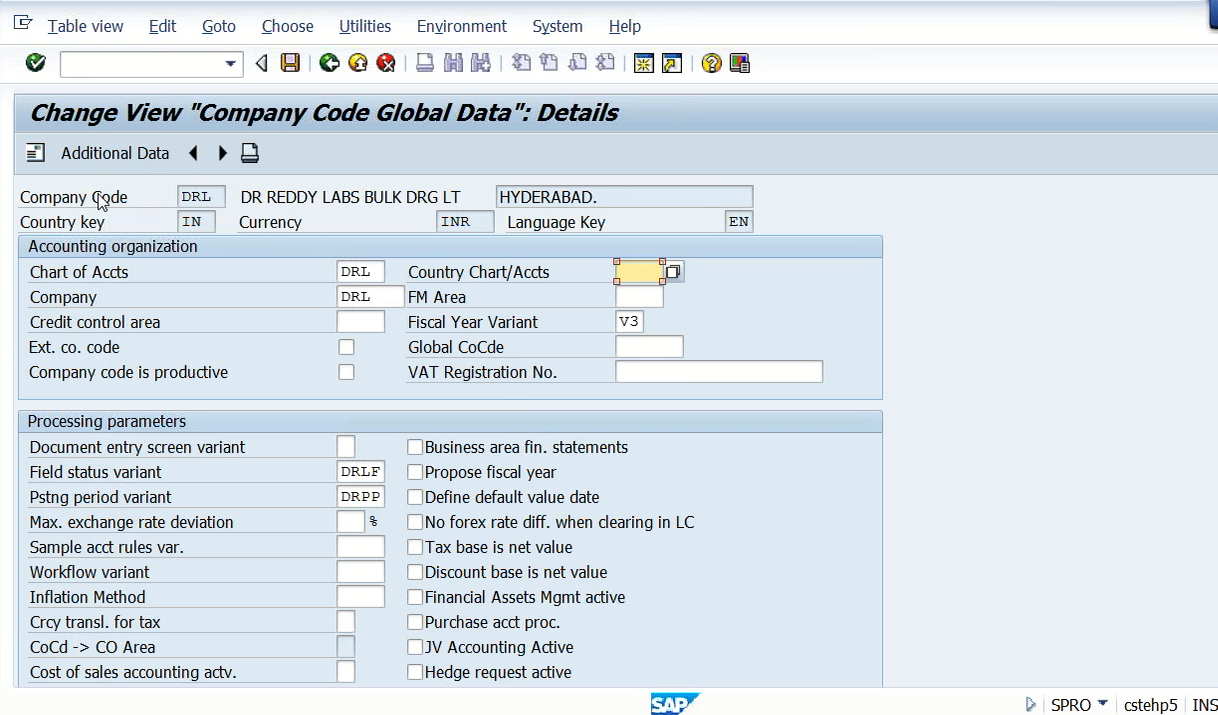
Company code, DRL. Right. Country, India. Currency, Hyderabad. English. Language, English. Charter accounts DRL, company is DRL. and V3. V three is nothing but fiscal year variant. That is April to March. And the field status variant, DRLF and DRPP. So, everything will be shown in one frame. Now apart from this, check this box, this box, and this box because I want to see my financial statements by business area wise. Unless I choose this, system will not show me. And the next one is proposed fiscal year. So, every time when I’m posting an accounting entry, I want the system to propose the fiscal year every time I need not enter. System itself take it by default once I start posting the accounting entries. And third one, define default value date. So, default value date means, value date is nothing but the date on which the value is going to be affected. Say, for example, I have posted an accounting entry on the 20th. When I am on the 26th, Now how the system understands it is, okay, I’m posting the entry with a past date, that is, prior to the current date. And, here, posting date as well as the documented date will be taken as 20th if I’m posting like that. But there will be one field that is called default value date. That value date system will show today’s date. So, it will take both dates but subsequently I’ll get one more field. That field is nothing but value date. That value date field will be with the current date. So, though my posting date and these things are different, system will take the value date. The importance of this we’ll see once we post an accounting entry.
So we save this. Now as of now, all 21 steps are over. But from ECC6EHP5 onwards, defining controlling area is mandatory. Without that system, we’ll not allow you to post accounting entries. So, after we complete this one, generally, it is sufficient up to if you are using the server, ECC6EHP4. You need not do any other things. But from version ECC6EHP5 onwards, defining controlling area is mandatory to post any financial entries. That means we have to define one controlling area because controlling area is nothing but the area which takes care of posting of the cost related entries, that is costing, profit center accounting, cost center accounting, profit center accounting, and profitability analysis. So if you want all these things, we need to activate controlling area. So by default, from ECC6EHP5 onwards, right, controlling area has to be activated. Otherwise, we cannot post accounting entry. So that’s why there are only three small subsets there. We’ll complete that. Then we’ll go ahead with the GL accounting posting.
So, go to Organization, Maintain Controlling Area. Double click on Maintain Controlling Area. Once we complete this we’ll close.Go to new entries. For the controlling area name, I’m using DRL. Name. DRL CO area. Controlling area. Controlling area, same as company code. Cross company code, controlling area. See, generally better to select a cross company code because when you are using multi company codes, right, there may be transactions between one company code to another company code. So cross company code, cost accounting will be taken care. And currency type, here currency type I’m using, say, company called currency. So many currencies are there. Let me take company called currency and there is nothing but INR. Chart of accounts, we have DRL chart of accounts. Then fiscal year variant, that is V3. What is the fiscal year variant we are going to use? V3. And standard hierarchy. Some standard hierarchy that is nothing but hierarchy of cost centers has to be defined.
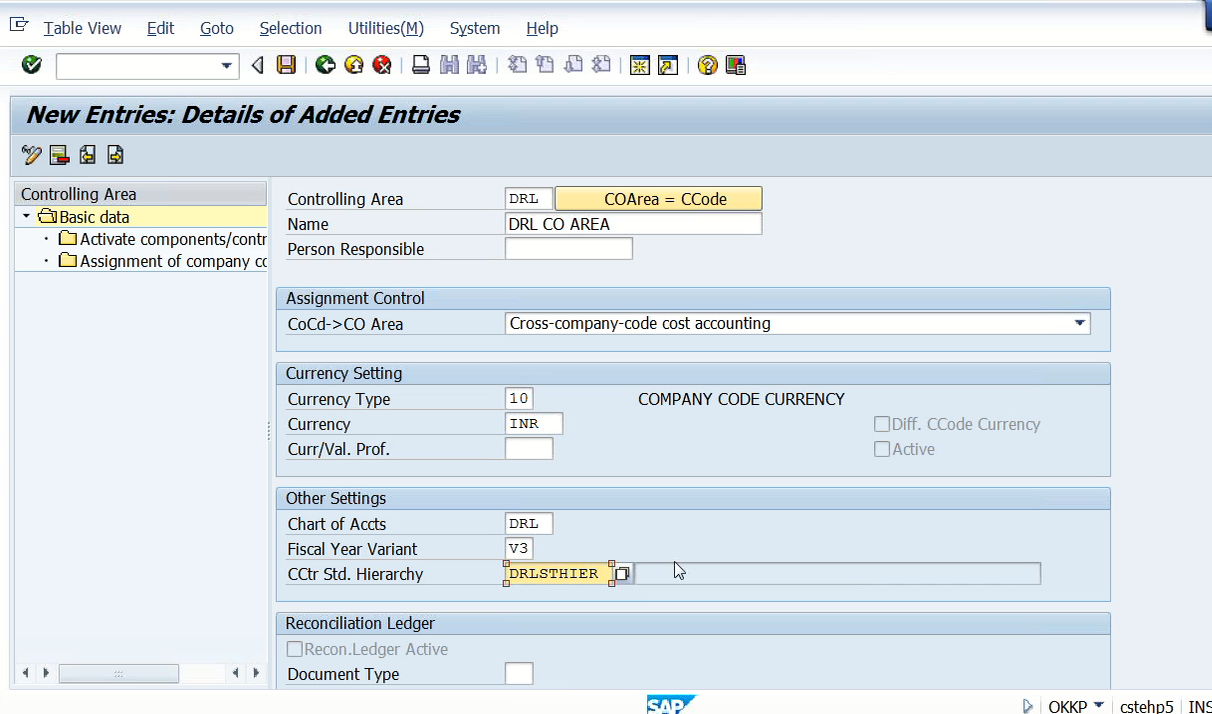
Anyhow, all these things we are going to study in-depth when we go to the controlling area. But now just formally, we are defining this controlling area for the purpose of posting my accounting entries. So, I’ll take, write DRL standard HIR. So DRL standard hierarchy. Save it. Then double click on assignment of company codes. Assignment of company codes. Don’t do this first. If you are going to use this one, system will throw out. And, here, assignment of company codes. Click on new entries. So, what are the company code that I have?
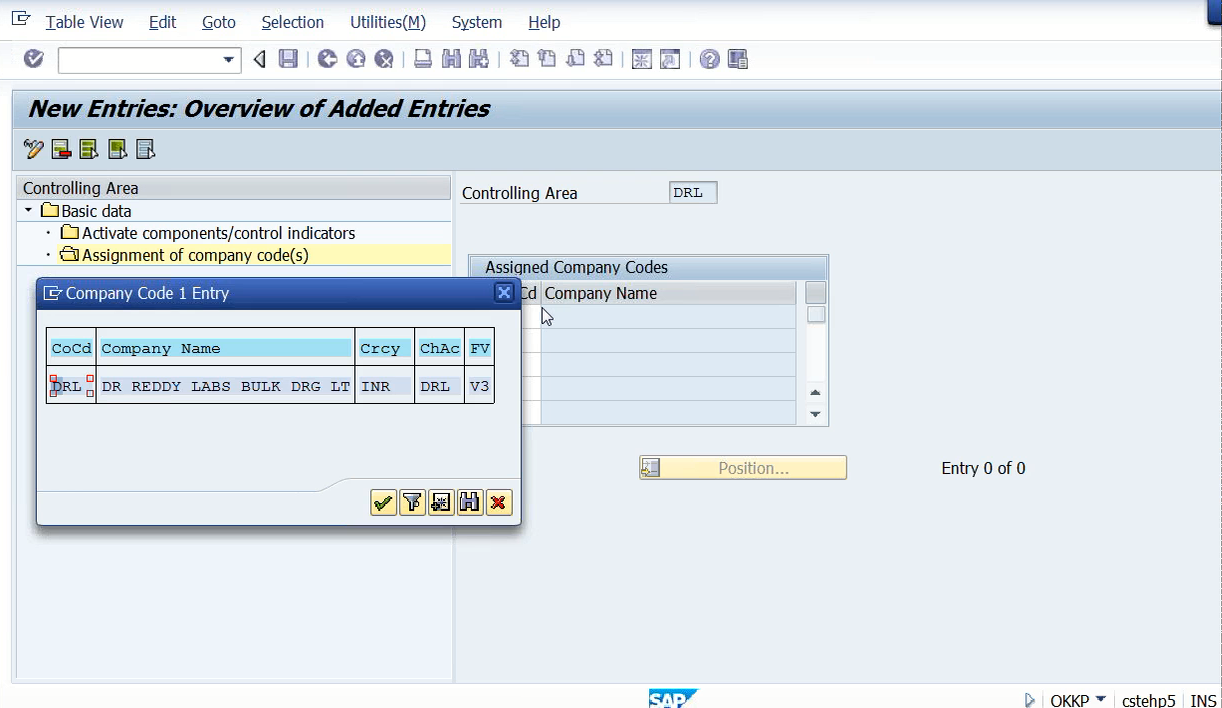
That will be visible here. DRL. Save it. Then go to activate components. Here, just do one step, you’ll give only the year, that’s all. Nothing more than that. Save it. Come back.