Credit Control
Okay, now we’ll see an interesting topic, which is credit control. Credit control is the credit limit that we give to new customers. For example, we have a new customer willing to buy products from us, we will give a limit, an amount limit up to which you can place orders, and if he wants to make more purchases over and above the credit limit, he has to actually settle the outstanding invoices first, and only then, the system will allow an order to be placed for the customer. Okay. Is this clear?
Thank you for reading this post, don't forget to subscribe!
For example, customer A is a new customer. Once he becomes our customer, a credit limit will be assigned, which is about $1,000, so he can make purchases for only up to $1,000. It can be one invoice for $1,000 or many invoices for $1,000, but once you hit the credit limit of 1000, then he has to settle some of the outstanding invoices and only then he can make new purchases. For example, he has two invoices, 200 and 800, which makes up the 1000. Now, if he wants to make another purchase for 300, the system will throw error. Okay. This is the existing invoice. The system will not allow a sales order to be posted for this customer after his outstanding invoices reaches 1000 because his credit limit is 1000. One more thing, the SAP will not check for credit limit if you post an invoice through this screen. This is called direct invoices or finance invoices. This means that, let me show you the screen, you can post an invoice directly into the finance without going through SD module. SAP will check for credit limit only if you post an invoice through the SD module, that is, using a sales order and building document and so forth. If you post the invoice directly here in the finance screen, it’ll not check for the credit limit. Okay, you’ll only check for the credit limit in this SD module. Let me just show you. I’m not going to explain to you about that because this is SD topic, but I can just show you.

Sales. Okay, this is how we create a sales order. So just bear in mind, this credit control credit limit, the amount that is set for the customer using a credit control model will only be checked if you raise the sales order through the screen here. Otherwise, this is the sample sales order screen. I am not going to explain about this. Let us go back now to the slide. Okay. In order for us to implement a credit control, we need a credit control area defined, and then, be assigned to the company code, only then we can start entering a credit limit for each customer. Let us see how we can do this. I go to see IMG screen. You see this? It’s under enterprise structure definition, financial accounting, defined credit control area, right under defined company, we are going to define a credit control area for our company. Let’s execute it. Just a simple screen. You can zoom in.

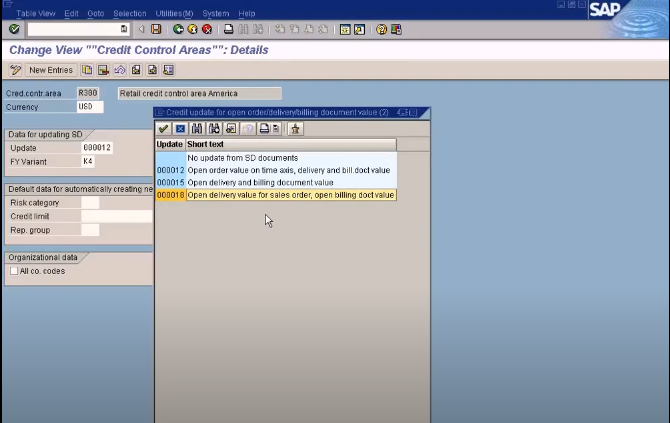
There are more settings. Let me explain that. Okay. Let me just show you a sample credit control area before we create one for us. Let’s look at America’s one. This is the order currency, USD, and these two fields will control the way the data is updating as sales distribution model. Okay, here you need to enter the order currency. Okay. Normally we’ll enter the company code currency here. Alright, and then here, we’ll choose 12 all the time because each number determines the way the SD document value is taken into account for the credit limit check. For example, 12, it checks open order value item on time basis in delivery and billing document value. If I choose 15, it’ll not check for order value, it’ll check only for open delivery and billing document value. If I choose 18, it will check for open delivery value for sales order.
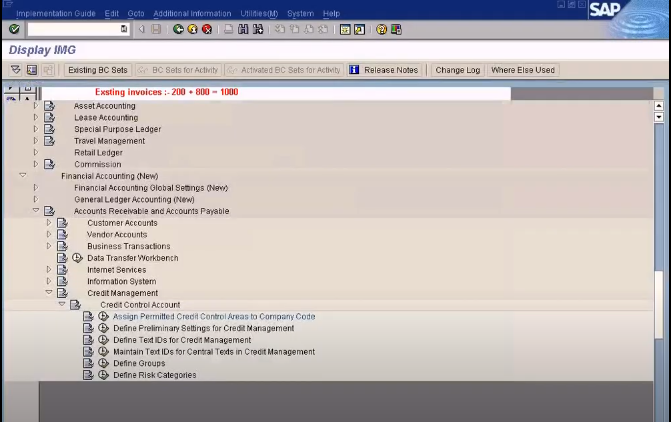
Alright. Just discuss this with your SD guy and choose the correct one. Alright, let us create one for our company. New entries. Just give it the name. Let me just check whether I have four digits to enter. I just enter, Sun. Currency is USD and date, I’ll choose this. Okay. In this clear variant, I need to put K4, which is our company code for fiscal year variant. Let’s save it, and we are done. We have created this credit control area. Okay, now let us go and assign it to the company code. How do we do that? Come down. Come down all the way, financial accounting new, account receivable, accounts payable, credit management. Okay, you see this, credit control account, assigned permitted credit control area to company code. It is under credit management, credit control account. It’s under accounts receivable, accounts payable. Just execute this. You can see all the company codes listed here and the credit control area next to it. Okay. This is the sample screen. Alright, you don’t have to zoom into the screen. Alright, just press new entries and mention your company code and mention your credit control area. This is a credit control area we created just now. It’s a company code. Save it. It’s saved. So this is how you assign the credit control area to the company code.
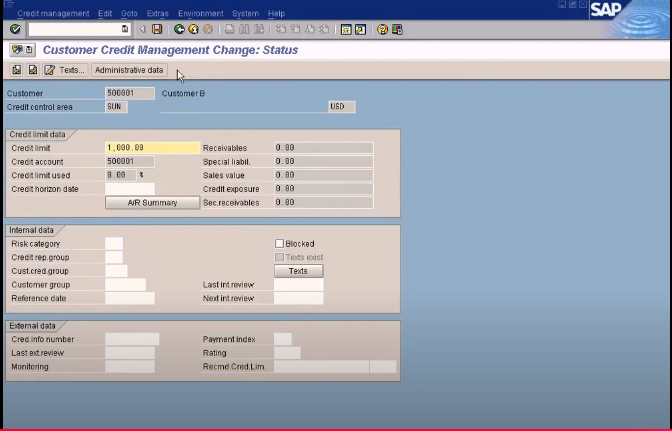
Okay, you have done this now. Now let us go and create a credit limit for the customer. Let’s go over here. Let me just close this first. Okay, see this? This is the menu path to create a credit limit. Send the account receivable, financial accounting, accounting, under credit management, master data. You just come here and press this change, and enter the customer code. This is the customer code I’m going to enter 500001 and the credit control area, which is sun. This Sun we created, and put a check mark here, status, under credit control area. Ignore about these three buttons here. These are checkboxes, not buttons. So ignore these checkboxes, we are not going to use this. Just come straight to the credit control area and press this, and press enter, and you’ll see the credit limit field here, just enter 1000, which means that this the 1000 credit limit that we are going to assign to the customer, then just press save. That’s it. Now the system has set up $1,000 credit limit for this customer. If you want to go in again to see, just press enter again so they can see the credit limit here. Once you set up this, then the rest will be taken care by the SD module. So whenever you raise sales order, then the system will come to check against this credit limit here. If it exceeds 1000, then the system will not allow the sales order to be posted. Okay, the finance module responsibility is only up to here to create a credit limit.
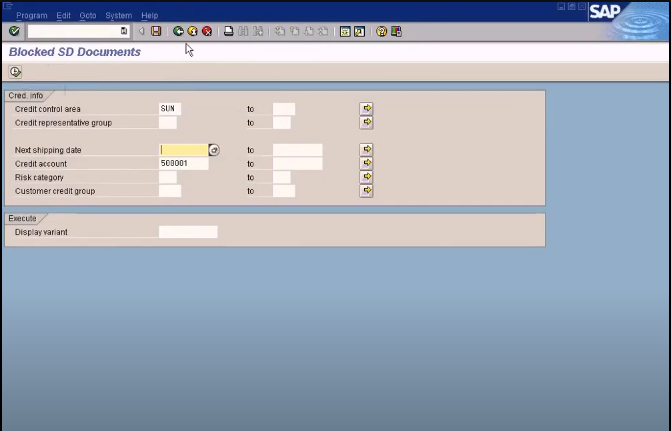
Once that is done, the rest is up to the SD module consultant to further configure it to suit the SD module credit limit requirements. For example, under the sales and distributions, there is also a credit management module where you can see a lot of reports. Here, you’ll see all the blocked SD documents. This means that if the SD user is creating a sales order, and if it exceeds the 1000 credit, which is set for the customer, it’ll block the sales order, and that blocked sales order can be seen in this report. Okay. That is for the SD user’s use. Then they can also decide to release the sales order for further processing, so that will come under release status. I’m not going to explain about all this because this is related to the sales and distribution module. Alright, that’s about it.