
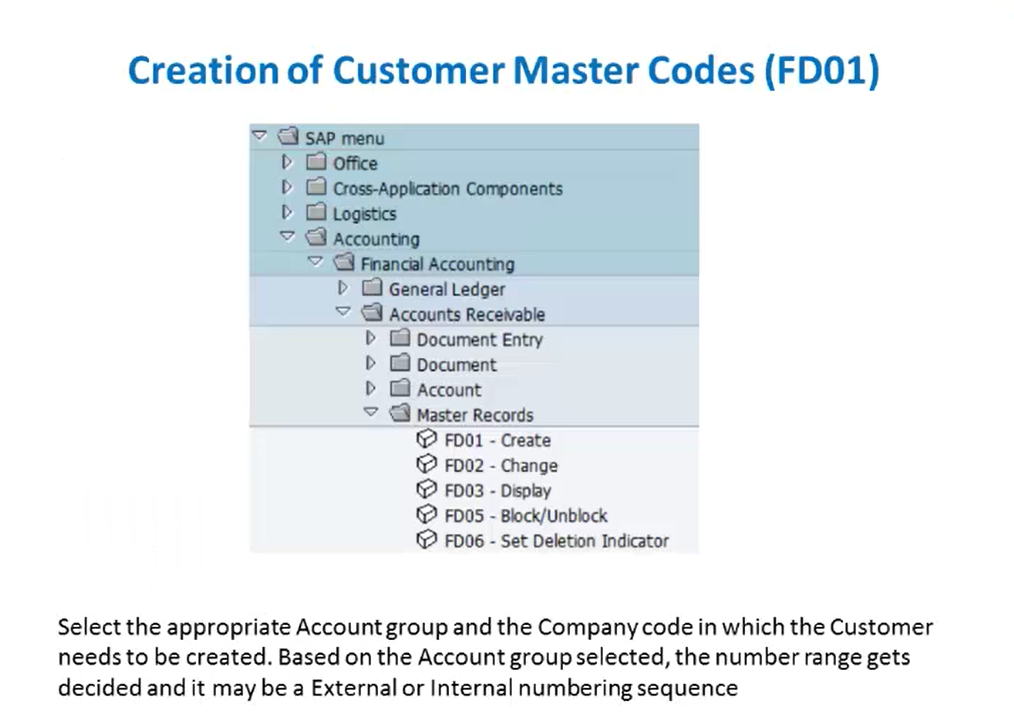
Creation of Customer Master Codes
After vendor master codes creation, next we’ll see creation of customer master codes. Now here we’ll use a transaction code FD01 for creation of a customer master code. Now here the SAP menu path will be SAP menu, accounting, financial accounting, then accounts receivable, then master records. Under master records, we will go to FD01 transaction code. Now here, under this, we will maintain the account group and the company code in which the customer needs to be created.
Thank you for reading this post, don't forget to subscribe!
And based on this account group selected, the number range gets decided. It may be external or internal numbering sequence. So here it is similar to the vendor master code creation. So we will maintain the account group and the company code for customer creation. And then we will click on the enter button.
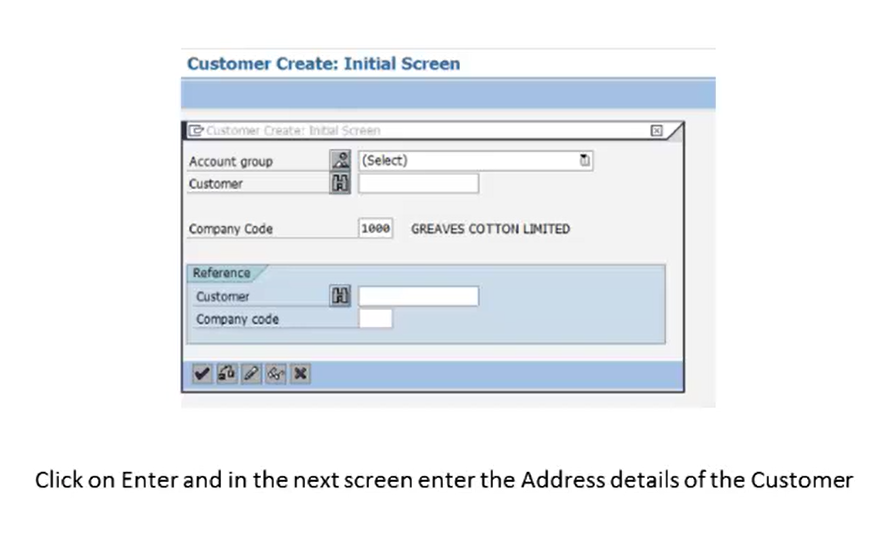
Now once we click on the enter button, in the next screen we will maintain the address details.
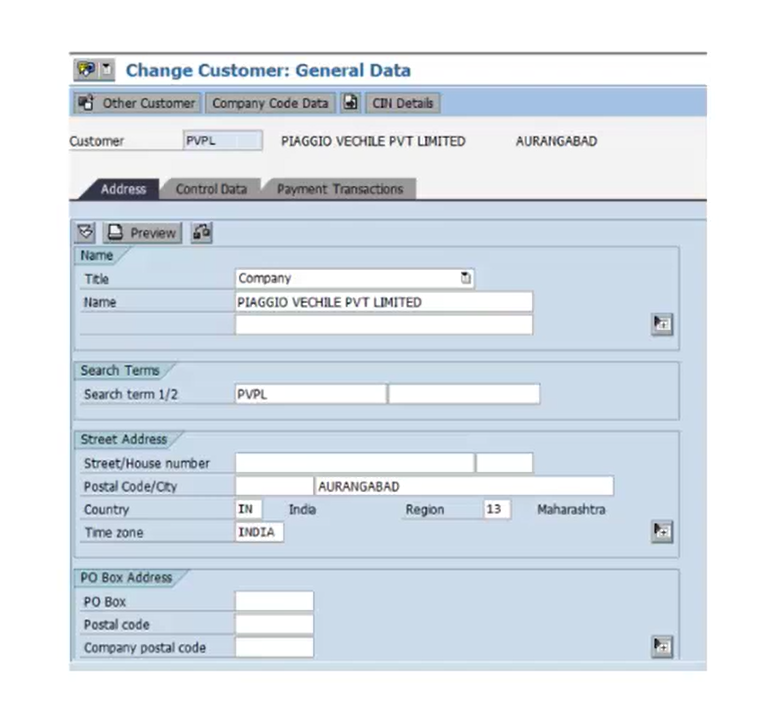
So here we will maintain the title and name, company code, country details, time zone, postal code details, PO Box address details, etc. So all these details are maintained under the address tab. Now after maintaining the address details for the customer, we will click on the CIN details tab to maintain the details for CIN maintenance.
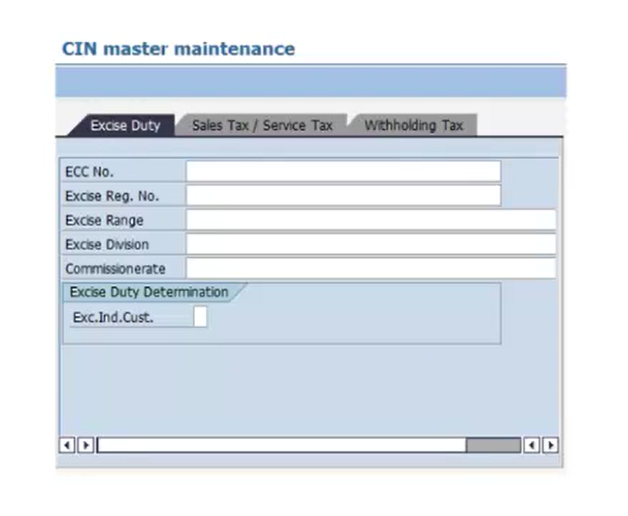
Here we will maintain the CIN master data under the Excise Duty. Now we will maintain the excise range, excise division, etc. So after maintaining these settings, we will go back on that customer creation screen. There, we’ll maintain the Control Data for that particular customer.

So here we’ll maintain the account control details, like vendor, trading partner, authorization, etc. Now after that, we will maintain the payment transaction details like the bank details of that particular customer.

Here, we have an important indicator that is the checkbox of an individual payee similar to the creation in the customer master codes. So here selecting this activates a special screen during document entry wherein the description of the customer can be entered. It is similar to the creation of the vendor master, and it works in the same manner. Like here, when a cheque is printed for a document, then there will be the name as maintained in the document and not as per the customer master records. So this is how we maintain the bank details for the customer.
Next, we’ll maintain the payment transaction details for the company code. So here we will click on the company code data.
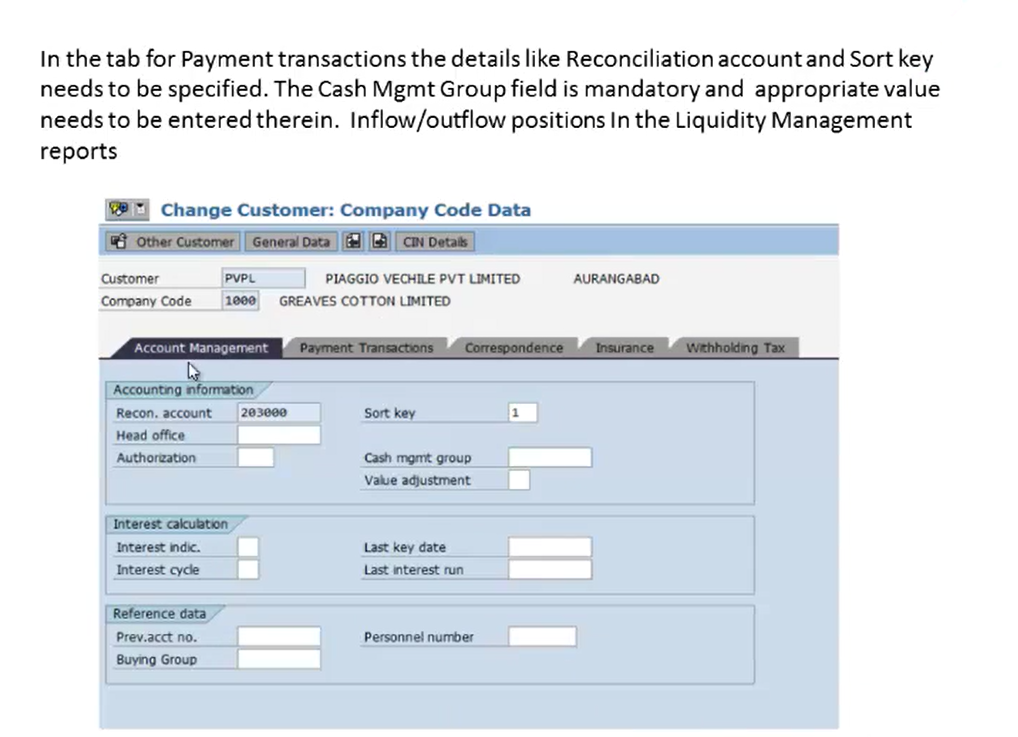
And then we’ll maintain the payment transaction details, like, reconciliation account and sort key information. So here in the Account Management tab, we’ll maintain the reconciliation account information and we will maintain the sort key. Now here we will maintain the cash management group field which is mandatory. And here we’ll provide an appropriate value to it. Now after maintaining these settings, we’ll have to maintain the payment transactions, like the payment terms and the payment methods for this particular customer. So here we will maintain the payment term and payment methods data.
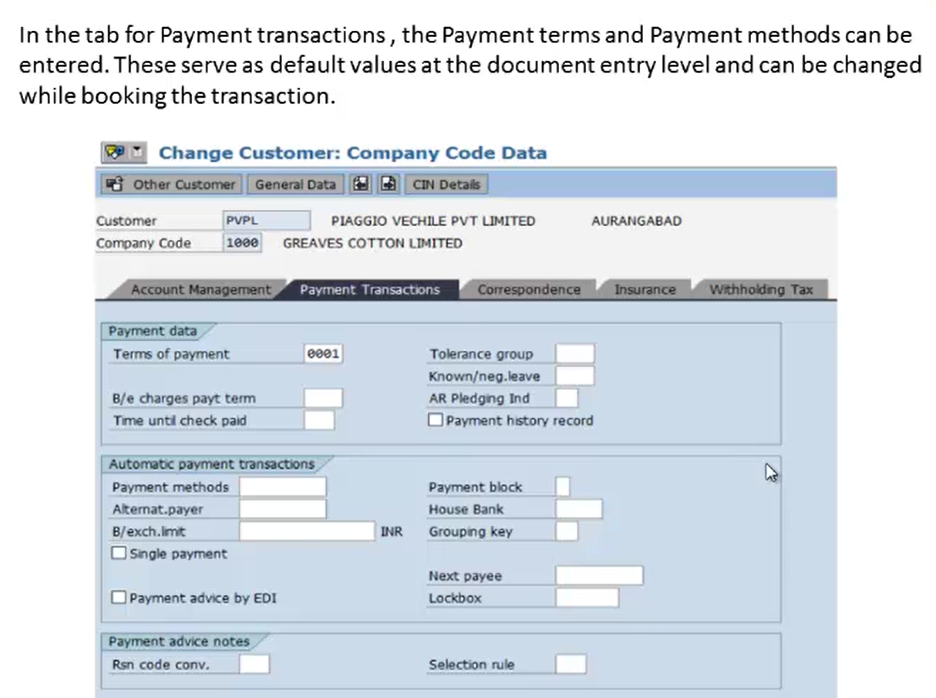
Now this serves as the default values at the document entry level and can be changed by booking the transactions. So after maintaining the payment transactions, we’ll maintain the correspondence values.
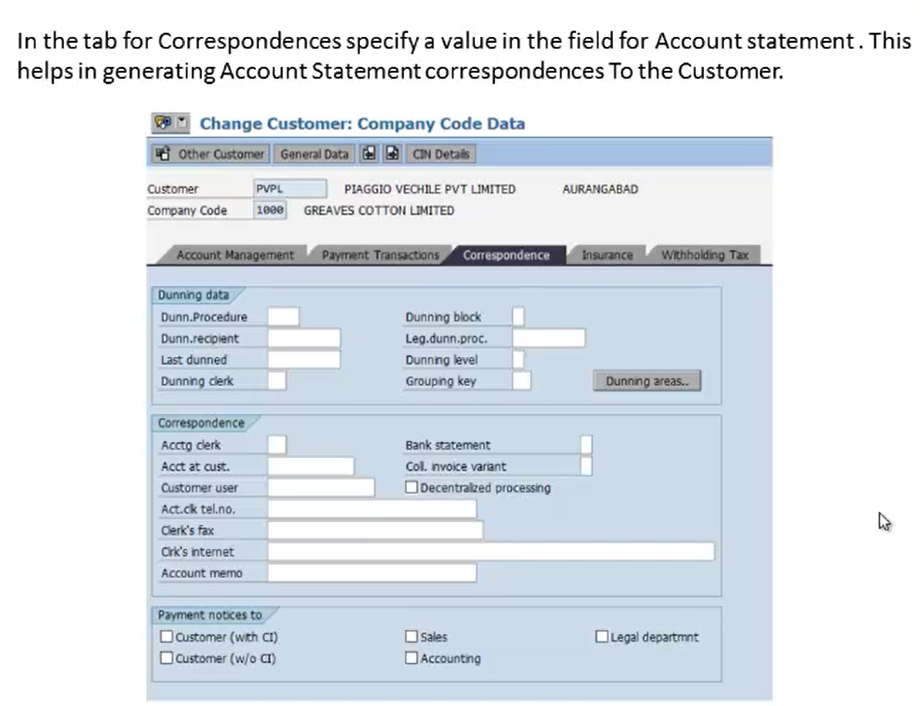
So here we’ll maintain the account statements for that particular customer. Now this helps in generating the statement correspondence to the customer. Now after maintaining the correspondence data, we’ll maintain the tax information, which specifies the TDS section under which the tax is to be deducted from the customer payment.
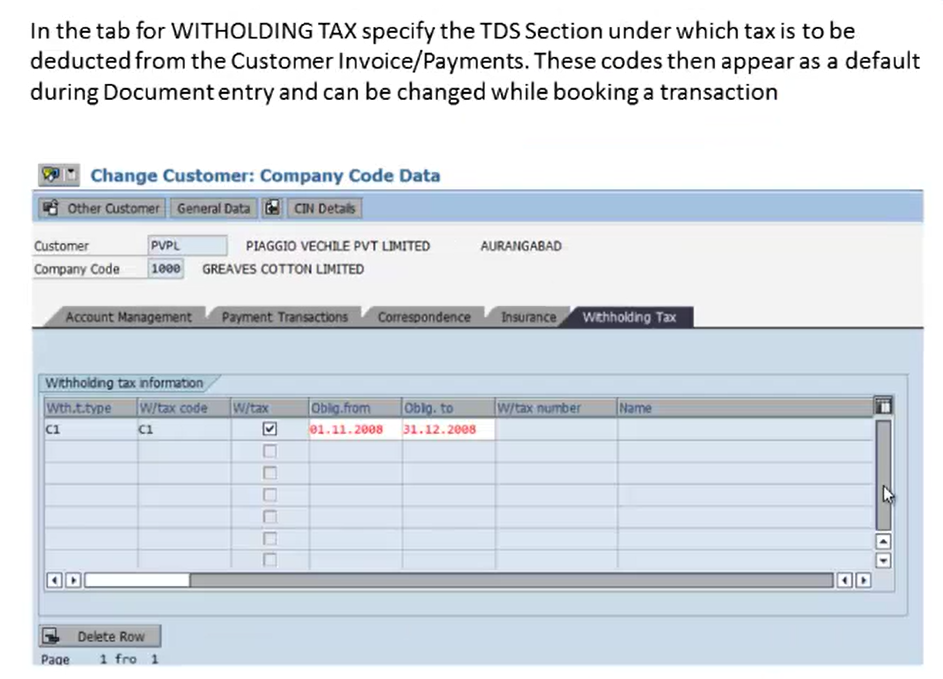
Now these codes appear as a default during the document entry and can be changed by booking the transaction. So similar to the vendor master creation, we’ll maintain the customer master data for the tax to be deducted from the payment. So, here we have some fields which refers from the vendor master. Here we will have to maintain the From and To date for that particular customer After maintaining these settings we’ll click on the save button to save the records for that particular customer So here we will maintain this for customer PVPL for company code 1000. This is how we create a customer master code.
Next, we will see how to create the internal master code, that is the internal order master. Now the creation of the internal order master has a transaction code K001.
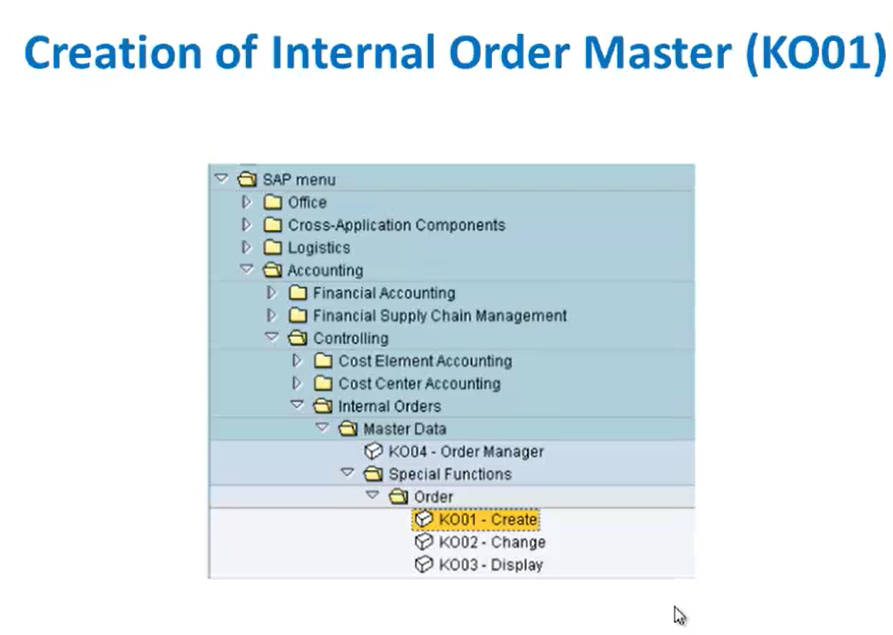
The SAP menu path is accounting, then controlling. Under controlling, we’ll go to internal internal orders. Under that we will go to master data, then special functions. Under special functions we have order. In that we will first go to creation. So here we will click on the K001 transaction code. Now after clicking on that transaction code, we will get a screen where we will have to mention the type of the internal order we are going to create. Now the type may be any.
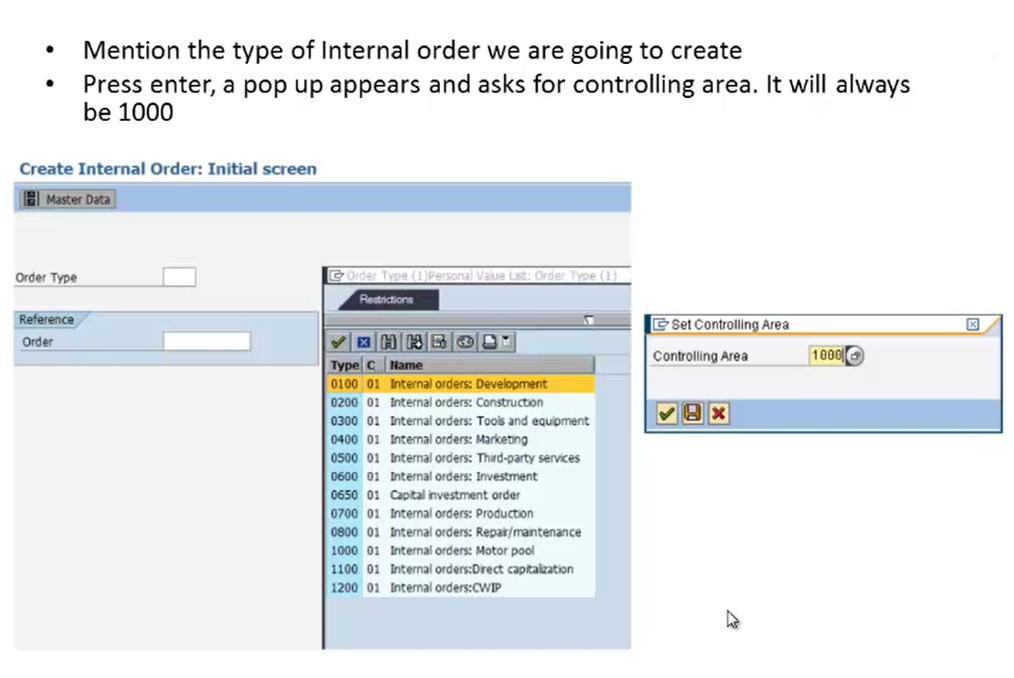
So here from the drop down, we’ll have to select the type. Now it will ask for the controlling area. So here our controlling area will be 1000. So we will select that particular controlling area as 1000 and appropriate order type will be selected.
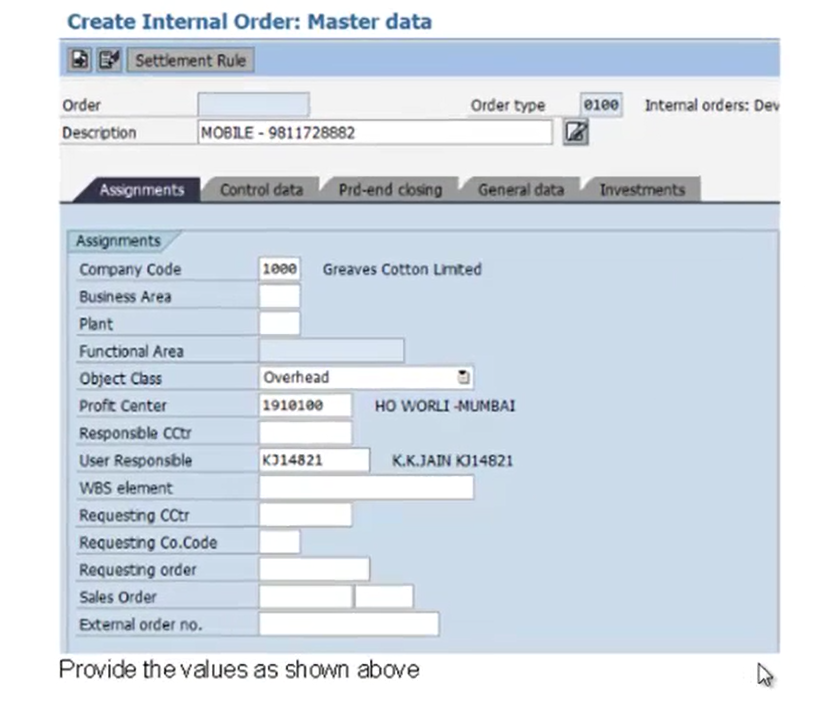
Now here, the order type is 100 for that particular controlling area. So here, we’ll provide the values like company code, then object class, profit center, business area, client, user responsible, and so on. So all these assignments will be maintained for that particular internal order, that is for order type 100.
Now after maintaining this assignment settings, we will go to the next tab, that is the control data tab.
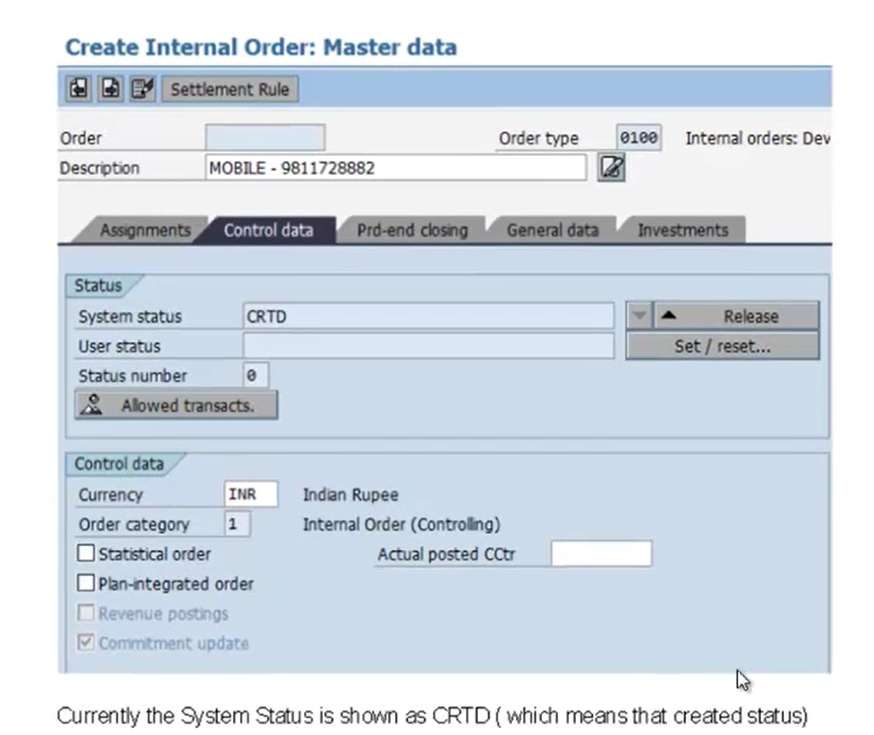
Now here currently the system is shown as CRTD, which means that it is in the created status Now we’ll put the system status as release, that is we will change the system status into REL.
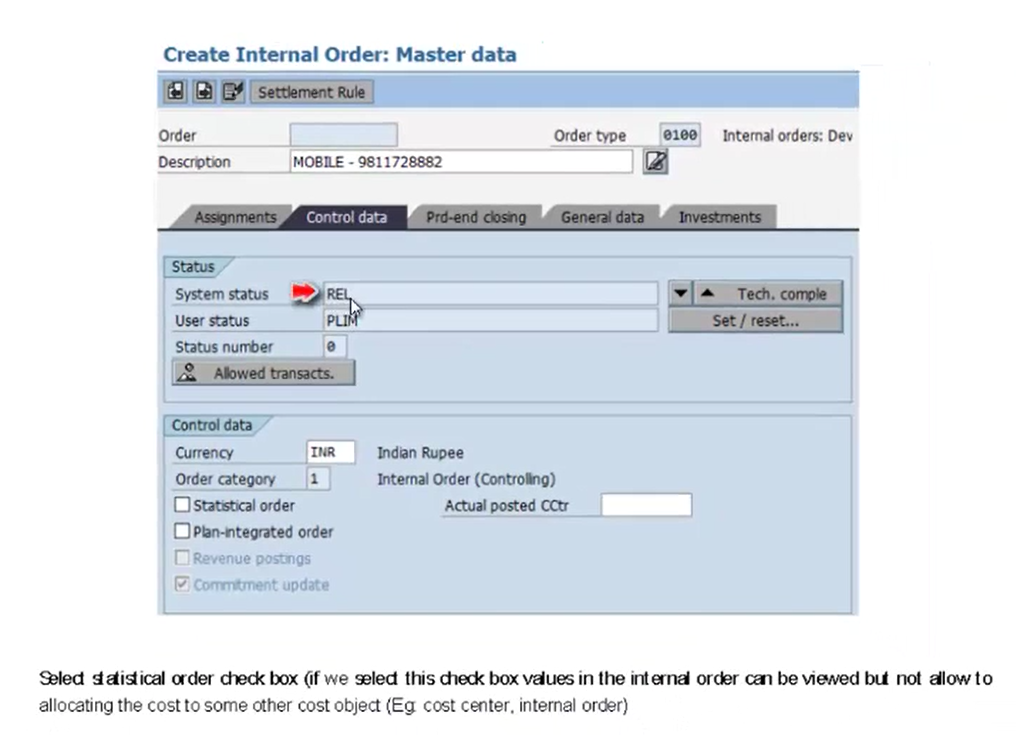
Now here we have seen that the system status has been changed to REL, that is in the released status. Now here we’ll select the statistical order checkbox. Now if we select this checkbox value in the internal order can be viewed but not allowed to allocate the cost to some other cost object like cost center and internal order. So here we will select this particular statistical order checkbox. So after maintaining this control data settings we will go to the next step.
Now here if order is in the Created status that is CRTD, we can only maintain plan values. And in Release status, system will allow plan and actual values. And we have another set status such as technical complete status. In this it will allow only actual values. And in closed system status, the system will not allow any values to post. So there are 4 system status in which we can maintain the settings for plan and actual values. So this is how we maintain the settings for creation of an internal master order.
Next, we will see the creation of asset master codes. Here the transaction code is AS01, and the path is accounting, financial accounting, then fixed assets. Under fixed assets, we have Asset.
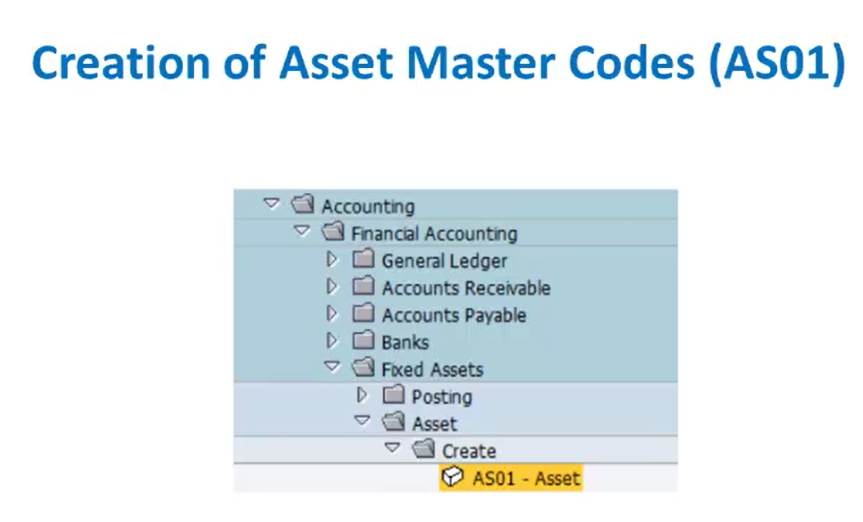
Then for creation, we will go to the AS01 transaction code. Now here, after entering that asset, that is the transaction code, we will have to maintain the asset class under which an asset is to be created as also the company code of the creation.
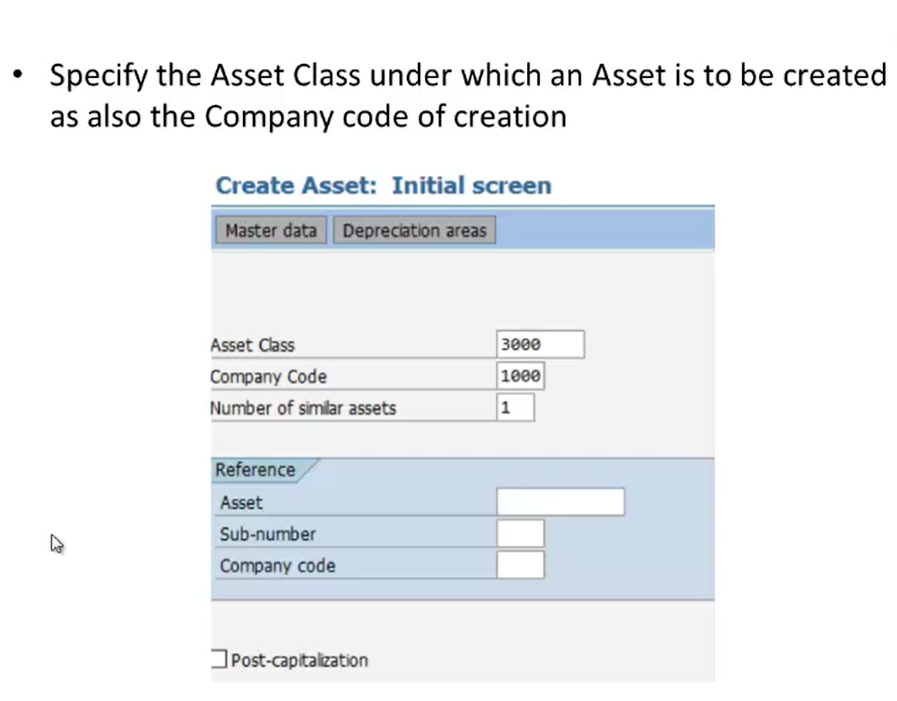
So here the company code is 1000 and the asset class is 3000. So after maintaining this initial screen, on the next screen we will maintain the details relating to that asset like description, serial number, inventory number, etc.
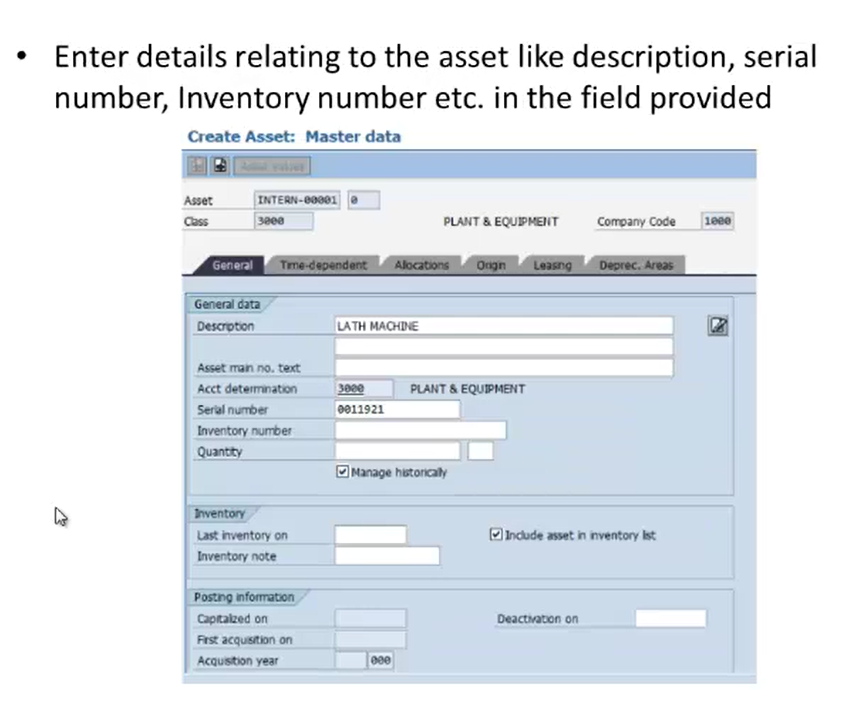
So here the description is “Lath Machine” then serial number is 0011921, and we have maintained the inventory number. Now after maintaining these settings we will go to the next tab that is Time Dependent.
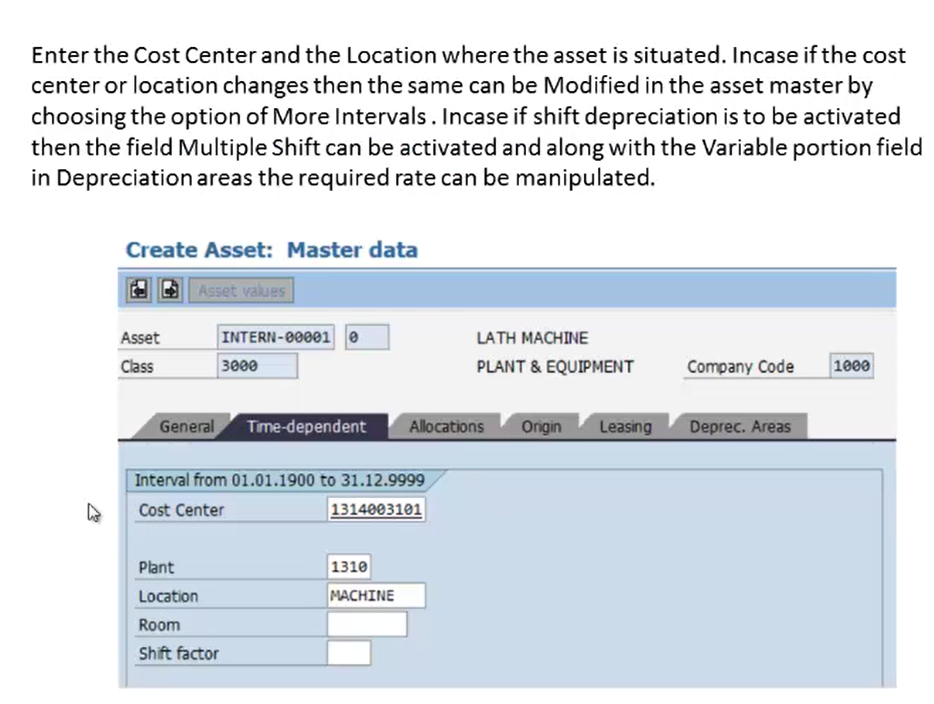
Now here we will enter the cost center and the location where the asset is situated. In case if the cost center or location changes, then the same can be modified in the asset master by choosing the option of More intervals. Now here in case if shift depreciation is to be activated, then the field Multiple Shift can be activated and along with the variable portion field in depreciation areas, the required rate can be manipulated. So here we will maintain the cost center and the location along with the plant for this particular asset. And if in case we need to modify this, then the same can be done in the asset master by choosing the option of More Intervals. And here if we have shifted depreciation to be activated, then that same can be done in the Depreciation Areas tab where the required rate can be manipulated.
Here in the depreciation tab, we will maintain the group asset field, which is mandatory for input and is basically used for tracking the depreciation as per the income tax act.
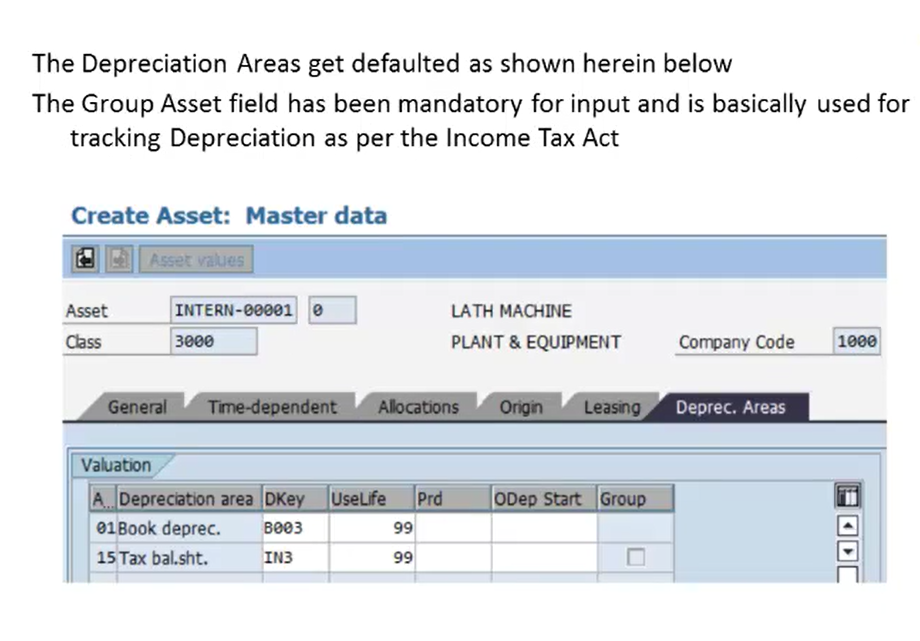
So here in the depreciation area, we’ll maintain the depreciation area first for the booking depreciation, then next for the tax balance sheet.
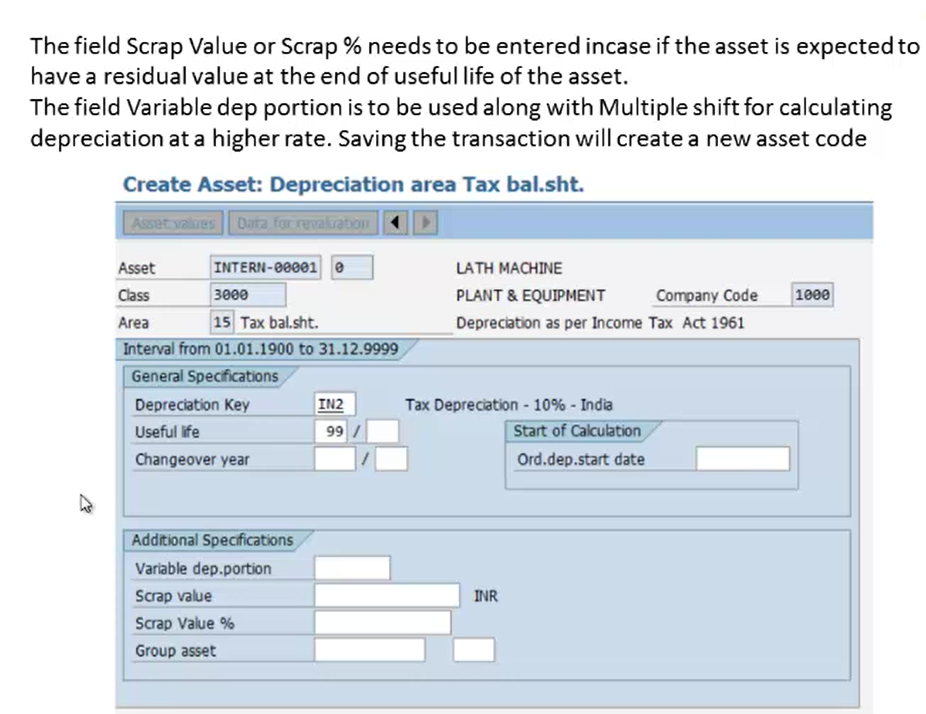
So here, we’ll first maintain the depreciation area on the tax balance sheet. So here, once we double click on that field, we’ll get a window where we have to maintain the scrap value or we say scrap value percentage. Now the field variable depreciation portion is to be used along with the multiple shift for calculating the depreciation at a higher rate. So here we will maintain this field variable depreciation portion where we have to maintain multiple shifts. Now after this, we will save the transaction and we will create a new asset code. So this is the asset creation for tax balance sheet.
Similarly we will create the asset for the next depreciation that is area booking depreciation.

Here also we will maintain the settings for scrap value and scrap value percentage, if required, and then we will save those settings. So this is how we create the asset for a particular company code.