
Creation of Asset Master
Next, after releasing the purchase order, we can create a good receipt. So let us see how do we create goods receipt. The transaction code MIGO. So this is a goods receipt screen.
Thank you for reading this post, don't forget to subscribe!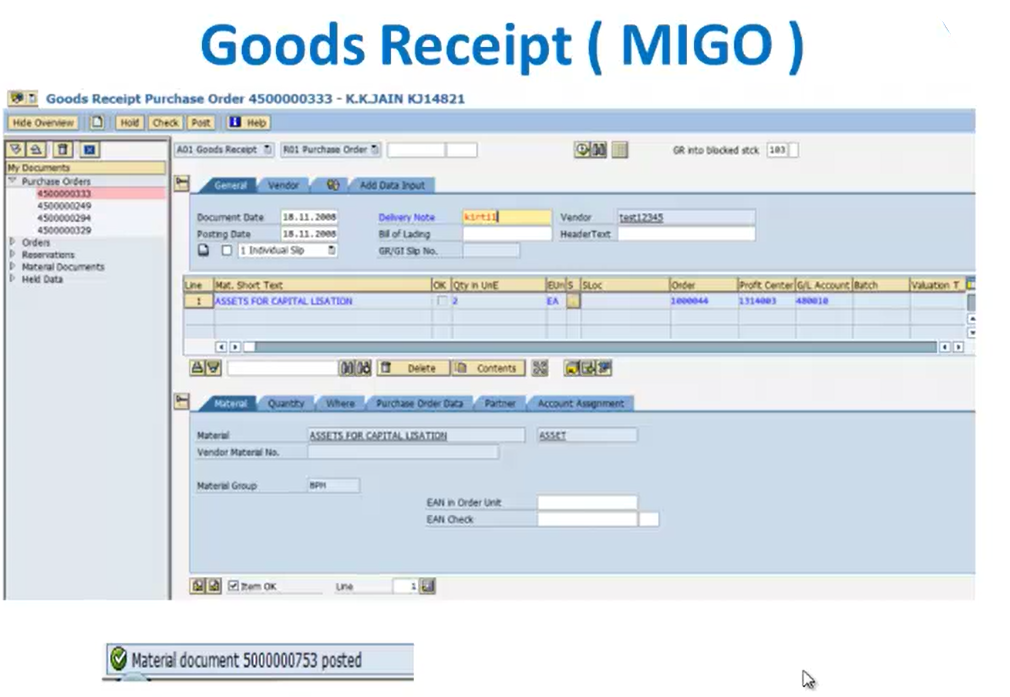
Now here once we enter the purchase order, we get a material document which is posted for that particular purchase order. Now after this we can view that particular document number which we have created.

So we’ll click on the list of documents and we’ll select the appropriate document number and we’ll click on the icon. Now after this we’ll get a general ledger view of that particular document containing the number of line items in it.
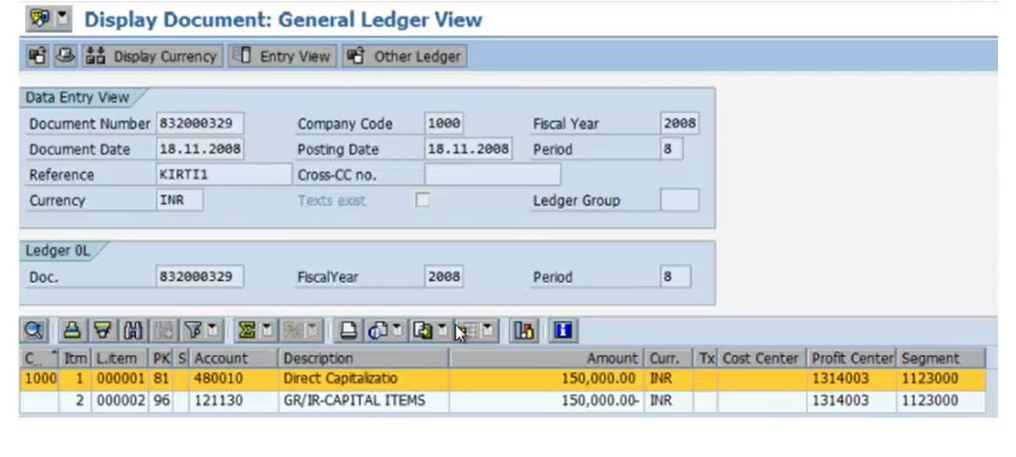
So this is the display view for that particular document number against that company code. Now after which we’ll select the line item first and we’ll get the details for that particular line item.
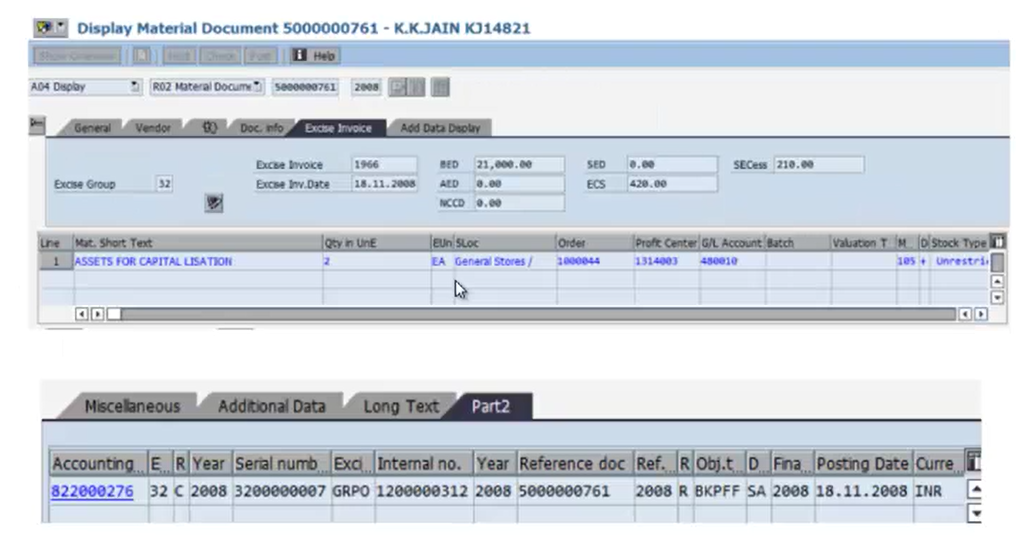
So here in this particular Excise Invoice we have the line item as “Assets For Capitalization”. So once we double click that we’ll get a screen where it will give us the details of accounting number, the serial number, excise number, internal number, etc. So this is the details which we have stored for that particular document number or that particular material document number.
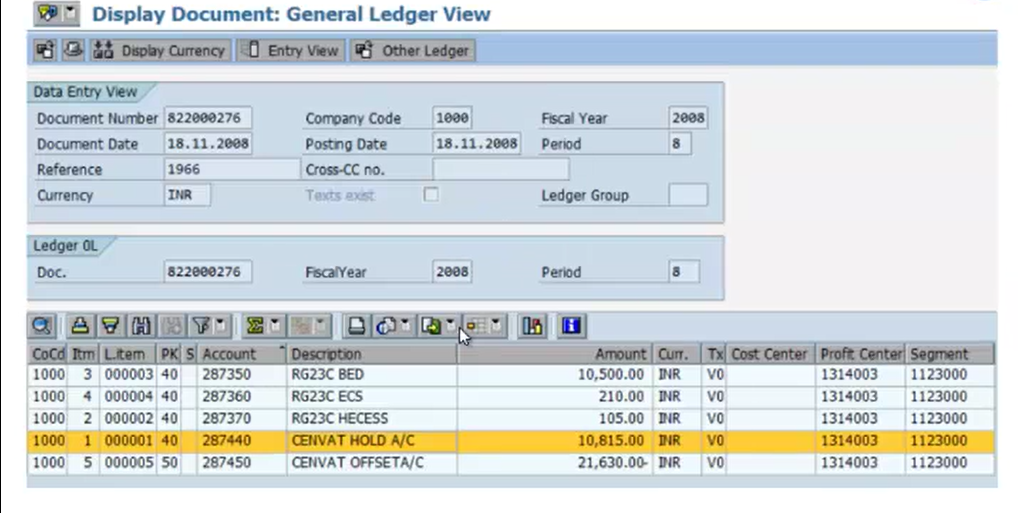
After that we’ll have that same document number under the general ledger view, once we create that material under the Goods Receipt.
Next we’ll see invoice verification. Now here we’ll use a transaction code called MIRO. So when we enter the transaction code MIRO, we’ll get this screen where we’ll have to select the purchase order which we want to display.
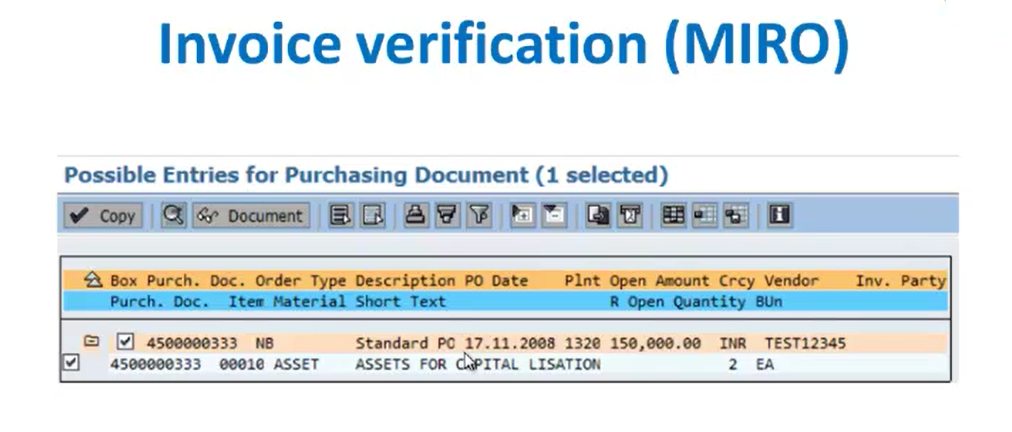
So here we’ll select this purchase order, that is for line item 1 “Assets For Capitalization”, which we have seen earlier. So once we click that particular checkbox, we’ll click on the display icon or we’ll click on the Document icon. So after which we’ll get a screen where we’ll have to enter the details for that particular document.
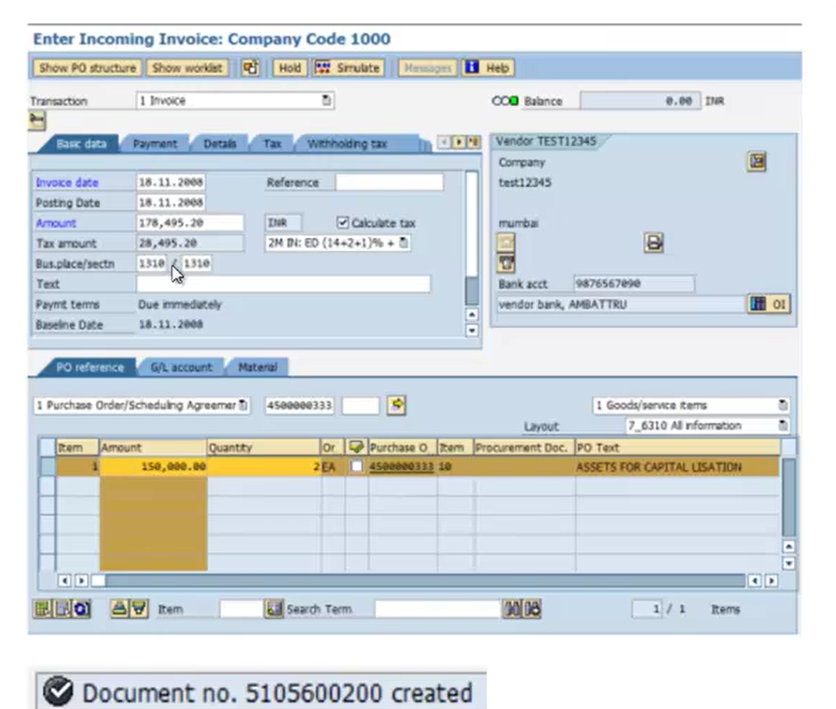
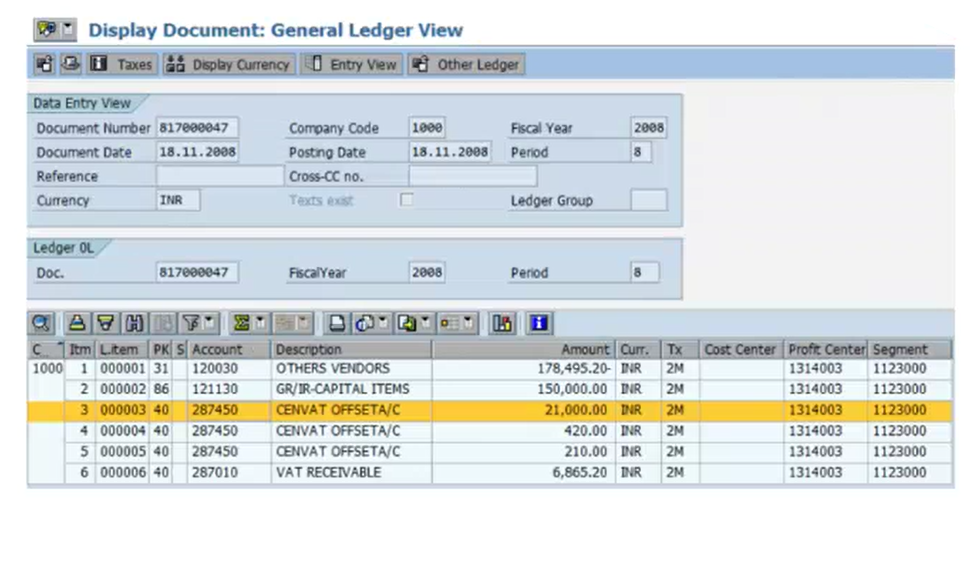
So here we’ll enter the appropriate documents and we’ll click on the save button after which we’ll get a document number, which is created for this particular invoice. After that we’ll click on the document list display, where it will give us a general ledger view for that particular document number. And it will contain the number of line items in that document.
Now next we’ll see settlement of the internal order. Now we have seen how to create an internal order and how to do budgeting of the internal order. Now next we’ll see how to do the settlement of internal order. Here we’ll use transaction code K088.
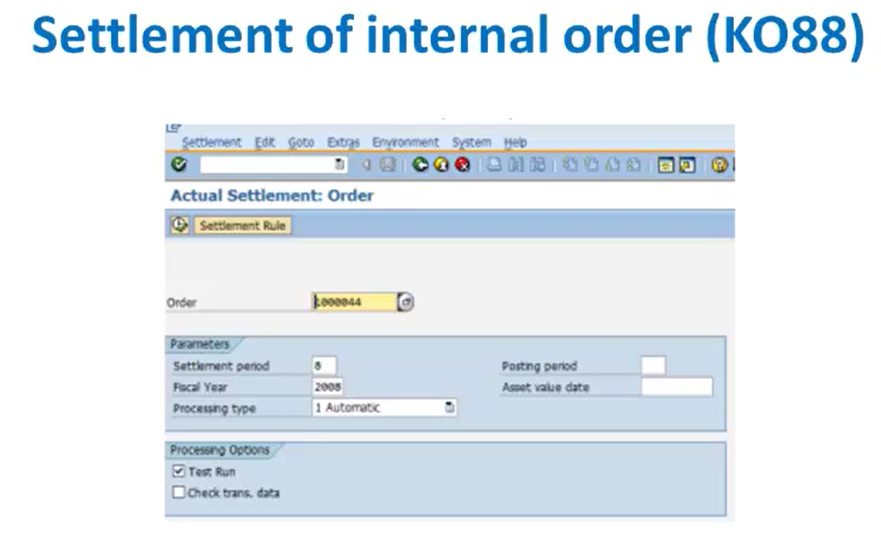
Now here we’ll have to provide the order number. So here we’ll use the same order number, which we have used for the creation of the internal order, then we have to set some parameters like settlement period and the fiscal year. So our fiscal year is 2008 and we’ll have to choose the processing time. So here we are choosing the processing type as Automatic. And we’ll click the checkbox Test Run. After that we’ll get a screen where it will give the basic list for selection, processing options and it will give the processing category.
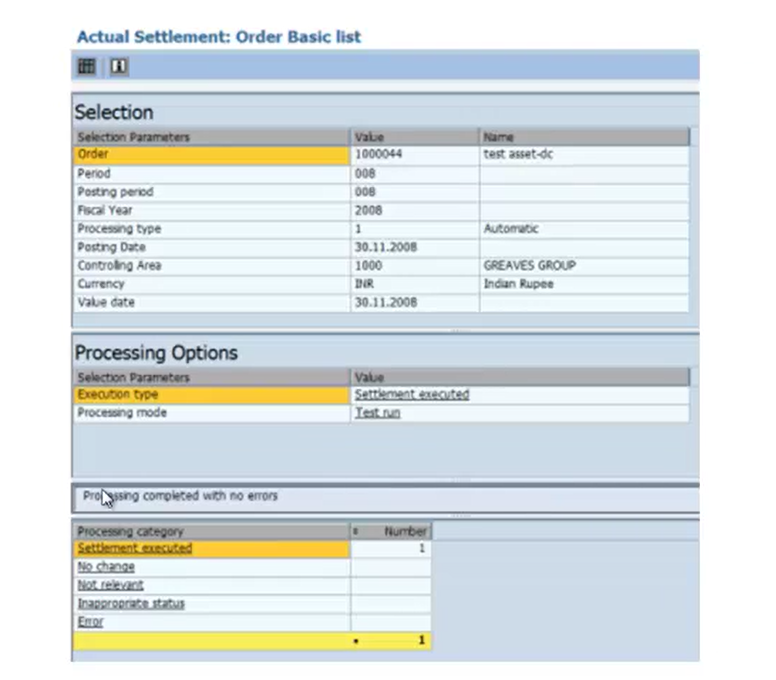
So here it will give the details for order period, then posting period, the fiscal year, the processing type, the posting date, controlling area, currency and the value date. Then under processing options, it will give us the parameters like execution type and processing mode. So these are the basic list which we have selected on the previous screen. And it will give the processing category like settlement executed, if any changes are done, not relevant and inappropriate status and if there is an error then it will display in this category. So this is the actual settlement order basic list, which is displayed after we select the parameters.
Next it will give a detailed list of the values which we have set. So below is a detailed list of the values. Here we’ll remove the tick in the Test Run checkbox and we’ll execute it again.
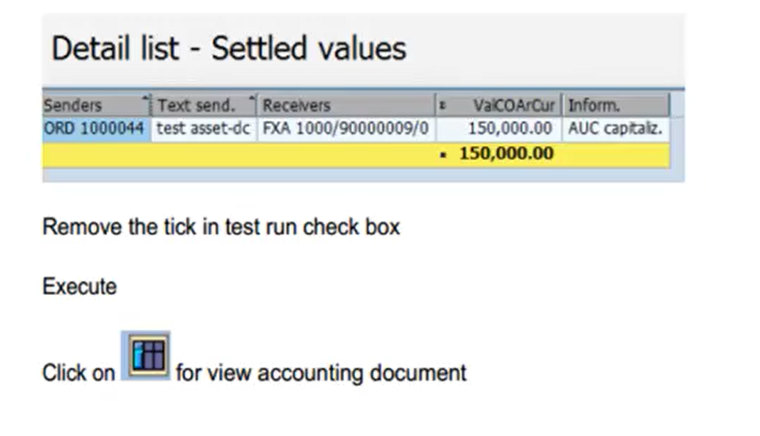
Previously we have clicked the test run checkbox and we got this particular basic order selected list. Now we’ll remove this test run checkbox and we’ll click on the execute part. Once we click on the execute part, we’ll get a screen where we have to click on this particular maintenance icon for viewing the accounting document.
So this is the display view of the data entry. Now here we have two line items Line item 1 for this account and line item 2 for another account in the same document number. After this we’ll see the general ledger view of that particular document.

So in the image is the general ledger view for that particular document with the two line items for that same document number. So this has the data entry view and the GL view, that is the general ledger view. So here for viewing the general ledger view we’ll click on the general ledger view and we’ll get the bottom screen for display document.
Next we’ll click on the icon that is display documents. So it will give all the documents which we have created. So we’ll select our appropriate document and click on the view icon, so it will give an overview of that asset document. So this is the overview of the asset accounting documents.
So here we have selected this particular document number that is Asset Transaction. So it will give that particular document description.

So this is settlement of an internal order.
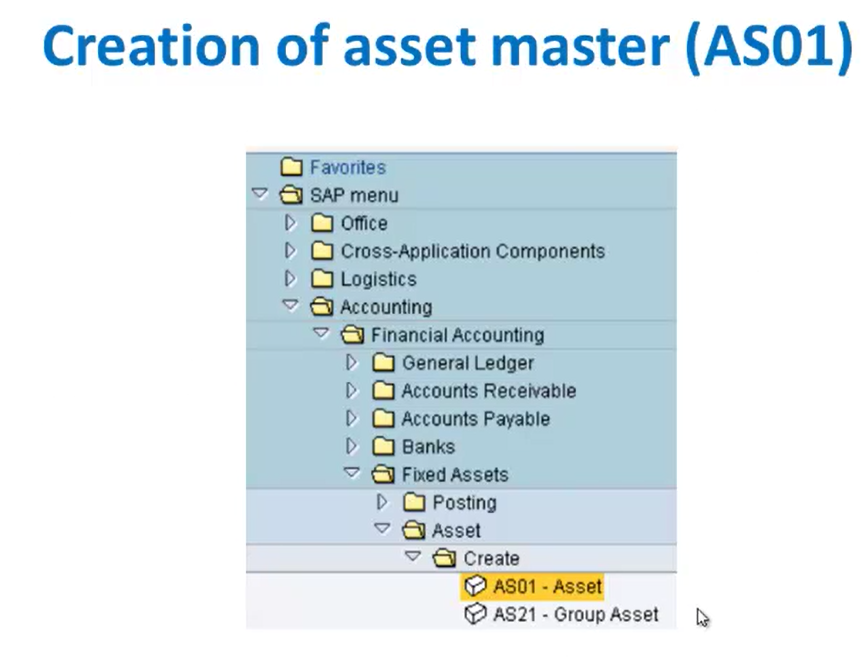
Next we’ll see how to create an asset master. So here we’ll use a transaction code AS01.
So here this is the SAP menu path. we’ll go to SAP menu, then Accounting, then Financial Accounting, Fixed Assets. Then under that we’ll go to Asset path, and for creation we’ll go to AS01 asset creation.
So after AS01, we’ll get a screen where we have to maintain the asset class, the company code and the number of similar assets. So the main part to be maintained here is asset class and the company code. After maintaining this we’ll click on the master data tab, once we click on the master data, we’ll get a screen where we have to maintain the data for that particular asset class.
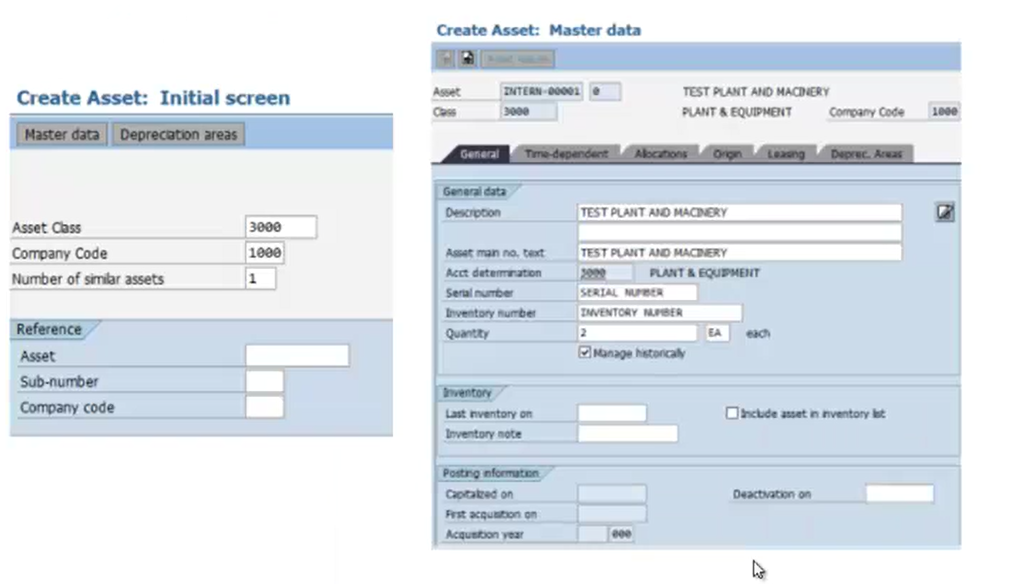
So here in the general tab, we’ll maintain the general data like the description for that particular asset, then text for that particular asset, then asset determination, then we have to put a serial number and inventory number and quantity for that particular asset. And we’ll tick the manage historical checkbox for this particular asset.
After this we’ll go to the time dependent tab. Here we’ll have to maintain the cost center for this asset and we’ll have to maintain the shift factor. So here for plant and machinery we only need to fill the shift factor, so this is the shift factor maintained here. Here we have used an example for test plant and machinery, so that is why we are maintaining the shift factor.
After this we’ll go to the depreciation areas tab, wow here we’ll maintain the depreciation area, that is book depreciation and tax balance sheet depreciation.
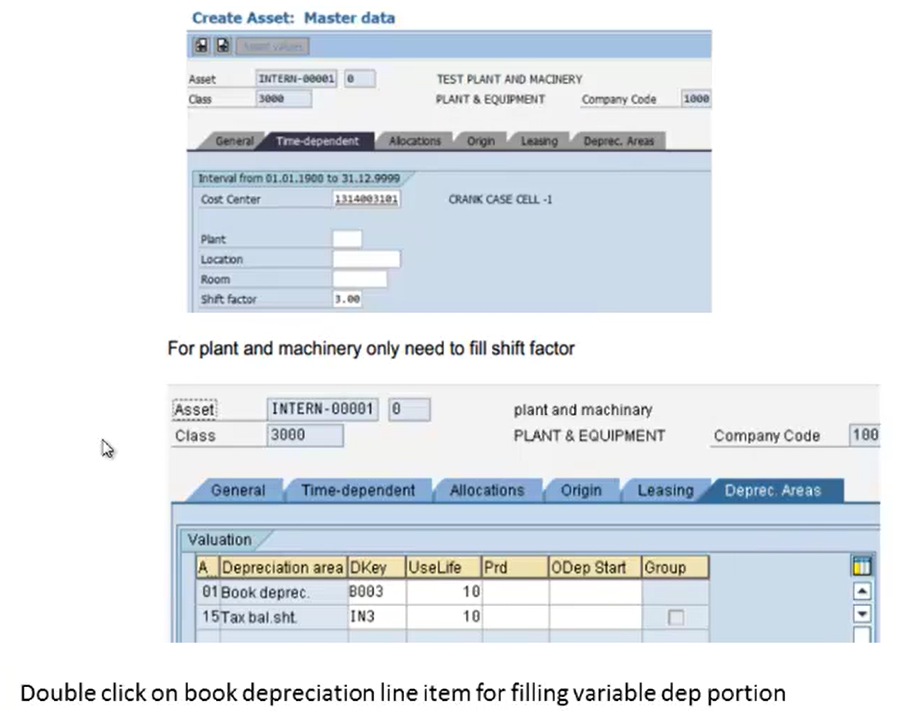
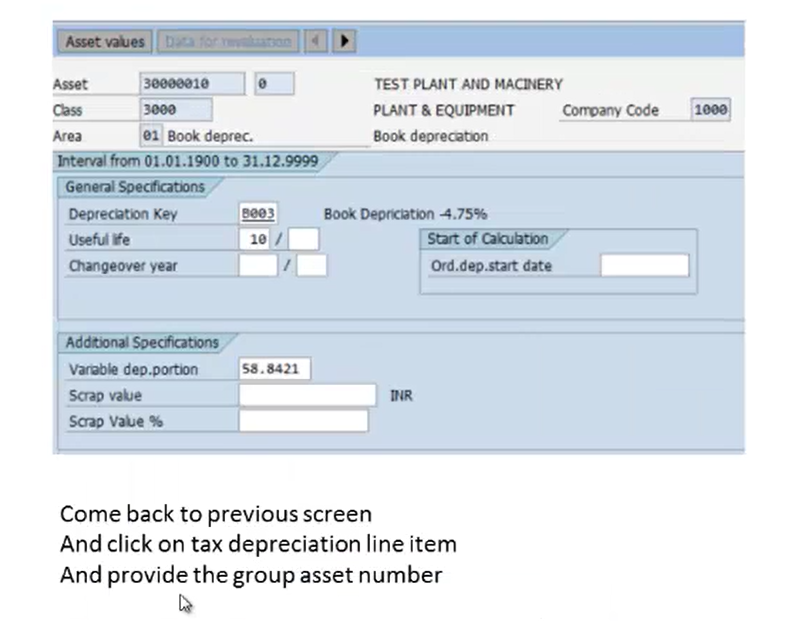
Now if you remember we have done this similar kind of depreciation areas in our previous sessions for maintaining different data for the particular assets. So here in similar way, we’ll maintain a depreciation area. Now here first we’ll click on book depreciation line item for filling the variable depreciation portion. So once we click on this line item, we’ll get a screen where we have to maintain the value depreciation portion. So here we’ll first maintain the book depreciation, that is area 01. So that is the depreciation portion.
Now after maintaining this, we’ll go back to the previous screen and we’ll click the second line item, that is the tax depreciation line item. And there we’ll provide the group asset number.
So here on the second area we’ll maintain the group asset number for tax balance sheet.
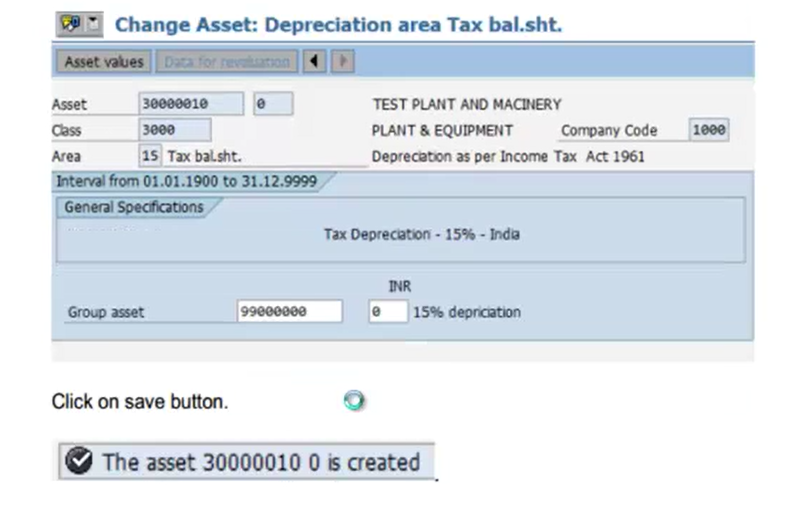
After maintaining this we’ll go back and we’ll click on the save button. As we click on the save button, we’ll get a message stating that the asset is created. So this is how we create an asset.
Now after creating an asset with transaction code A01, next we’ll see how to do the settlement of CWIP to the main asset, and that is done with the transaction code KO02. Now let us see how do we do that.