
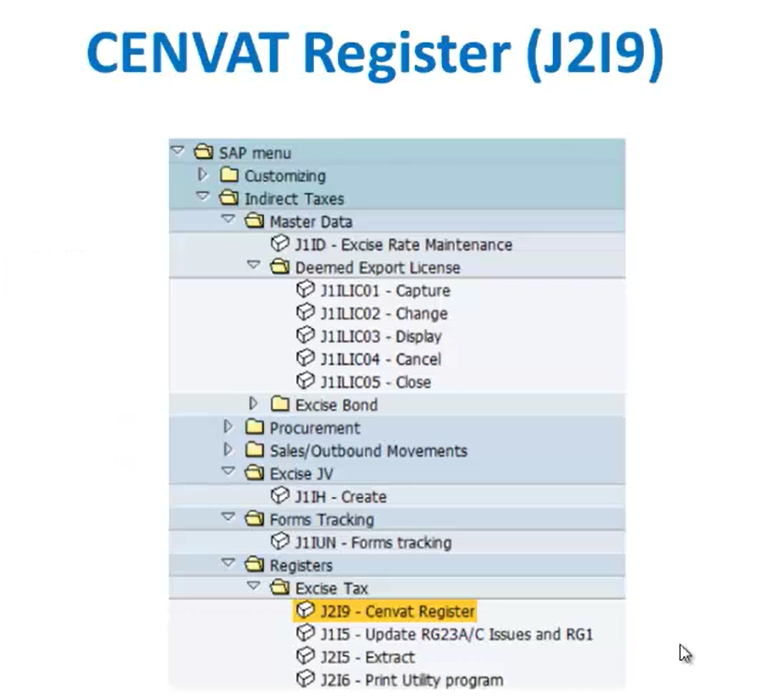
CENVAT Register (J219)
After service tax and excise duty, next, we have CENVAT register. Now we have different registers under excise journal vouchers. Now first, we’ll see what is a CENVAT register. The transaction code for this is J2I9.
Thank you for reading this post, don't forget to subscribe!
So this is the SAP menu path for excise tax under send with register J2I9.
Now here under this we’ll have to provide the company code, the excise group of which we want to take the CENVAT register. Then we’ll have to provide the date range for which we want to limit the report, and we can take a detail or an extract for input materials and capital materials and execute the report. So here we’ll provide all these details for CENVAT register under the transaction code J2I9.

After that, we’ll click on the execute button. So once we click on this execute button, now here we have selected the radio button as abstract. So this is the abstract report for that particular company code.
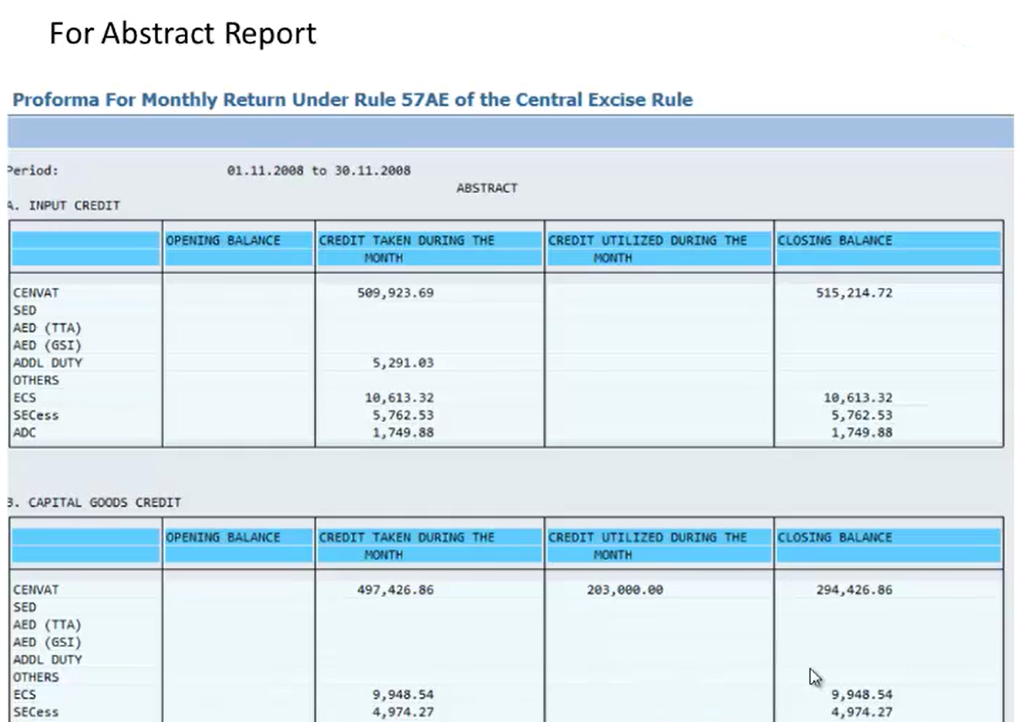
So here we have the period from this level 2008. Then this is the abstract report, and first we have the input credit details, then we have the capital goods details. So this is how we get the details for an abstract report. This is a detailed report. So this is the abstract report for that particular company code.
This is a detailed report.

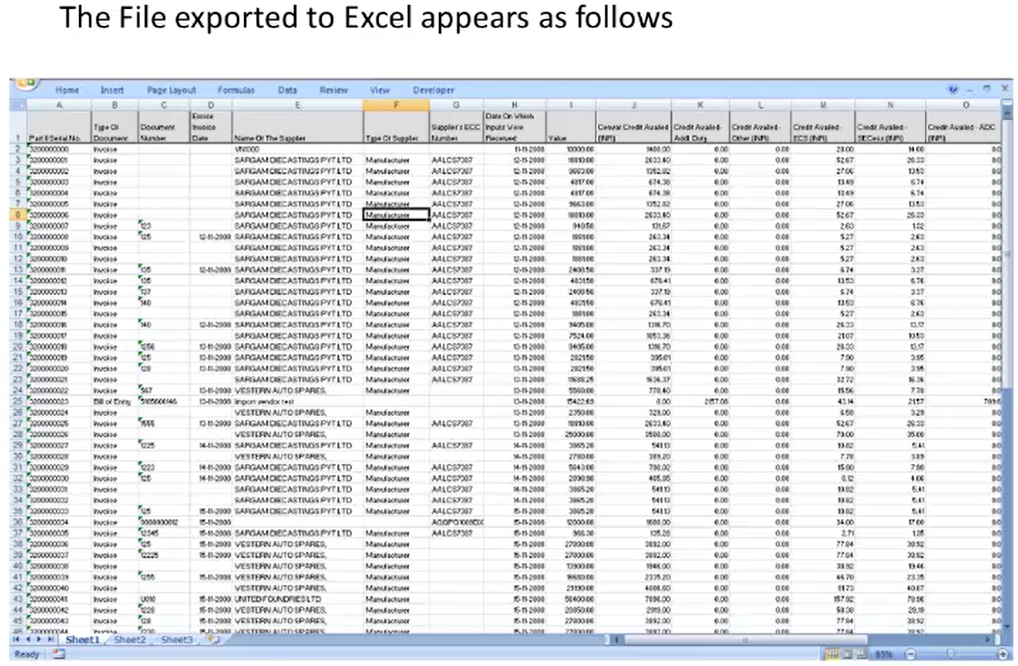
Here for detailed report, we have some icons which gives us the details for that particular report. Now here this first icon shows detailed display report, then once we click on the second icon, it sorts in ascending order. The third sorts in descending order. The fourth icon will filter our report, fifth will give the total of the report, then sixth icon gives the subtotal of the report. Seventh icon is for export to an excel file. Eight is for word processing. Ninth is for local file. While clicking on the tenth icon, we can send an email of this particular report. Then Eleventh is for ABC analysis and once we click on the twelfth icon we can change the layout for that particular excise invoice. So this is a detailed report which we’ll get once we click on any of the icon.
Now here this is the excel file which appears for that particular report. So here it will contain all the details related to that particular document that is the invoice.
Now here for seeing the details transaction wise, we’ll click on the desired line and we’ll click on this display icon. So once we click on this display icon, we’ll get this particular detailed description.
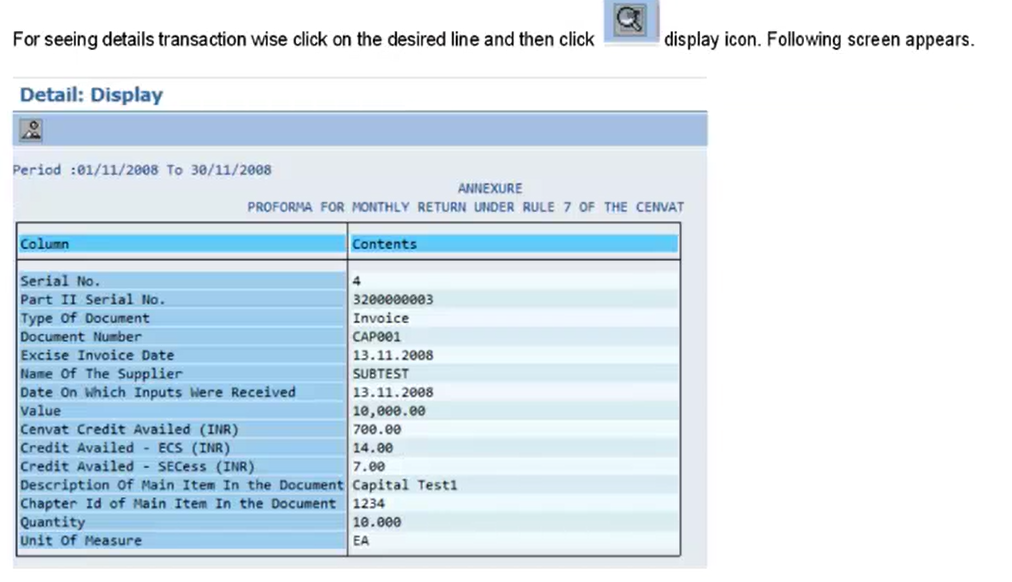
So here, this is called as a detailed view for that particular abstract report by clicking on any of the desired line and then clicking on the display icon. So here, you get the detailed view for that particular transaction.
Now we have update of registers as RG1 registers and RG23 registers. So here we’ll have to enter the company and the plan details. Then we have select the appropriate excise group detail. Then after that, we have here registers like RG23 or RG1.
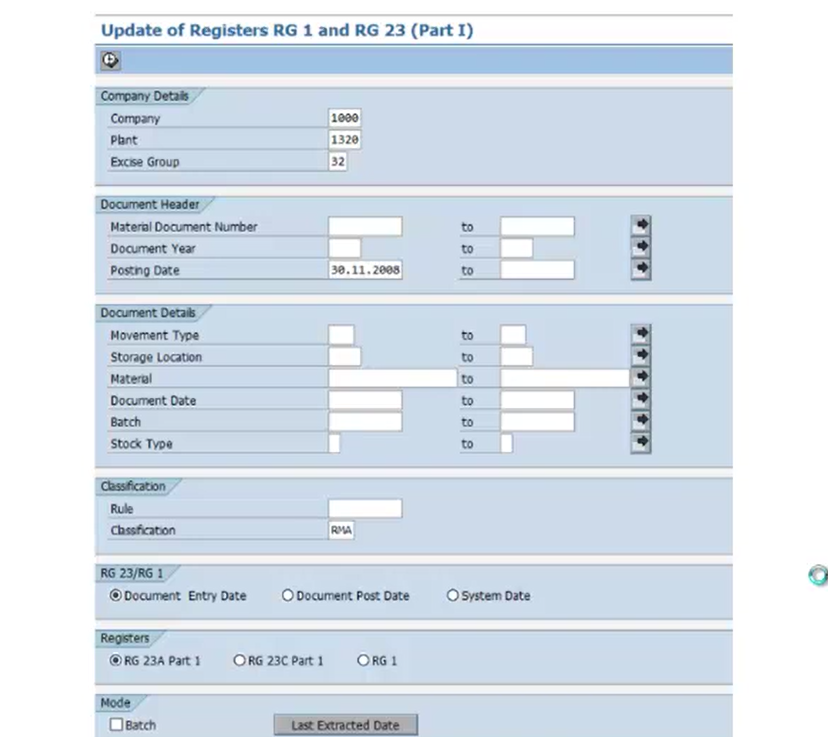
So here we’ll select the radio button as document entry date, and we have different registers like RG23A and RG23C. So we have selected RG23A as our register, and then we’ll click on this execute button. So this will update the registers detail. Now after CENVAT registers we have how to excise registers extraction. So we’ll see how to extract the registers detail.
So here we’ll use a transaction code J1I5. So here for excise register prints, we have to run 2 reports. First is for extraction and the second is for printing that extracted report.
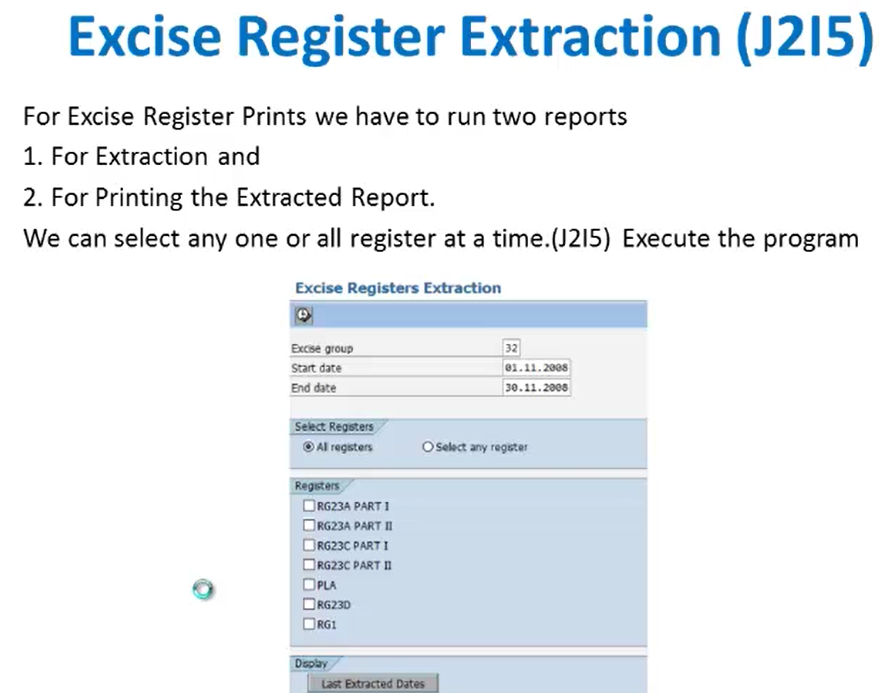
So we can select either all registers radio button or select any register radio button under transaction code J215. So here we have selected all registers radio button. Then we’ll click on this execute button. So that was excise register extraction.
After that, we’ll see how to print that excise register. So here we have seen that either we can print the excise register or we can directly choose any of the registers. So first, we have gone through a J2I file. Now the second method is printing that particular exercise register. So we’ll go via transaction code J2I6.

So here in print registers under that same screen, we’ll select the desired register and click on the execute button. So here we’ll print that register by selecting the radio button, RG23A, print register. Then here, we’ll have to select the form selections. Either we’ll get the script form for that particular register or Excel form. So here we have selected the radio button as Excel sheet. Once we select this radio button, we’ll click on this execute icon. So once we click on the execute button, we’ll get a screen where we have to provide the details like file name and the location for saving the output.
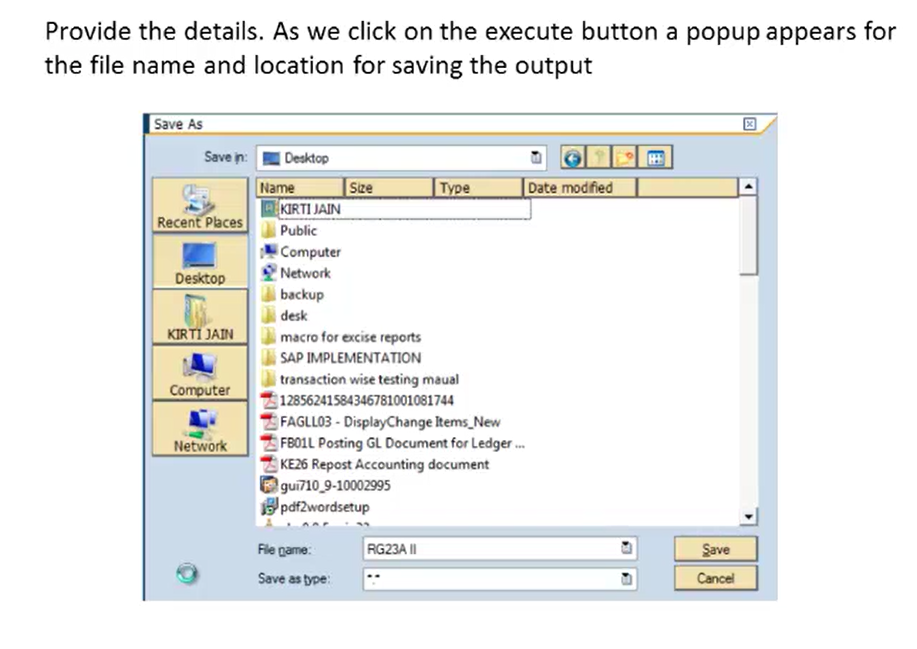
So we have provided the file name as RG23A II, and we have provided the desired locations. And then we’ll click on the save button.
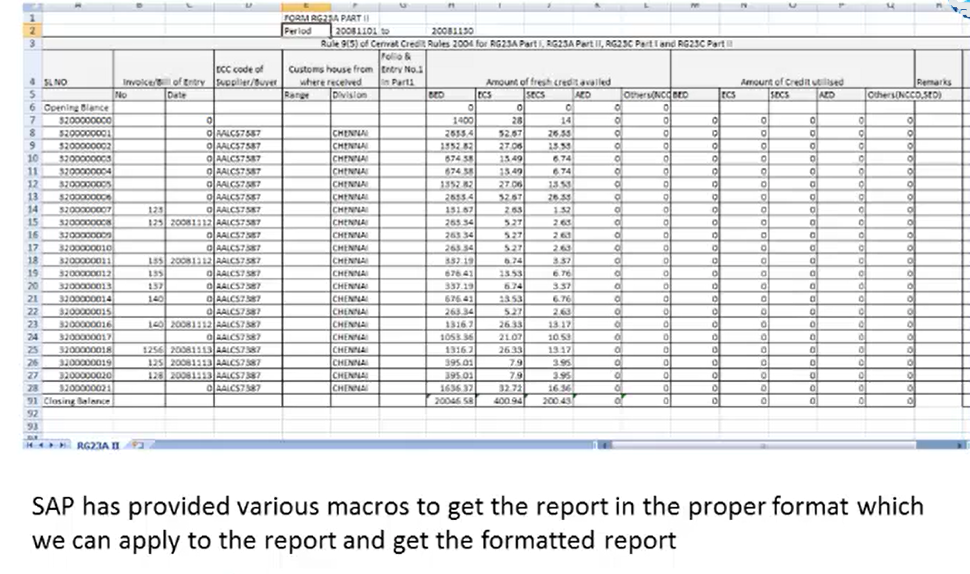
So this is the file which we have generated and that will be saved under that particular location. Now here SAP has provided various macros to get the report in the proper format, which we can display or which we can apply to the report and get the formatted report. So this is the RG23A excel sheet, and we can use macros to get the report in our proper format. So this is how we print the excise invoice registers by using a transaction code J2I6.
So after printing the excise registers, next, we’ll see what is monthly utilization of CENVAT credit and payment from PLA that is personal ledger account. we’ll use a transaction code J2IUN. This is the SAP menu path:
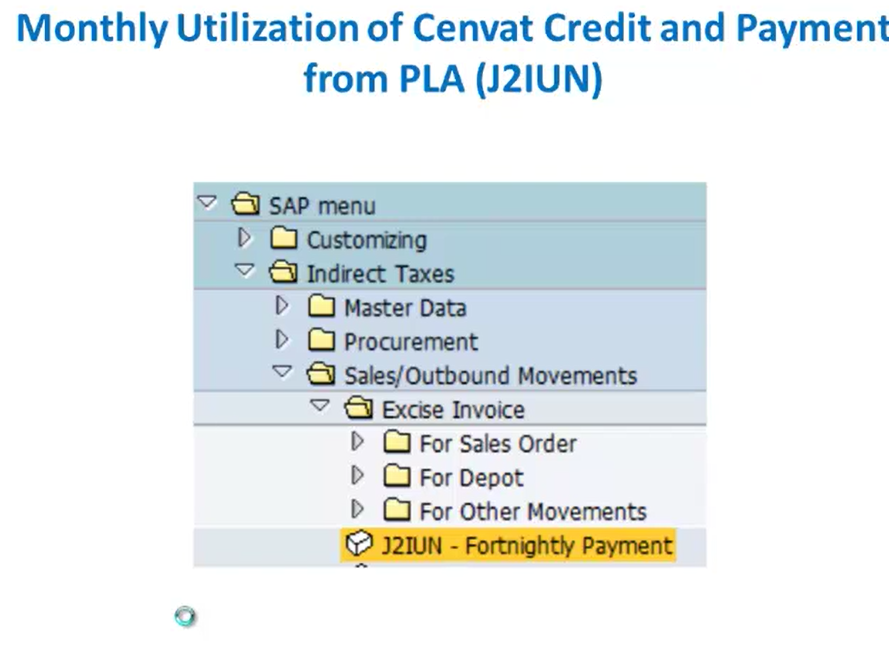
So here we’ll utilize the amount based on fortnightly payment. So here we have selected J2IUN transaction code. Here in this screen, we have to provide the company code, plant, excise group details, then we have to provide the period details.
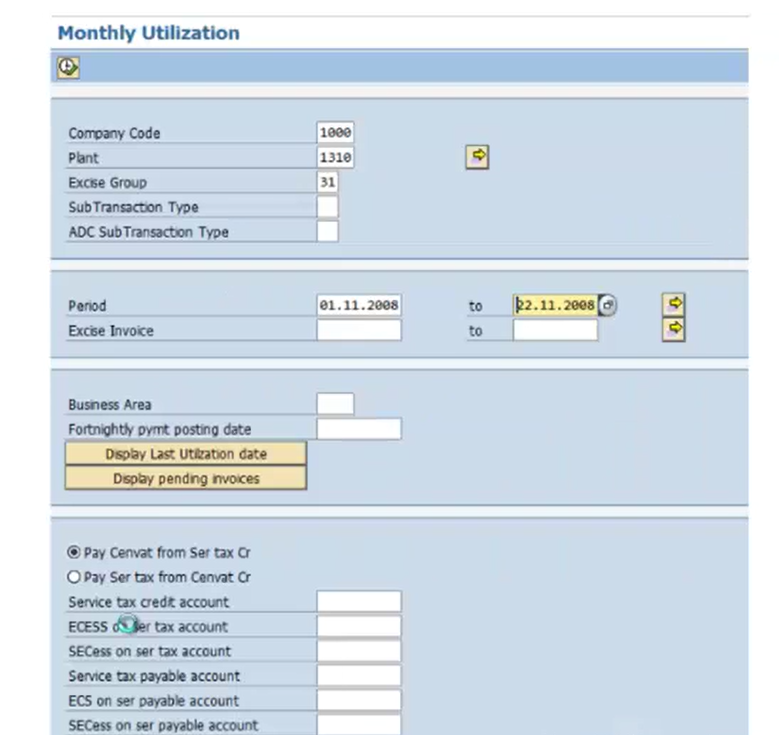
Now here we have selected Fortnightly payment. So here, either we’ll select display, yeah, last utilization date or display pending invoices. So here, depending upon the process, we can check last utilization date and view the pending invoices to clear by clicking on the following button.
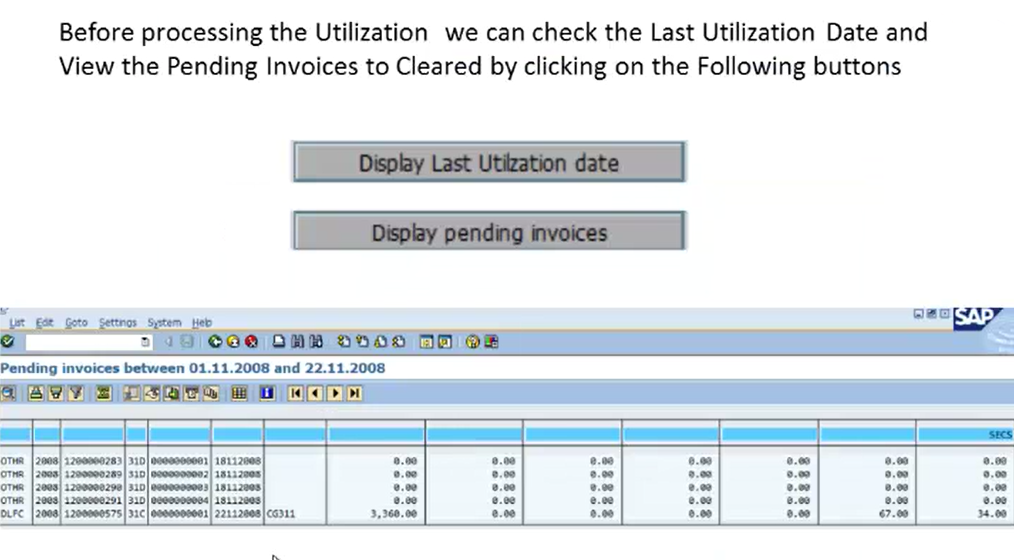
So either of the buttons which we select will get this particular screen. So here once we select that last utilization date, we can get the display pending invoices for that particular utilization. So these are the pending invoices from that particular period, which we need to utilize. This is how we view the details for this invoices fortnightly.
So after viewing this utilization of the payment, next we’ll see what happens when we click on the execute button. So once we click on the execute button for that fortnightly payment, we’ll get a screen where we have to give the monthly utilization details that is on the basis of duties. So here we’ll select the duty, which is required.
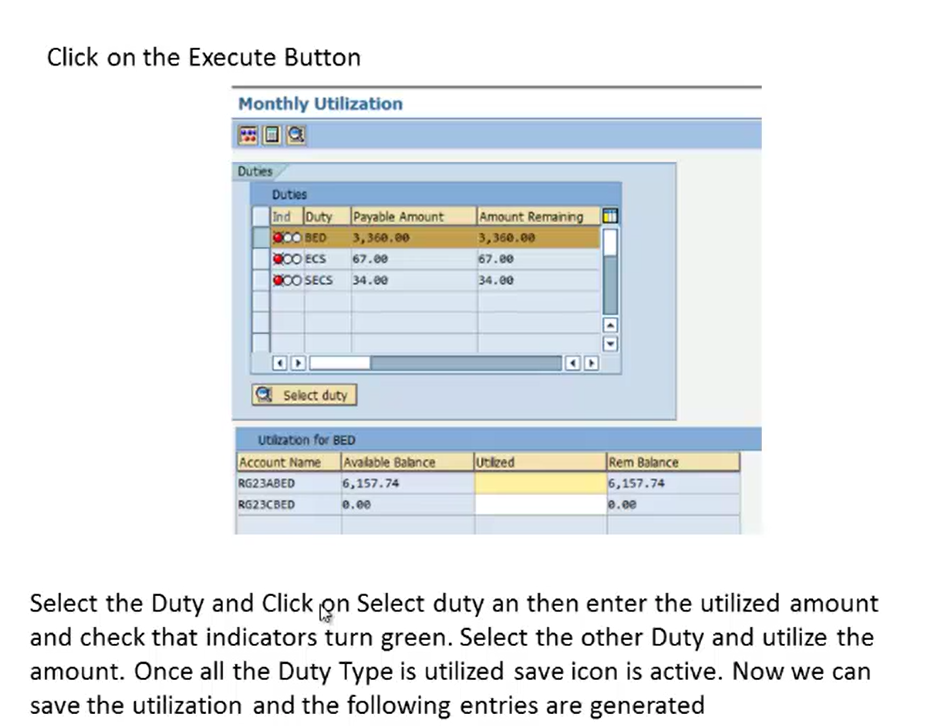
Then we’ll click on select duty button. So here we’ll have selected this duty. we’ll click on the select duty button and then enter the utilized amount. Here we’ll have to enter the utilized amount and then check the indicators. So this is the indicator. So once we select this utilized amount we’ll have to check for this particular indicator. So this indicator will turn into green colour from the red colour. Then we’ll select other duty and utilize the amount. Once all the duties that is as utilized we’ll save the icon and that will be activated. So we’ll have to utilize these duties from red colour to green colour by providing the utilization in this particular field.
After that we can save this particular entries, which we have created. Now we can save the utilization and the entries, which are generated will appear like this.

So here we have all the entries which we have utilized in green colour and these are the utilized records. So for this particular field that is a particular duty we have utilized this amount. This is how we get the monthly utilization screen. Once we save this, we can get the GL account determination screen where we have maintained the GL accounts. And then we can click on this continue button, and then we can save this posting. So this is how we assign the utilization fortnightly and monthly, and we have seen what happens when we click on the execute button and assign the duties for the particular utilization. So this was about CENVAT registers.