
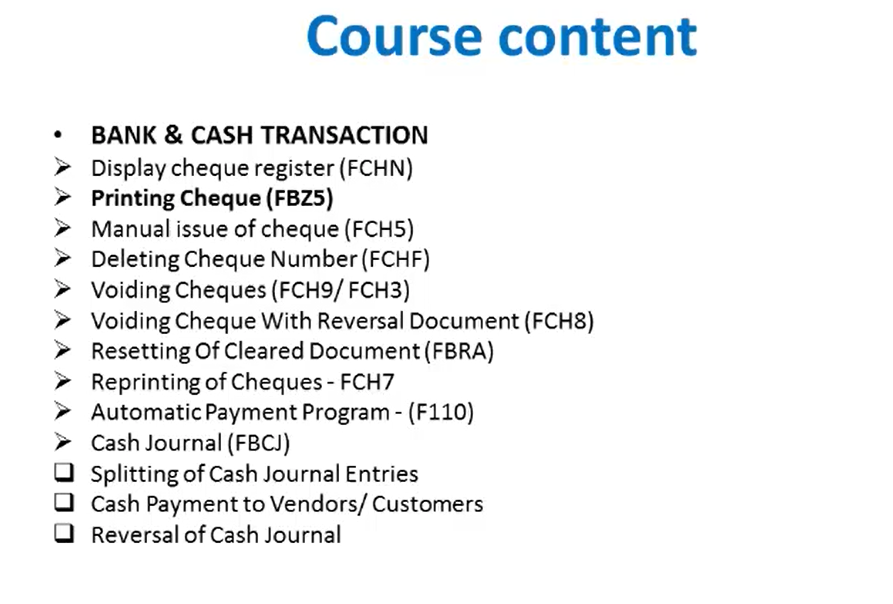
Bank and Cash Transactions
After displaying the cheque register, next we’ll see how to print the cheque. Now here we’ll use a transaction code, FBZ5. So this is the SAP menu path for printing cheques.
Thank you for reading this post, don't forget to subscribe!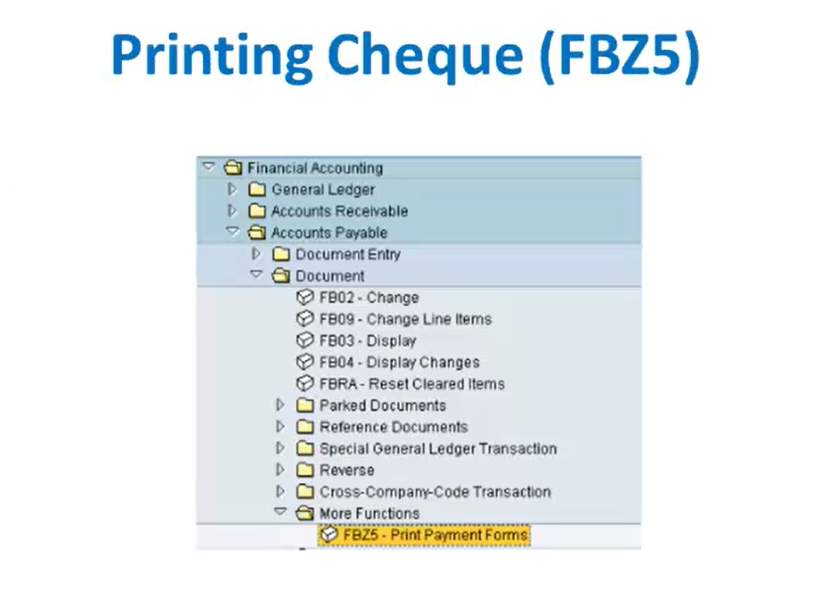
So we’ll go to Financial Accounting, under that we’ll go to Accounts Payable and Document. Under that we have options called More Functions, where we’ll click the FBZ5 transaction code, that is for printing payment forms, i.e. printing cheques.
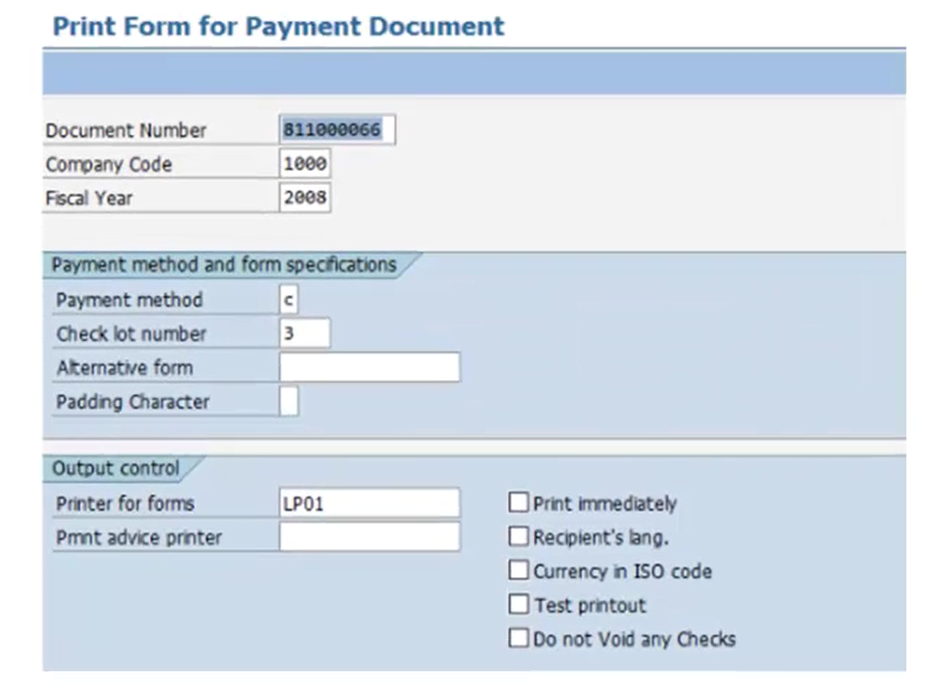
So here for printing cheques we’ll provide the document number, the company code and the fiscal year. Then we’ll provide the payment method, so here our payment method is C, that is check. Then we have to give a check lot number and the output control, that is printer for forms. So here we have to provide an output device, that is lp01 by default. After that we’ll click on the execute button or we can go to print button.
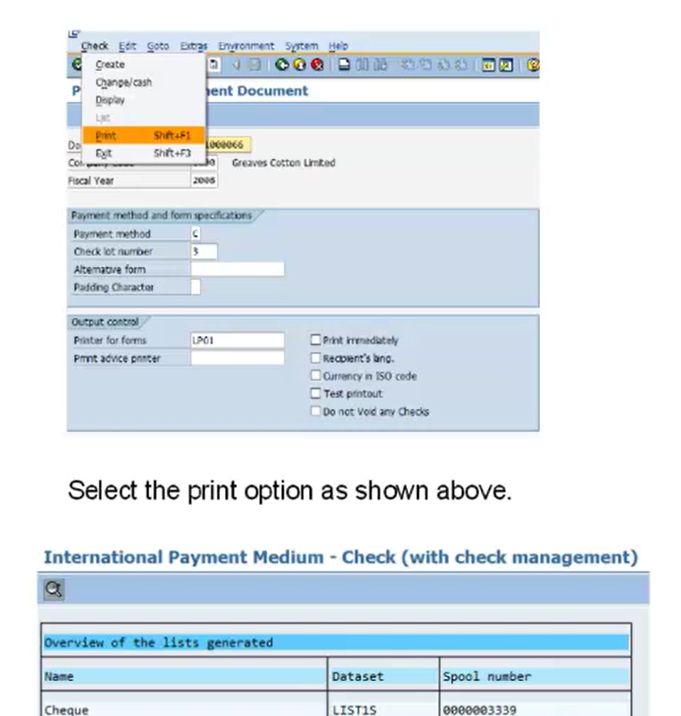
So we’ll go to check and click on print. So here we’ll get a print option as shown above and then it will generate a spool number for that print option. So after this we can go to SP01 transaction code and for that particular spool number we can get a list of print option.
So here this is the print preview for that particular check. So here we’ll get the bank number, the account number, and the check number. So this is the print preview of check. This is how you do the printing of a check by providing the check number, bank number, the company code and the fiscal year.
Next, we’ll see how to do the manual issue of a check. So here we’ll use a transaction code FCH5. And this is the SAP menu path: under Financial Accounting, we’ll go to Accounts Payable. Then under Environment, we’ll go to Check Information and there we’ll go to Create, that is creating of a manual check FCH5. After entering FCH5, we’ll get a screen for check information.
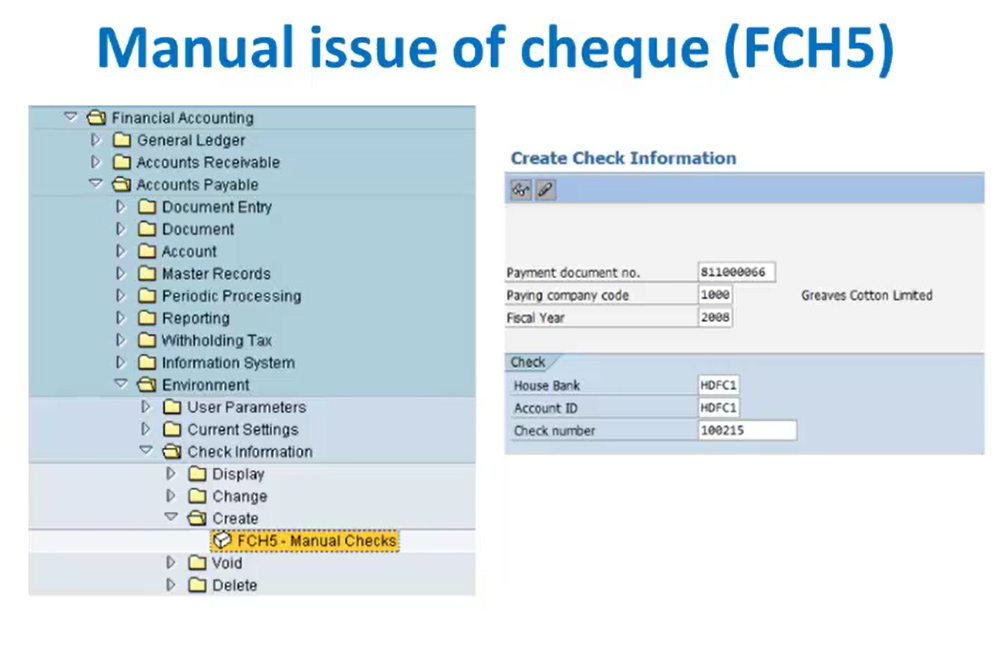
So here we’ll create the check information. we’ll have to provide the document number, the company code and the fiscal year, and we’ll have to provide the house bank details. So house bank account ID and the check number, these are the bank details for that particular check. After this you click on the enter button. So here on the next screen we have to provide the check information.
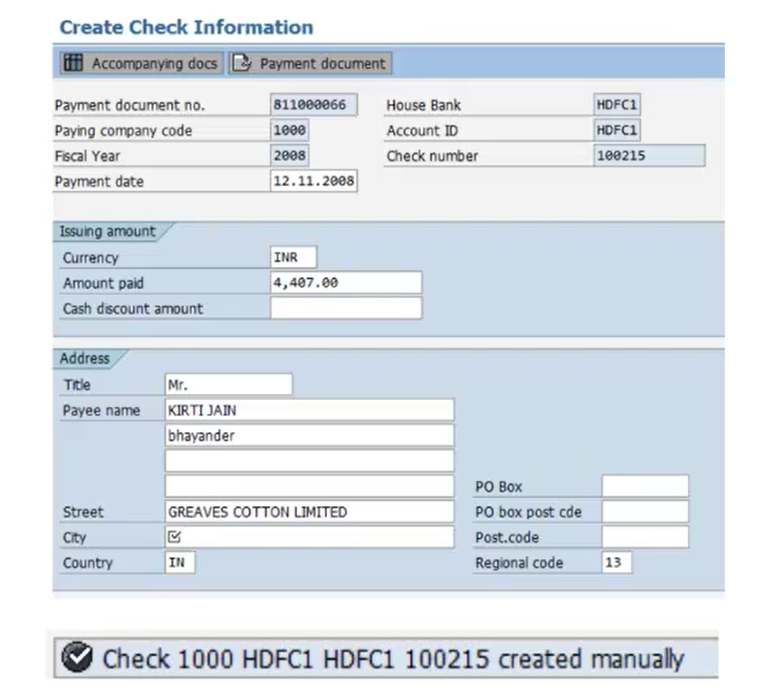
So here we’ll provide the issuing amount. First we’ll give the currency which is INR and we have to place the amount to be paid. So here in the appropriate field, we’ll give the value of the amount to be paid and then we’ll give the address details for that particular customer. And after that once we click on the save button, it will give a message stating that cheque for this company code, this house bank, this account ID and this cheque number created manually. So this is how we create a check information. This is called a manual issue of a check.
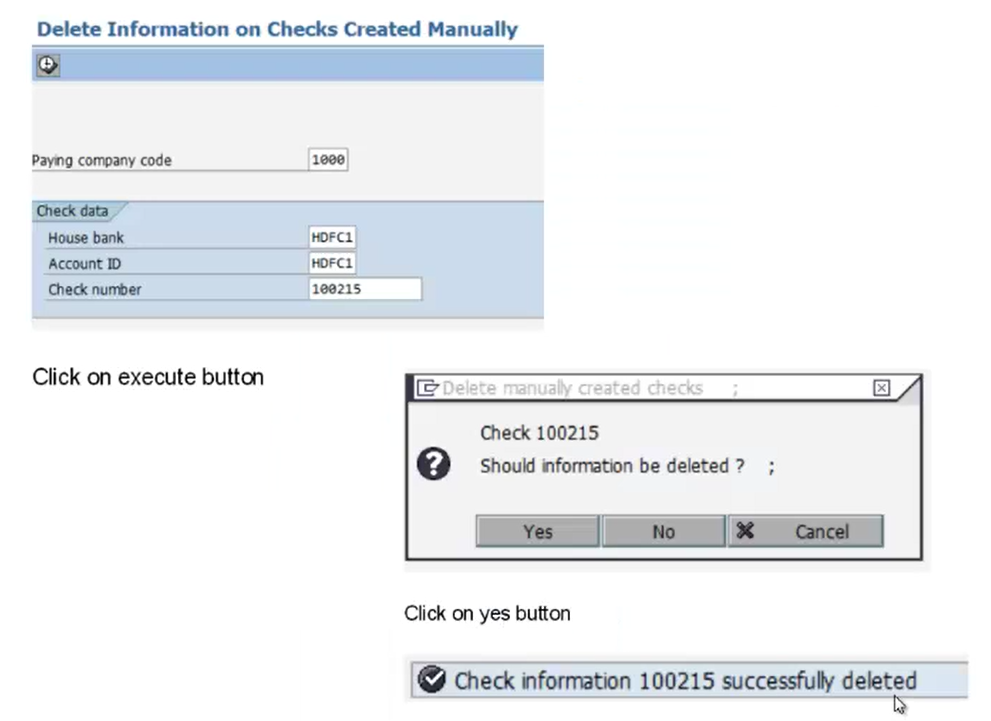
Next, we’ll see how to delete a check number from the system. Now for deleting a check number, we’ll use a transaction code called FCHF. So this is the SAP menu path: under Accounts Payable, we’ll go to Environment, then under that we’ll go to Check Information. Now we have clicked on Create button in the previous example for creating a manual check. Now here we’ll go to Delete option, since we have to delete that particular check which we have created. So we’ll go to transaction code FCHF or we’ll go via this SAP menu path.
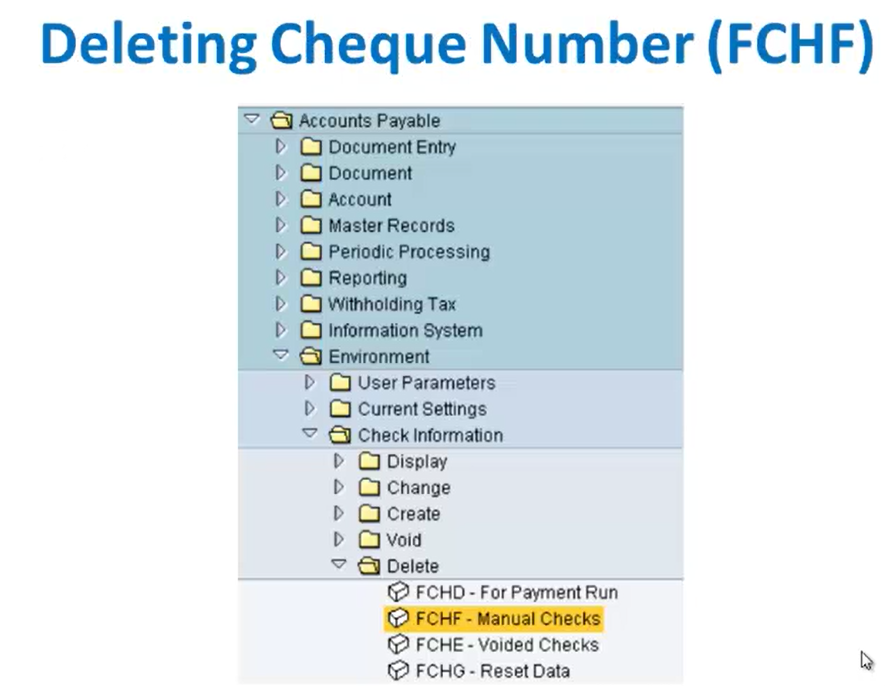
Under FCHF, we have to provide a company code and the house bank details, like the account ID and the cheque number to which the cheque is to be deleted.
Now once we give these details, we click on the execute button, and once we click on the execute button, we’ll get a screen where it will ask if that particular check number should be deleted or not. So once we click on the yes button, it will automatically delete that check from the system and will state a message stating that check information, this particular check number is successfully deleted. This is how we do the deletion of a check number.
Next, we’ll see about voiding checks. Now voiding checks can be done in two ways, either by using a transaction code FCH9 or FCH3. Let us see how to do a voiding check.
Now in voiding checks, if checks that have been utilized needs to be voided then the code FCH3 can be used to void the same. So here we’ll use the company code, bank, and check numbers that needs to be voided. Note that a range range of checks can also be voided through this transaction. So we have to specify a void reason code and click on the icon for voiding. So this is the process for FCH3.
Now if cheques that have been already issued and needs to be voided, then we use a transaction code FCH9. Here, we’ll have to provide the company code, bank and the cheque details that needs to be voided. We have to specify a void reason code, and we’ll click on the icon Cancel Payment.
So these are the two process by which we can do voiding of a check. So FCH3 is used when checks needs to be voided, that is they have been utilized, unutilized. And FCH9 is used when the check has already been issued and needs to be voided. So these are the two processes. So here we’ll use FCH9. This is the SAP menu path for FCH3 and FCH9.

Then under that, we’ll go to FCH9. Then under the Void Issue Checks screen, we have to provide a company code, the bank details, and the check number to be voided.
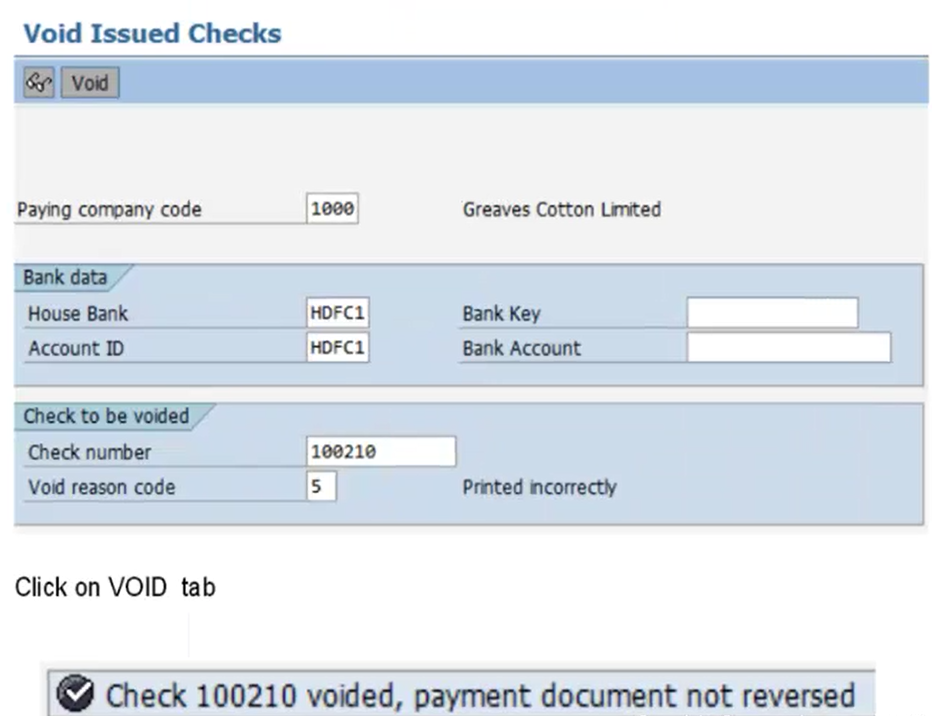
So here we are going through FCH3 since we have a void option over here and under FCH9, we’ll be having a Cancel Payment option over here. So after providing the details for check number and the void reason code, so here this reason states that it is printed incorrectly. So if there is another reason to be printed here, we have to click on the F for help button, which is available here, and we can select the appropriate reason code. So after providing the details, we’ll click on the void button. And as soon as we click on the void button, system will generate a message stating that this particular check number is voided and payment document not reversed. So this is how we can stop the payment, or we can avoid the issued checks.