
Accounts Receivables Configuration (Part 2)
So, let’s enter a credit memo for customer. So, we use FB70 to enter a customer invoice. If you want to enter a credit memo, we can use FB75. And the screens are exactly the same, but it will say credit memo here. So let me choose my company. If you want to post in your company, that will be great. So, we can do it the same time. So, I’m going to use my same sales account, 400,000 for that. And notice that since it’s a credit memo, automatically it’s saying debit, but when we were in the customer invoice, it was saying credit. So that’s automatically done for us, so we don’t have to choose debit or credit. So, let’s go ahead and enter our invoice. Let’s enter it lower than our invoice, and I’ll show you why when we will clear it. So, you know, whatever your invoice amount was, enter something a little lower than that. So, I’ve entered a credit memo for $50 in my company for customer 75.
Thank you for reading this post, don't forget to subscribe!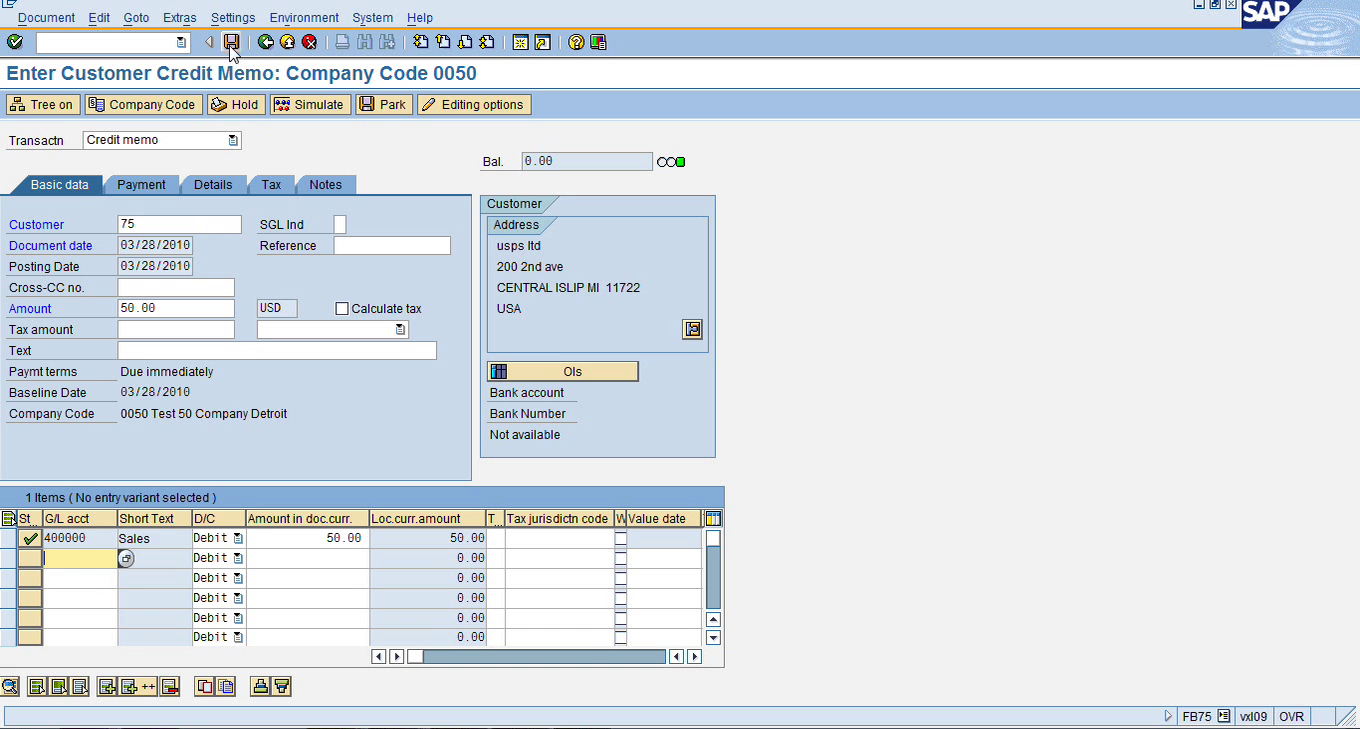
Let’s go ahead and post this.
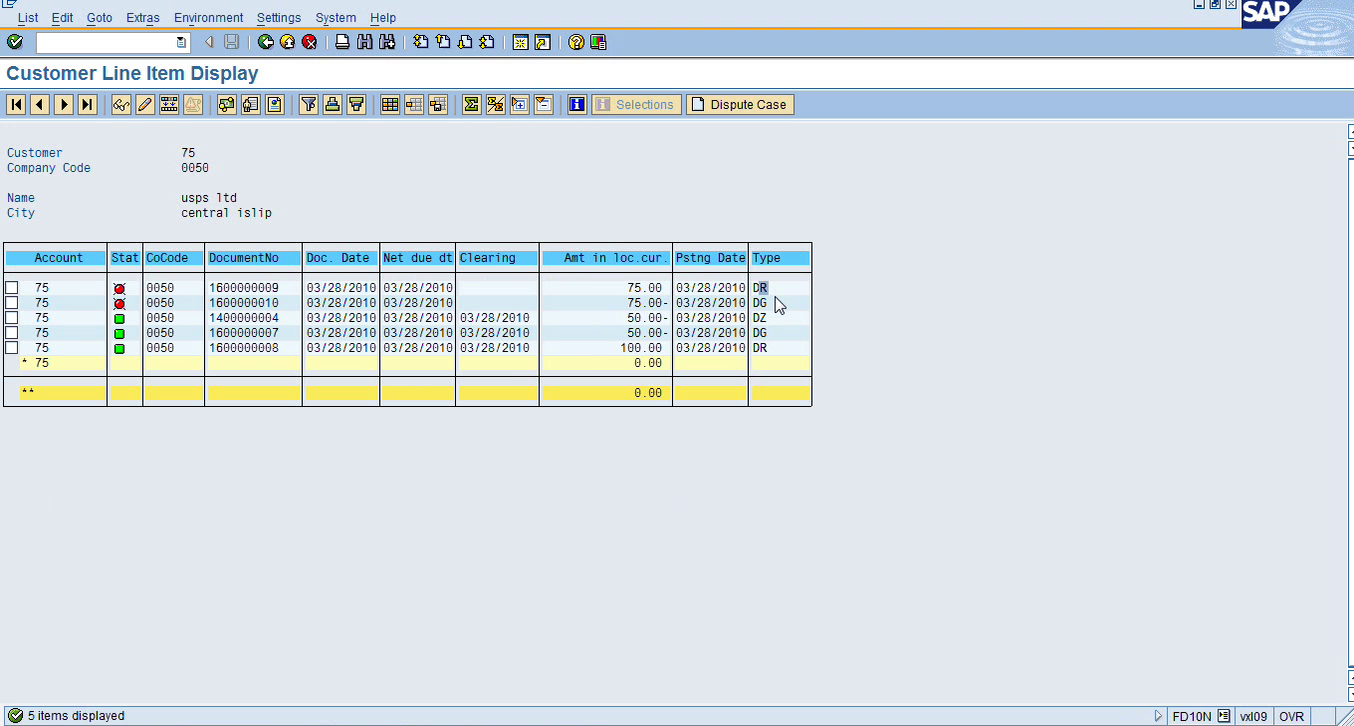
So in my example, I’m using customer 75. So, if you see, I have a customer invoice of $100 and a credit memo for $50 making my net balance for that customer $50.
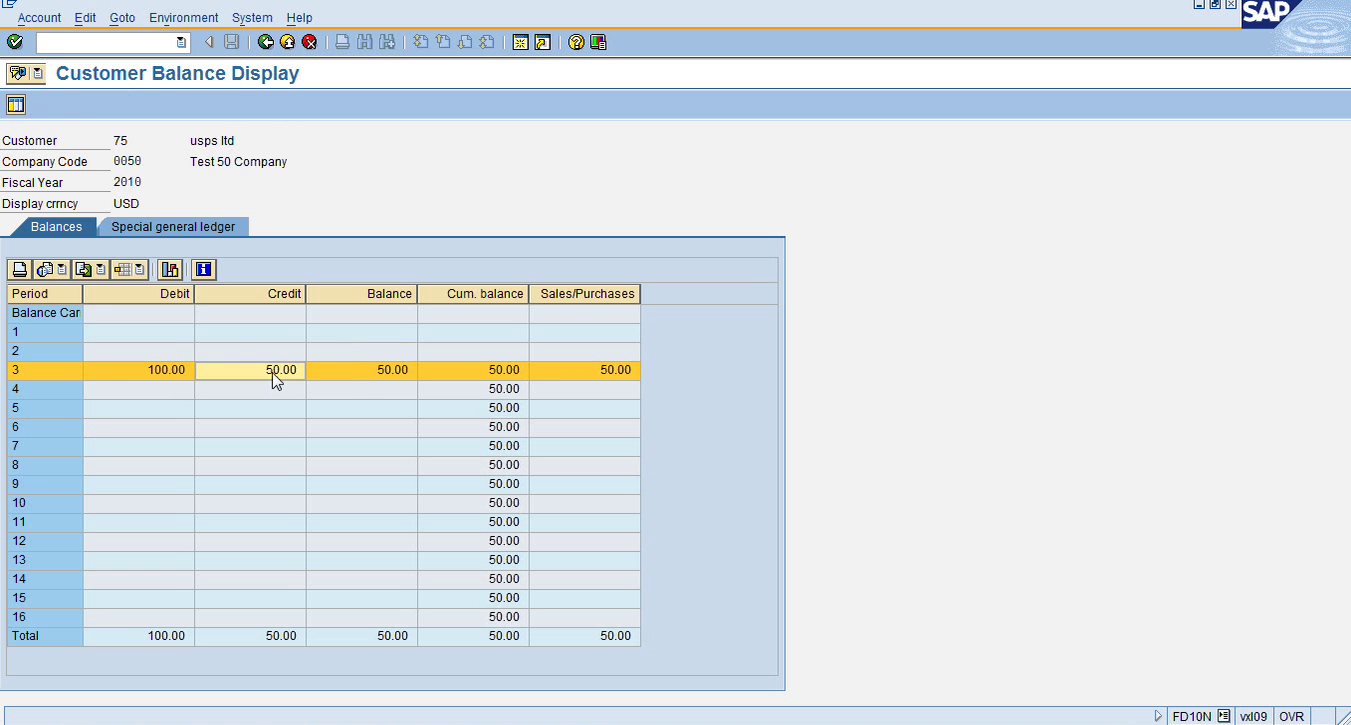
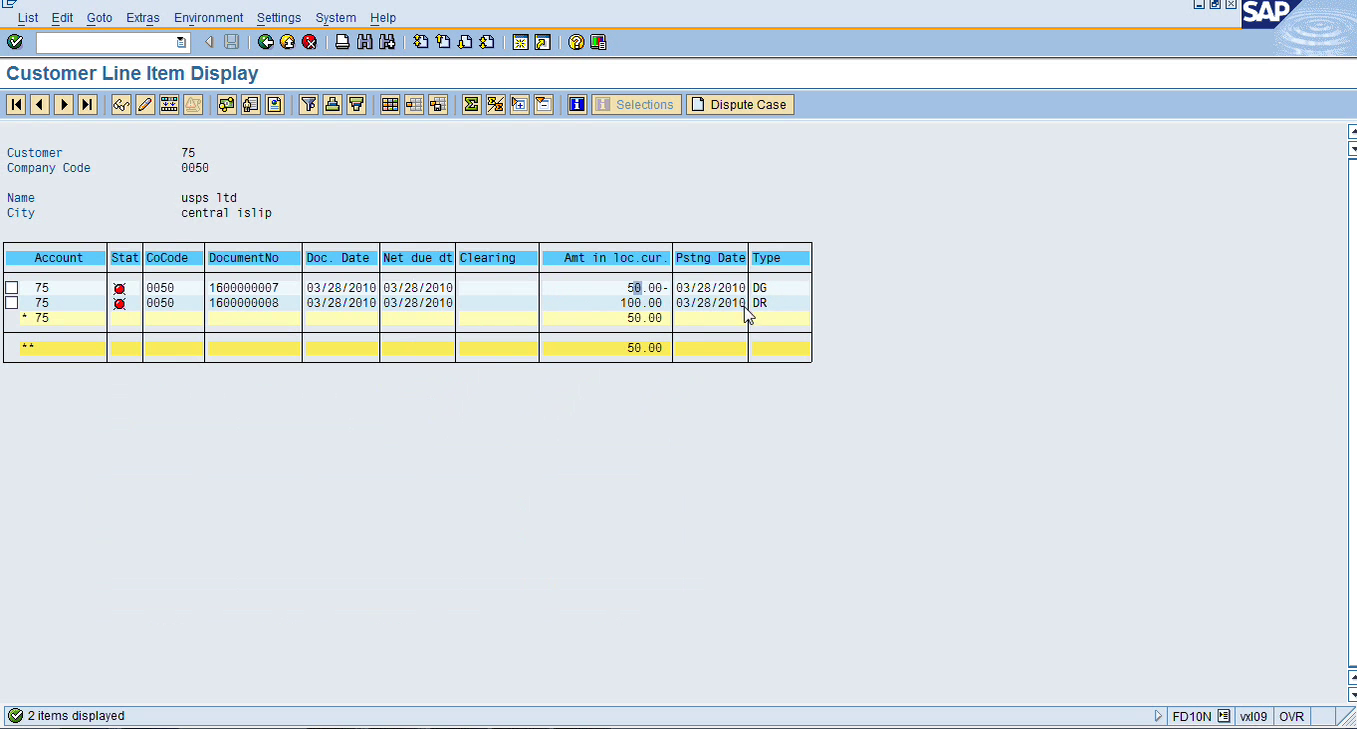
If I double click on the balance, it is showing $50, document type, DG for $50 and document type DR invoice for $100 and the balance is $50.
So, what I’m going to do next, the reason why I entered a credit memo, I want to show you a couple of things.
So, our next step, all of us have entered a credit memo and we have a net balance, what I want to do is, I want to do a payment receipt for $50. Let’s say we receive a check from the customer for $50 and I will show you how to process that and then we will go into the transaction and clear everything. All the line items should add up to the total amount that you have on the header level.
So, let’s do a customer payment. So in my case the net is $50. So, let’s say if my customer sent me a check, and I want you to do the same thing, you do process your own payments. So, I’ll do $50. So, what is the transaction? I believe it’s F-28 here, incoming payment, F-28. And again, this exactly looks like what we did this morning with F-53. These are old transactions, and they all look alike. Instead, here in account type it’s D, but in that f-53, we have K for vendor, here we have D for customer. The rest of the information is the same.. I’ll choose my cash account that I will deposit the money in and the amount; in my case I’m using $50. So, I will search for my customer. Mine was, I believe I was using, 75.

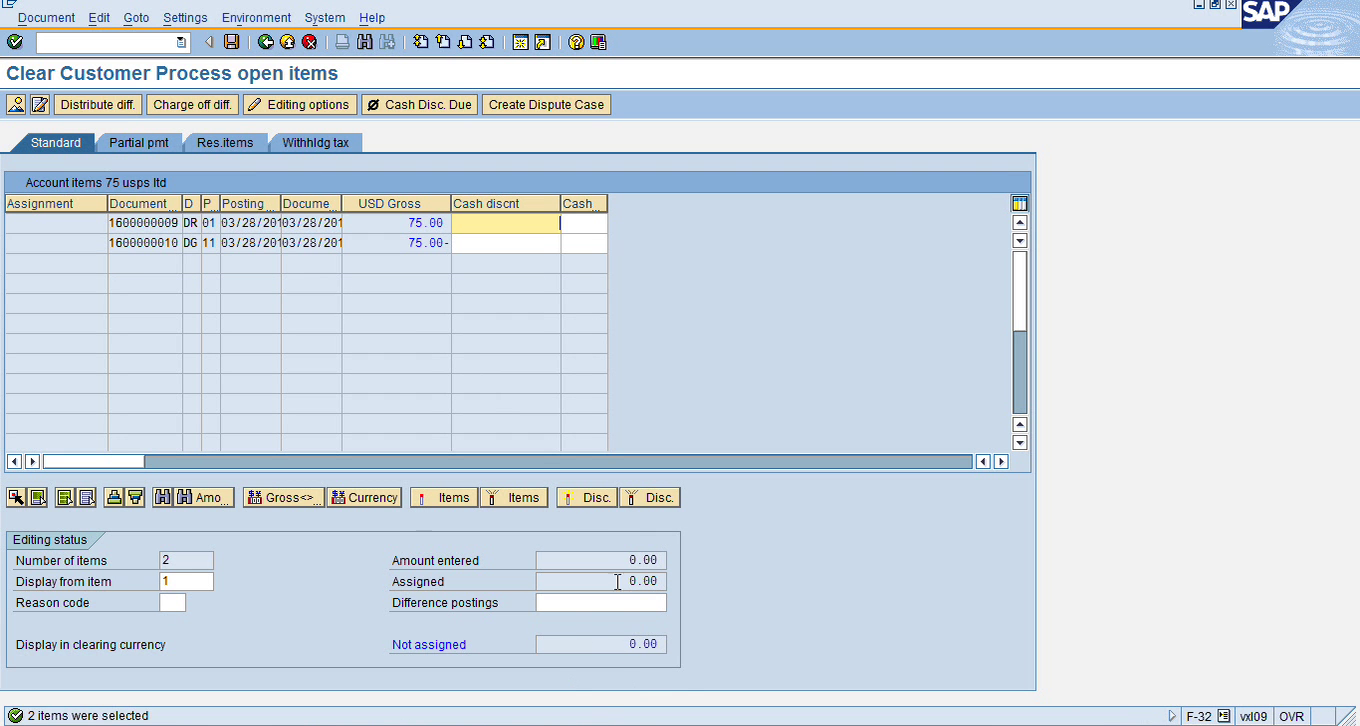
So, you choose your date, company code, make sure it’s correct, and then the cash account and the amount here. And the customer number here, and then it should be D here. Once you have that, then you will click on process open items.
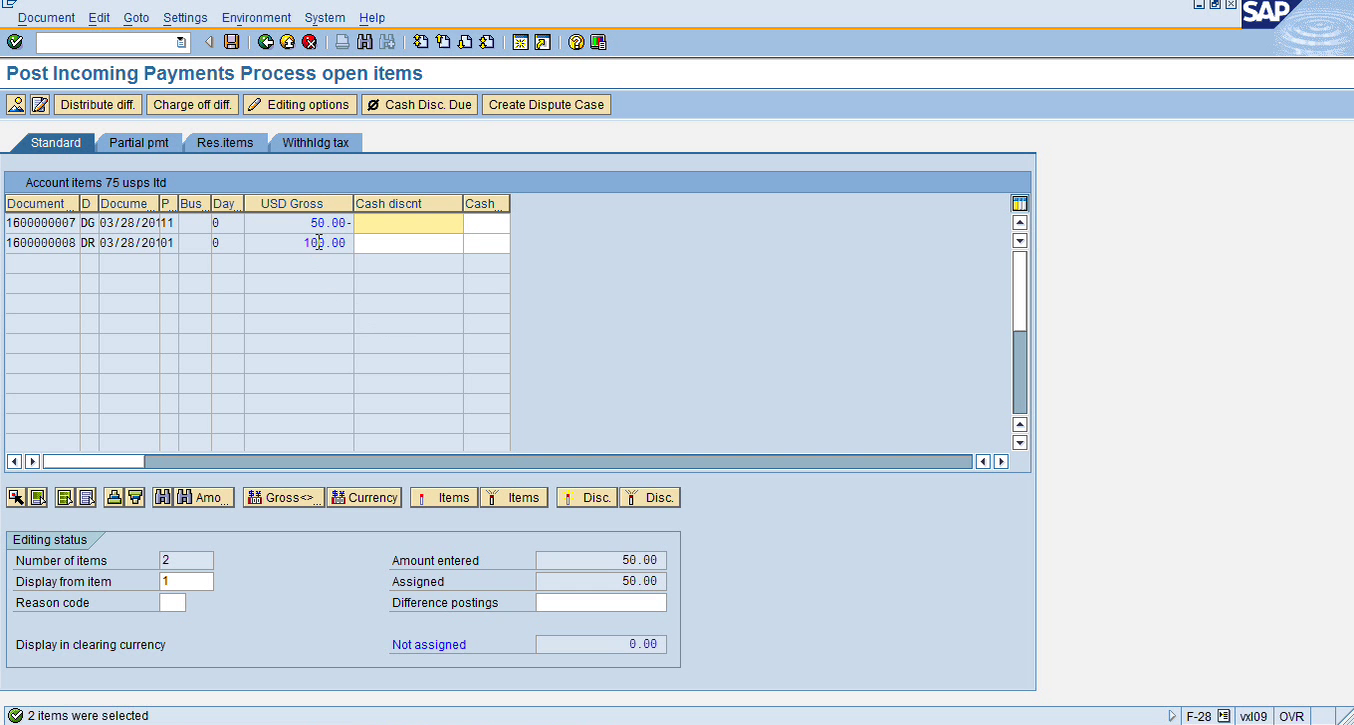
And by default, these 2 are selected, our credit memo and our invoice. And everything is balancing out. It will clear these 2. So basically, this transaction will post incoming payment and it will clear the open items for us. And once I have that, I can click on save, a. And this document was posted, and if I go in FD10N again for my company, I should have a zero balance. And if I click on balance, I should have green light for all the documents.

That’s all we need on this query.
All right. So, and also document clearing, in account F-32, is very similar to what we did in AP, and this is exactly the very same transaction that we have. Let me briefly show it to you. And these are all, you know, if you compare the screens, F-28, they look very similar. Basically, if everything matches, you will have a 0 in ‘not assigned’ and you can post it. If you have a balance there, which means you cannot clear it, but if you want to post the difference to another GL account, you can do that. You click on distribute difference and then it will do that for you. So let me quickly show you, so basically your understanding should be that this account clearing is very much the same whether in GL, AR or AP, just the transaction codes are different, but basically, they are the same. So, let’s say if I have an invoice, Let’s do for 75. In customer 75.
So, first let me show you the balance.
So the balance I have is $75. This is my open item, $75. So, if I go in clear (F-32), I should not be able to do it, because there’s only one item, that is if I do process open, you see now I’ve not assigned a 75.
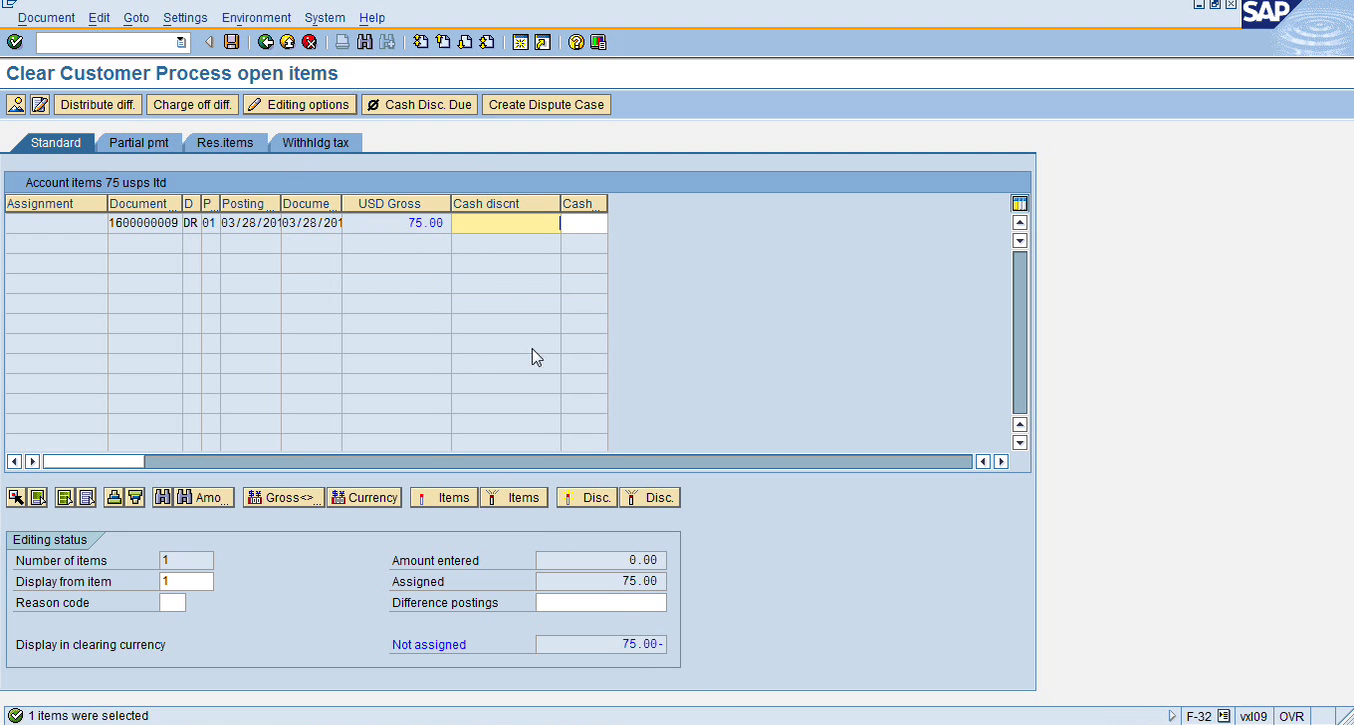
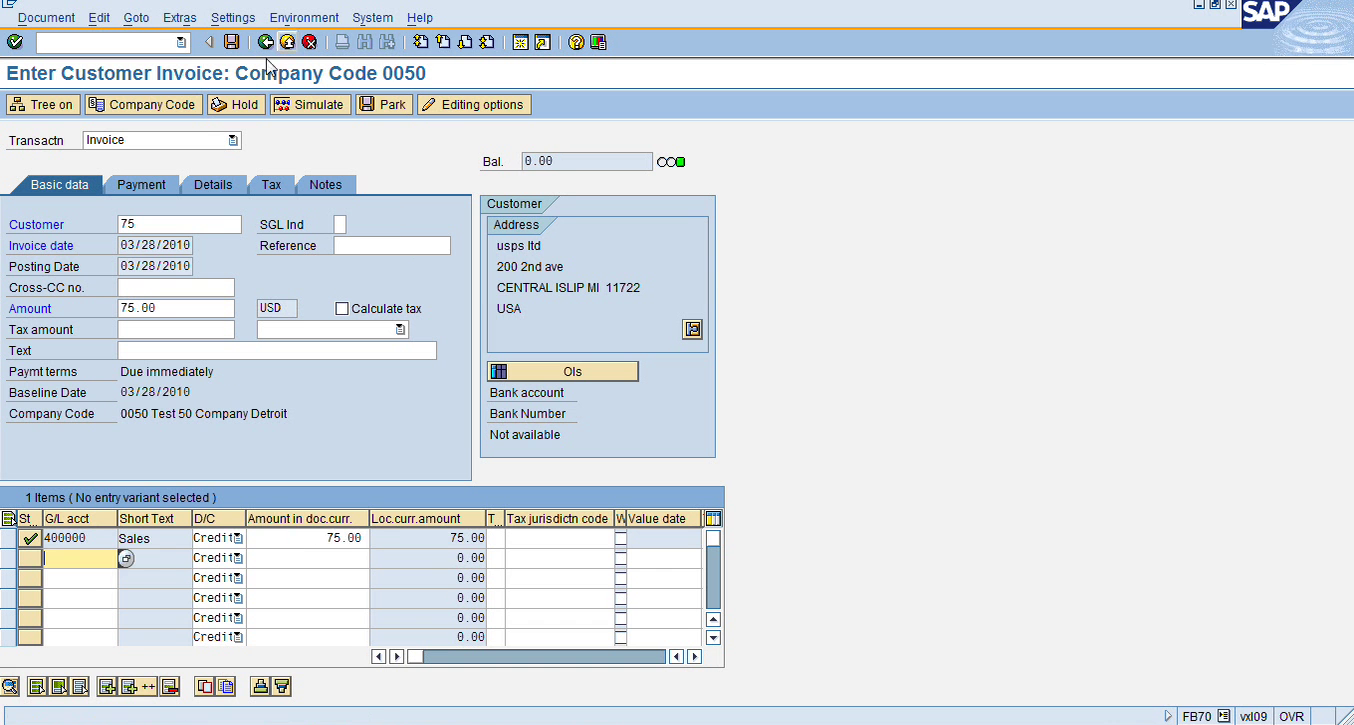
See? Because it is only picking up open items, so I have only one open item, I cannot clear it. If I click on save, it will say “The difference is too large for clearing”, I cannot post it. So, you see the screen exactly the same when we are doing F-28 or F-32. So, there are many transactions in AR, AP, and GL that you will come across this screen, where if you want to distribute the difference, you can click ‘charge off’ and post it to some other account and clear this document. But if it’s exactly matching, then you will have $0 here in ‘not assigned’ and then you can click on post to clear them together, they’ll be cleared. So, to give you an example, let’s post a credit memo for $75 and then we can clear it with no difference. Let’s do it for 75.

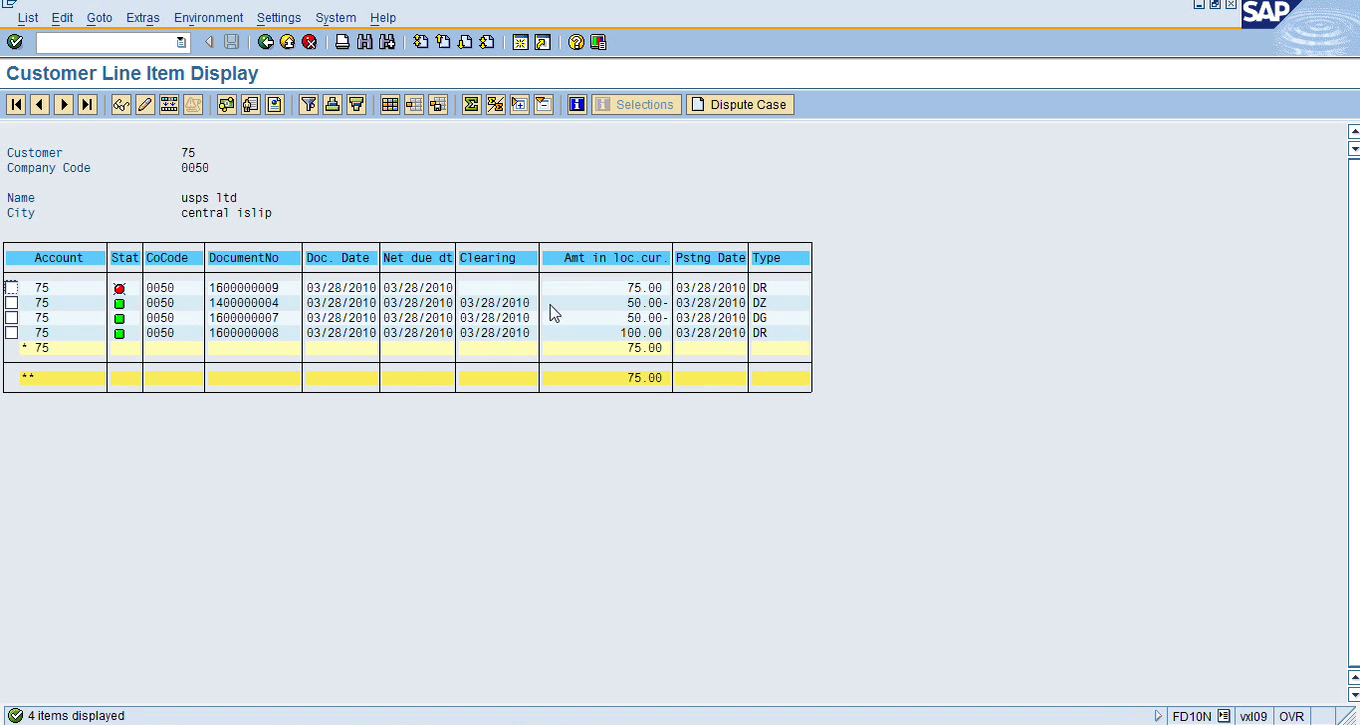
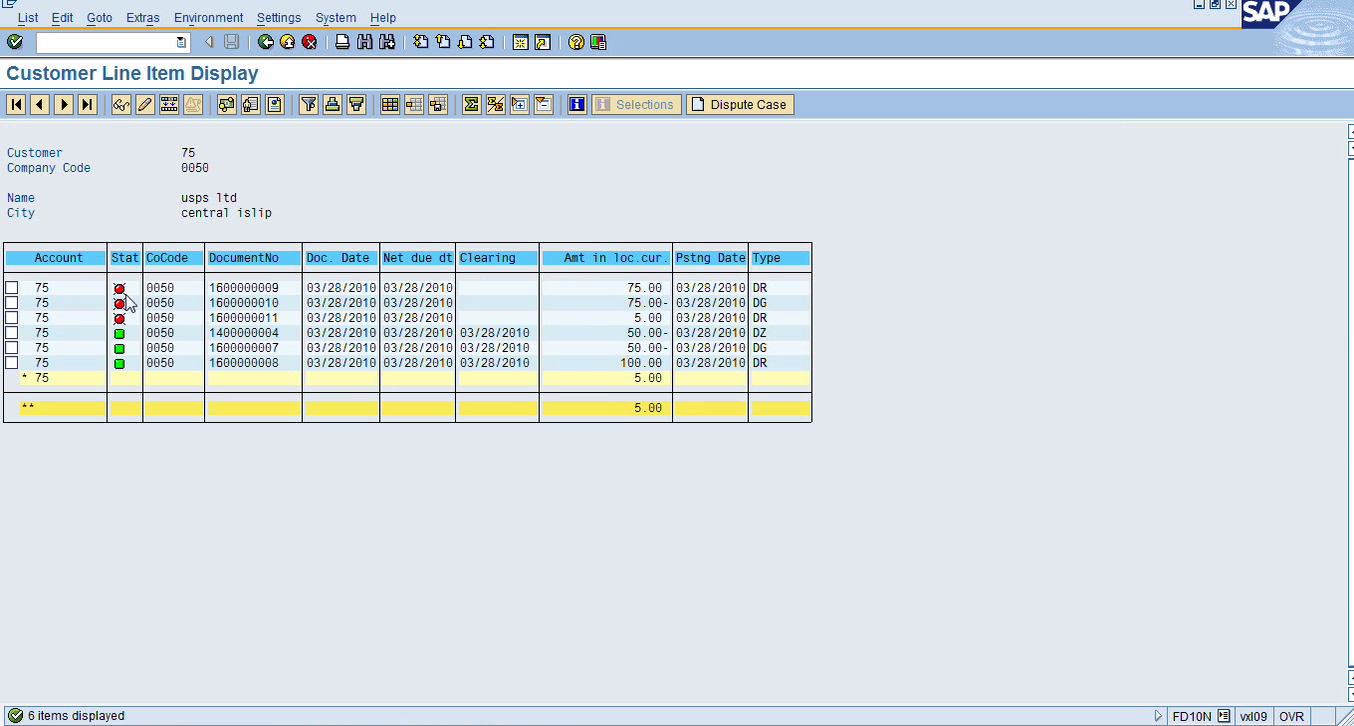
So now if I go in FD10N, my balance should be 0, but I should have 2 open items for 75 here.
1 credit memo and 1 invoice. Document type, DR is for customer invoice and DG for customer credit. So, I have a zero balance, but I still I’m showing 2 open items. I want to clear them. So, I can clear them in F-32. So here I’ll enter my account, click on process open item, and here now I have ‘not assigned’ as $0.
If I click on save, it will match these 2 and it will clear them. But if, for example, they are not matching, I have a difference of a few dollars and my manager says, okay, go ahead and charge it to some expense account and get rid of the open items, then I can click on charge off difference and post the difference to another account and still clear them. So let me do that. Let’s say if I have, invoice for $5, so my difference is $5. So now if I go in FD10N, run it, I should have a balance of $5 and I have 3 open items.
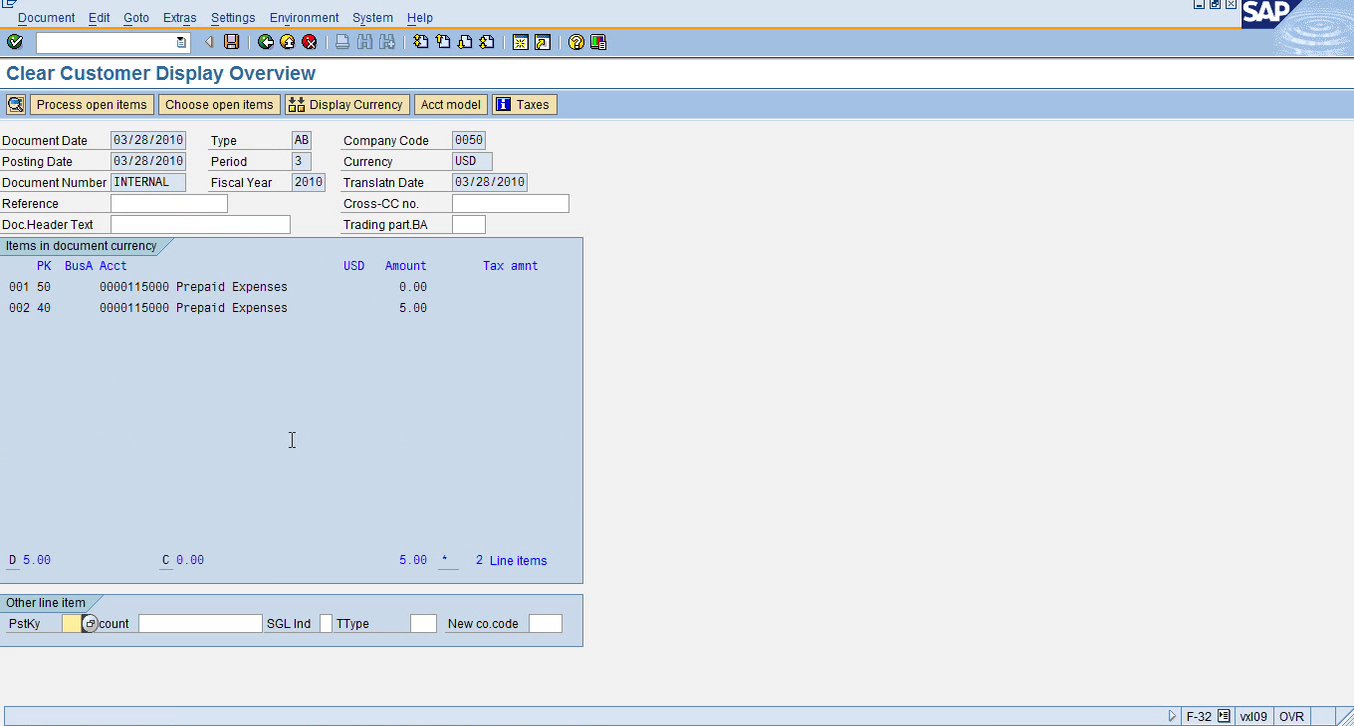
So, let’s say my manager says, okay, go ahead and clear all these and charge this to some expense account and we want to close this account, get rid of the balance, $5. So, let’s say if I have to do that, then I still can go in the F-32 to clear. So now I have I have ‘not assigned’ as $5, so I cannot post it. I have to charge this difference of $5 somewhere. So, let’s do that. I need a credit, so I’ll post 50. And let’s just use the same expense account for $5. So, I have to post this $5 to another account so I can clear these 3 open items. So, I’m crediting 115000 for $5. So now if I click on it, it will show me this.
So now if I post this, now it has posted the difference and cleared it. So now if I go in FD10N, I will have a zero (0) balance, and all these 3 documents are cleared, the $5, and the two $75s. And if I click on it, now I have a zero balance in this customer account. So, there are many ways you can do that. You can also do that with incoming payment of F-32, but the screens are exactly the same when you clear it in AR, AP and GL. When we go to that F-32, in that screen, there is a section called cash discount. We can use that if we have not applied a discount to a customer and we want to reduce their balance. We can do that if we want to distribute the difference, I mean, if you want to apply the cash discount there, we can use that.
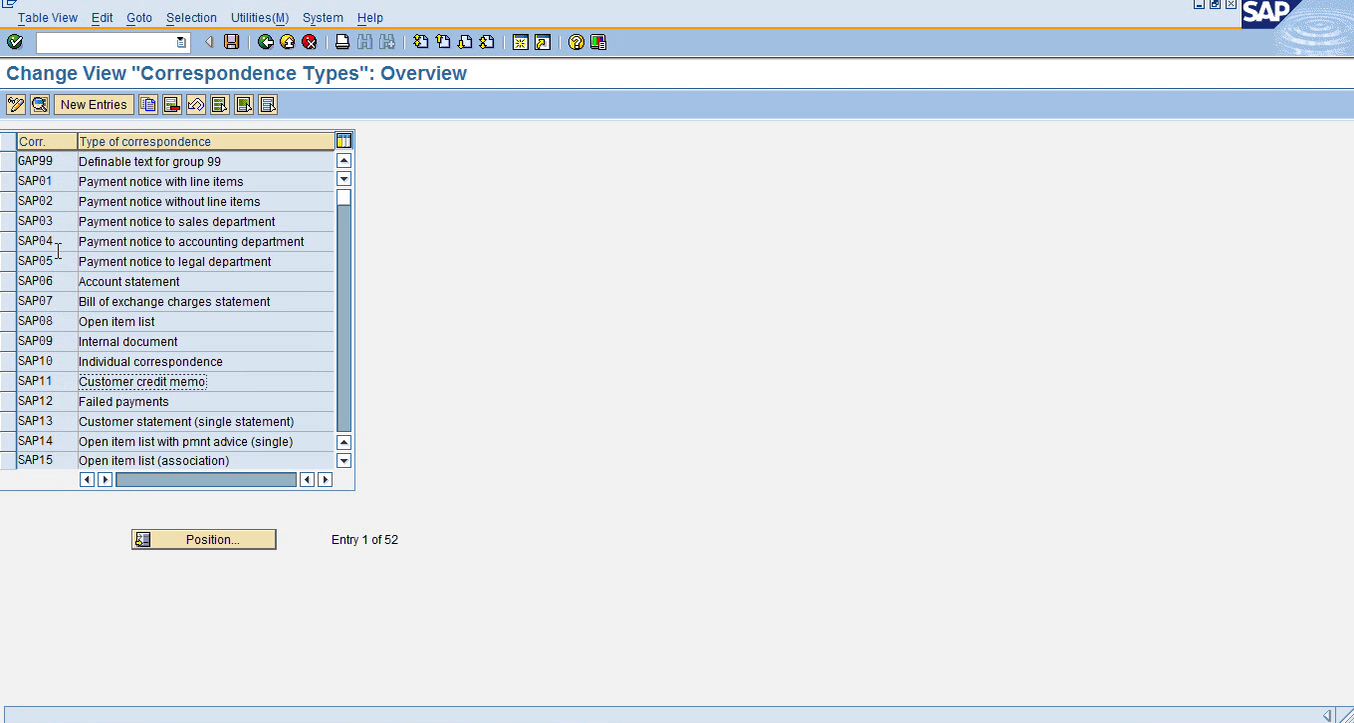
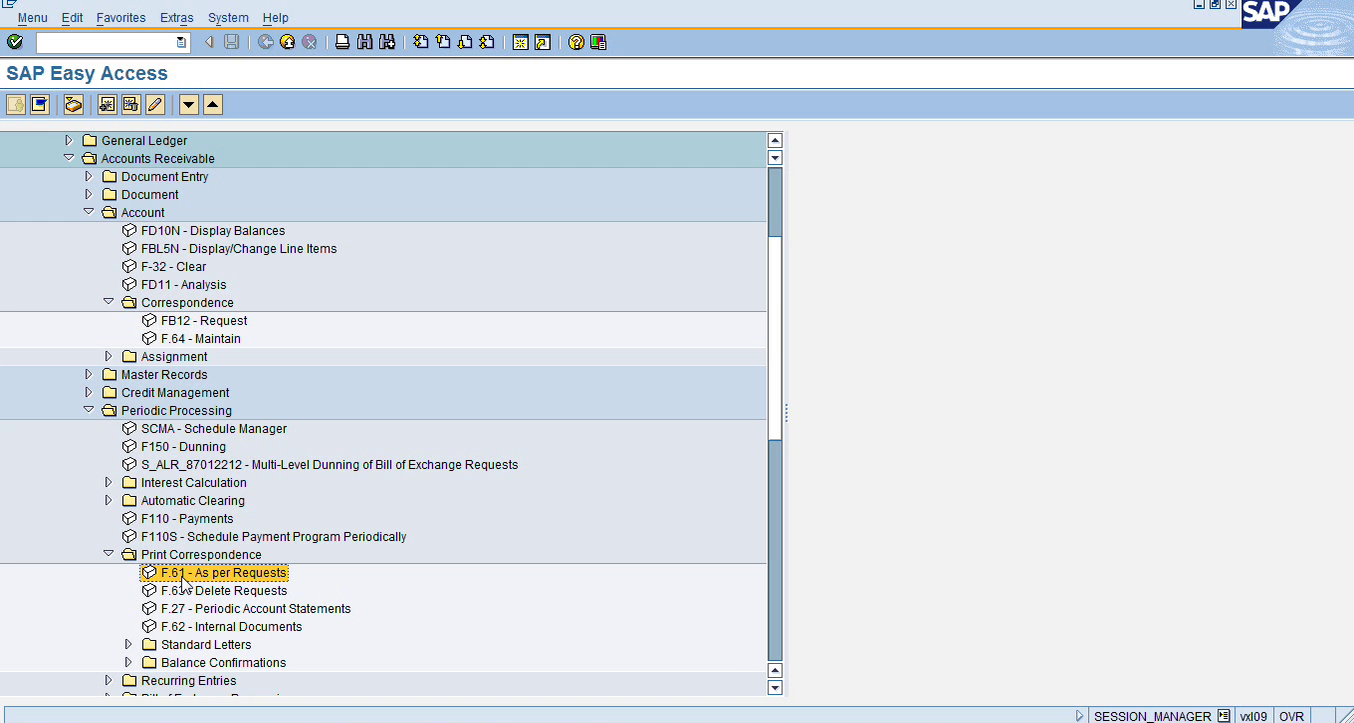
So, let’s go ahead to our next topic, which is Printing Customer Invoices or Statement and sending it, normally like these are mailed, when you enter a customer invoice or you want to mail it to them. So, SAP has a standard form for customer invoices and customer statement and I’ll show you how to configure that. And then when you enter an invoice and then you can print a statement also and then that can be sent to the customer. Let’s go ahead in the config document. Let’s start from Define Correspondence Type. So, in Financial Accounting, ARAP, Customer Accounts, Line Items, Correspondence, and then Make and Check Settings for Correspondence. And then the first thing we have is Define Correspondence Types. So again, when you get this message, “the table is cross-client”, which means this configuration is valid for all the companies, it’s not something that you are doing for your own company. Anything you change here will impact all the companies that you have in the server. So, these are the standard correspondence types and you’ll understand what it means when we’ll process a statement.
So, these are the standard available like payment account statement, there are so many types. But for our test or our exercise, we will use 2 of them. We’ll choose SAP06 account statement and SAP19 customer invoice. And these are standard SAP, we don’t have to configure anything on this step, that’s all the information that is here. So that’s the first step. So, we will use these 2 types. So now we need to make sure they are configured for our purposes and for our company code. So again, we’re using the standard correspondence type but we still have to configure it, basically assign it to our company code, so it is available for our company code. Right now, it’s available for anybody but still you have to go in these transactions and assign them to your company. So that we will do in the next couple of steps.
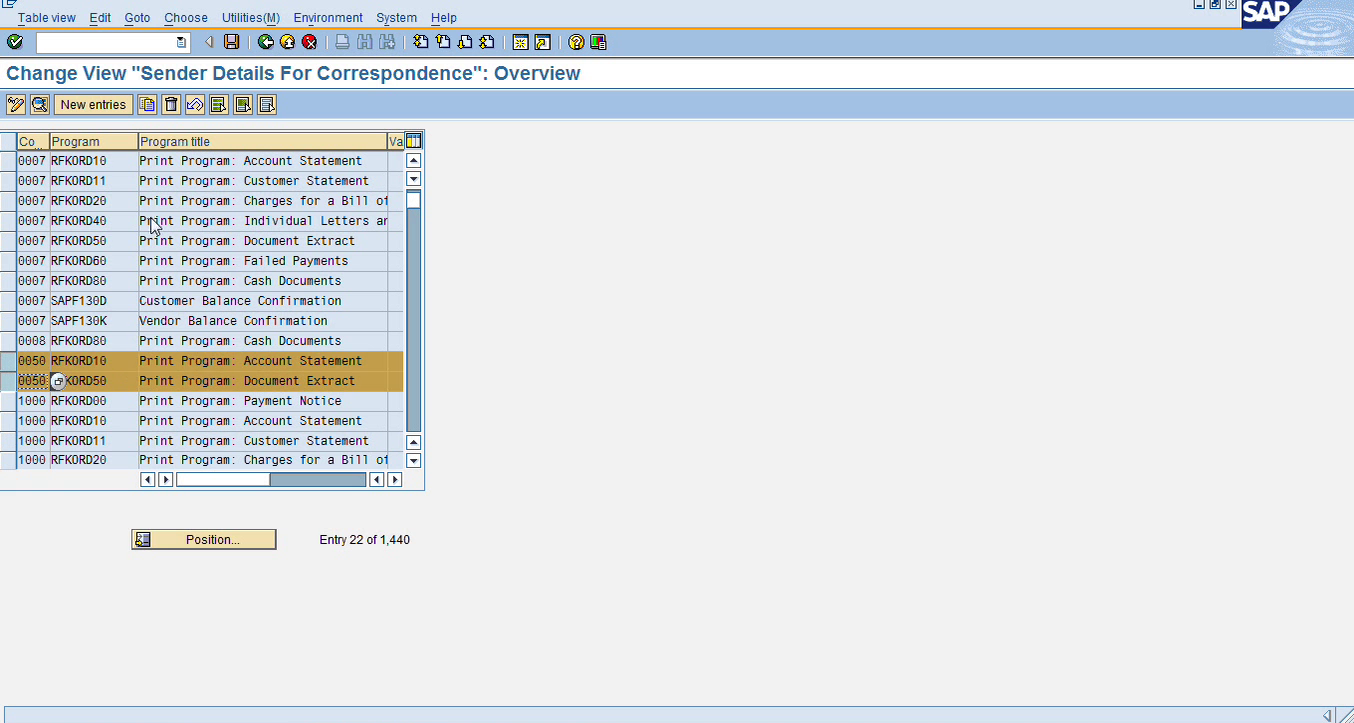
So here we are using Assign Programs, so we are going to the third step. We are skipping second for now, we are going to third, Assign Programs for Correspondence Types. And here, basically, we are assigning an SAP program to a correspondence type, and also based on our company. So, first company code, company code is assigned to the standard correspondence type and inside that, we have the program name. So, in our case, I’ll go to my company code so basically, this you need to do for your company. You can either copy mine and then you can do that or you just create a new one. Create a new entry or copy mine. So, mine will be somewhere here. So, I have these 2; I have the account statement and the customer invoice. So, if you double click on it, it will give you some more information. So, this is the SAP standard program that I’m using for printing the account statement, RFKORD10, and this is my variant.
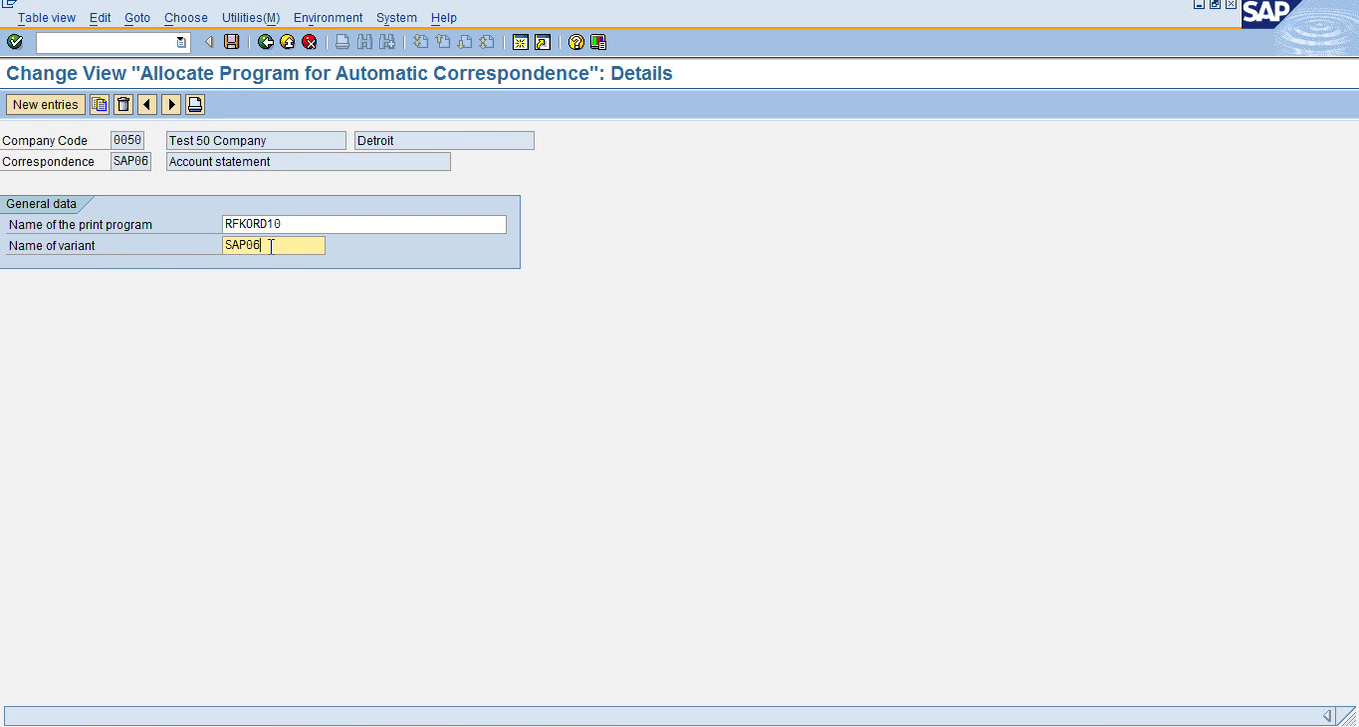
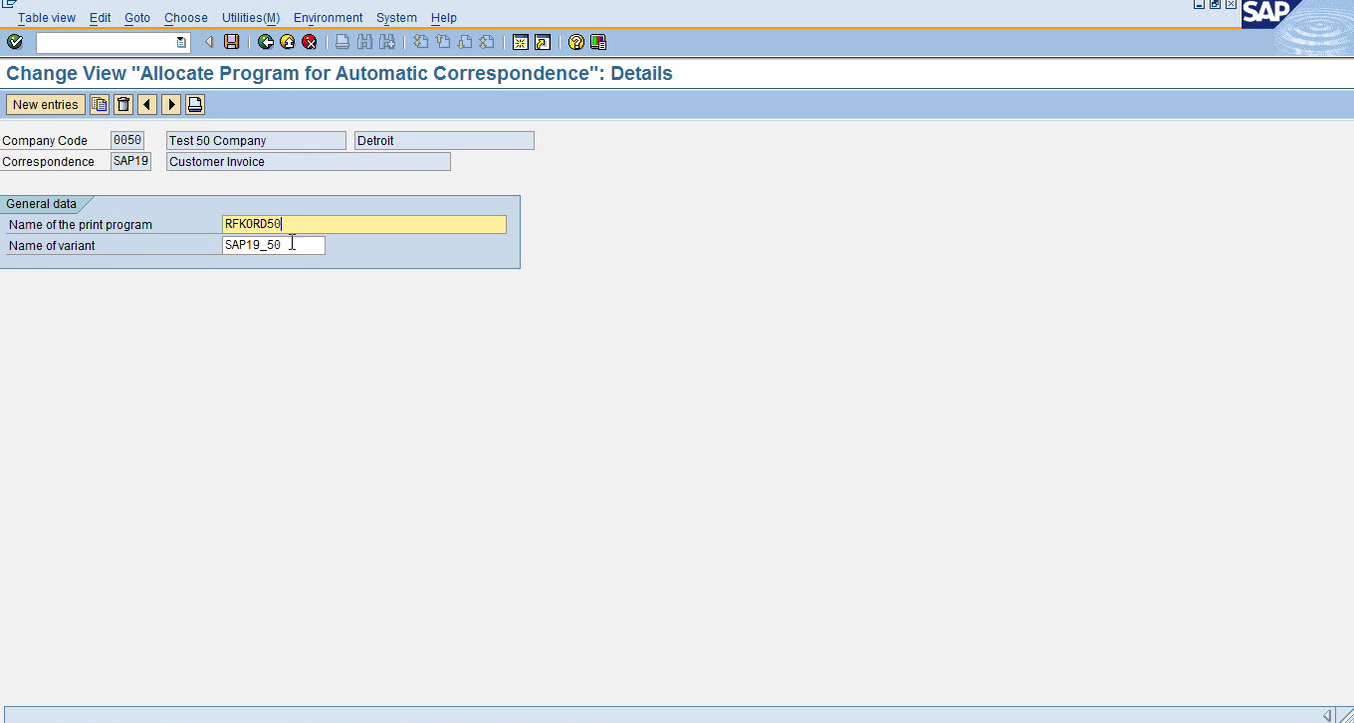
If you want, you can just copy exactly like this and just change the company code here and use that for your company. And for invoice, I’m using this, the second one. And here I have a different program, RFKORD50, and I have a variant for that too.
So, again, it will be easier if you just click on copy and just change the company code to your company and then save it. So that’s the second step, we assign our company code to the correspondence and in the correspondence, we have the name of the print program. Basically, this program will print the customer invoice or the statement.
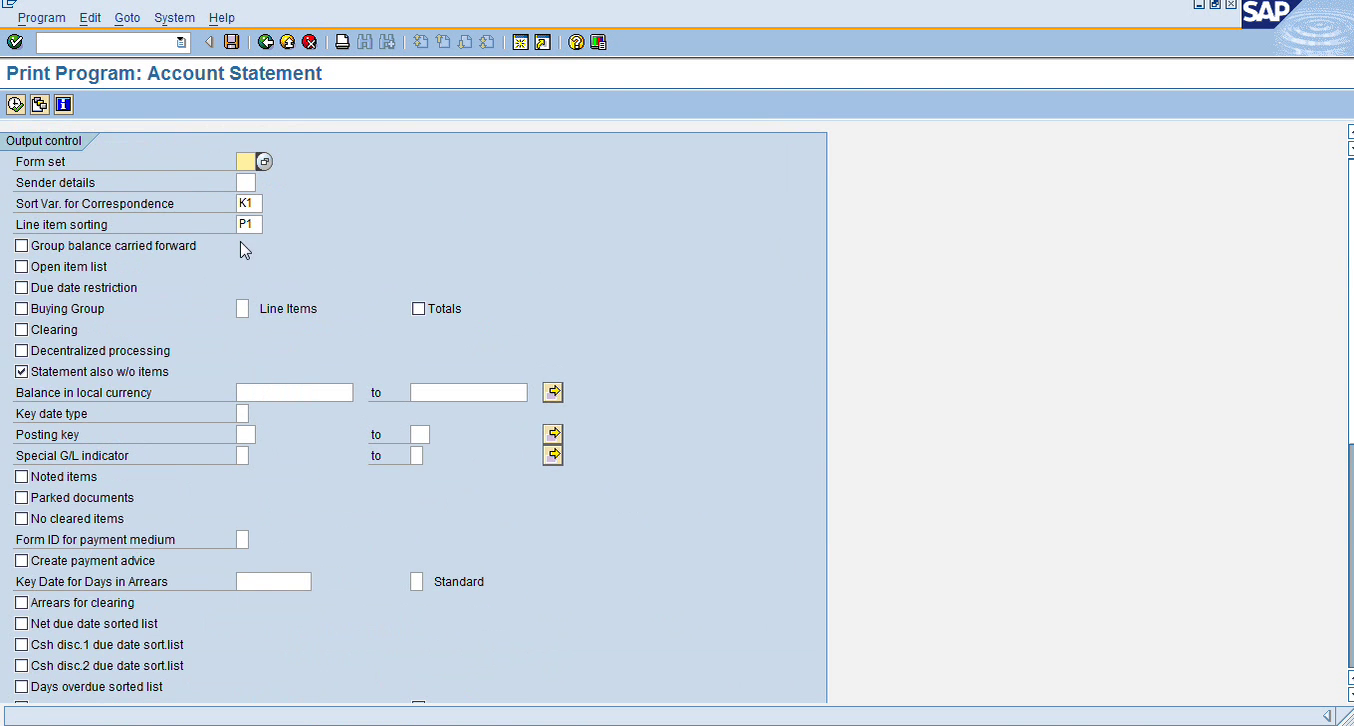
And then we’ll go to the second one, Create Report Variance for Correspondence. So, this will go now after configuring the corresponding types. So here, this step, you don’t have to do it for your company, but I’ll just show you. So, we’re using these 2 programs, RFKORD10 and RFKORD50. So, for ORD 10, we were using SAP06 variant. So, I’m going to open it. I’ll enter the program here, and I’ll click ‘with variant’ and then use this variant SAP06.
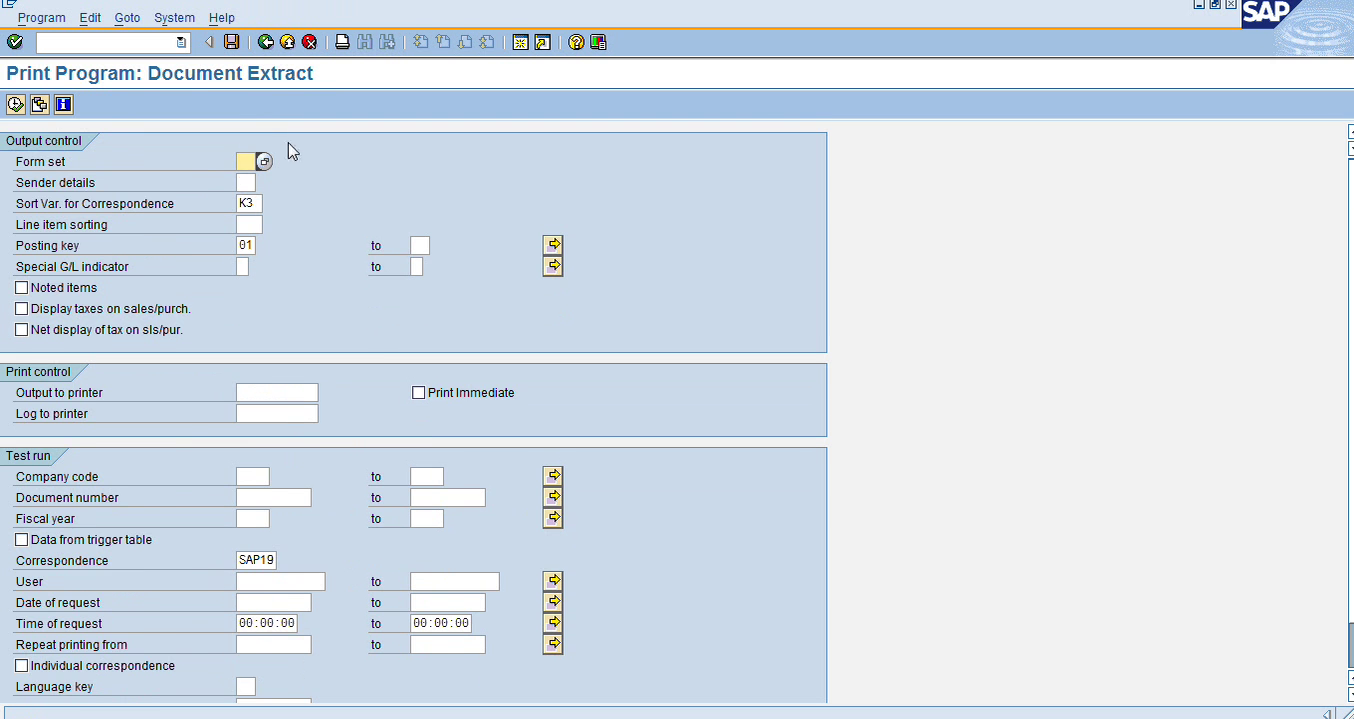
So, it’s basically that I’m asking what type of document to pick up and some information that, you know, so this variant you don’t have to do on this level, but I’m just showing you. So, the 50 program is for invoice, and for that, I have my own variant that, you know, you can also use, SAP19_50.
This is the variant. So again, you have to do the third step, but you can skip this one, Create Report Variance. You should be set; you don’t have to do this. Now, all the remaining steps you will have to do. So, Define Sender Details for Correspondence. Again, this will be assigned to each of your company, so you can just copy mine. So, if I go in 0050, again, I’m assigning my company code to this program and what type of program I have.
You can just copy these 2, just select these two lines, click on copy, and enter your company code and you will be fine. And then you want to use the Determine Call-Up Functions. Determine Call-Up Functions; and, again, you have to do it for your own company. If you go in company 50, I have these settings. You can use that. And I believe that’s it. And after you do this, let me tell you, you need to, if you can, write down the 2 transactions that we will use. So first, let me enter a customer invoice. So, we have an open item, and then we will print that invoice or do an account statement. So, I’m using my same 75, let’s do it for $1,000.

So now I have an invoice for this vendor, USPS. So, 1,000 is open item and 1,000 is open item. So, to print the invoice or to get account statement, I mean, you have to do it in 2 steps and it’s not user friendly and everybody hates that process. And I guess, SAP should do something to improve that. So, you have to first trigger it in one transaction and then you have to go in the other transaction to print whatever was triggered earlier. So, it’s a 2-step process. In one step, you trigger it, and let me show you both transactions. The first step is FB12 in which you request, and the second transaction is F.61.
So, we will use this FB12 first to request the open item for printing and then we’ll go in F.61, as per request. So, these two transactions we will be using. And again, it’s not very user friendly, because if you go in FB12, you need to know the document number that you want, like this document I know is this number. So, this step, if you want, you can skip FB12 and do it from here, from Customer Line Item Display, you can do that. So, it’s easier, I guess. You don’t have to remember the document number. But if you do it from FB12, it will ask you first, it will ask you what correspondence. Let’s say you want account statement, you need the customer number. But if you’re doing customer invoice, it’ll ask you for their number and it’s sometimes difficult to remember to copy and paste. And I’ll tell you how you want to do it. First, you go in the document. Right now, I’m in document, $1,000 invoice. I can go in Environment and Correspondence.
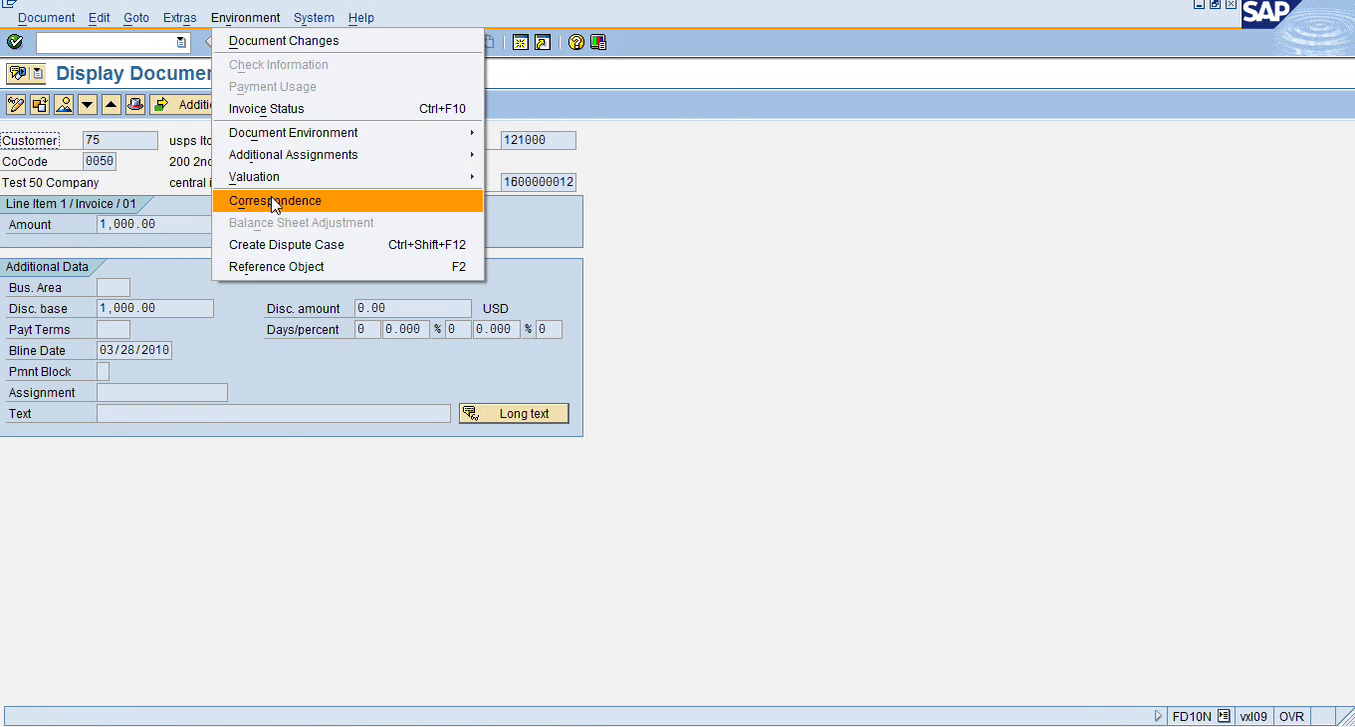
This is the same thing that I’m requesting here, under correspondence. So, I find this easier. Instead of going in FB12, you can go in from FS10N or anywhere else. Go in the document first and then trigger the correspondence from there. So, environment, correspondence, so I get to the same screen.
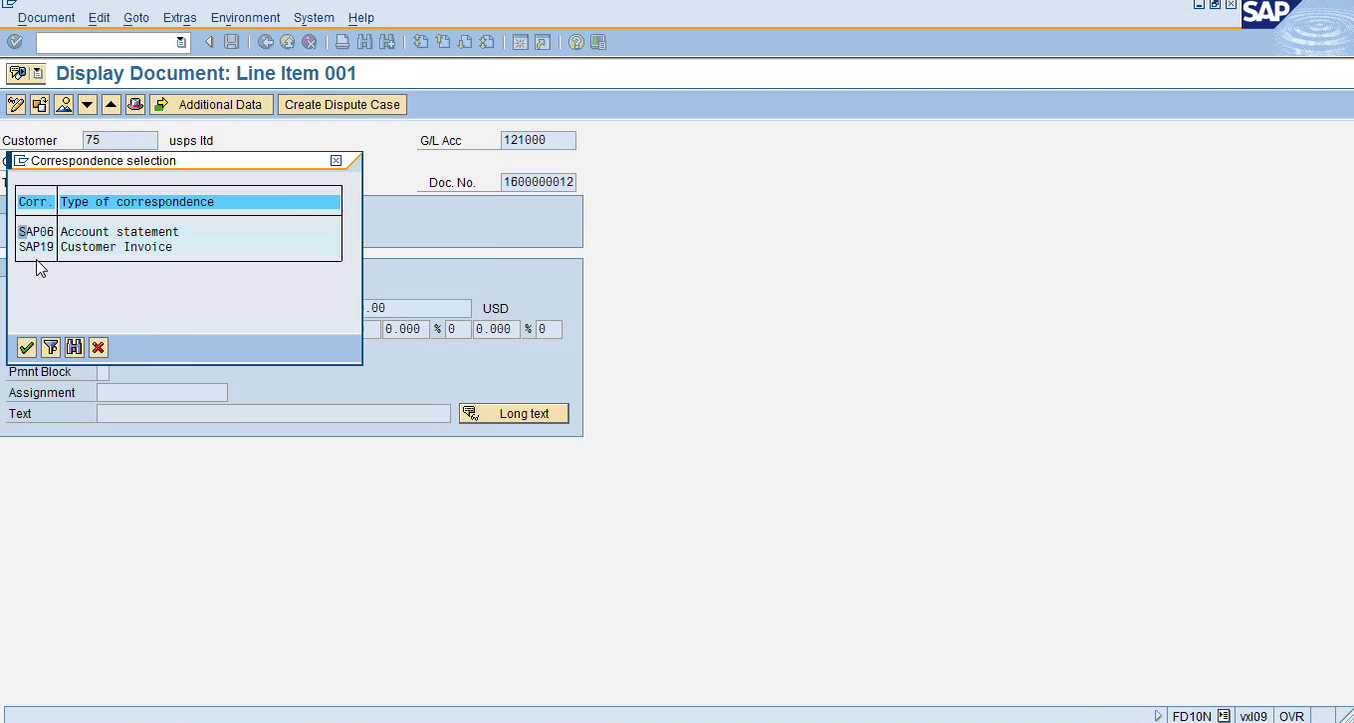
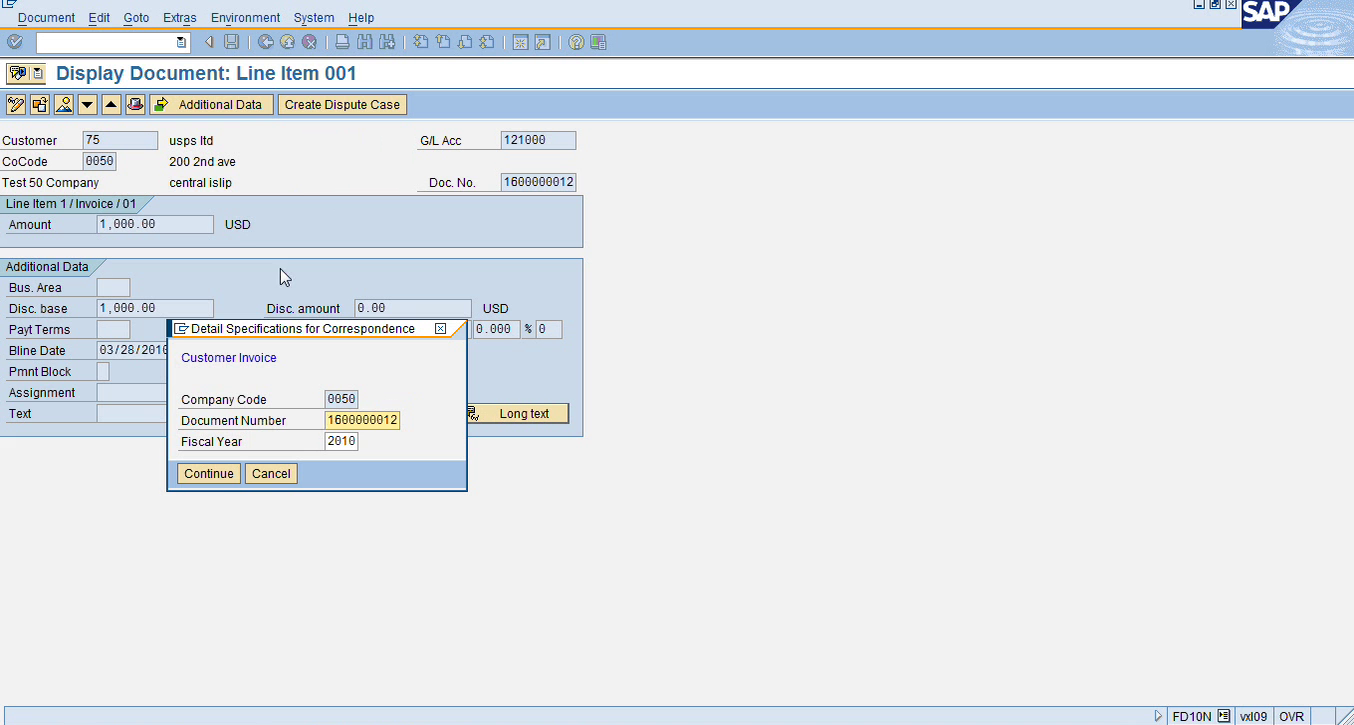
So, let’s say I want an account statement. So, I choose my correspondence type. Remember we configured 2 correspondents. SAP06 for statement, SAP19 for invoice. So, let’s say for this one, I want a statement. So, I’ll just double click on it. So what I did, let me start again. So, I went in FD10N, I double click on my balance to see my open item, and I want to print an invoice for this open item. So, I just double click that open item, then I went in Environment, then I went in Correspondence. Then it asked me, okay, what type of Correspondence are you looking for? A Statement or an invoice? So, I said, okay, I’m looking for a Statement. Then it will ask, from which period to which period? So, let’s say from January to end of March. And then I’ll click continue. This step is done, message: Account statement was requested. That’s all you need on the first step. So instead of doing FB12, we went directly from the document. So, we don’t have to remember the customer number and then the document number. So, this part is done. Requesting is done. That’s the first step.
So, what’s the second step? To print the correspondence. So, I’ll go in F.61. And here I can enter my Correspondence but the easiest way is to enter your Company code. But if you want to narrow it down, you can. You know, again, you enter your correspondence type. But at a minimum, if you enter your company code, it will pick up whatever you have requested.
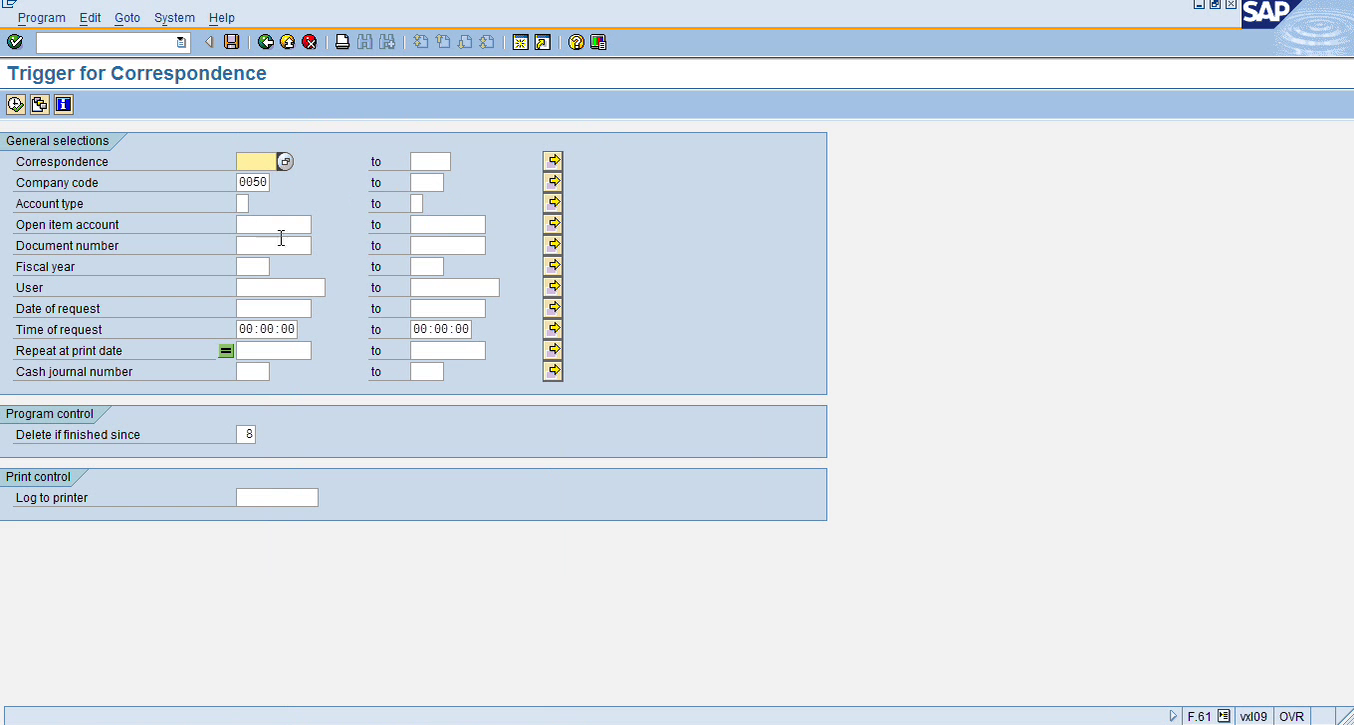
So, enter your company code and click on execute. It’ll say “A correspondence request was selected. Would you like to issue the request?” Yes, Fine. You can click on yes to continue and then you will get to the screen that it has triggered.
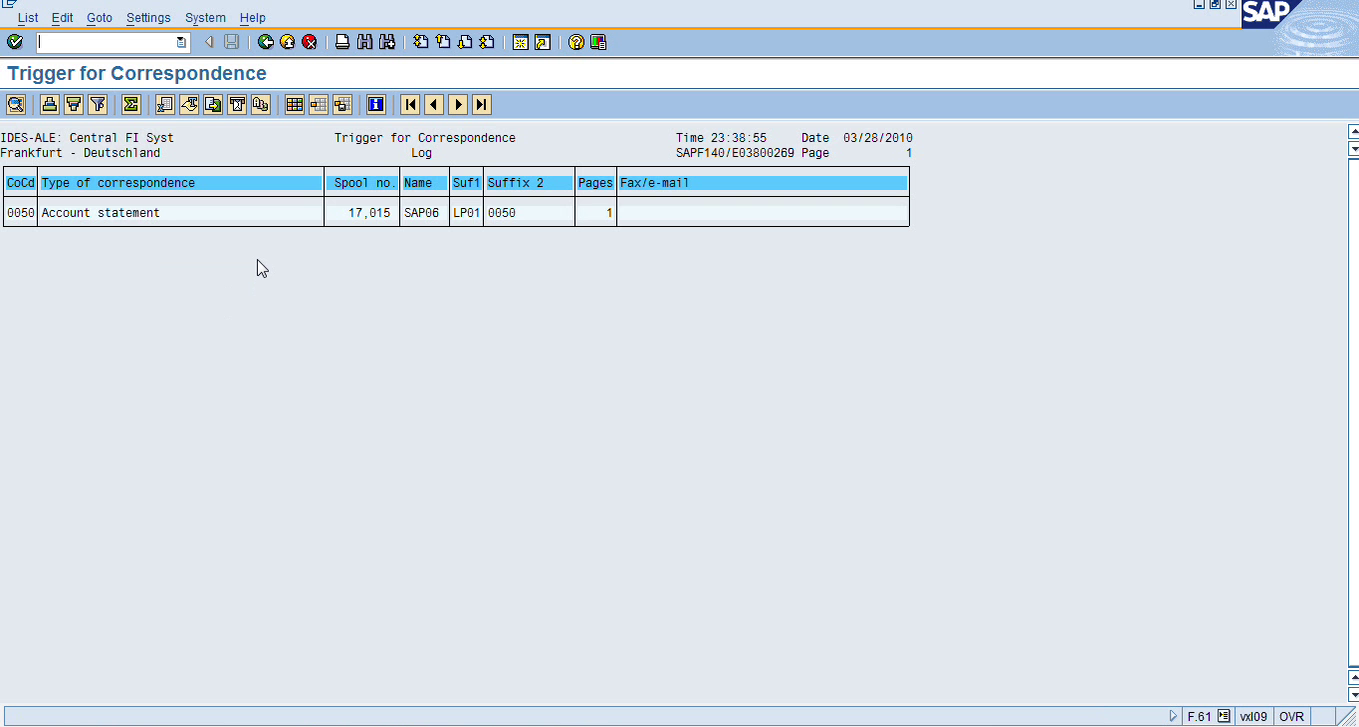
Now the same way as we know that we are not connected to a printer, everything that we print will be saved in our Spool. So, the same way that we did it for our checks, we’ll do the same thing. We’ll go in Systems and we’ll go in ‘Own Spool Request’. And by the way, you can delete all the other ones that you don’t want to view. You can just select them and click on the garbage can and they will be deleted. So, the recent one was this one that is created now. So, I will click on it to view it.
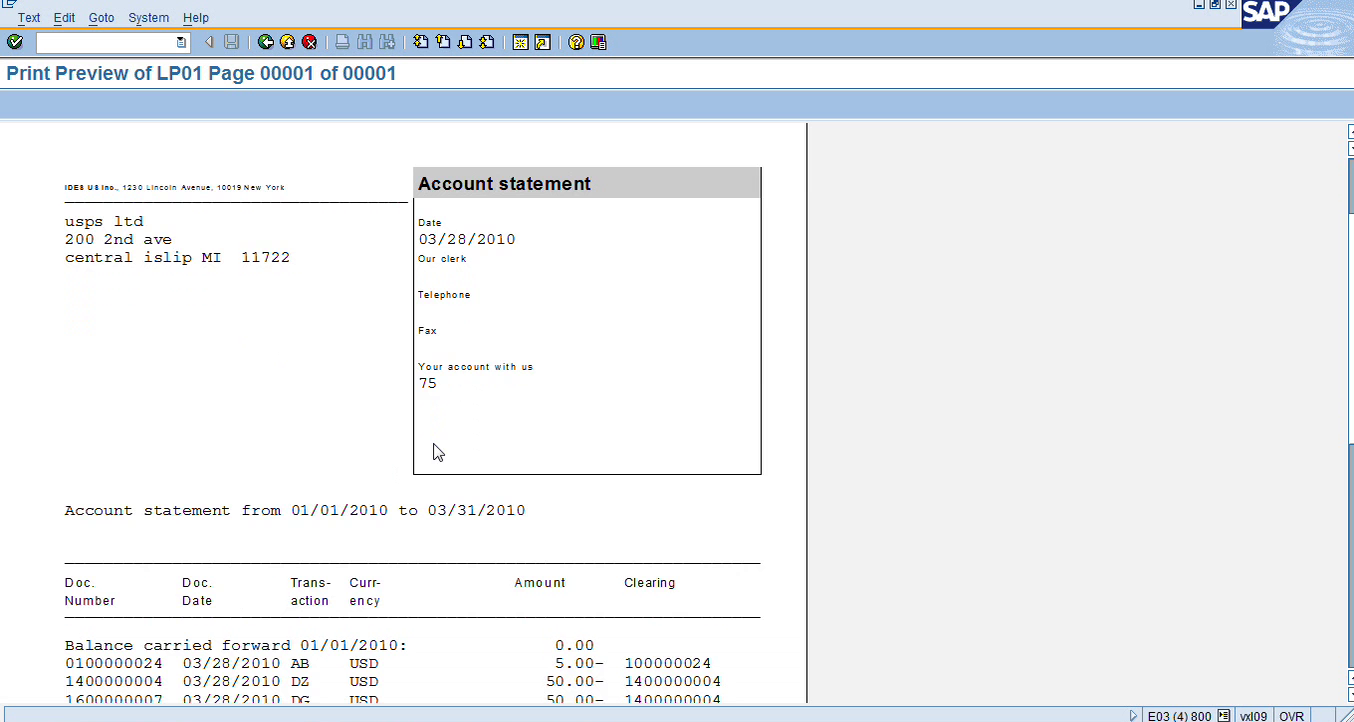
So, this is my account statement from my USPS customer. And again, this information is coming from the master record. I believe Vimby created this. So, it’s coming from the customer master record, the address and the name. This is today’s date. And this is your account with us. Our account number in SAP for this customer is 75, that is listed here. Scroll down, now it is giving us all items, including close, open, everything, and giving us a balance of $1,000.
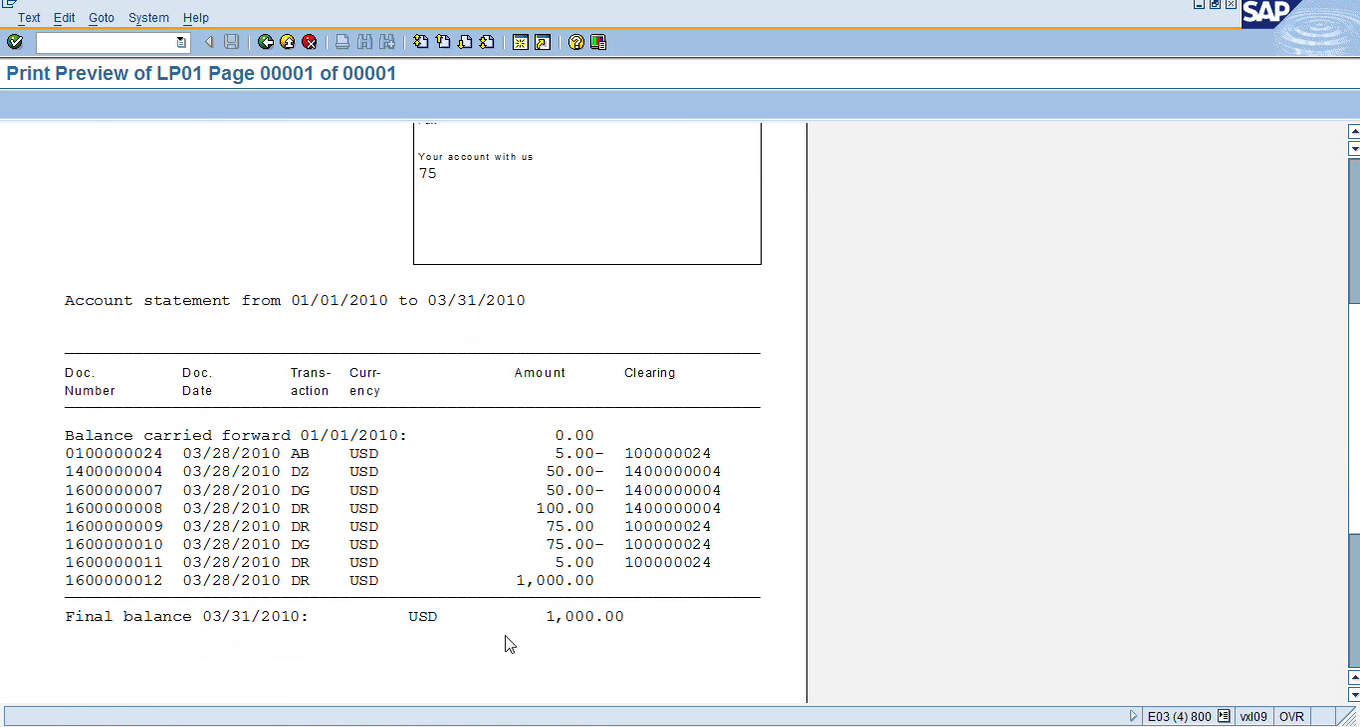
And that’s exactly what we have. That’s exactly what we have here in our balance display, $1,000, and all the items listed here. And this can be printed and sent to the customer or emailed, depending on how you configure it, whatever email address that you have in the customer master record, this can be emailed as a PDF document. You know, you can process all your statement in one shot that it’s mailed to all your customer accounts. So, you don’t have to do a regular mail or you can print all these and then mail them individually. So, this was the account statement. And again, as you know, whenever you click on Spool, it creates a new session. So right now, I have 1, 2, 3, 4, 5 sessions. So as soon as I hit 6 sessions, I will not be able to create any more. So, I’ll just cancel this so I don’t reach the 6th session.
So, let’s say now I want to do a customer invoice. So, I’ll go back from my document and I’ll click on environment, correspondence. So, this time, I will choose SAP19, customer invoice. So now see the advantage now?
It’s automatically picking up the document because I am already in the document. But if I do it from FB12, I will have to copy and paste and it’s very time consuming. So, the advantage of going through the document is it’s automatically there. So, you go and just request it. When we did account statement, it asked us for the beginning and the ending date we needed. But in this case, we want one invoice, just this invoice, so it’s asking what is the document number? I continue and then you get “customer invoice was requested”. So now I go back in F.61 transaction – As Per Request. So again, I will enter my company code and click on execute. “Would you like to issue the request?” Yes. And it’s in my Spool. I’ll click on System, Own Spool Request. So, I have a new item here. I’ll click on that.
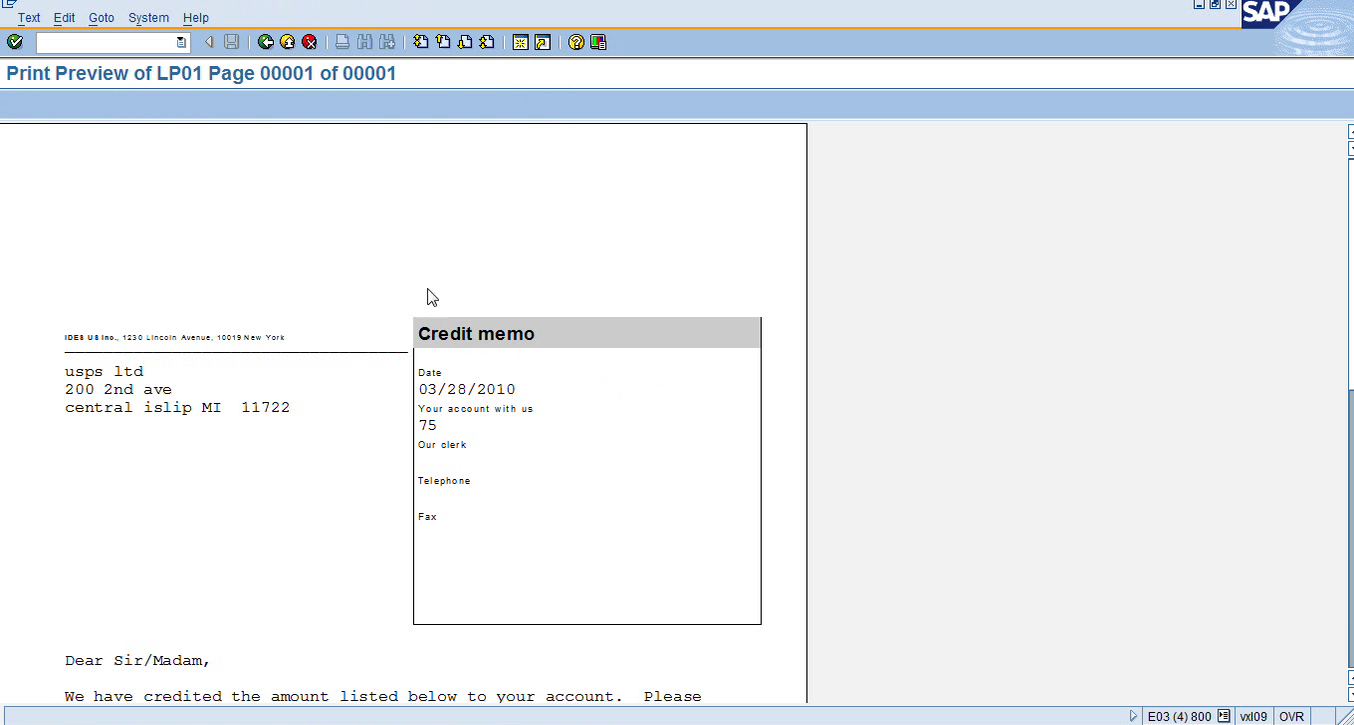
And what you will notice is a credit memo because somebody screwed up with the SAP forms and just switched it. So just ignore that. But normally in the real system it will be an invoice. And again, because it’s a credit memo saying something else. “We have credit amount listed below to your account. Please remember to deduct this amount” because it is treating it as a credit memo. But in the real system, it will be an invoice and it will say something like, you know, “you owe this balance to us”. So, but just disregard, you know, this information, but it should be an invoice. And it is listing us a $1,000 invoice that is open. And this should say your company code name, since we are using the standard IDES, existing IDES Inc., but it should be your company name here. Yours sincerely and then your company name here. And, you know, SAP should do something about triggering invoices. It should not be that. There should be just one button you click and press. That’s it. But it is a long process.