
Accounts Payable Configuration 1
In this class, we will do AP go over AP configuration. So there are 2 steps in AP we will do. One is just the AP configuration setting up the account group, setting up vendors. And in this part, we will enter a vendor invoice and then we will configure the automatic payment program to basically pay that vendor and print checks for that vendor. So that’ll be the second part.
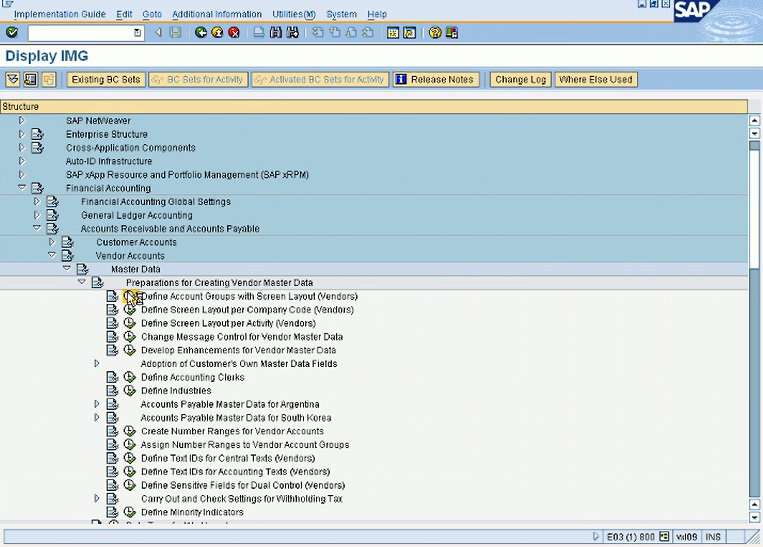
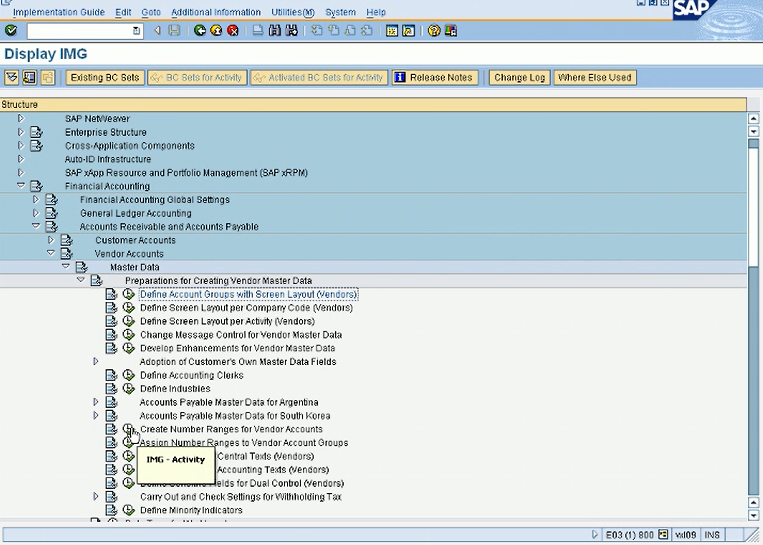
Thank you for reading this post, don't forget to subscribe!So basically, first thing we need to do is define account group. But these account groups are already there. We don’t have to, we can if we want, we can create new groups. Let me go over what a group is. So in financial accounting, accounts receivable and payable, vendor accounts, master data, and preparation for creating, and define account groups.
So let me go in here.
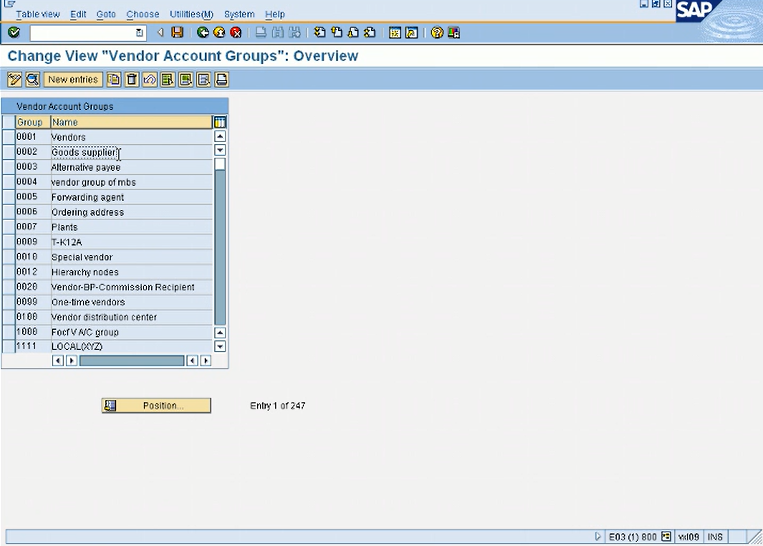
These are SAP given, 0001, 0002 these are SAP given account groups. So what is account group? Basically, if you want to group your vendors, let’s say 0001 are your vendors are your domestic vendors, can be domestic vendors, and you need to separate out for reporting purposes, you want to separate your international vendors, you can create a separate group for that. And also these groups can be assigned to different number ranges. So let’s say 001 is assigned to one series number range. So vendors starting with 1, 1000 are your domestic vendors. Vendors starting with 2 are your international vendors. It’s up to you how you want to define. So basically it’s a very important question if you are working with a company, who you are in the process of going live. So the first thing you need to ask them, you know, how do you want to group your vendors? I know at least 2 groups you need, one is for your regular vendors and one for your employees. Because employees are also vendors in SAP because you need to like for your expense reimbursement, not for your payroll, but for your expense reimbursement you need to get a check from SAP or payment from SAP. So you need to process the payment. So your employees also need to be set up as vendors. And you don’t want to group them in with your regular vendors. So normally your employees should be a separate group and your regular vendor should be one group. But within your regular vendor you can however you want to define your group that will be your business decision. But normally for our test purposes, we will just use this 0001 vendors. But you can also create your own. If I double click on it, it will give me some more information.
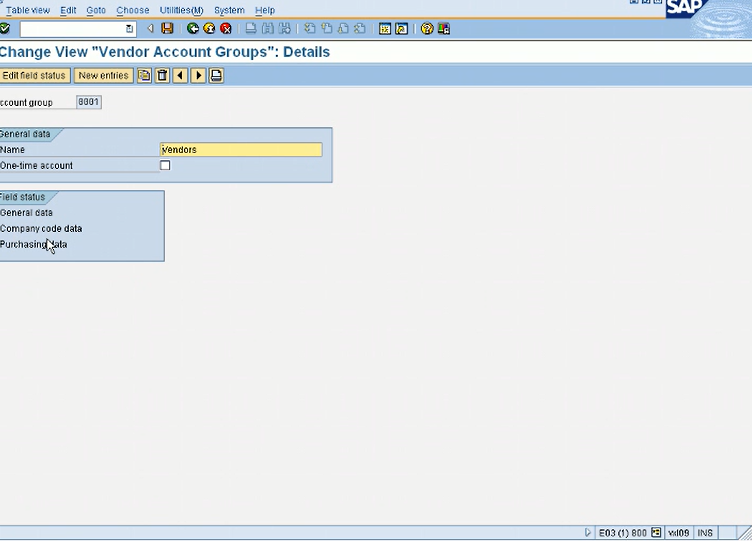
And within this field status field, it will have the required, optional suppressed information within a vendor master record. And I will show you when we will create a vendor master record, some fields will be required and those fields will be coming from here, from the account group. And within the account group, if I click on general data and then further if I click on address, you see that within the address field, that the name field is a required field.
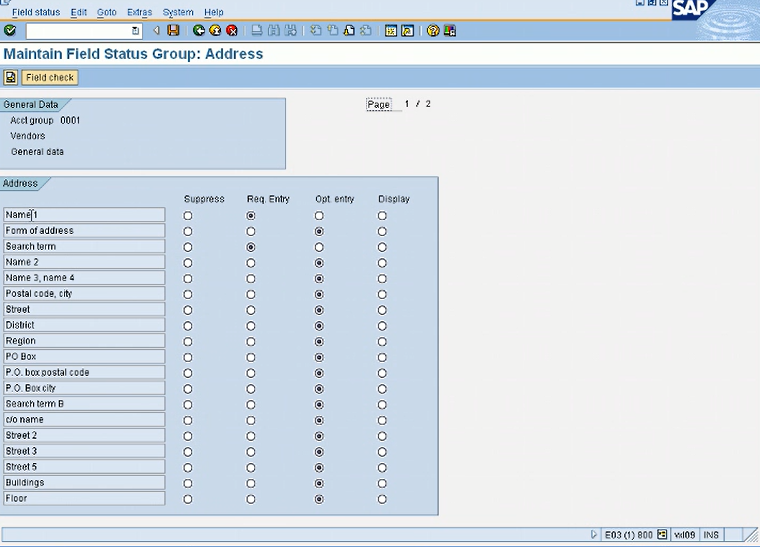
And, search term is required. So these are, like, suppressed required optional displays. Because that’s how you configure it for your vendor account group based on your requirements from the company. If the company say we need, let’s say, a PO box is a required field or a telephone number if I scroll down, it’ll be in the next field here, like communication.
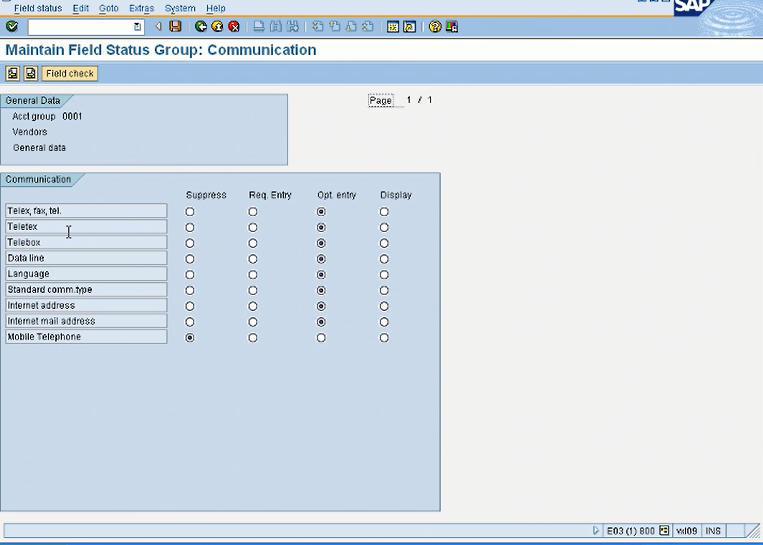
Let’s say telephone, if your company say, we need telephone number in the vendor master. We need we always need that. So you can make that as a required field here. Right now it’s optional. And let me just show you also if I’m just showing you from when I go and create a vendor transaction FK01.
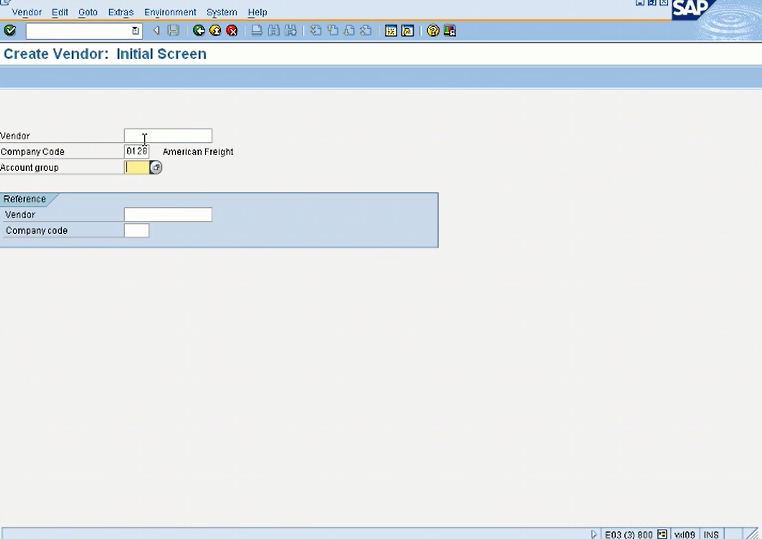
So first thing I choose is account group. Vendor number is SAP given. I will leave blank company code. I’ll choose my company code. And so I’m choosing so here I will see these account groups.
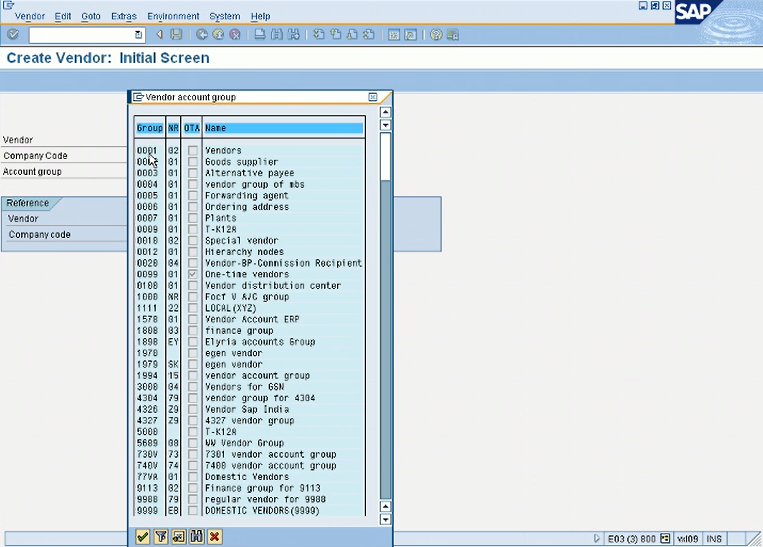
So I’ll choose 0001 that we just discussed. So when I come here, you see this checkbox which means it’s a required field.

And if I come here and if I go in my address, see name 1 is required?
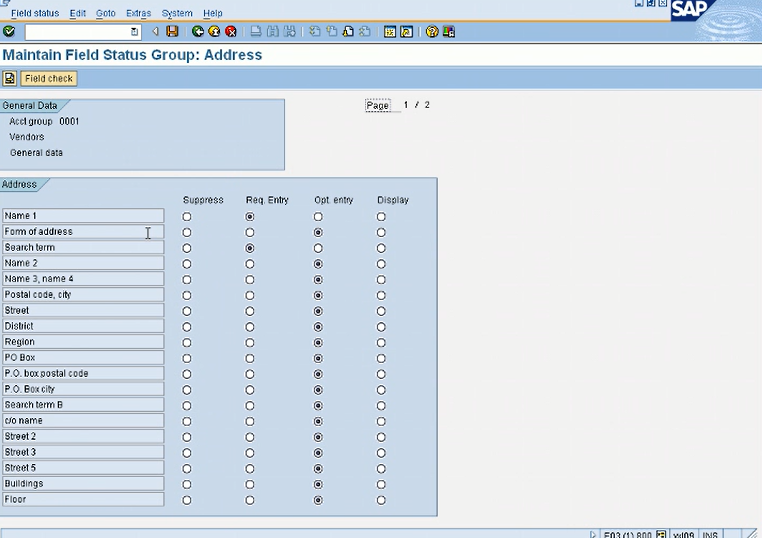
This is name 1 field required field. Search term required field. And then some of the fields are required by SAP that might not be required here. So I don’t want to change that. Don’t change that. So, like, country is coming from SAP because SAP needs the country information, because that will help SAP to determine the taxes and the currency, and also the language for this vendor. So that’s why the country is coming as a standard SAP requirement. So there are and there are like 7 or 8 screens for vendor creation. This is the first screen. And I just wanted to show you that the required information is coming from the account group.
So as you can see it’s a test system. People have created their own vendor groups. It’s a big list. But normally I’ve seen most of the companies will at least use the first one 0001 given by SAP. And then they will create one for their employees and one other for their international vendors if they want. So that’s the first step. So we don’t need to create a group but you can just see the importance of vendor groups. And this is the first thing that you will have to select when you go and create your vendor. So General data will have this information.
Now the second step are the number ranges. So what are number ranges? Just like we did for GL accounts, we gave a number range to an account group similarly to this and to the document we gave number ranges. We have to do the same thing for these account groups. Okay, under create number ranges for account groups.
So now we know that we will be using 0001 account group. So let’s just make sure what number ranges it has. These are all the number ranges. Assign number ranges to vendor account groups.

So as you can see our account group that we will be using will be 0001 and 0001 is assigned to number range 2. As you know, this is a test system, people played around with it. Normally 0001 will be assigned to 01 and 0002 will be assigned to 02. Well, that’s fine. We just want to understand the concept. And what is 02 number range? We can see it here Create number ranges to Vendor Account Group, and if I click on the glasses interval, so 02 number range start with 100,000 and goes to 199999.
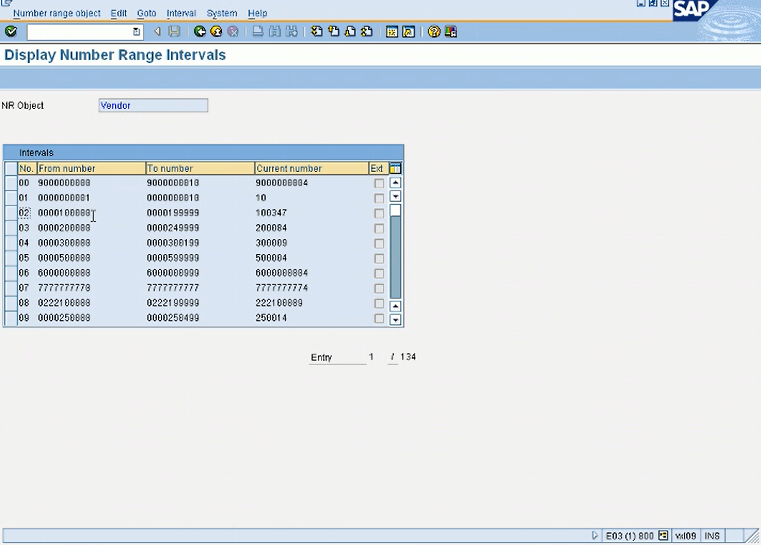
Normally, it’s very clean. 01 is a 1 series range, 02 the 2 series range. But as you can see it’s all screwed up because it’s a test system. But you just need to understand the concept that our vendor group is 0001 which is assigned to number range 02 and number range 02 start with 100,000 and goes all the way to 199999. And this is also giving you current number is 347. So what this means is if I go and create a new vendor, the number that I will get is 100348 because that will be the next number. So these number are SAP given. But if I check External here then I can name my own number within this number range. But that will be very messy because it’s very hard to maintain. If you are using your own number, the best practice is leave it unchecked and let SAP give you the next available number. You only define the number range here. And also keep in mind if you have a separate, like account group, for your employees you can assign a separate number ranges. So like what we do in our company for employees we have a separate group which is assigned to number range 05. So we start with 500. So we know if a vendor number starts with 5, it’s the employee account number, and if it starts with 1, it’s our regular vendor. So that’s how you do it. So basically, again, account groups are assigned to number and number assigned to number ranges.
If you go here, assign number ranges.
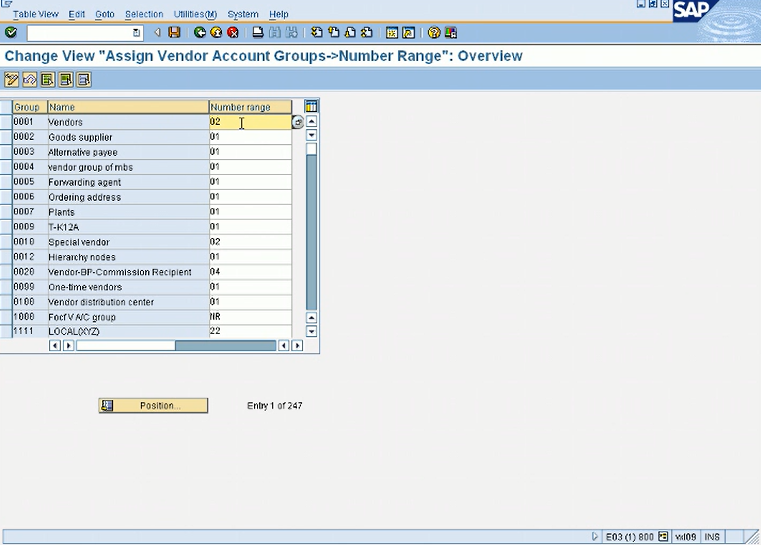
So number range 2 is assigned to our vendor group. And you will see this concept everywhere. You will see this concept in accounts receivable. You will see this concept in document number ranges. So, you know, SAP wants to create a process, they use it in multiple places. You will see this concept in, other areas too. And AR accounts receivable is just a copy of accounts payable. So whatever we are doing, we will do the same thing in accounts receivable. So we are ready to create a vendor account. And I’ll show you.

So company code 0050, account group 0001, and leave the vendor field blank because we want SAP to give us the vendor number. And I will press enter.
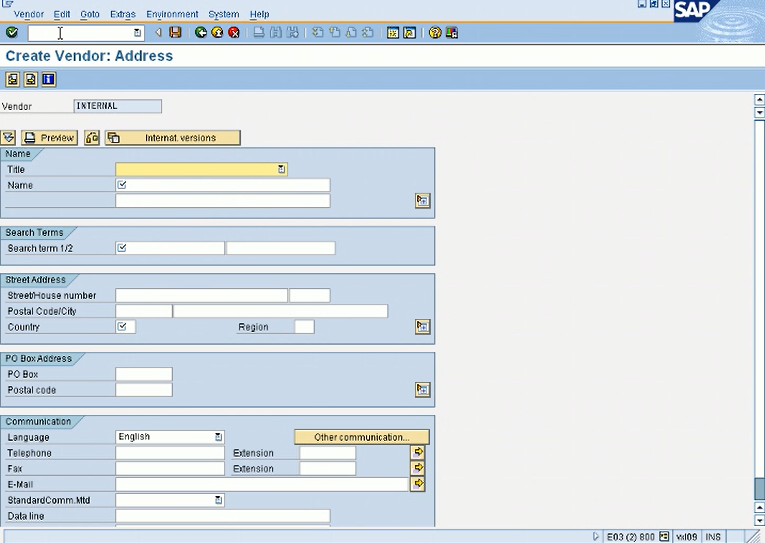
So this is the first screen of creating a vendor master record. So I will enter a vendor name, so let’s just say Comcast. Work field is fixed first. I’ll enter Comcast. Again, I need to enter the address, address is an optional field, but let me let me enter it. Let’s say main main street 100 postal code. Let’s just use this. 48823. It’s Lansing. Country is US. Region in this case will be state, so MI.
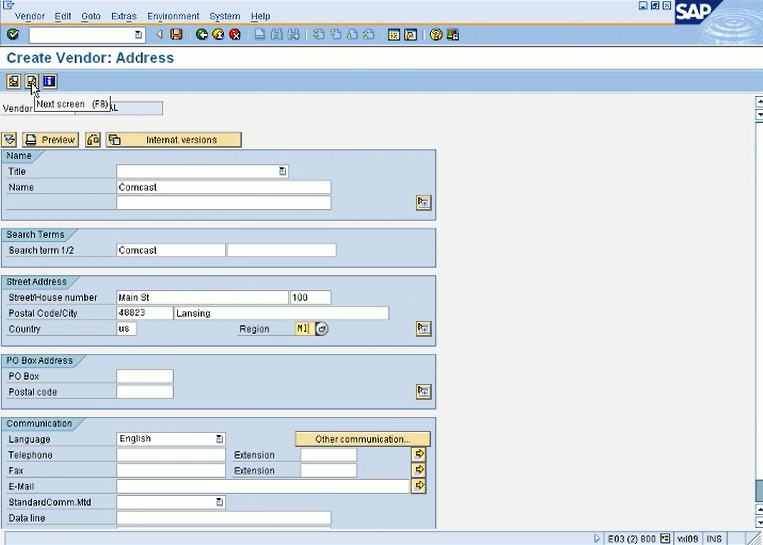
Now I don’t have any required information on this screen so I can click on the right arrow to go to the next screen.
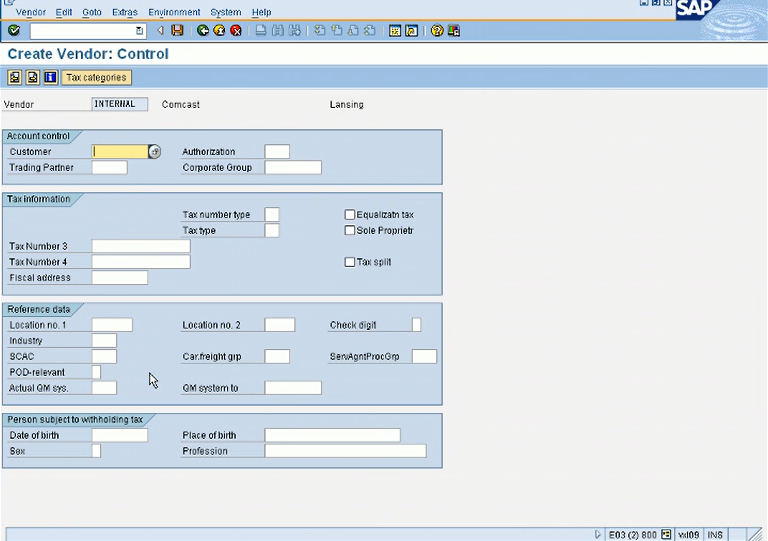
As you can see there is no required information on this screen. We don’t have to enter anything here. Go to the third screen.
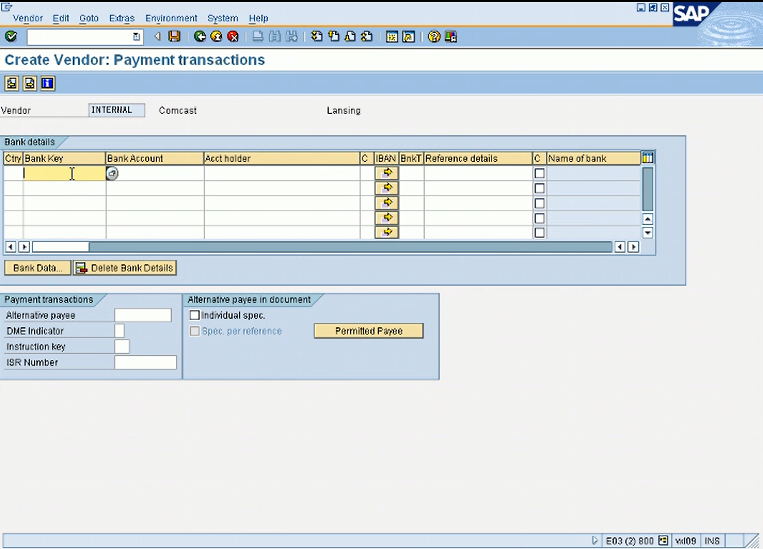
This screen is used if we are doing wire payments and we want to do wire from SAP. In that case, we will need the banking information of the vendor. We don’t do that much in the US, but in Europe it’s very common. In Europe they don’t write checks anymore. But in the US. We are very far behind in banking technology, we still do checks. But in Europe what in the country they will enter the country key for the bank. Let’s say if it’s British in the UK, they will enter GBB. GB I believe for basically the country if it’s British, if it’s UK, I believe it’s GB Great Britain. And then the bank key is in the US what’s called a routing number. Bank key is like routing number and your bank account number. So basically country, your routing number and your bank account number for the vendor. And the rest of this is optional. So that’s how SAP will create the file that will be sent to the bank. But in the US, it’s not that common because we don’t do any wire, we do check payments, and for check payments, we don’t need this information entered. And the the other field for alternate payee. This can be set up if, you know, if you want the check to go to another location of the same company or let’s say Comcast order it from Michigan, but they are saying okay the payment should not go to the Michigan office, should go to our California office. In that case, you can create a separate vendor record for the California office and enter that vendor number here. So the invoices will be entered to this vendor number that we are creating. But the payment when we will do the payment, payment will go to this vendor. It’s sometimes used when you want payments to go to another company. And let’s go to the next screen.
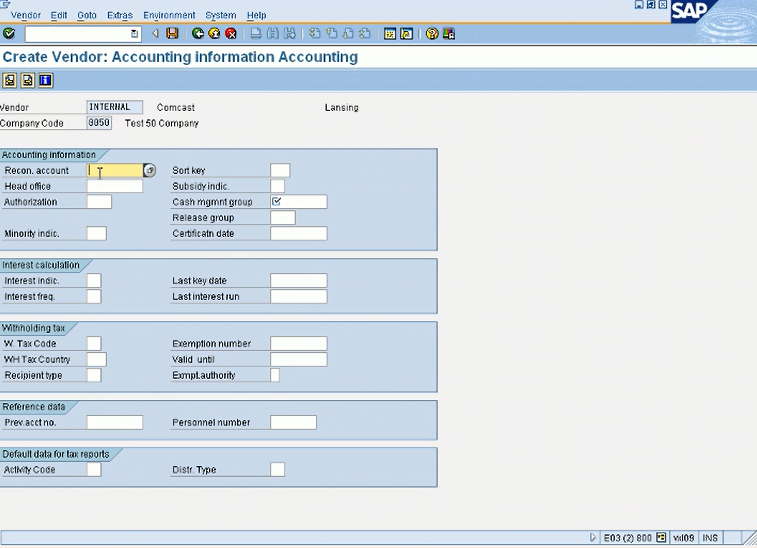
Reconciliation account. We need that before we create the vendor. So what is a reconciliation account? Reconciliation account is basically your link between your sub ledger accounts payable and your main ledger, your general ledger account. So your individual vendor balances will be in your AP, but the total of those balances will be in your general ledger under your accounts payable account. So that is that account, the link between the GL and the AP, and it’s always a required field. So let me create a new session. So what I’m doing is I’m going in FS00 and I’m creating a new GL account.
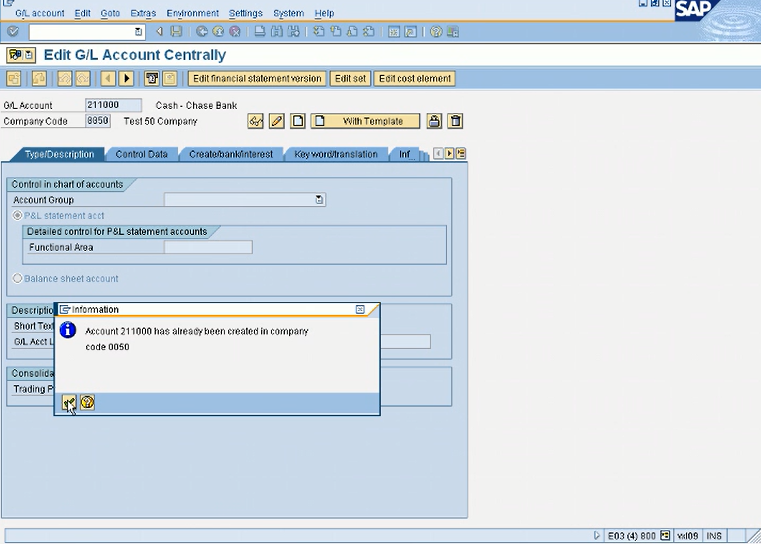
In case, if you don’t have it, this is the time to create a new GL account. So you can name it whatever you want and normally in our company, you know, what we do is use 1 series for assets and 2 series for liabilities. So you can start and you know GL account starting with 2 just to make it easier. And since I already have 211000, I’ll just do 211010. But it’s up to you, I mean, whatever GL account you want to create, and this GL account, you will have to enter it in each vendor master record that we create.

So this is a balance sheet balance sheet account, and I’ll just name it accounts payable accounts payable. That’s all I need here.
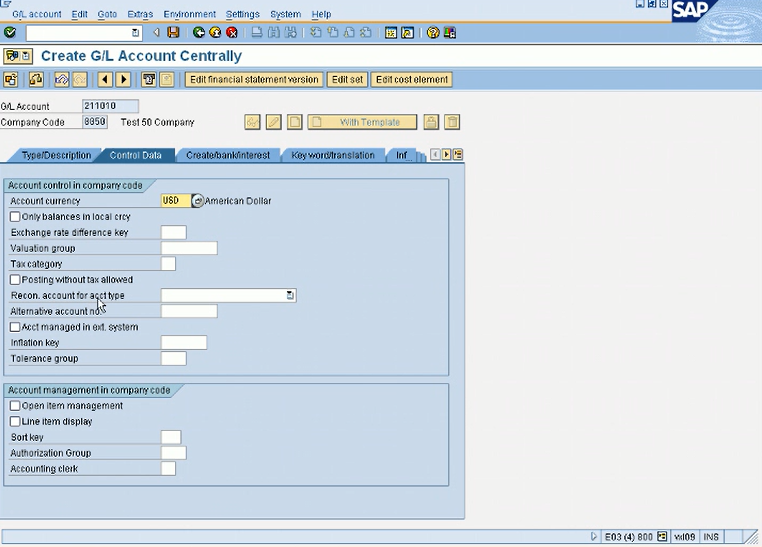
The most important information here on this field is this reconciliation account for account type. Here we will have to choose vendors. So basically this is not a normal deal account. This is just a reconciliation account. It cannot be posted directly, it has to be posted through a vendor account. Because this is just a total for all your individual vendor balances. So this is very important to check this reconfirmation account type for vendors here. Otherwise, you won’t be able to assign it to your vendors. And in the field status, you can choose on anyone, and then just go ahead and save it. So now basically we have created a reconciliation account for vendors in our GL from transaction FS00.
Now in this reconciliation account, I’ll see this list here. I have 2. I can pick any one now.
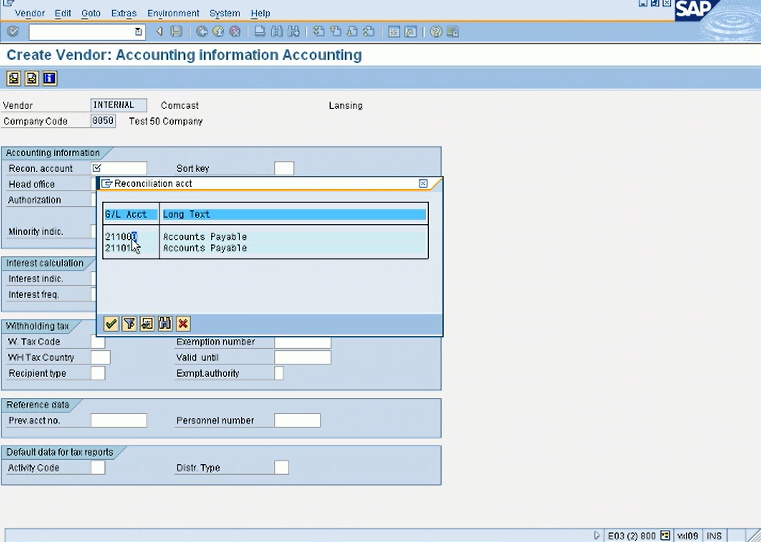
I’ll just pick the first one. So this will be again your link from your sub ledger accounts payable to your main general ledger. So they will always be in sync, because in the old systems like Peachtree, I have not used Peachtree because in older accounting system that was a big issue that your sub ledger was not tying with your general ledger and you have to do some reconciliation every month. But in SAP, you don’t have to do that, it’s always reconciled. Your AP balance is always equal to your GL accounts that you have for accounts payable. So there is no reconciliation required. In SAP, you don’t need it because they’re always reconciled. Because if you are trying to post a AP entry and if something is missing like there is no reconciliation account in the vendor master, then it won’t allow you to post that vendor invoice. So it will always make sure that your publisher is aligned with you. So in SAP, if it’s a reconciliation account, you cannot never post it directly. So as you can see, there’s one more required field, cash management, because that’s what’s in the settings. I’ll just choose whatever is available, you know, it does not matter. We don’t use cash management, but you know where is it coming from? It’s coming from the account group settings in the field status under account group, and you can always change that too. And also there’s one indicator, minority indicator because some companies want to keep track of their minority vendors. So this is a good place to select that and then you can run a report, how many vendors are minority vendors and then you can see their transactions. That’s one way of, you know, selecting it.
Let’s go to the next screen. This is very important. It’s one of the most important screen in the vendor master. Payment terms.
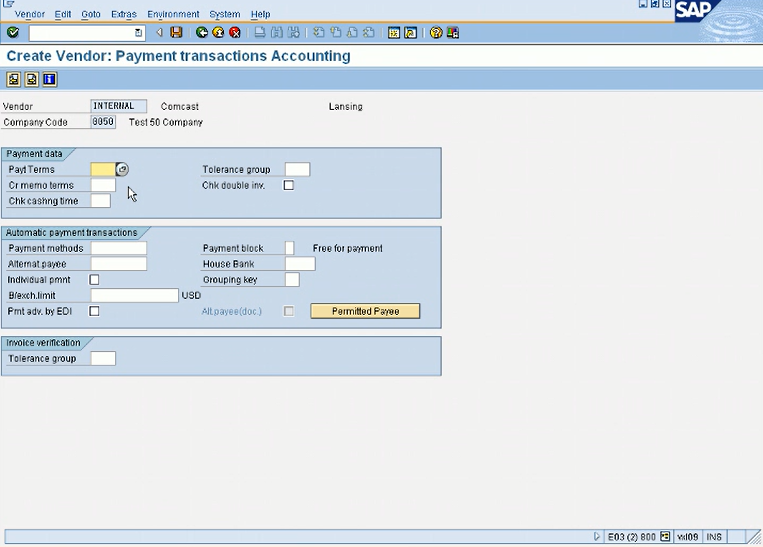
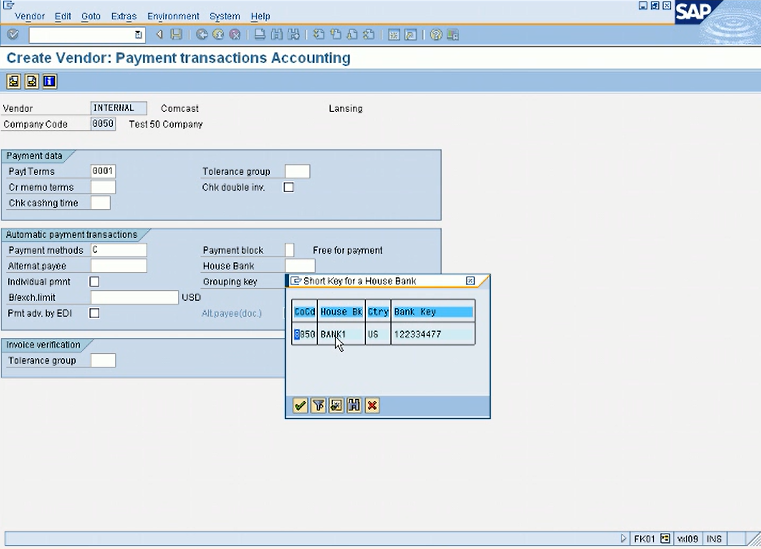
So when you enter a vendor invoice, when should it be paid? So that will depend on the payment terms that you have in the vendor. For our invoices, we will just use 0001 immediately. So, you know, because we will enter the invoice and we will do a payment. So we don’t want the next 30 or next 15 because we want to pay at the same time. So we will just choose 0001 immediately. So payment methods, whether you whether you wanna pay by checks, wire, this configuration, we will do in config 3, and then we’ll come back and then we can enter checks here.
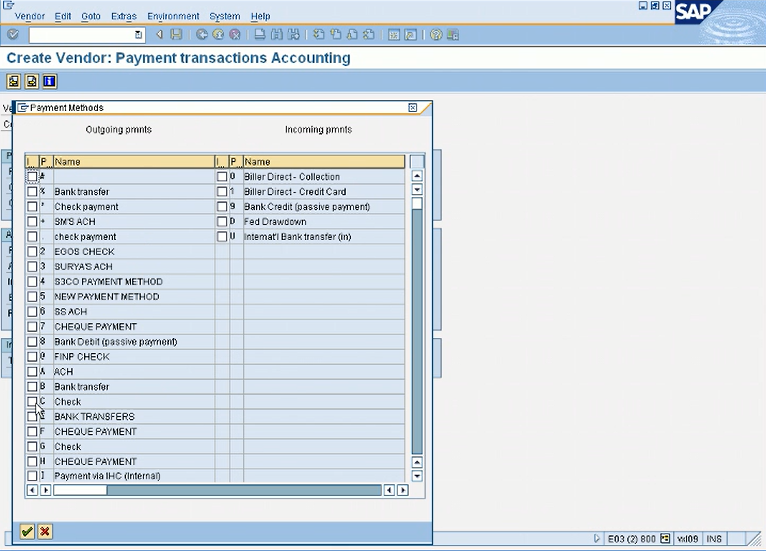
But I have already configured for my company, I can enter it here. But if you can see checks, you may enter C. But if not, then we can always update the vendor master record. Like right now we are in transaction FK01, then we can come back in FK02 in change mode. Right now we are in create mode, we can come back in change mode and update the payment method. But since in my complete code I already have the check payment method, so I will just use C. Any other field that you are missing, you will have to update it later before we do the payment. There’s your house bank, and I will go in detail in config 3 when we go to config 3. So in my company, I have my house bank, so I’ll just select it here.
Let’s say if your payment method is missing and you are trying to do an automatic payment, then this invoice for this vendor will not be included. And this is a very common mistake that, AP users do, that when they create a vendor that they forgot they didn’t set it up properly. And then there are like processing 100 vendors and they are saying like 10 of my vendors are not included in my payment run. Why is that? So most of them when I do the analysis, the issue is the vendor master. It is something that is missing in the vendor master. Maybe the payment term is next 30 and it’s not 30 days yet or the payment method is something else, let’s say in the master record it’s wires and they are trying to do checks for that vendor. So that payment will not be selected. So this is why I say this screen is a very important screen, for your accounts payable. So, that’s all we need, we are at the last entry. So now after editing, I want to save it.
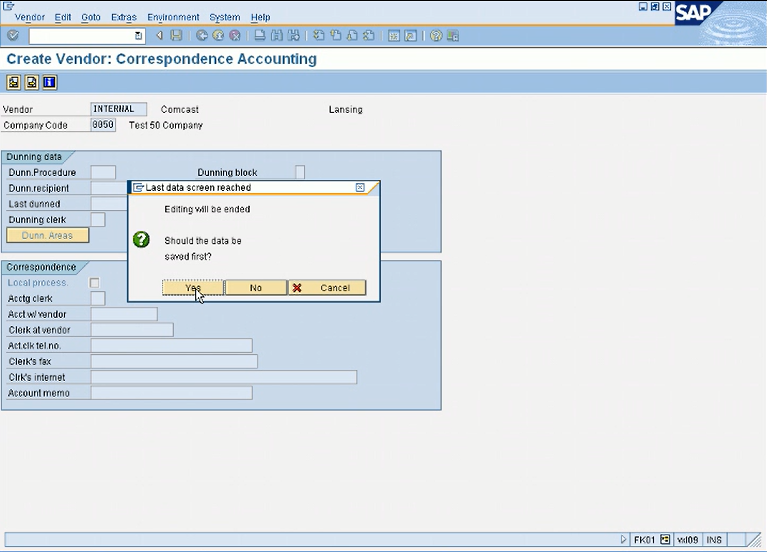
So once I click yes, the vendor will be created and I will get the vendor number at the bottom of my screen.
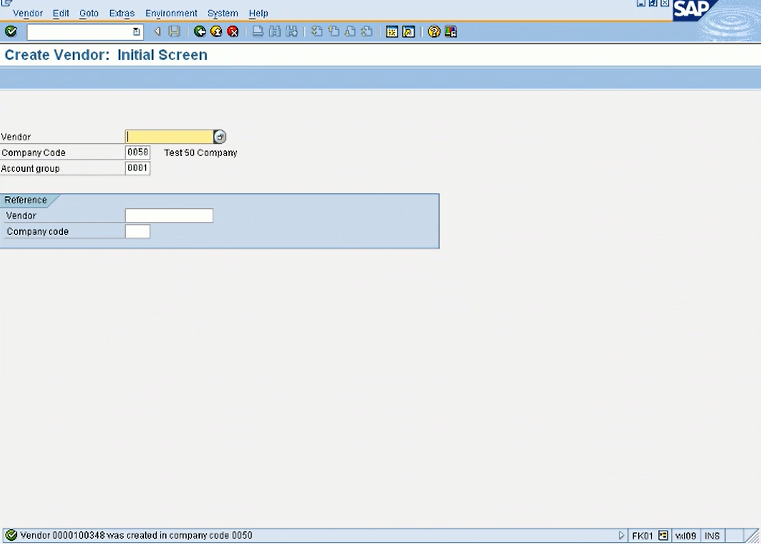
So 100348 was created, and I as I showed you, this was the number that we saw in the next available number, on the number ranges. So this vendor 100348 is created. And what transaction did I use? I usedFK01 to create a vendor. In SAP normally 01 means create, 02 means change, 03 means display. That you will see in many transactions.
So let’s say if we want to go back in this vendor master record and change something, I’ll just go in FK02.
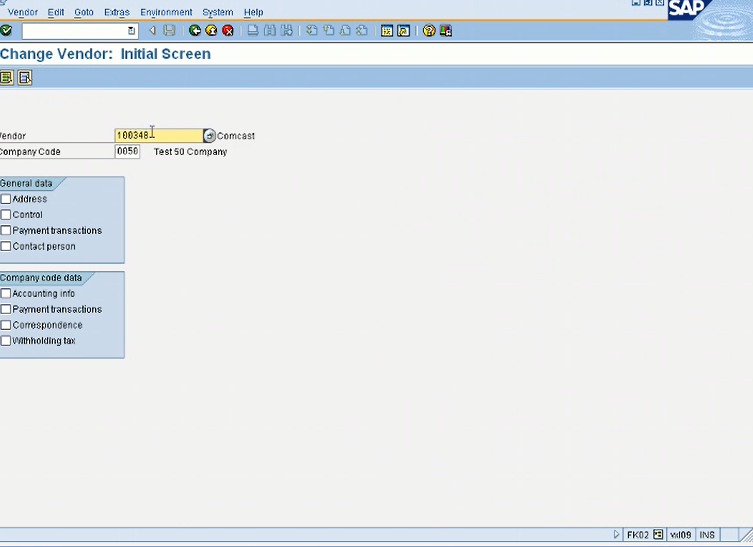
And by default it will give me the last vendor that I was working on so 100348 was the last vendor. So now it will ask me which section I want to go. So again, let me go over this. Some information is saved at the client level, which is the general data like the address and all this information and some at the company code level. So let’s say I have 10 company codes and I use the Comcast for each company. So I have created one number 100348. I can extend basically this vendor is created for at the client level and at the company code level. So I can extend this vendor to my second company code and the second company code will use the same vendor number and all the information from the general data will be copied, but for the company code I will have to enter the new information that will be just specific to the second company code. But the general data will be shared. This way you can have the same vendor number across all your companies and you can run a report if you want to see balances for one specific company or you can run a balance for all your companies for this vendor. Basically vendor number can be extended to other companies within your organization. You don’t have to create multiple numbers if you are for one vendor.