
Accounts Receivables Configuration (Part 1)
So, let’s start with the accounts receivable. It is exactly like accounts payable, very similar. We have to see account groups, assign account groups to number ranges exactly like what we did in the AP. So let me go over to the document that I have, FI Config-4. So, for this, we have to go in Accounts Receivable and Payable 🡪 Customer Account 🡪 Master Data 🡪 Define Account Groups with Screen Layout. So, we’re not creating any new account groups. There are so many, right now. We can use the one that, you know, that they have here.
Thank you for reading this post, don't forget to subscribe!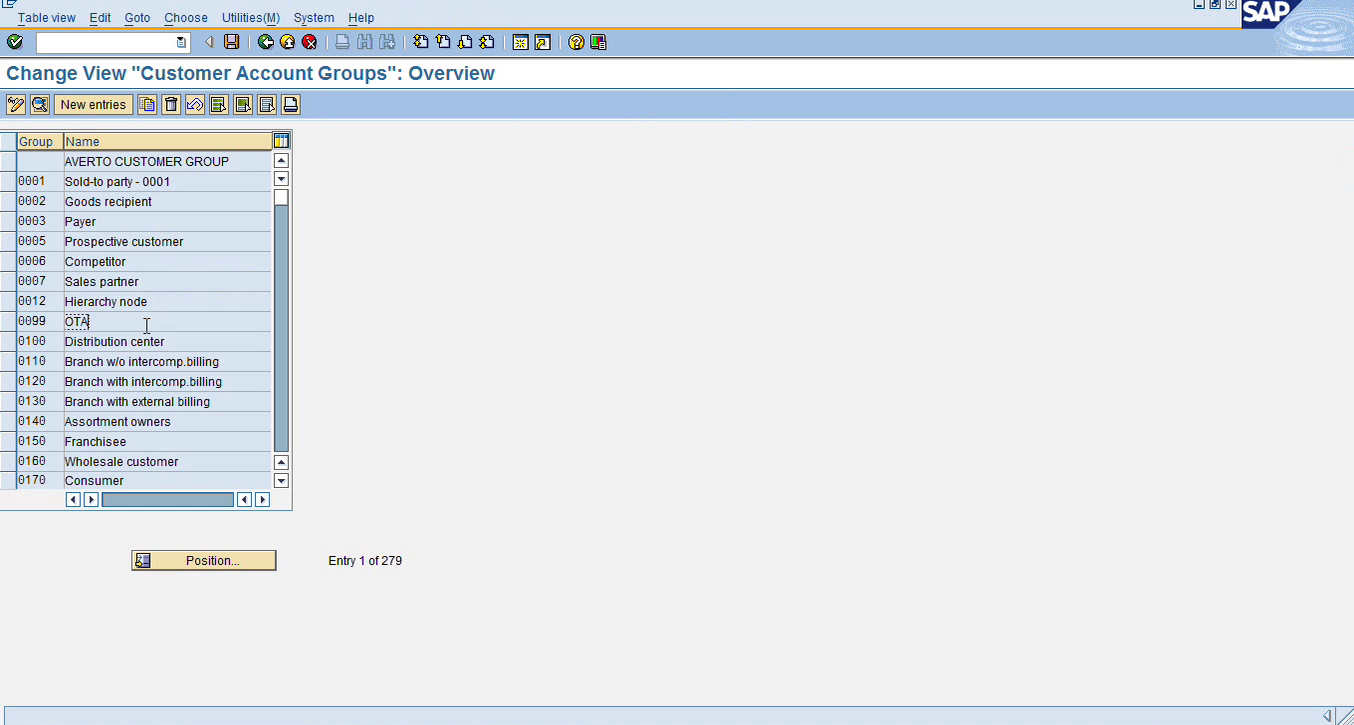
So, again, this represents if you want to sort your group, your customers, your domestic, your international, your employees or anybody you want to group them, you can have separate groupings for them. That’s all it does. So, we will choose the standard one, 0001, sold-to-party. This group we will use and inside that just like accounts payable, it will have the required entries. It will control, okay, this field is required, like Name, Search term, Postal city, Transportation zone, these are required fields.
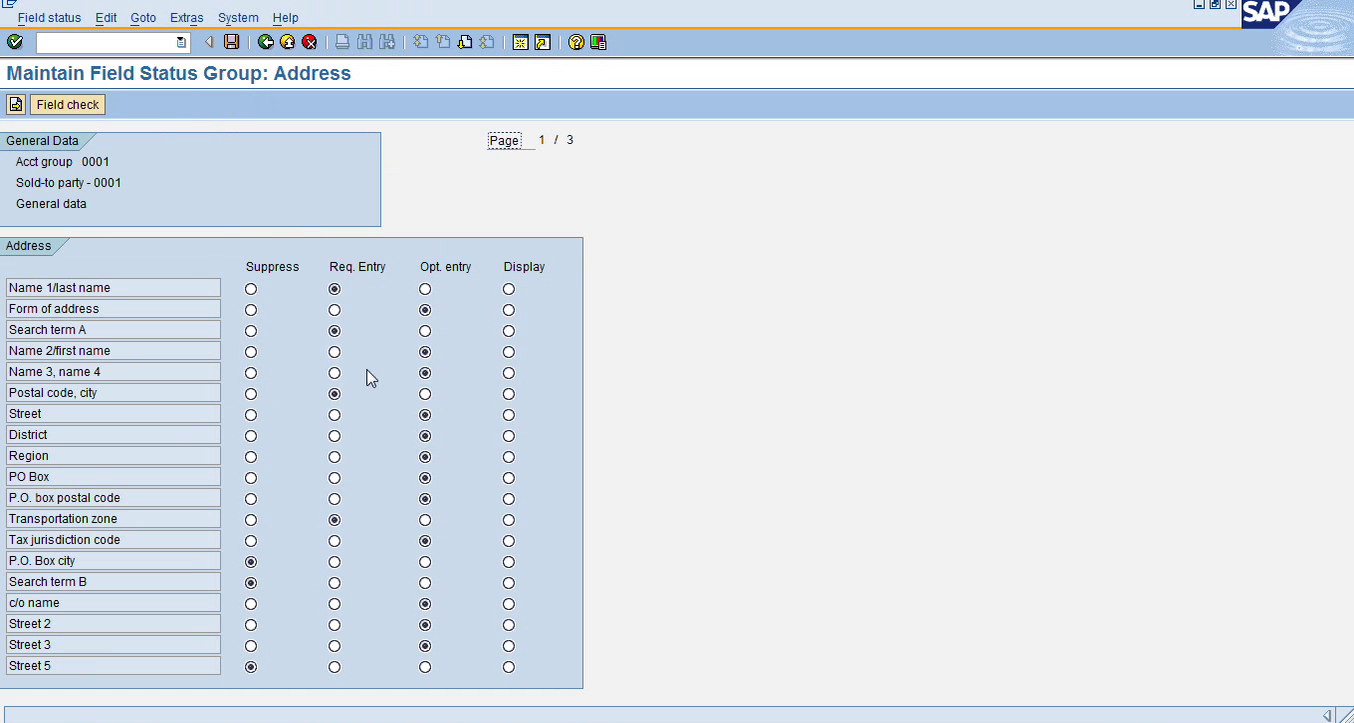
So that’s what your account group will control when you will go and create your customer. So, for our test, we will choose account group 0001. And just like accounts payable, you will have a number of number ranges and then you assign it to your customer. So, number ranges, and these again are at client level, so all the companies that exist in the server will use this, so you don’t have to do anything for your own companies, it’s already there. You are ready to go ahead in FK01 and create your FD01, but first, I guess, you will need create a GL account for accounts receivable.
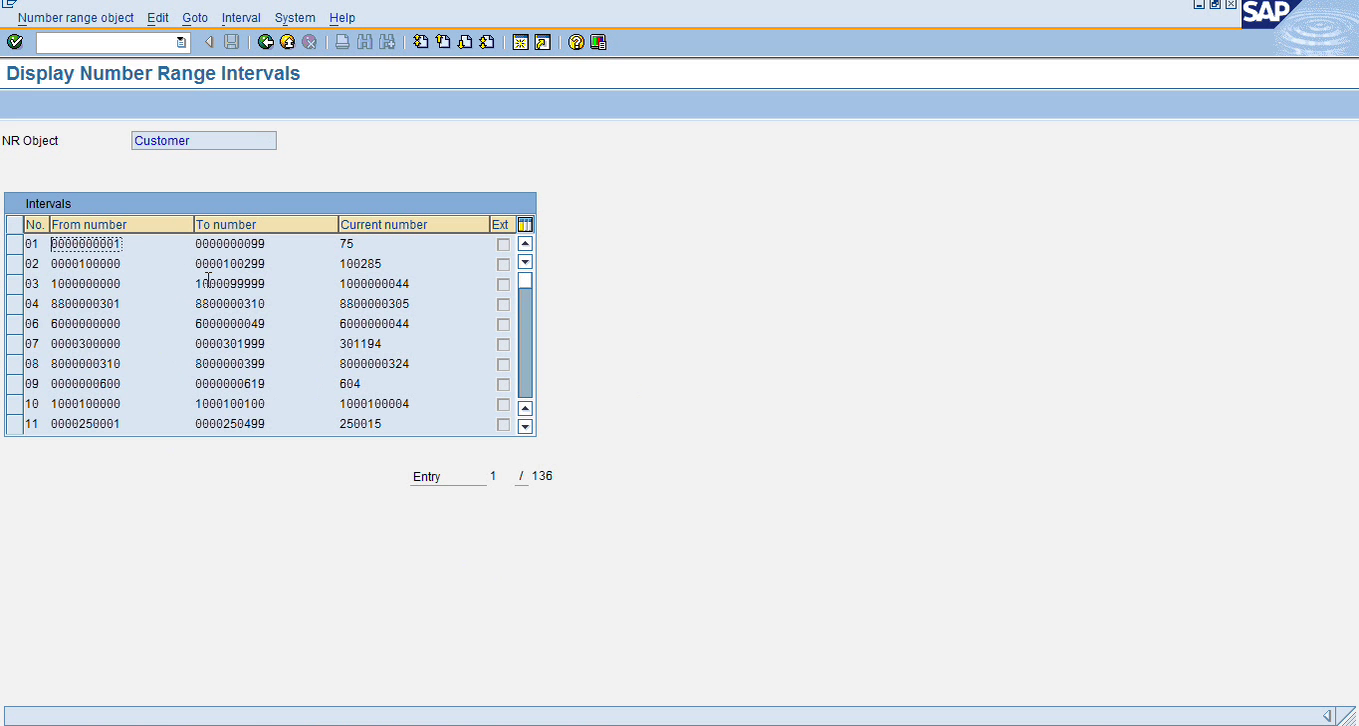
So, these are your number ranges just like AP, you know, and then you assign your number ranges to customer account groups. So, ours is 0001. So, as you know it’s all screwed up because everybody played with it, so they assigned number range ZG. But normally for this account group 001, it’s SAP given account group and the number range is normally 01. In this case, it’s ZG. So, let’s go ahead and check what ZG is. In interval, if I go to the bottom, I should have ZG here.
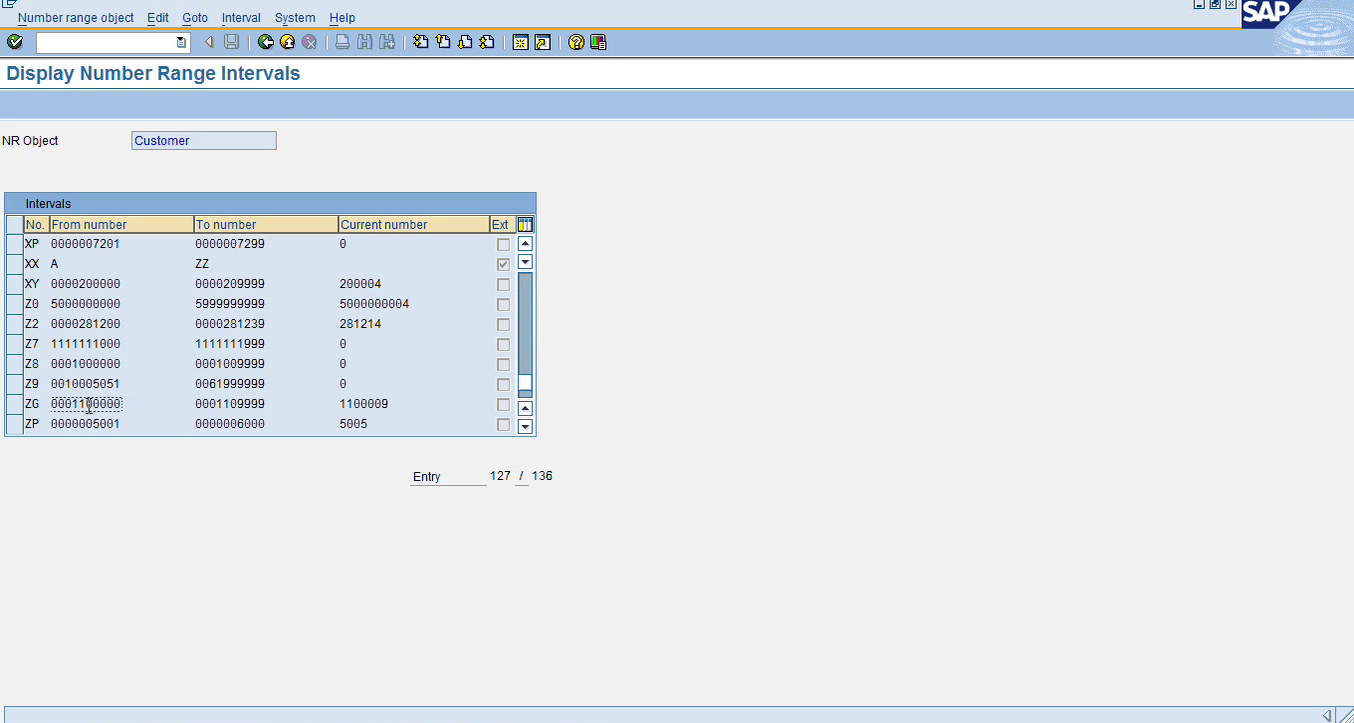
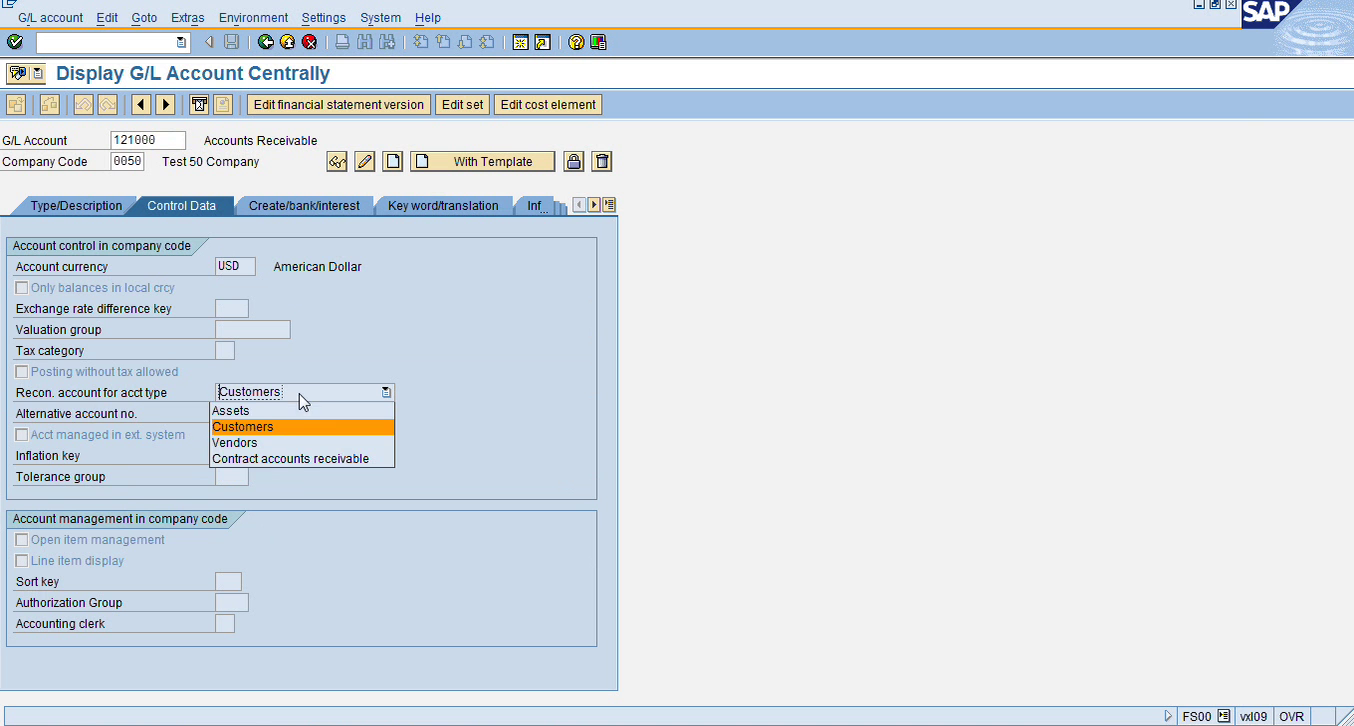
So, ZG is here. It’s from 110002 to 110999. So, we’ll just use this. That’s all we need to create a customer. But before we do that, what you need to do in your system, in your company, you will need to create a GL account for accounts receivable, just like we did for accounts payable, and it is called a reconciliation account. So basically, you will go in FS00, and then you will type in your account. In this case, we will you can name it 121000. And then you’ll basically click on GL and create. And it’ll be a balance sheet account balance sheet account and you can name it accounts receivable. The most important thing is in control data. It’s a reconciliation account. So, you should have it, Customers, in the reconciliation account type. Just like for accounts payable account, we chose vendors. So, for this, for AR, we have to choose customers here.
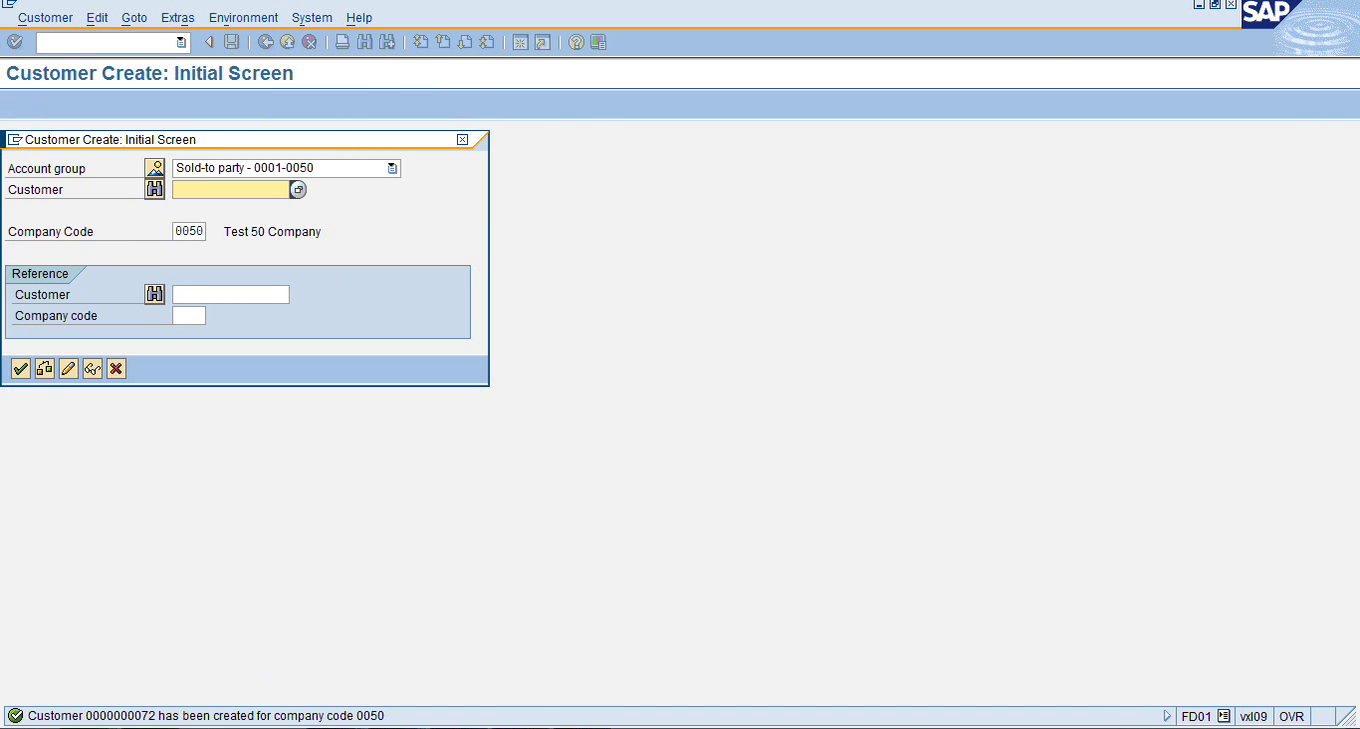
And then we will choose create/bank/interest and you can choose G12 as field status group. So that you have to do in your own company, once you do that, basically you are all set for creating a customer. In the meantime, you can go and create a customer. Let’s get it for you in front of users. Transaction is FD01. Just like FK01 is for creating vendor, FD01 is to create customer. So, our account group will be – sold-to-party is a long list, so you have to scroll down- 0050. And, then leave the Customer name blank.
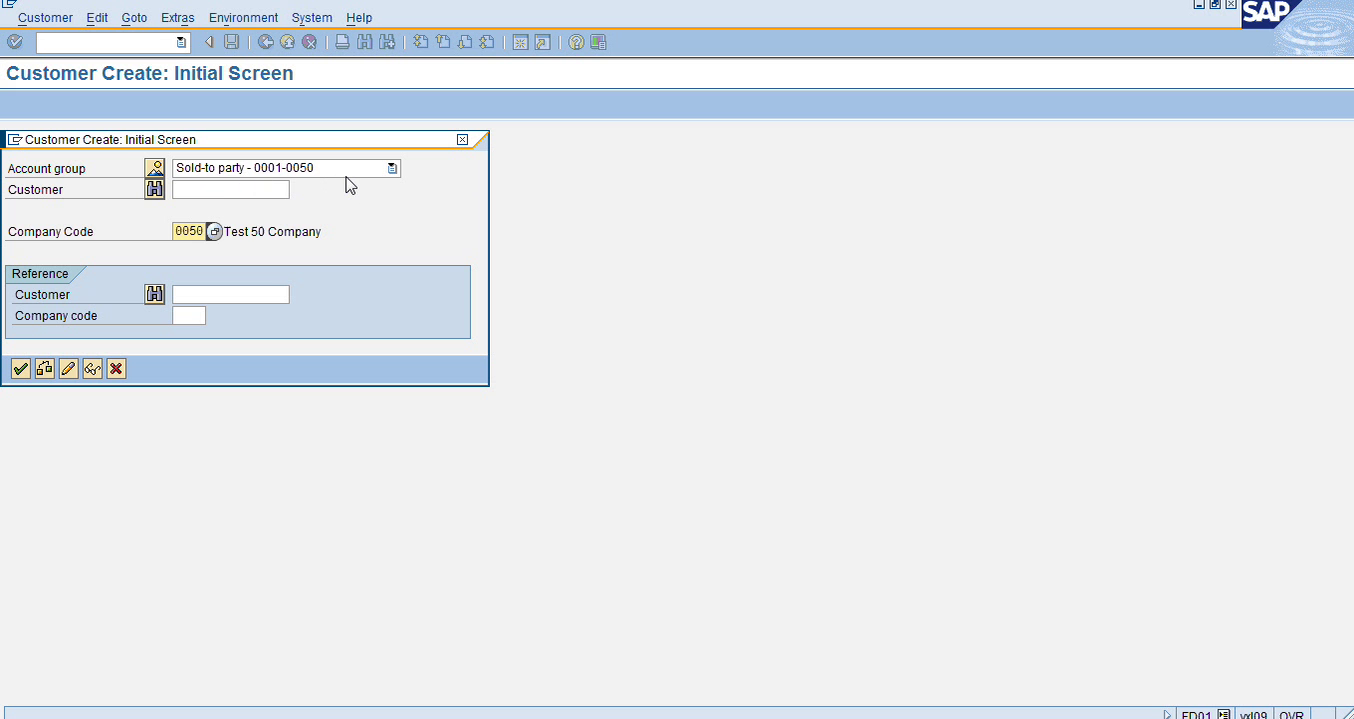
So, your company code and account group choose sold-to-party and press ‘enter’. Just like AP, we chose account group and we chose our company, and just press enter and then you have to choose the name of your customer. I’ll just choose ‘Cust’. And enter the – you know, in the account group setting, these are required fields – so just enter the required fields that come up.
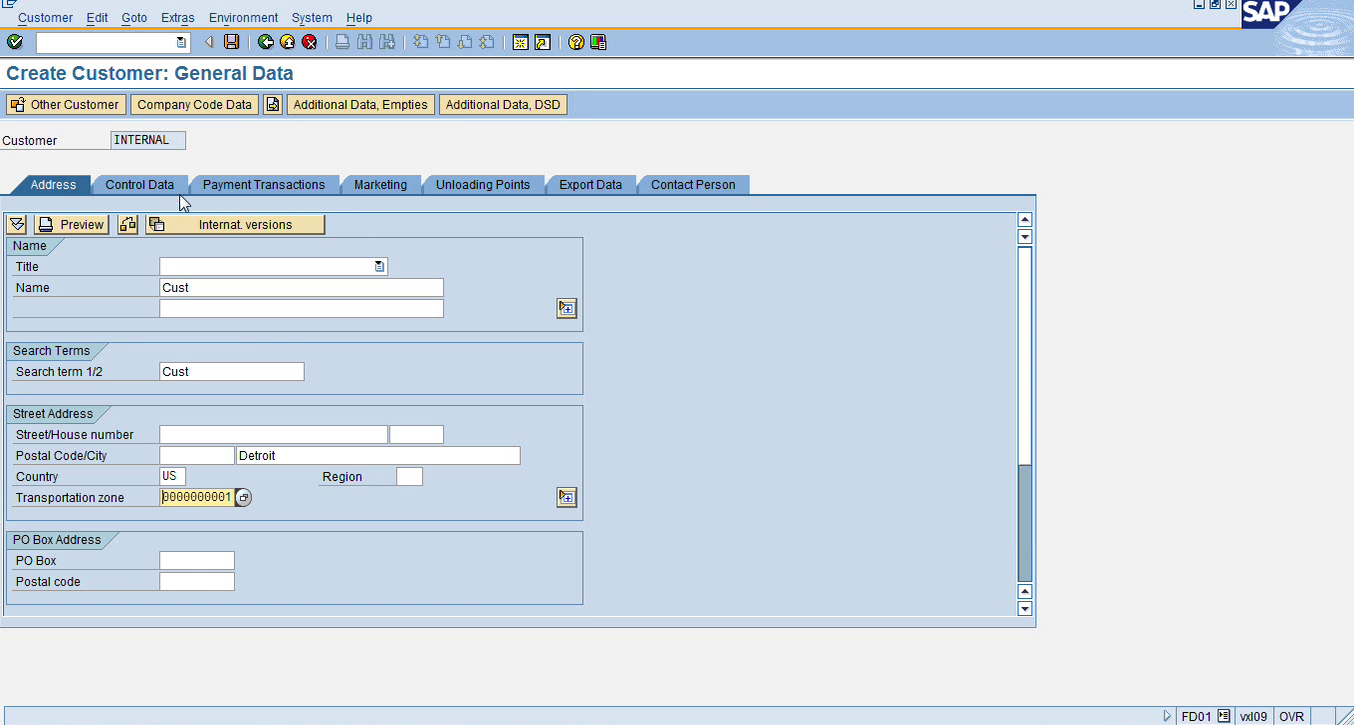
And it’s a little bit different. The screen is a little bit different, control, payment, transaction. You don’t need that. To go to the company code level, you will have to click ‘Company Code Data’. And the first thing that comes up is reconciliation account, and this is the one that we just created.
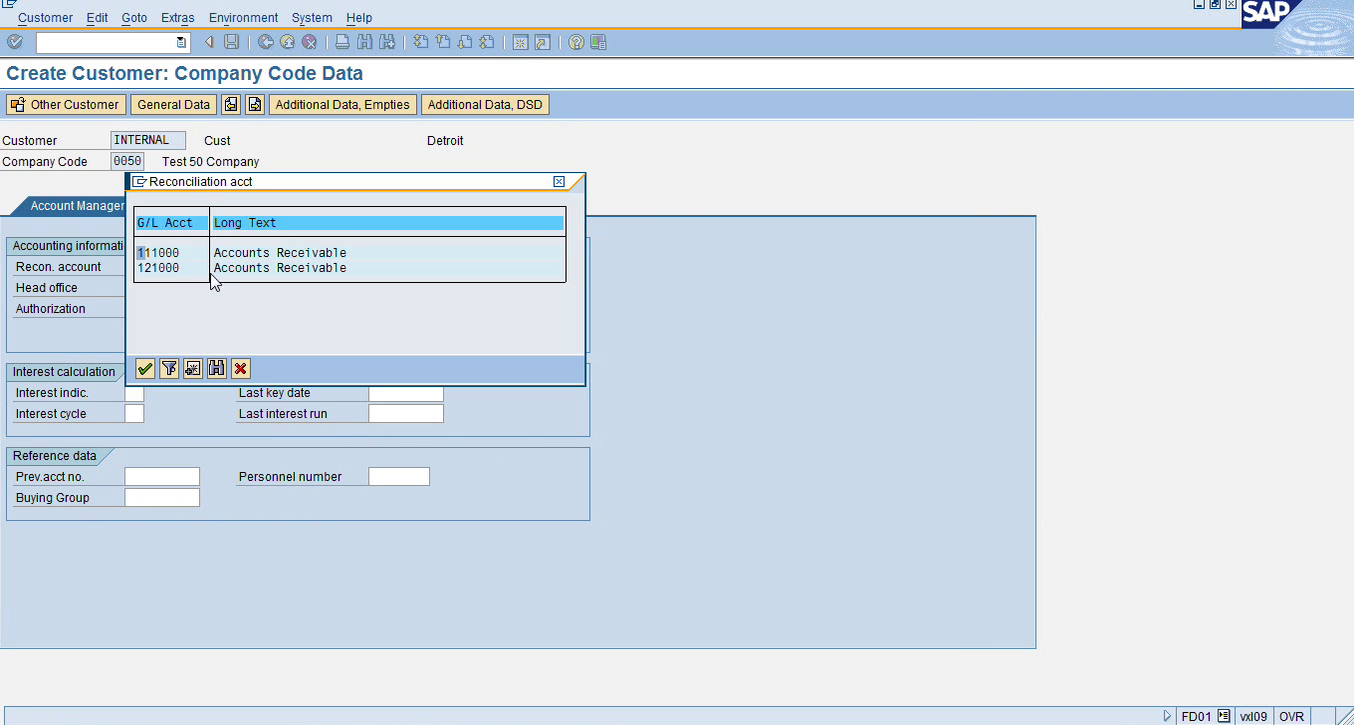
So, we I’ll choose my 121000. And then payment transaction, I can choose the term of payment as Due immediately. That’s all I need here. Once I click save, I will get a customer number at the bottom of my screen and then I’m all set.
Again, let me scroll over to the reconciliation account, the most important thing is you have to check the customer in the control data tab. Only then you will be able to assign it to your customer master record. Otherwise, if you have this field blank, then it will be just like any other GL account. It will not be a reconciliation account, which basically a reconciliation account is a link between your main ledger, your GL and your sub ledger, which are Accounts Receivable, Accounts Payable and Asset Ledger, and these are the options you see Assets, Customer, Vendors. So, when we created an AP account, we choose vendors here. Now we are creating an AR account, so we are choosing customers. And in the next couple of weeks, when we will create an asset GL account, we will choose asset in the reconciliation. And that’s all you need.
So now basically we’ll go in FD01, just like I have in my notes here, FD01 to create customer. So FD01 or you can also go from the menu here. So Accounting, Financial Accounting, Accounts Receivable, Master Record, and Create. So, you know, you can go this way too. So, what we discussed was we will choose, account group sold-to-party. This was account group 001, and then you will enter your company code here.
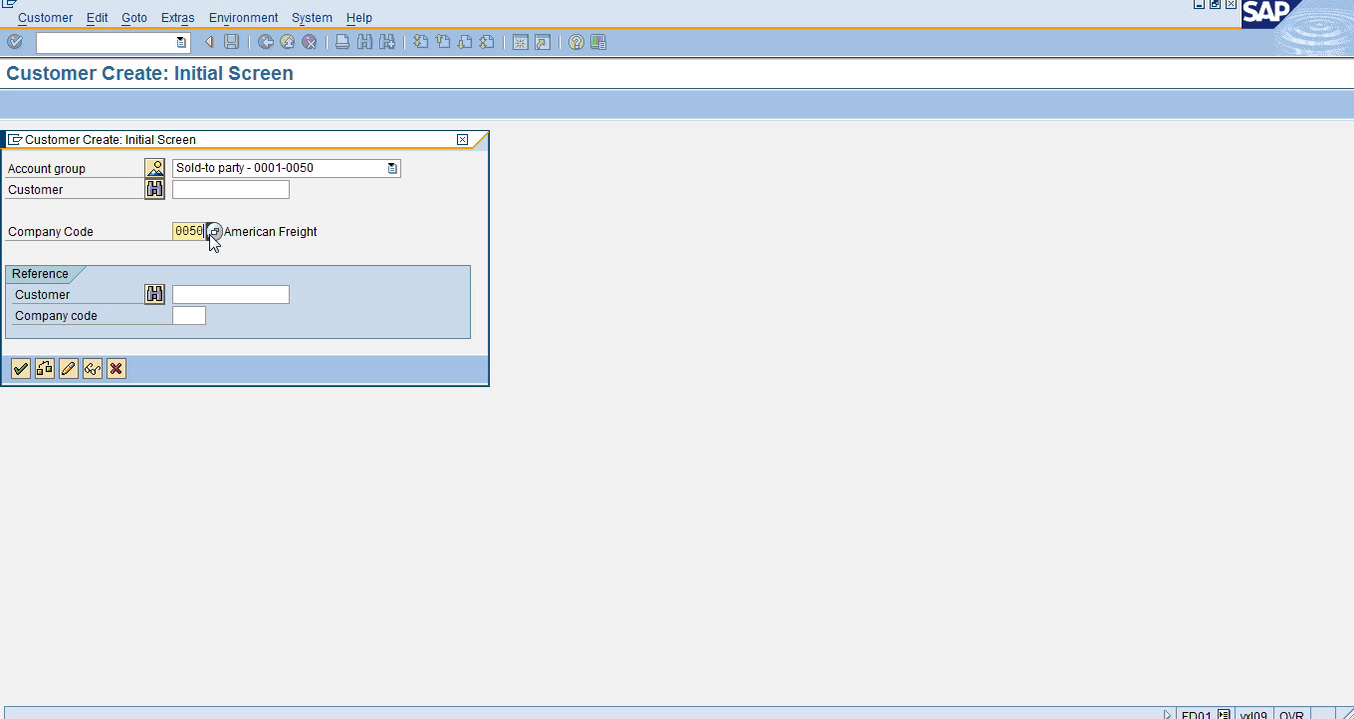
That’s all you need to enter here, account group and company code.. And then you will press enter. And then you can type the name of the customer, the name you like. Let me do FedEx this time. Search terms, again these means required fields based on the account group settings and the field status for that account group. So, we have to enter something there, but let’s enter the address. Transportation zone is required based on the account group. We can choose one of these options.

And again, all these steps are at the client level, so if you have this customer in multiple company codes, so they will all share this information. Only the information that is entered as a company code data will remain with your company code. So, when you extend this vendor to another company, then all this information will be copied. I’ll show you in a minute. When I’m done, I’ll show you. So now, I mean, all these tabs are optional; You don’t have to, I don’t think any of the fields are required in these. Again, this is the banking information.

If you receive payments from wire and then you do electronic banking then you will need your customer banking information here. Again, country and then bank key is routing number, bank account is your customer account number. And all these are optional. We don’t have to enter it. The important thing after entering the address information is the company code. So let me click the company code tab, and it will take me to account management tab. And here, I need to enter the Recon account that I just created. I’ll click on that field, it will show me the account that I just created, I’ll just double click on it. And then if you want, you can enter the terms of payment in here, 001, and that’s fine. Correspondence, these are all optional fields that you may enter but not required. Once you enter this, the reconciliation account, you are ready to save this customer. If you click on save, it will save. If you want to go back and see it, you can go in FD02. FD01 is create, FD02 is change, FD03 is display. So, let’s go in FD02 in change mode and by default it should take you to the vendor that you just created so you don’t have to search for it. And then you press enter, now you are in change mode.
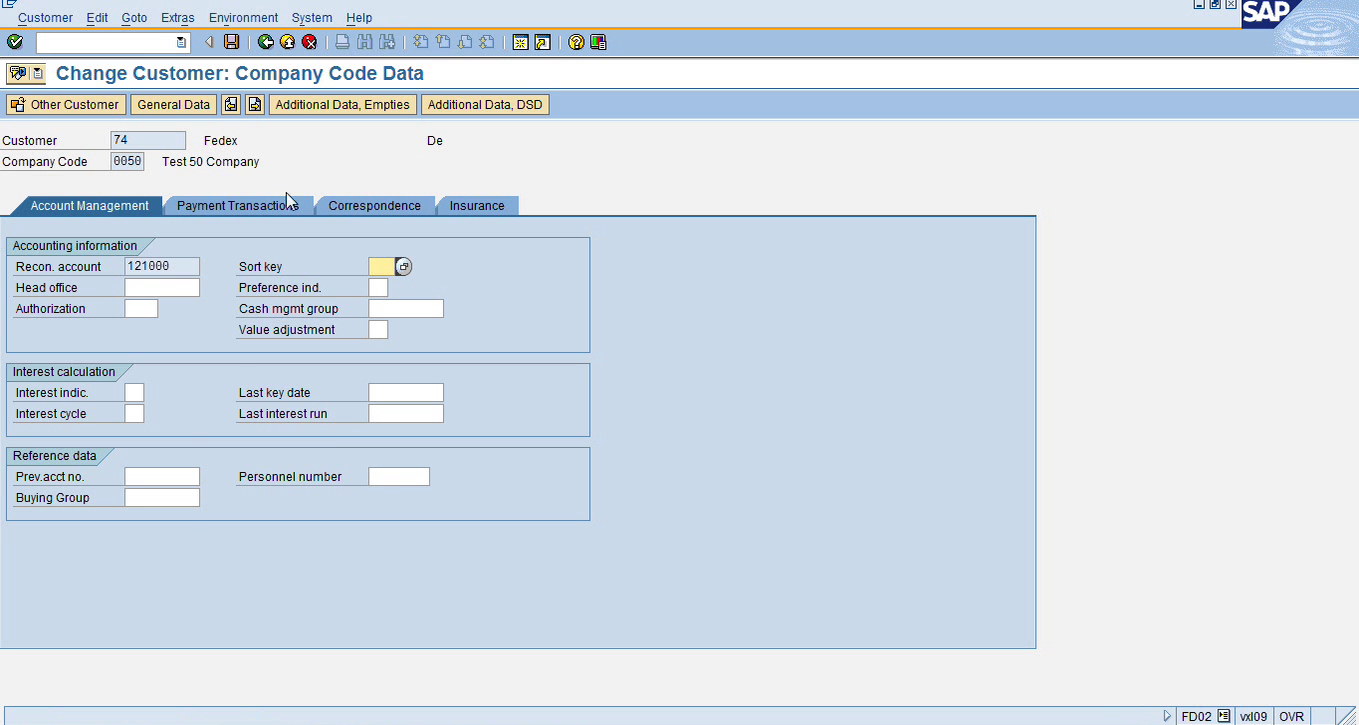
And again, we are at the company code level; If you want to go to the main level, the general data, we can click on general data. It will take us to the general data tab and then we see the address and all the information. If you want to go back to the company code, we go click on company code. And if you notice, reconciliation account, once you assign it will be grayed out. You will not be able to change it and this is a very important thing. Once you assign, that’s it. You cannot change it anymore. And I’ll tell you one interesting thing. In one of the companies, this field was not a required field. This has to be a required field in your account group settings. In this one, reconciliation account is a required field. This is coming from the account group setting so it has to be a required field. What happened in one of the companies was that this field was not required, and then what happened, they didn’t enter anything here, and they saved the customer. Well, once you save it, this field is grayed out. So, what happened then? Basically, this customer is not linked to any GL, and even if you go in change mode, this will be grayed out, even though you didn’t enter anything, but this field is not available after you create it. So, the customer that they created, they were not able to use it because it will not post, because it will give out an error the “reconciliation account is missing”. But it won’t let you enter it also because you only have this option once when you are in FD01. So, make sure this is a required field and you enter this. Because that’s the key, you know, then all your subledger and ledger are tied because of this field. And if you don’t have this, then SAP will validate your customer invoice. And if it doesn’t find it, it will not let you post a customer invoice or in case of vendor, a vendor invoice. So, because of this field, all your ledgers, your subledger is always tied to your main ledger, your GL.
So let me show you one more thing. Let me tell you the difference between this general data tab and the account. So, let’s say if I want to copy one of the accounts that Vimby created in her company, and let’s say if I want to, (let me just get the number first from her company), her company is V100; So, let’s say the USPS account that she created and the customer number is 75. See? So, let’s see if I were to extend this to my company. So, vendor is 75. So let me display that in her company. So, she has this information here.
This is at the general data tab. And this information company code, this is at her company code level.

So let me use this customer in my company. So, I’m going to go in FD01. This time, I will not leave it blank, I will not leave customer field blank because I’m using an already existing customer. So in the customer, I’m entering 75 and my company code.
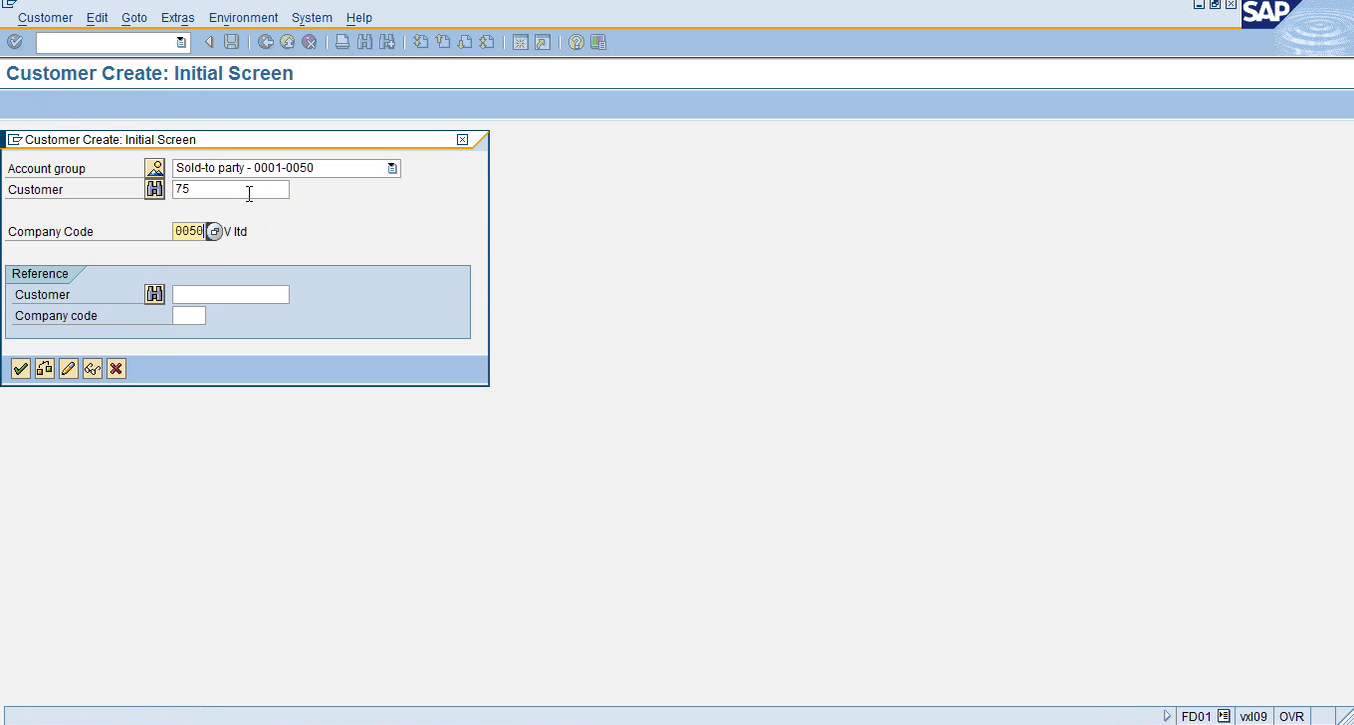
So, normally, you’ll leave this field blank, but I’m entering it because it already exists, and I’m extending it from Vimby’s company to my company. So, it took me directly to the company code data information.
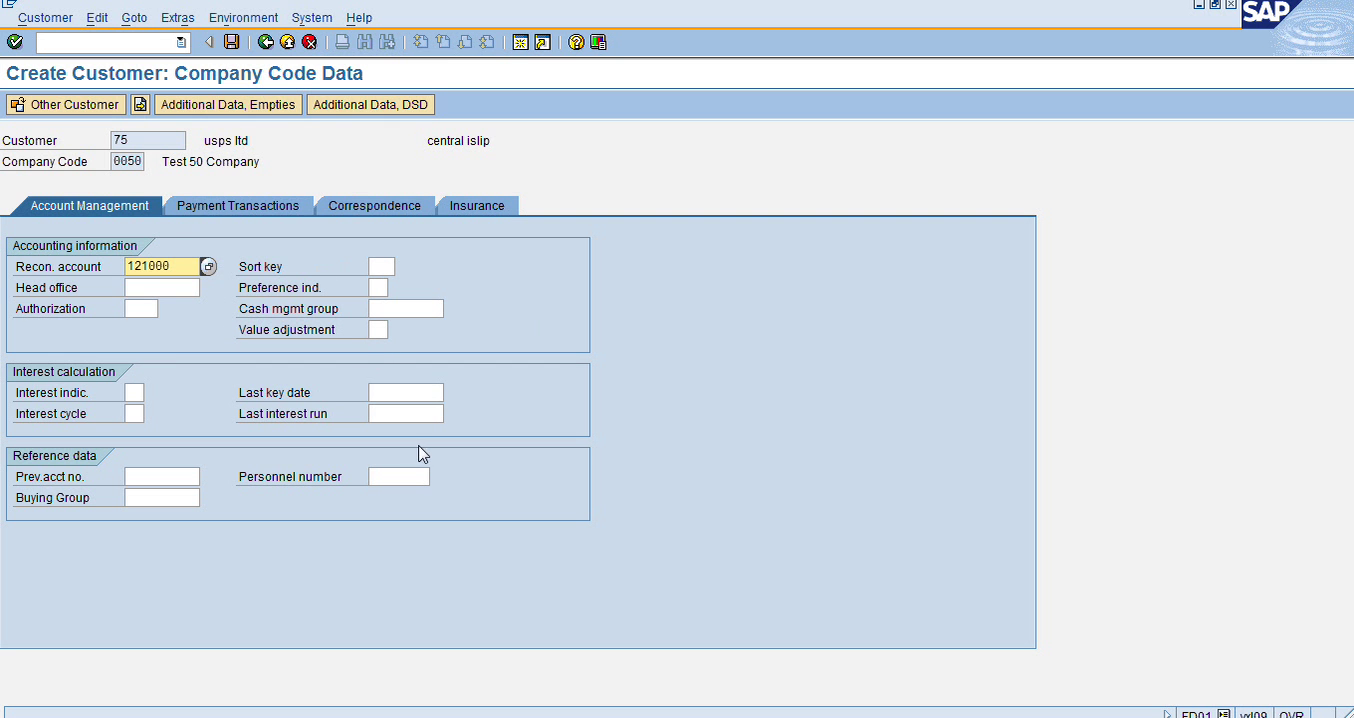
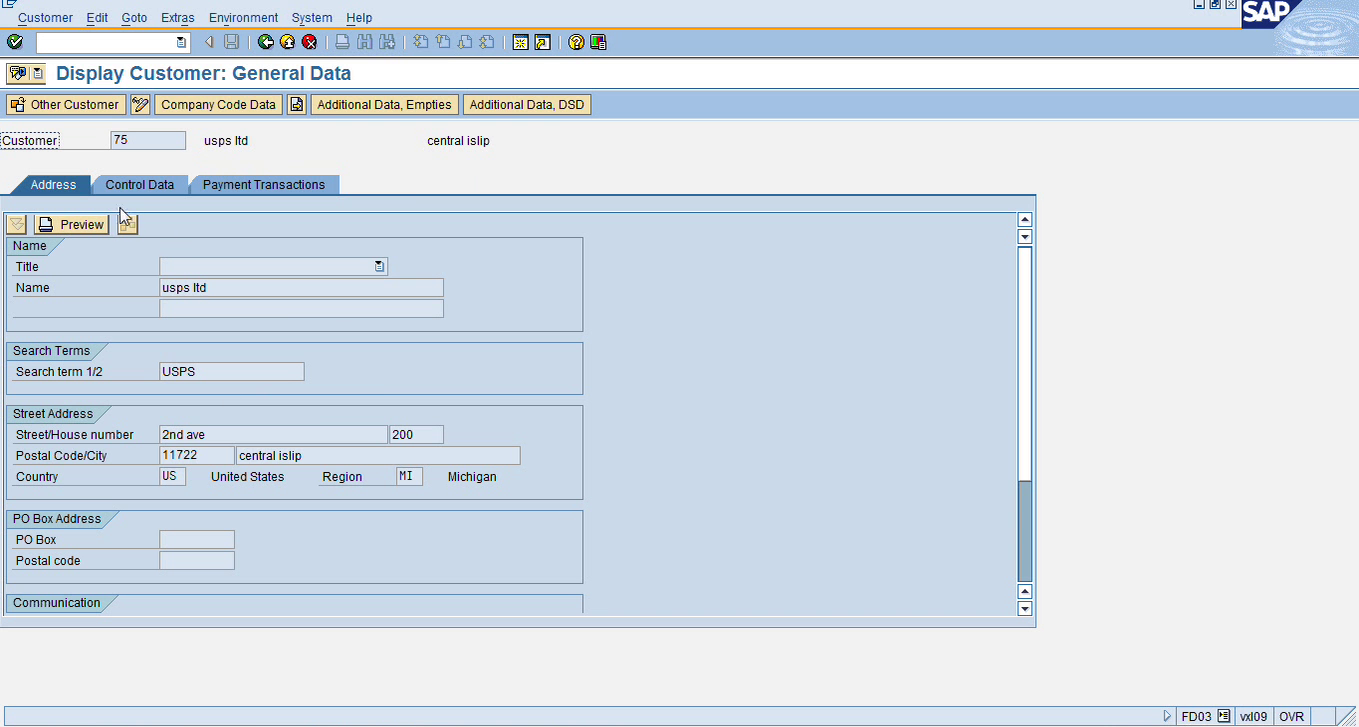
And it’s USPS, and I’ll choose my Recon account, then I will save it. So now if I go in my company, if I go in FD03, to display this customer, customer 75 and company 50, so now the general data is shared by all the companies.

This is all the information that Vimby entered in her company, but it’s at the general data tab. So, it will be shared by all the companies. But when I click on company code, this is only my information, company code 50.
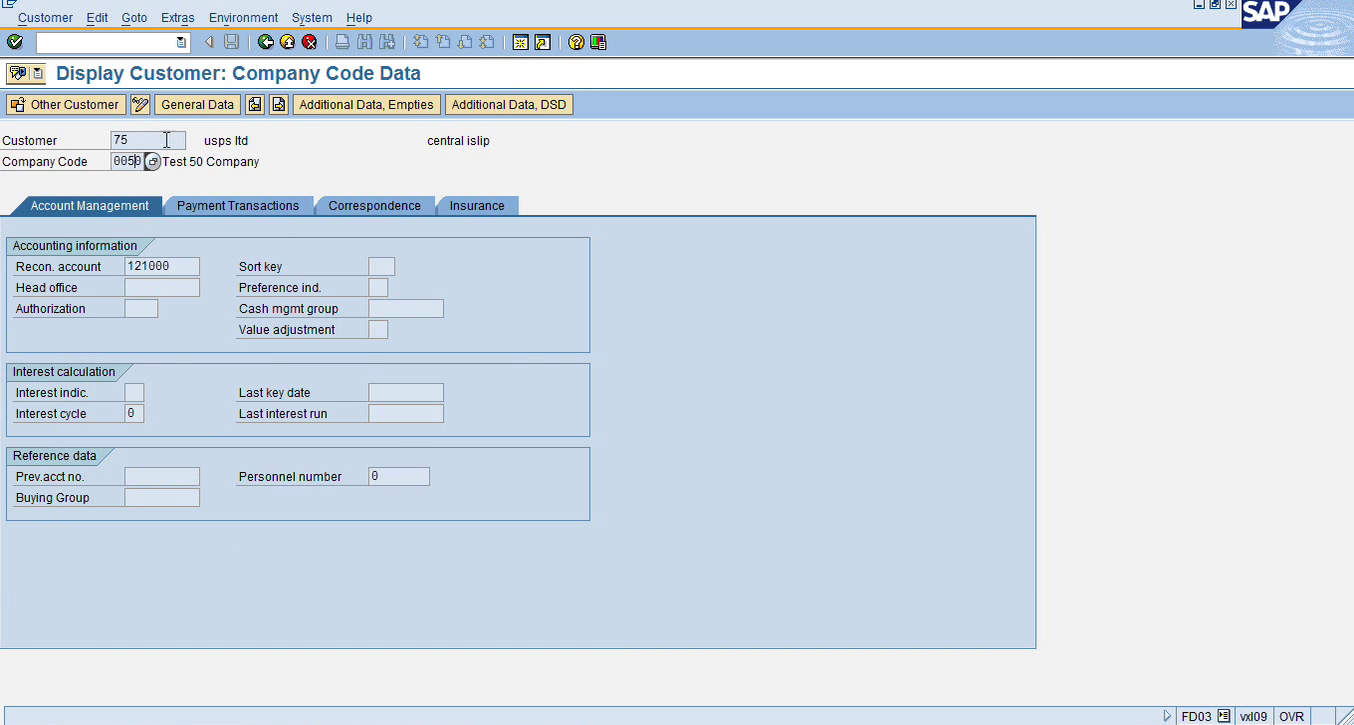
At the general data, see the company code field is gone because it’s for all the companies. When I click on Company Code Data, then you know I have the Company Code here and this is specific to Company 50. That’s how you differentiate. And very similar, if you go to the Vendor Master, the screens are different, but it’s basically the same thing. If you go to display, then you see it separately. You have tabs for it, general data and company code data. You have separate tabs and for vendors and for customers similar but, you know, the screens are a little bit different, but basically the same thing. General data is shared by all the companies, the company code data is company code specific. So, what that does is, you don’t have to create multiple customer or vendor accounts, you create once and then you extend it to your other company. But these tabs address, control, payment transactions shared by all because it’s at a general data level. Go in FD03, then you will have to have the tabs at the top, general data and then the company code data. It’s a little bit different but it’s the same thing. General data information shared by all the company and then company code data information specific to your company.
So, since we all have a company code, let’s post a customer invoice. So, I have attached the instructions for that. And so, let’s go over. So, we did for GL, in GL we did FB50 for GL entry. In AP, we did FB60 for a customer invoice, we did FB65 for a customer credit memo. Similarly, for accounts receivable, we use FB70 for a customer invoice, FB75 for a customer credit memo. And I’ll show you here. Go in Document Entry, you will see that FB70 in AR is an invoice and FB75, a credit memo. Similarly, if you scroll down in Accounts Payable, if you go in Document Entry, FB60 an AP invoice, FB65, AP credit memo. If you go in GL, Posting, FP50, a GL document. And again, if you go in Account, you will see our transaction FS10N that we used for display balances. And if you go in Accounts Receivable, if you go in Account, you will see FD10N. If you go in AP, you click on Account, you will see FK10N. And I’ll tell you in the accounting world, they use this transaction almost on a daily basis, FK10N, FD10N and then FS10N for the GL. They use it daily multiple times. So, these are important transactions and if you have practice on this, it will help you a lot. And similarly to clear the AP, to clear 2 open items manually, we went in F-44. In AR, we will go to F-32 to clear, but the screens are exactly the same. Screen is exactly the same. And in GL, it is F-03 if you have open item or if you want to clear 2 open items. So let me stress one more thing about the open items. For accounts receivable and accounts payable, everything is automatically open item management. But I’ll tell you what I mean by that. But for GL, you have to manually select, and where do you do that? In FS00, you do that. I think I went over in the first class, but let me stress that again. In FS00, if I go in my cash account,

So, we went over this line item display. If you check this, then it will let you use FS10N to see the display. But this open item management should be selected for few accounts, like the cash clearing account. So, if this is checked, only then you will be able to use the F-03 to clear open items. So now if I go, because in this as you can see, this is not checked. Open item on the GL is not checked. If I go and see the balance, I will not see the green and the red light. So let me stress that. But if I go in any customer or vendor account, if I go in FK10N, I will see this green and red light because by default, all customer and vendor records have open item management. This is open item management, that you’re managing open items. These (green) are closed, these (red) are open. This is called open item management. So, for all AR and AP accounts, it’s always there, you don’t have to check it. But for GL, you will have to manually check it when you create, only then you will see these red and green lights. So let me quickly do that and I’ll show you how it will look. So let me create one cash account and then I’ll show you the light that it will have. So, I’ll check both open item and line item display. This is the first time I’m doing it for a GL account. So, I’m going to post an entry to this account. I’ll show you the FS10N. So let me post an FB50. So, now if I go in FS10N,
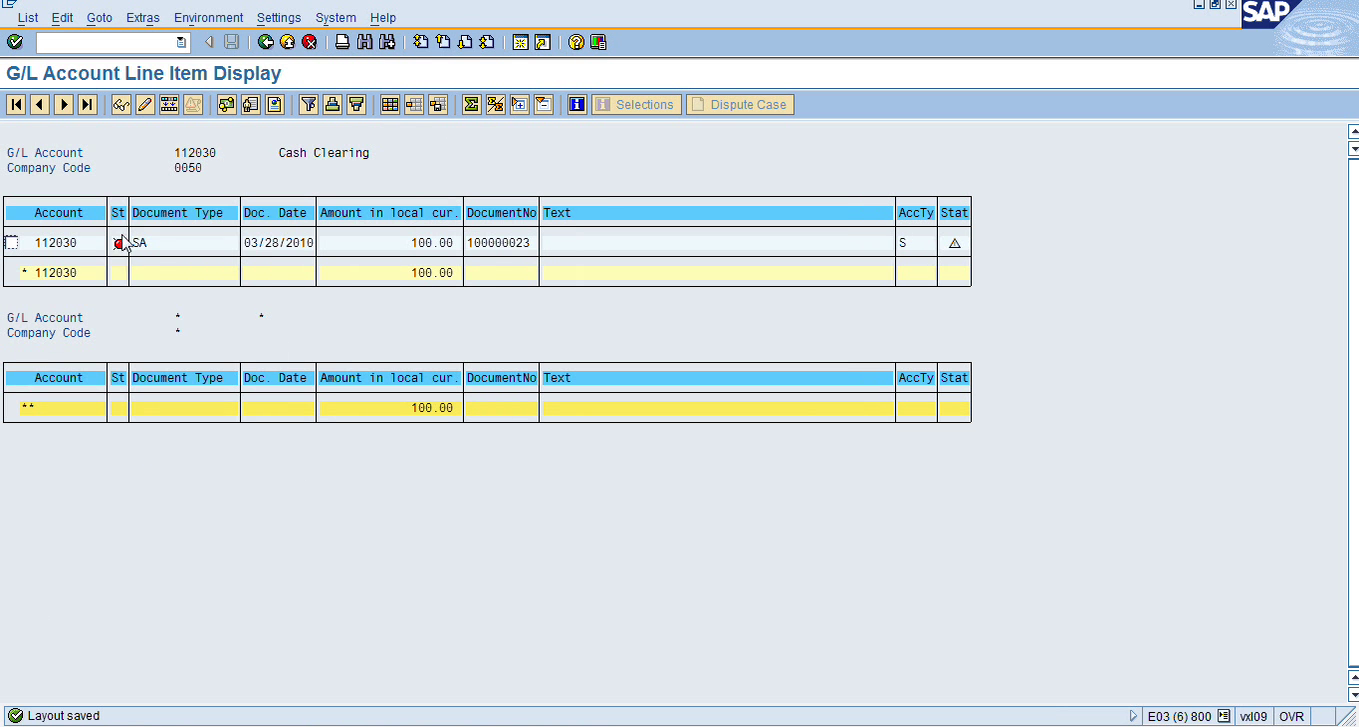
See the right light here? See now it is coming because I have open item selected in this GL account. If I do it for any other account, if I do it for my other cash account, it will not have anything, because it’s not open item management. If I do a range and I’ll see if I can do both.
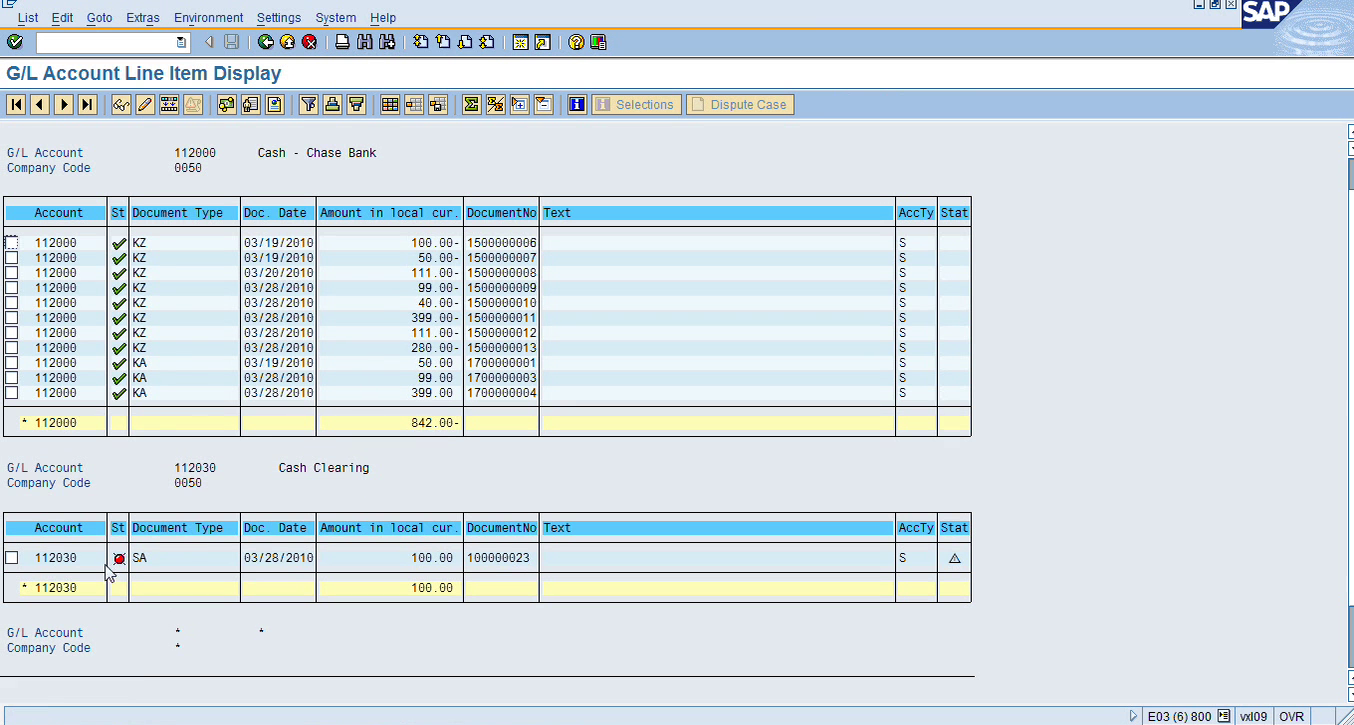
See? This one has a red light, but this one has nothing here because why? Because the open item is not managed here. If I go and show you the Master Record, you’ll see this account open item is not selected, that’s why you don’t have a green or red light. But in this account that I just created, I have open item selected, that’s why I’m seeing this red light. So, which means that at the end of the month, I know this has to be cleared. Because in reality, you will have hundreds of items here, so you want to see which ones are cleared, which ones are not. So, this will help you and let you know which ones are cleared. So I just wanted to show you the difference between the GL and AR, AP. In AR, AP, it’s by default selected that all customer and vendor accounts are open item management. But for GL, you will have to manually select and you only want to select those accounts that should have a zero balance on month end and then you want to track what is the remaining balance that I have to clear. Just I wanted to stress that point.
So, I guess now we are ready to post a customer invoice. Yeah. I was showing you all these transactions. So this is AR. So, we really are ready to do FB70, which is post customer invoice. So, let’s go ahead and do that FB70. And, let me choose my customer. I’ll do a search just like I do it for my vendor, and I’ll choose one of my customers. Let’s use the FedEx. Invoice date, today’s date, amount, let’s just do it for 250. GL, let’s use the same prepaid expense account that we have been using just for this test. Or if you want to go ahead, you can go ahead and create a revenue account if you want in FS00, create a sales account. That’s up to you. So, it will be exactly like we did. Why don’t we go and first create a sales account, that will be better. So, let’s go in FS00 and create a sales account. Let’s do 400,000 as a P&L account. And let’s do sales.
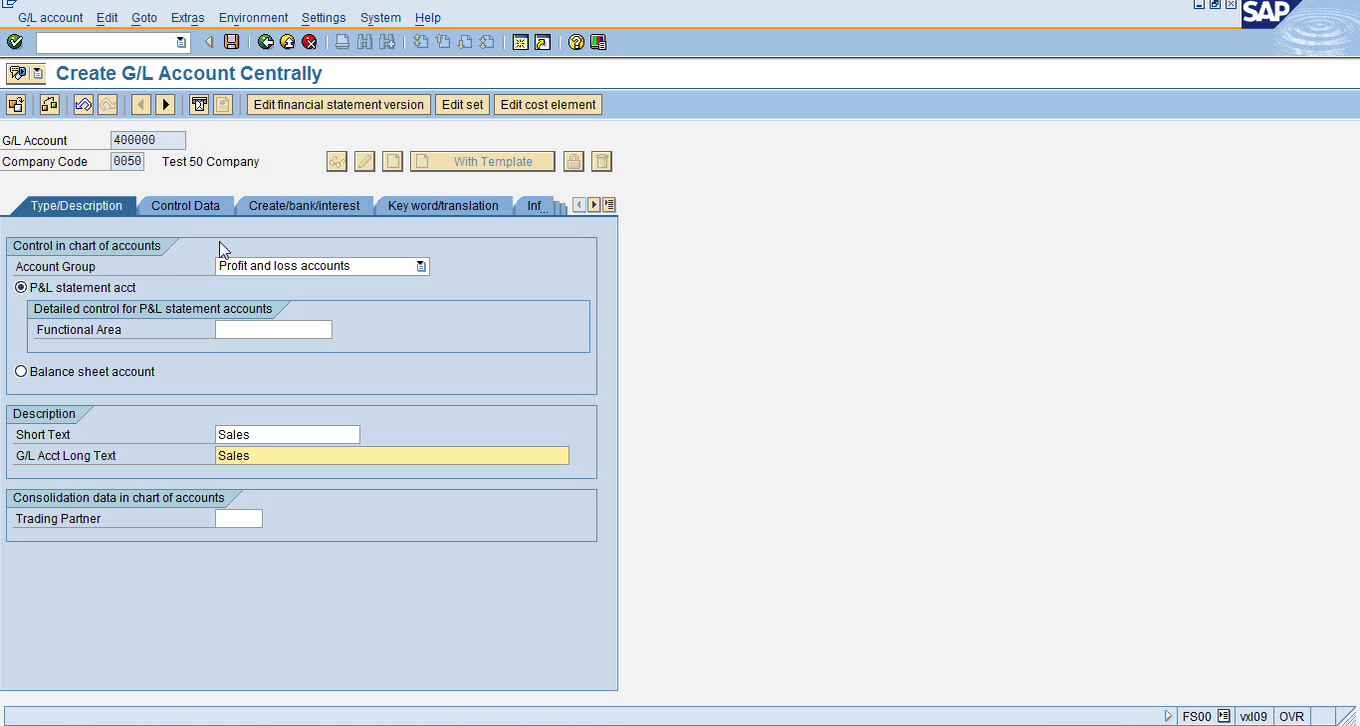
So, you’ll have profit and loss account here, P&L here, and then description you’ll do sales and control data, we will just check line item display. And field status group, let’s do revenue accounts, G029. So that’s all we need. And you’re going to save this. So, then I guess we just go back and create a customer invoice and we’ll use the sales account. So, I’ll choose my FedEx, Date, Reference. Now let’s do 200; Account: (let’s search for our sales account. It’s 400000), Sales: 200.

And then if I have a green light, I can simulate.
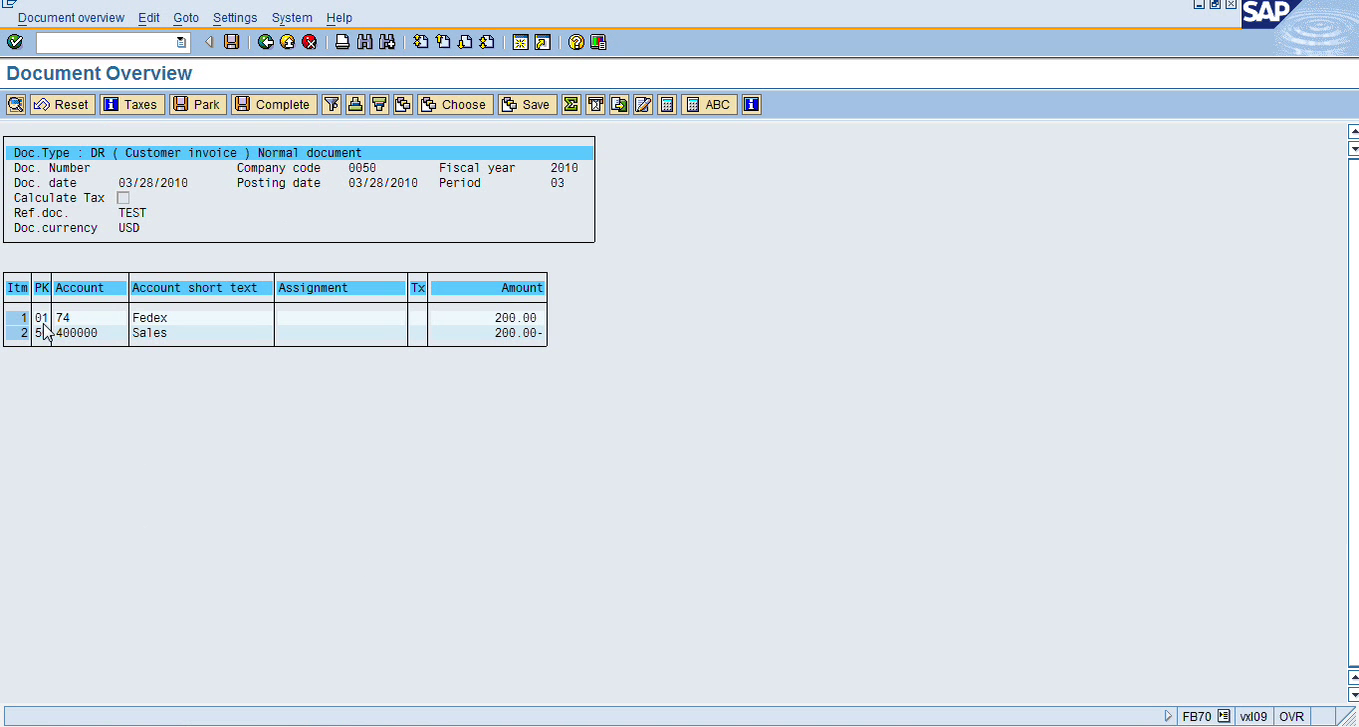
And now see this posting key is 01 because now we are debiting customer account. So, it’s 01, and posting key 50 for credit to a GL account, posting key 50. I can go ahead and post this. And my customer invoice is posted.
I’ll tell you how to retrieve a parked document. Let’s go in FBV0. Basically, we are retrieving a parked document and we’re going to post it. So then go in document list, because we don’t have a document number. So, enter your company code, fiscal year, entered by, might be your name I believe and then execute.
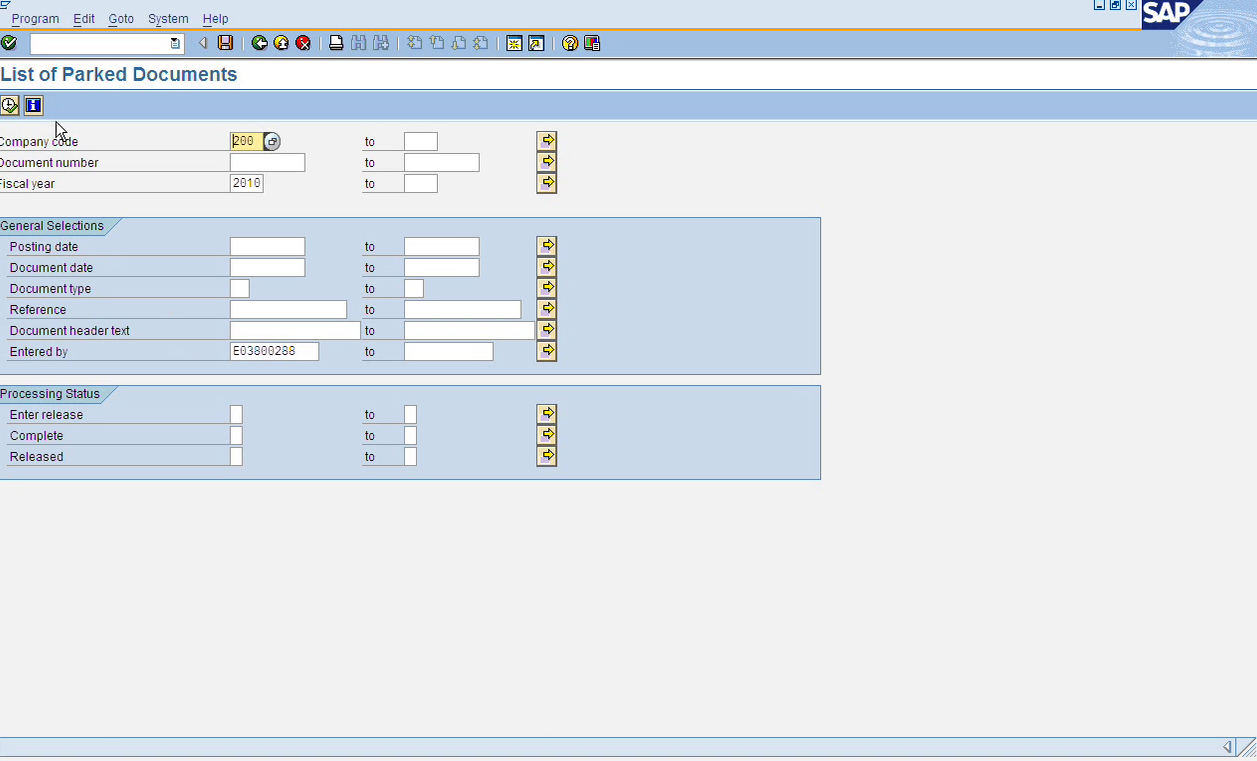
So, just click on Execute. So, you should have that document and then you double click on it.
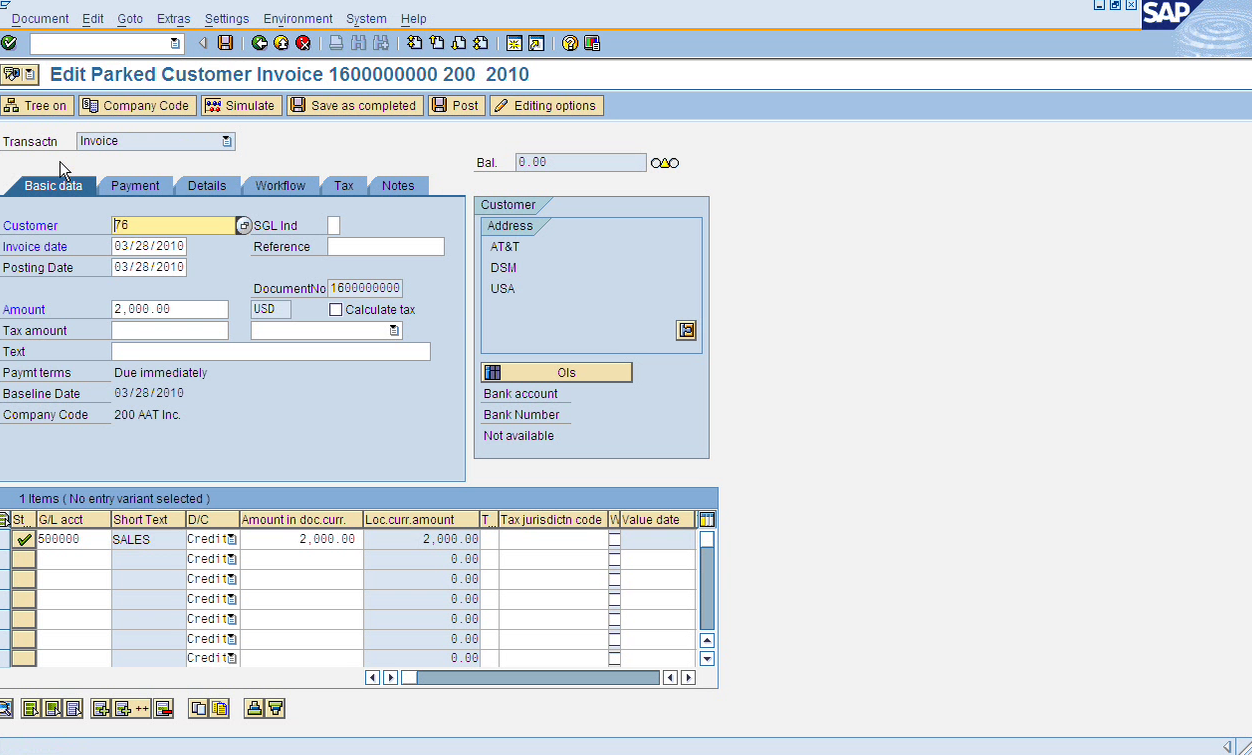
So, this was the document that you’ve parked. So, I think we discussed in the first class the functionality of parked mode. Normally we use it when we don’t have the information or if we need approval from a manager, so we don’t want to post it but we still want to save the information. So, for that purpose we need park and post so that, you know, the AR or AP staff can enter the document and park it. It’s not posted to the ledger yet, but then they can get the approval later from their manager and then they can decide to post it or delete it. On your top right you will see ‘post’, so this will post the document. You know, what happened on the month end, one of the processes on month end is to search to get a list of parked documents because, you know, some documents you park and you forgot to get approval, they will be hanging. So, you want to make sure one of the month end processes is to go over a list of parked documents and make sure either they are parked or deleted because you don’t want to leave them forever. So that’s what we went in FBV0 and from the menu it’s under Accounts Receivable, under Document and under Parked Documents, we have FBV0. So here we can decide either to post it or delete it. So, in this case, we decided to post it. Now if we go in Account, in balance, FD10N for your customer, we will see a $2,000 invoice. If I double click on the balance column, I’ll see it again as an open item because by default all customer and vendor accounts are open item management, unlike GL which you have to manually select.
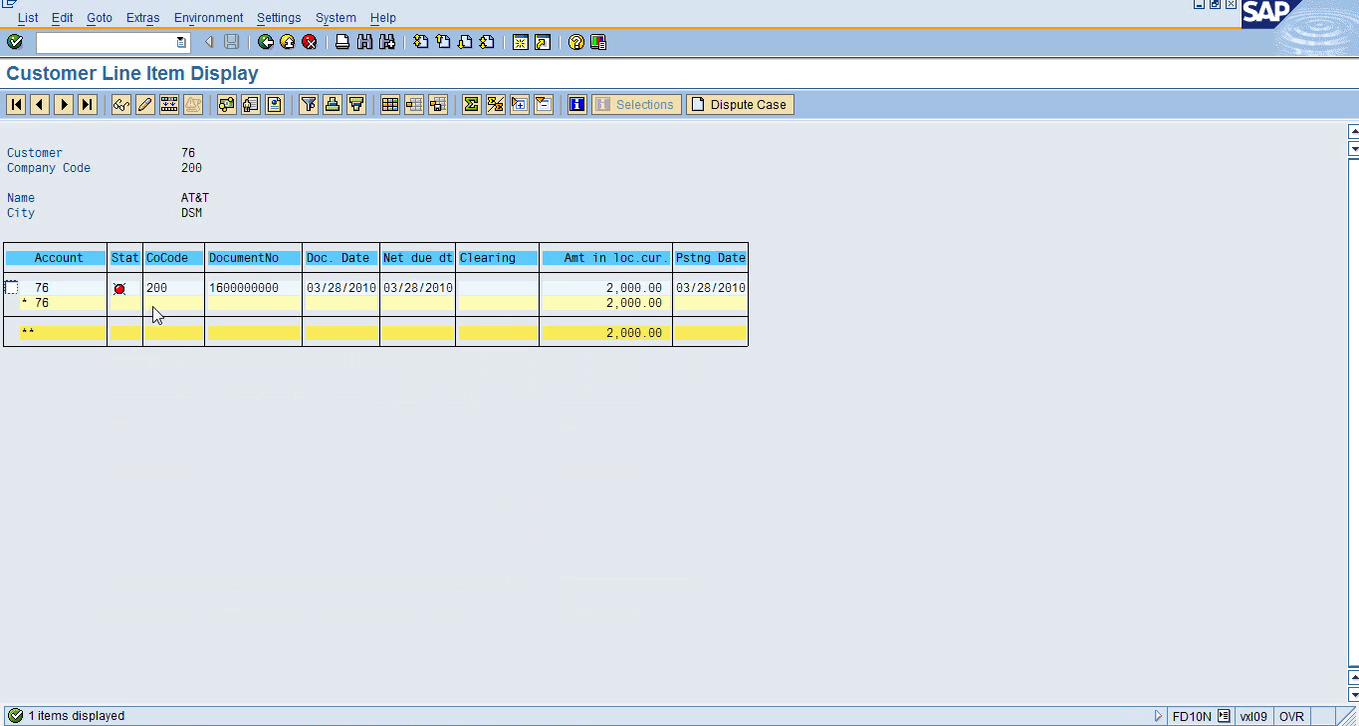
So now you have this invoice.