
Vendor Payment Revision
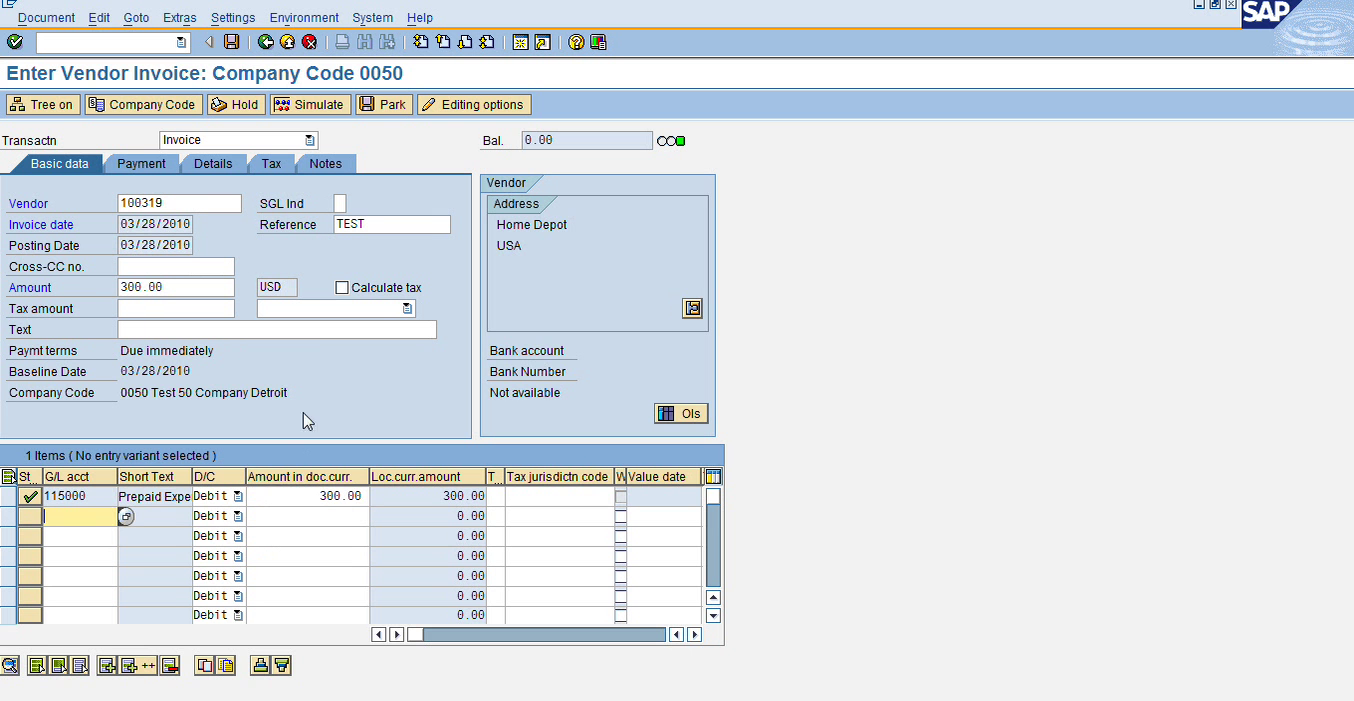
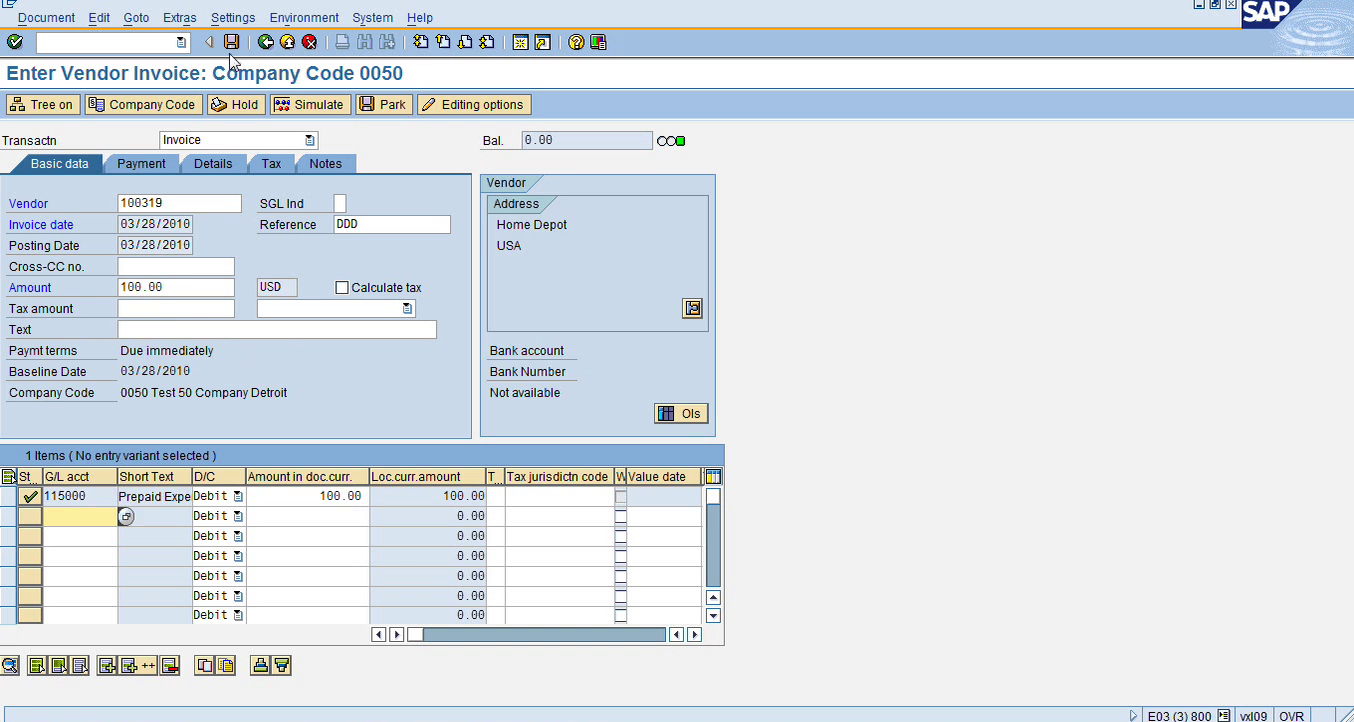
So, in the last class we did the credit vendors and then we configured the payment program. We paid our vendors by check. Let me just go over it one more time. I’ll just enter invoice, do a payment run, and then the new thing that we’ll do is we will reverse that check. If we printed the check but then we realized we don’t want to mail the payment, we want to cancel it. We cannot do an FB08 like this for GL entry. We have to reverse the payment. So let me start with that. So, I’ll just enter invoice. Let’s do it for $300.
Thank you for reading this post, don't forget to subscribe!
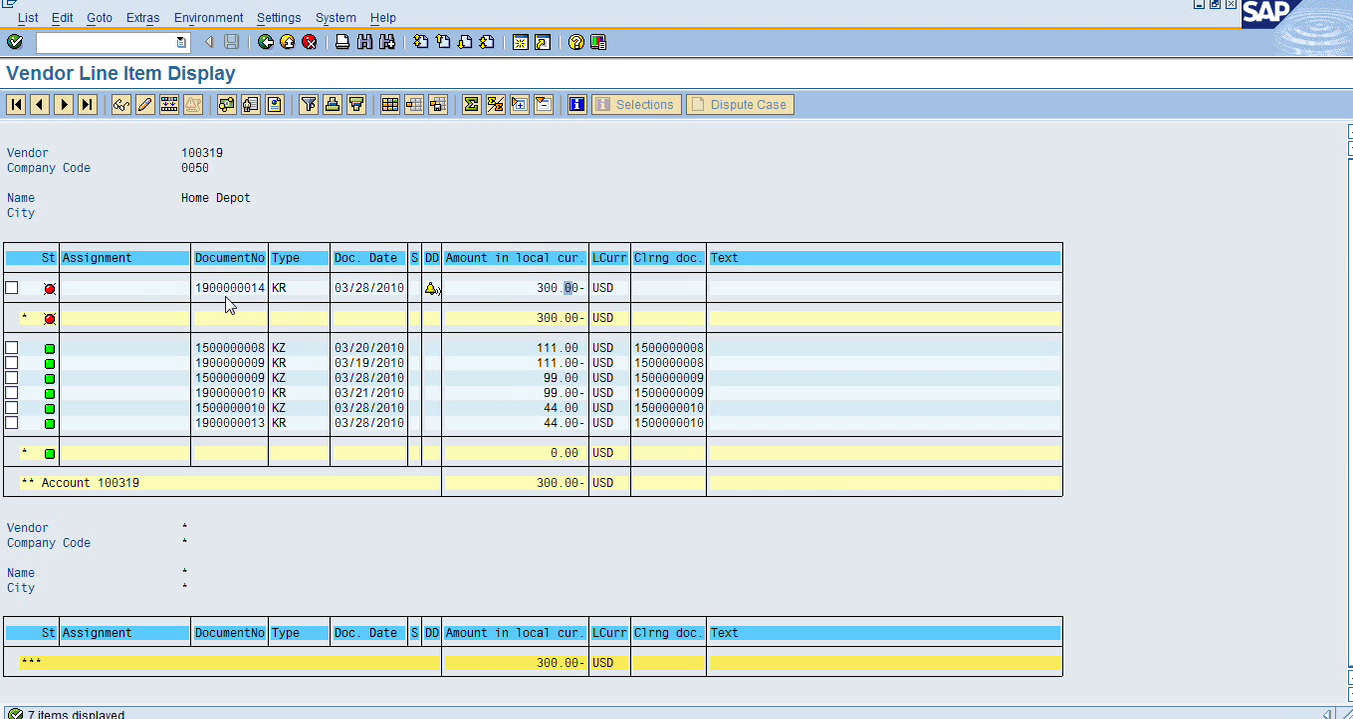
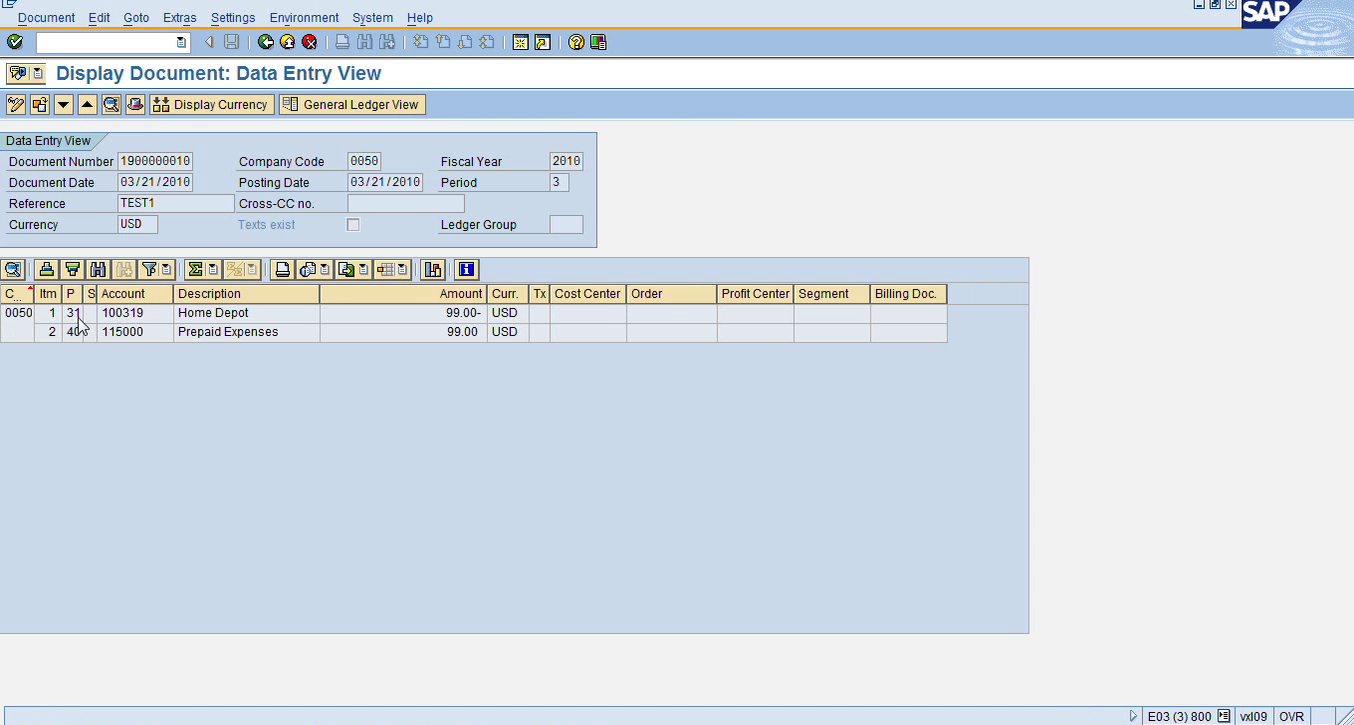
I’ll go ahead and save this so I have one invoice. So, the transaction I have to use if I want to see the balance in the vendor account in accounts payable is FK10N. FK10N, that’s for vendor. So, K is representing the vendor. If we do FS10N, that’s S is for GL, FS10N and if you want to do accounts receivable, it will be FD10N. So, these three transactions are used for GL balance, AP balance, AR balance. So, I’ll do FK10N. So, I’ll use my vendor 100319. So, if I see that, so it will have this $300 balance for my invoice that I just entered. If I double click on the balance column, I’ll get all cleared invoices except 1 and this is the one that I just entered, this is for $300..
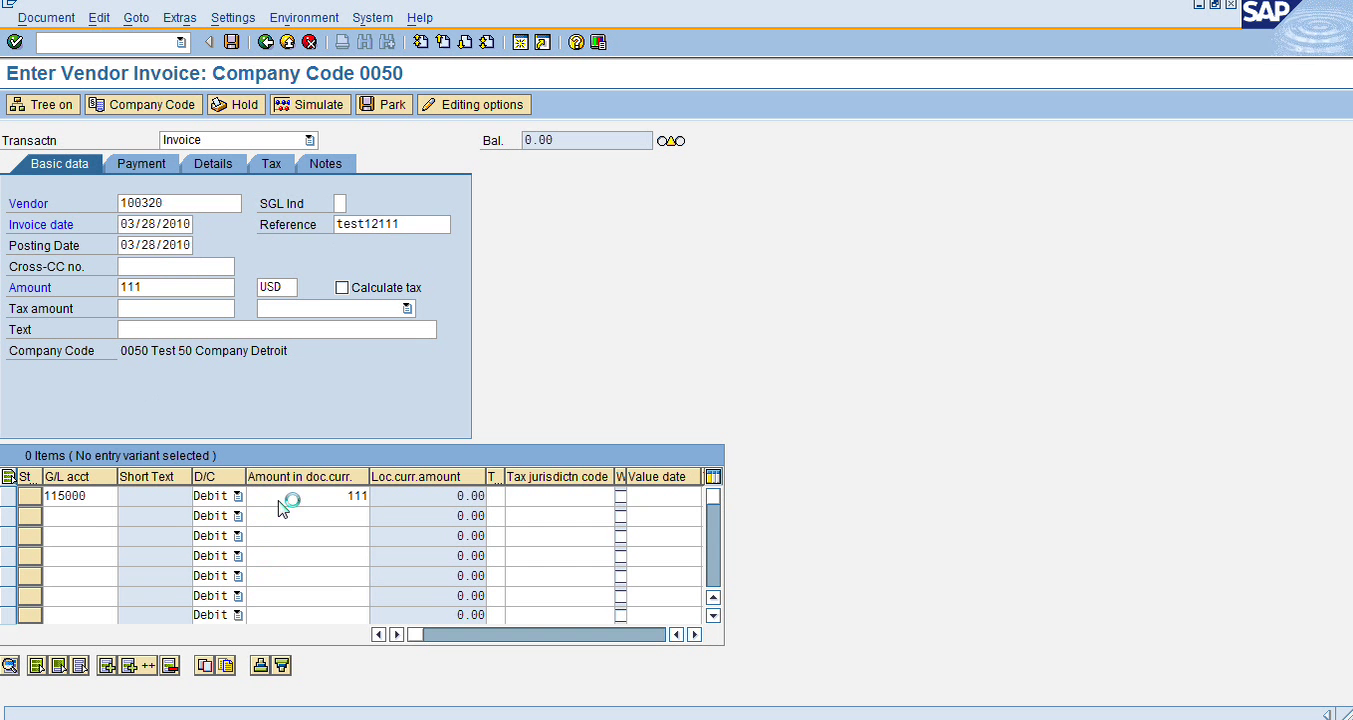
So, I’ll go ahead and pay this and after paying this it will also turn green and I’ll do the payment run. So, let’s pay this vendor invoice for $300. Let me do one thing, let me enter one invoice in another vendor. So, we will pay 2 vendors in this payment run. So let me use one of my other vendors. So, let’s use ‘VXL’. Let’s do this for 111.
Okay. So, I have 2 invoices. So, I’m going to pay these 2 vendors now with my payment plan, so, transaction F110. So, this morning I did KB01 so I’ll do KB02, start with a new payment program. KB02 enter my parameters, my company code, payment method, next payment date. So now I want to do 2 vendors. So, either I can enter a range or I can list them separately here, single values if they’re not in a range. I can list them individually, but let me do a range. I will do from 319 to 320.
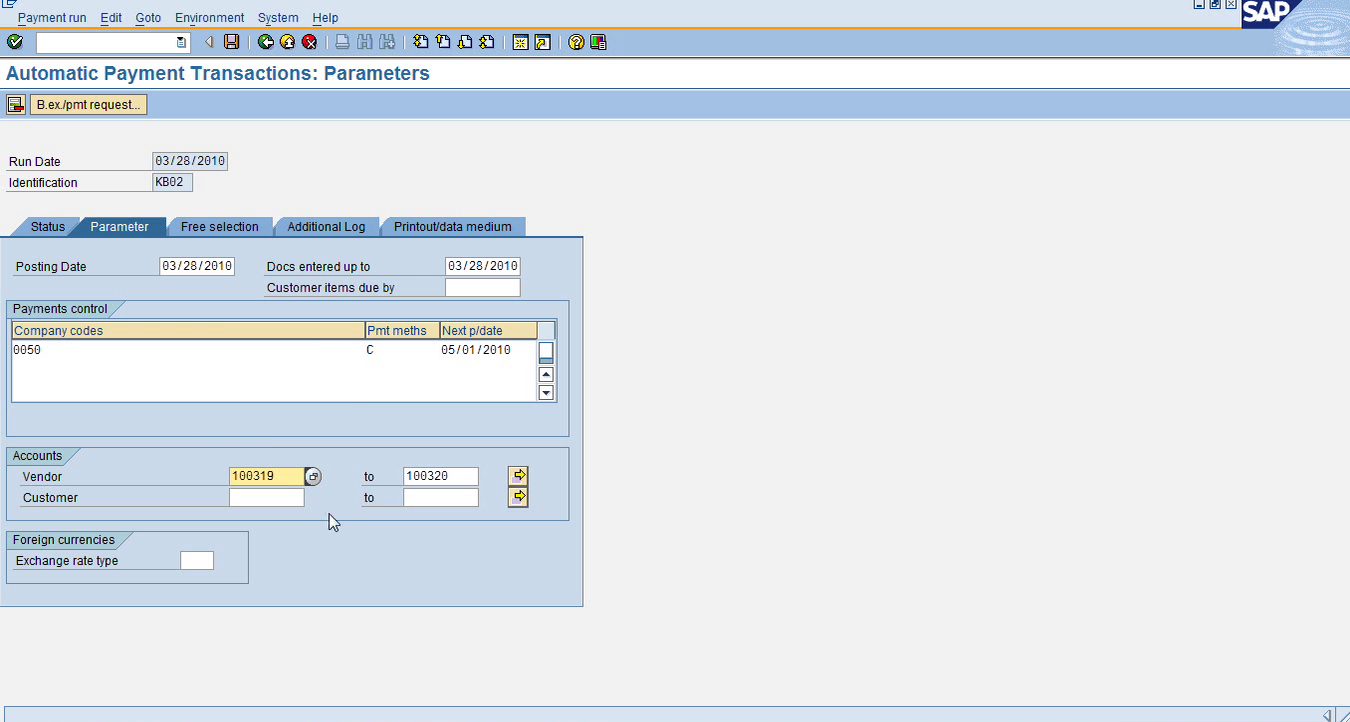
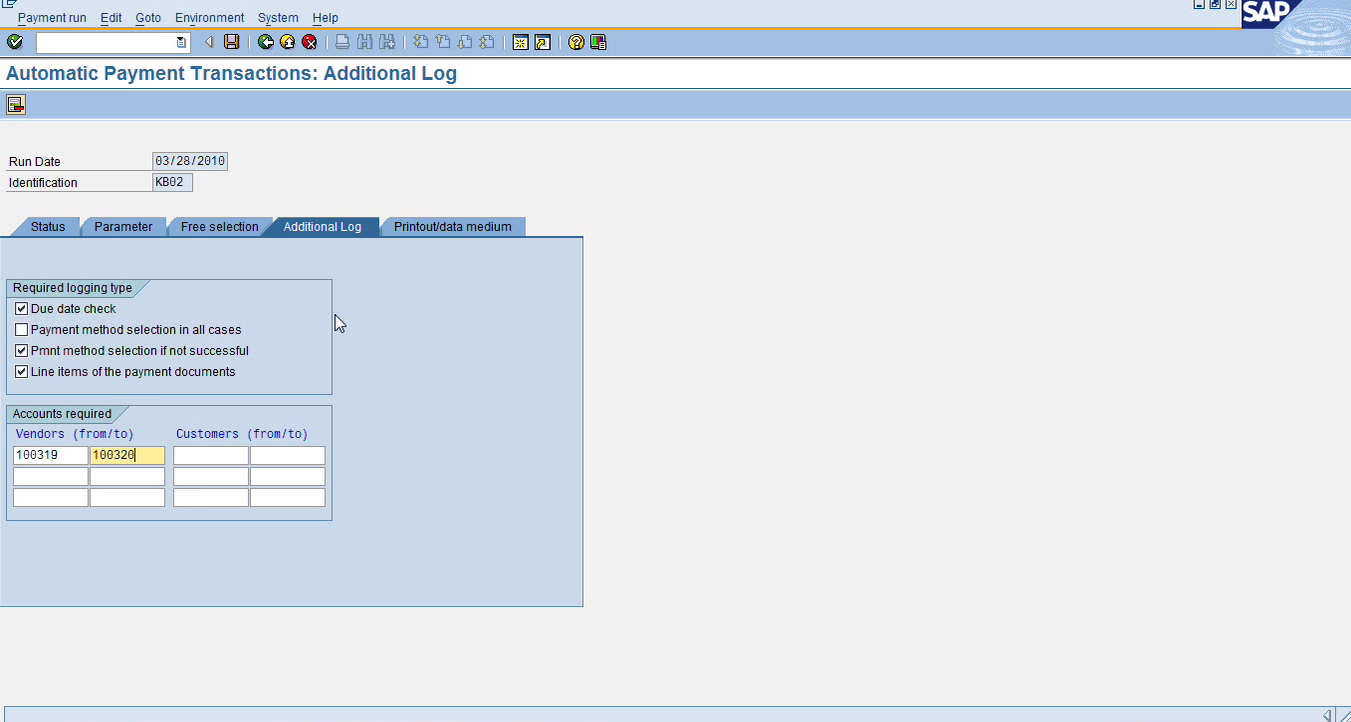
That’s all I need on this screen. I’ll go on additional log tab, check due date check, payment method selection if not successful, line items of the payment documents, and now I’ll use 319 to 320.
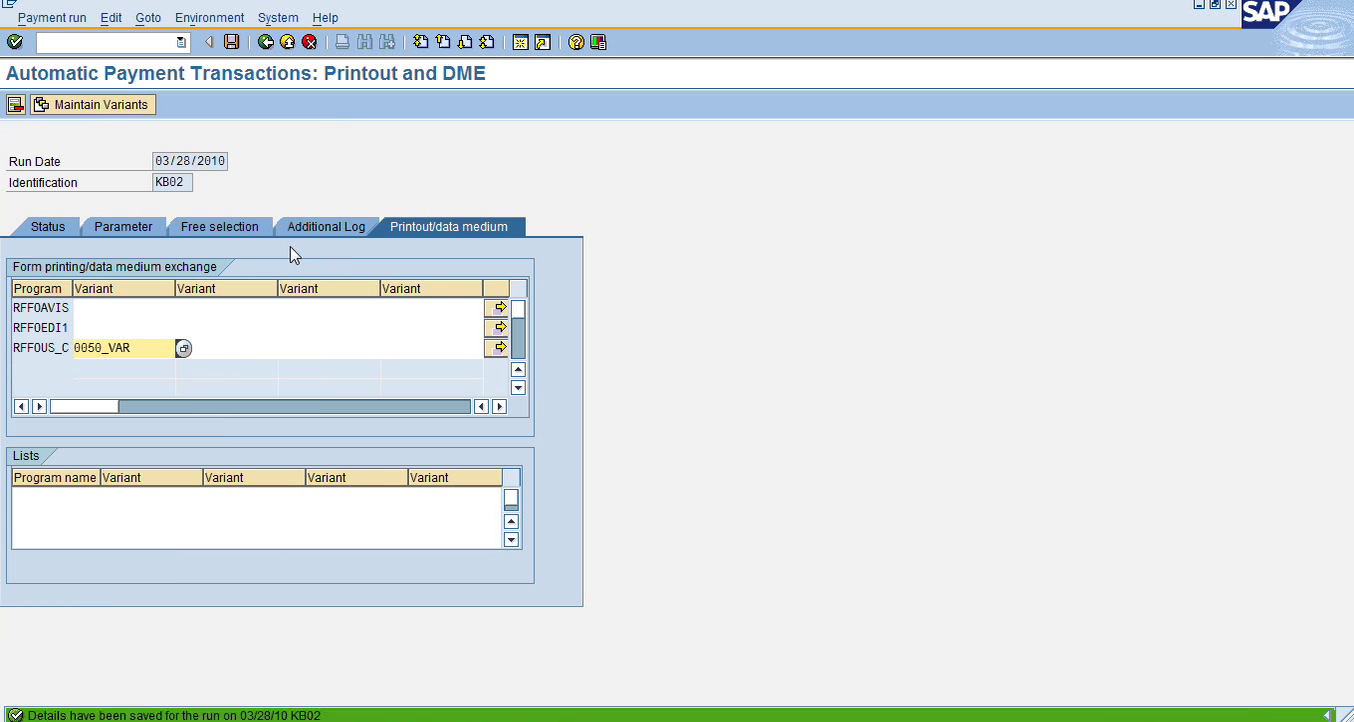
Now I will choose my variant which is I know 50 VAR and I’ll choose this.
Now I will save this. Details have been saved for this payment run. I’ll go back in the status tab. And I’ll do the proposal, ‘start immediately’. Alright, proposal is running, now it’s completed. I’ll click on the pencil, all accounting clerks.
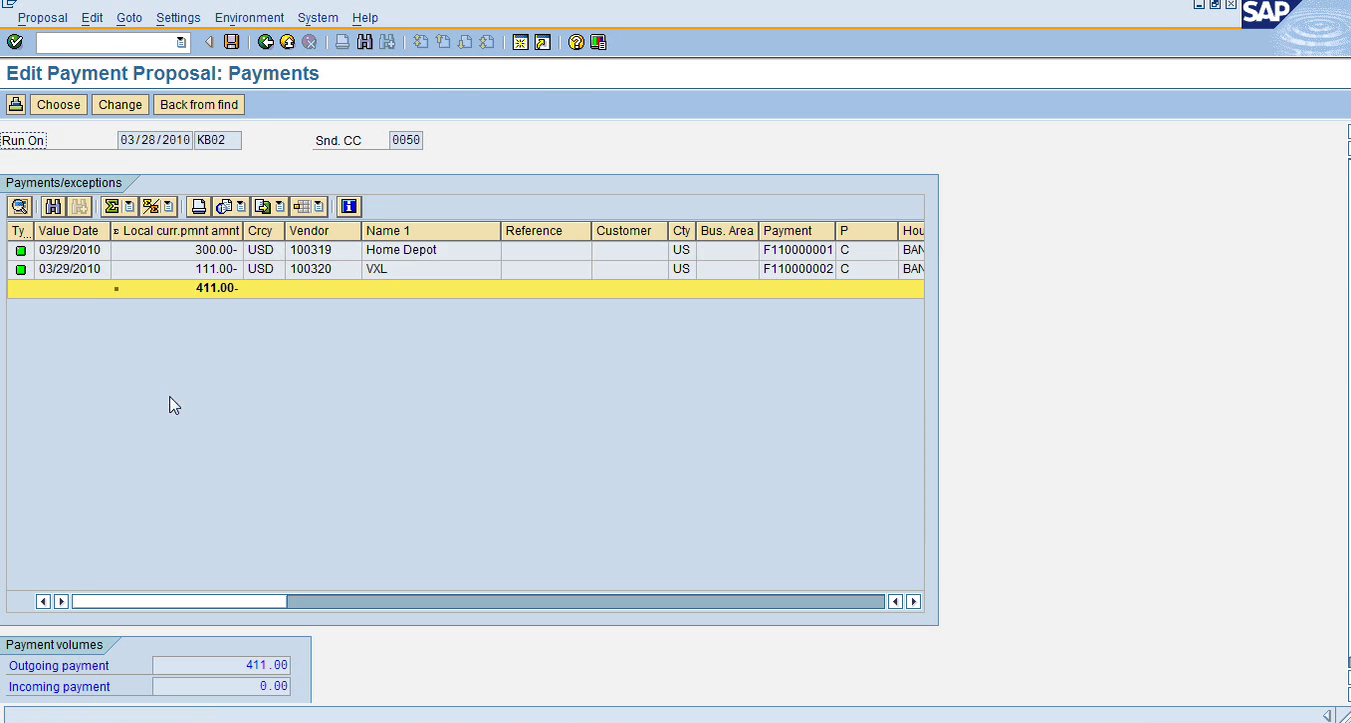
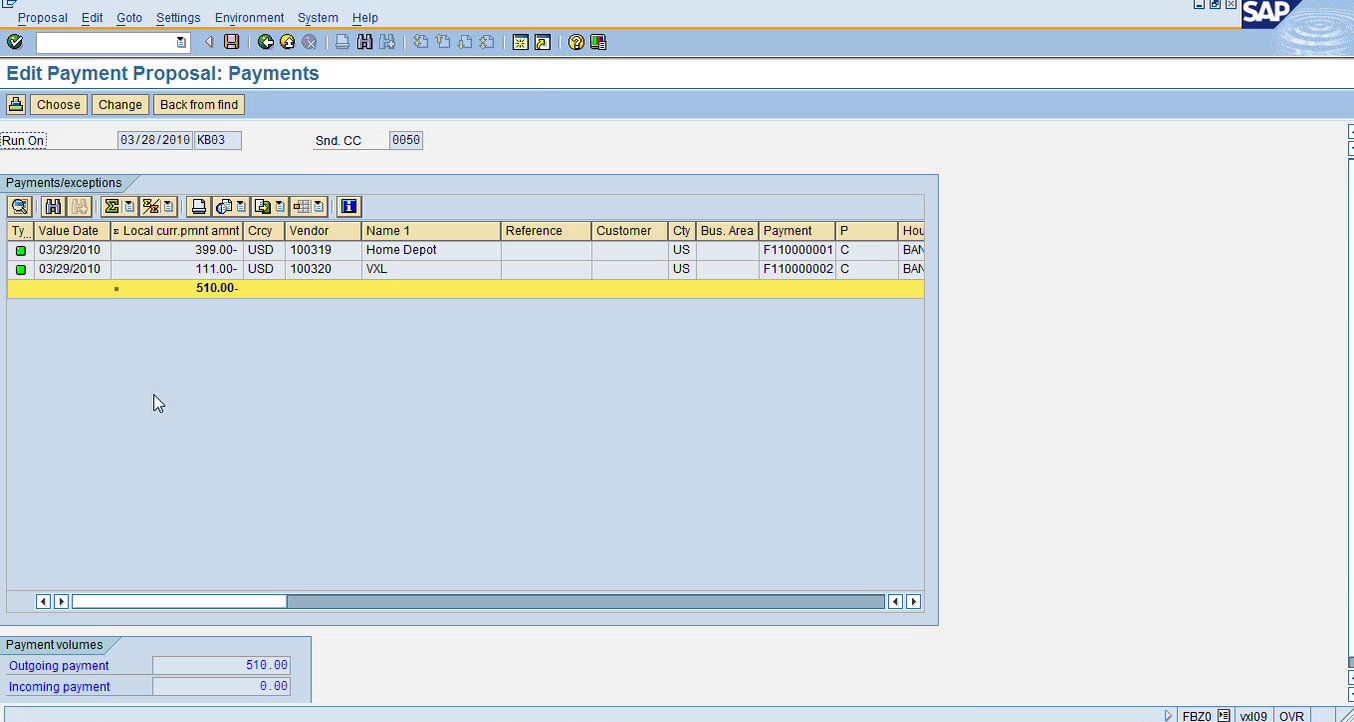
So, I got 2 invoices, 1 for VXL, 1 for Home Depot. First is vendor 319, second is vendor 320. So, I got both invoices. And I just want to go over one more time, if I want to block one of these payments, let’s say these 2 vendors come up and I don’t want to pay VXL, So I will just double click on this, and then, I can do block all, A is basically block for payment, and I can do block for payment. Now this is blocked.
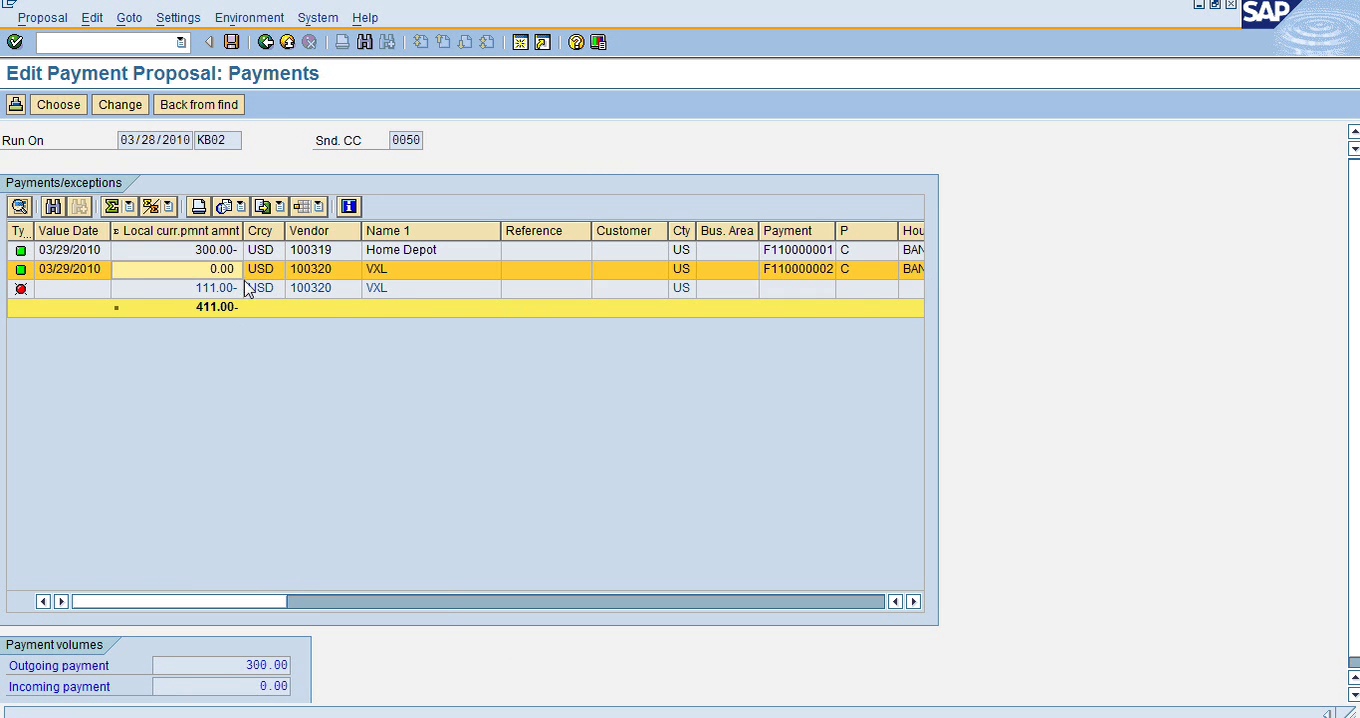
See? 100 is coming here, but this is now 0. It is showing 0 because this is not included in the payment run. If I save this data now if I go in proposal see this is now it’s coming with a red light.

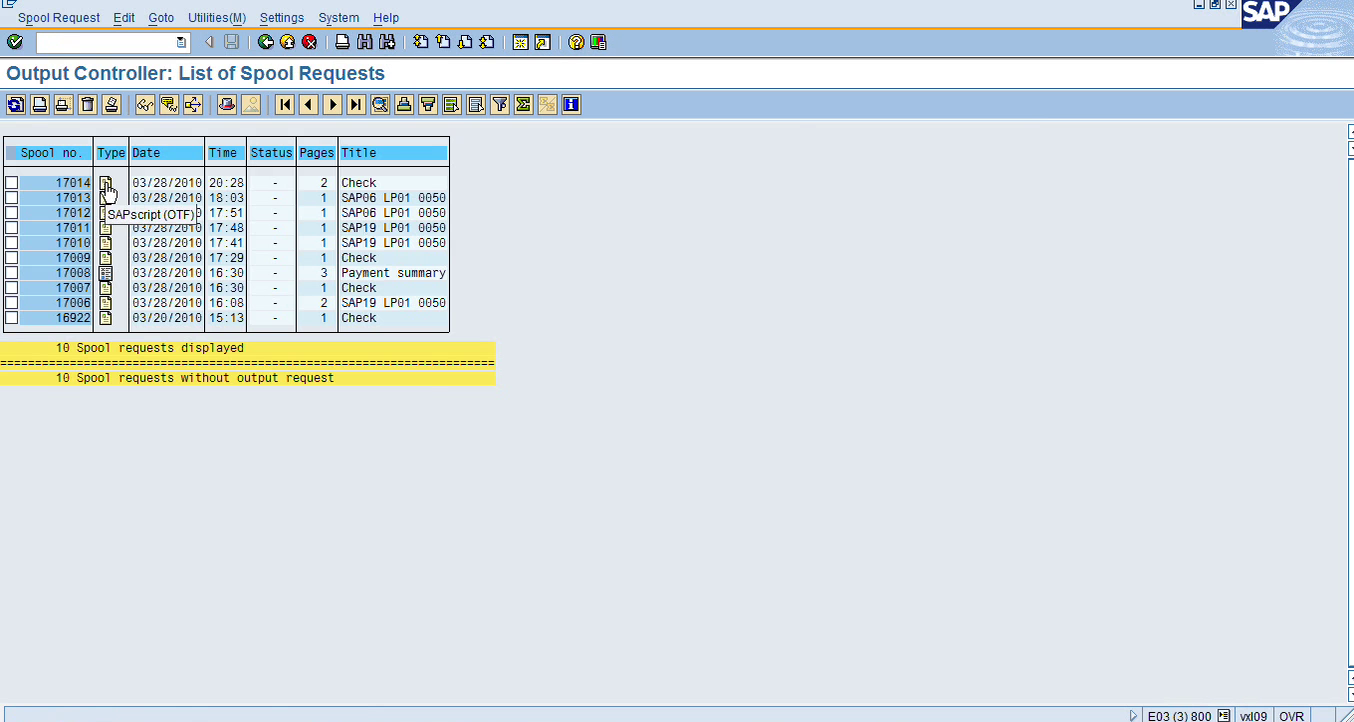
See? This is not included. So, if I want to include that back, I’ll just double click on it, then I’ll just remove the block indicator. Now when I go back, I think it’s created a new line. This is a little bit different on 6.0. So, I guess the second line is removing the block. So now let’s say if I want to go ahead and pay these vendors; so, I’ll just click on payment run, start immediately, and continue. Payment run has been carried out, so I want to print checks. I’ll click on ‘printout’. Now I can go in my Spool Request and click on it.
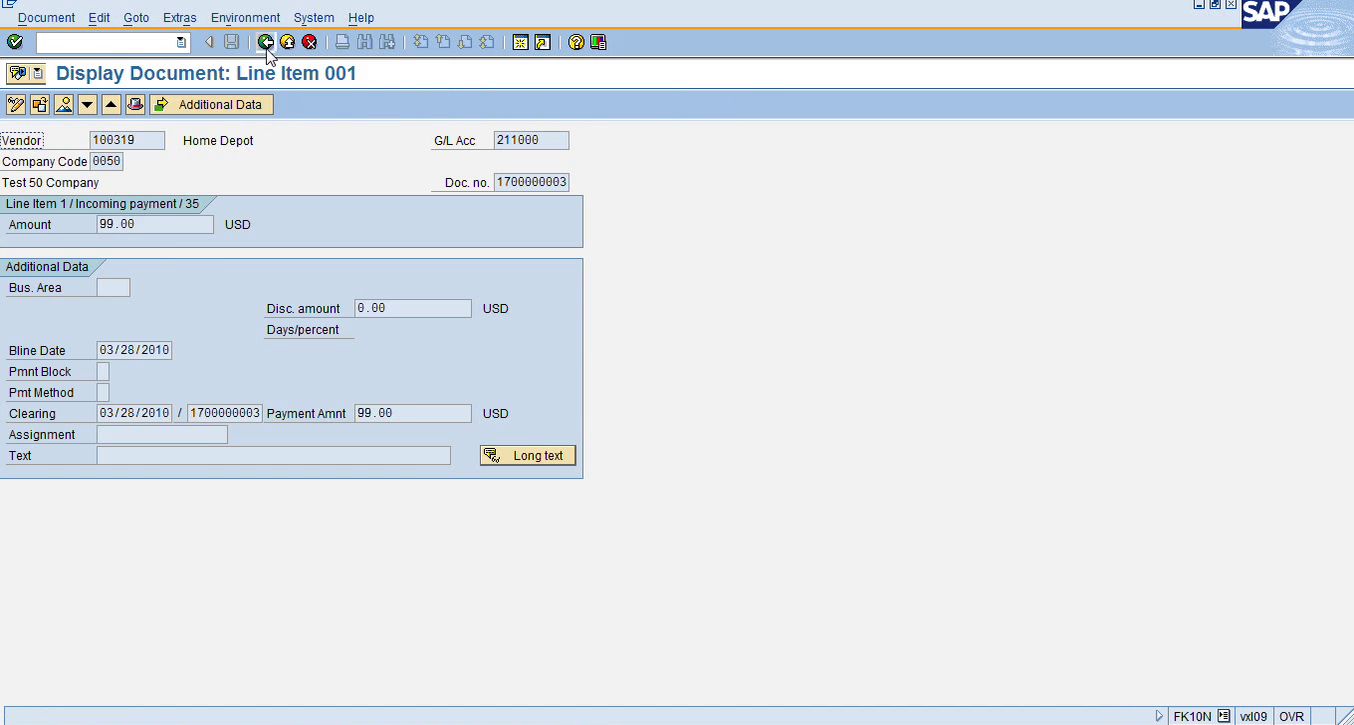
But let me show you how to reverse a payment. So, this is the last payment that I did. So, the check number is check no. 9, as you can see in the screen here and it’s for $99 that I made the payment to Home Depot.
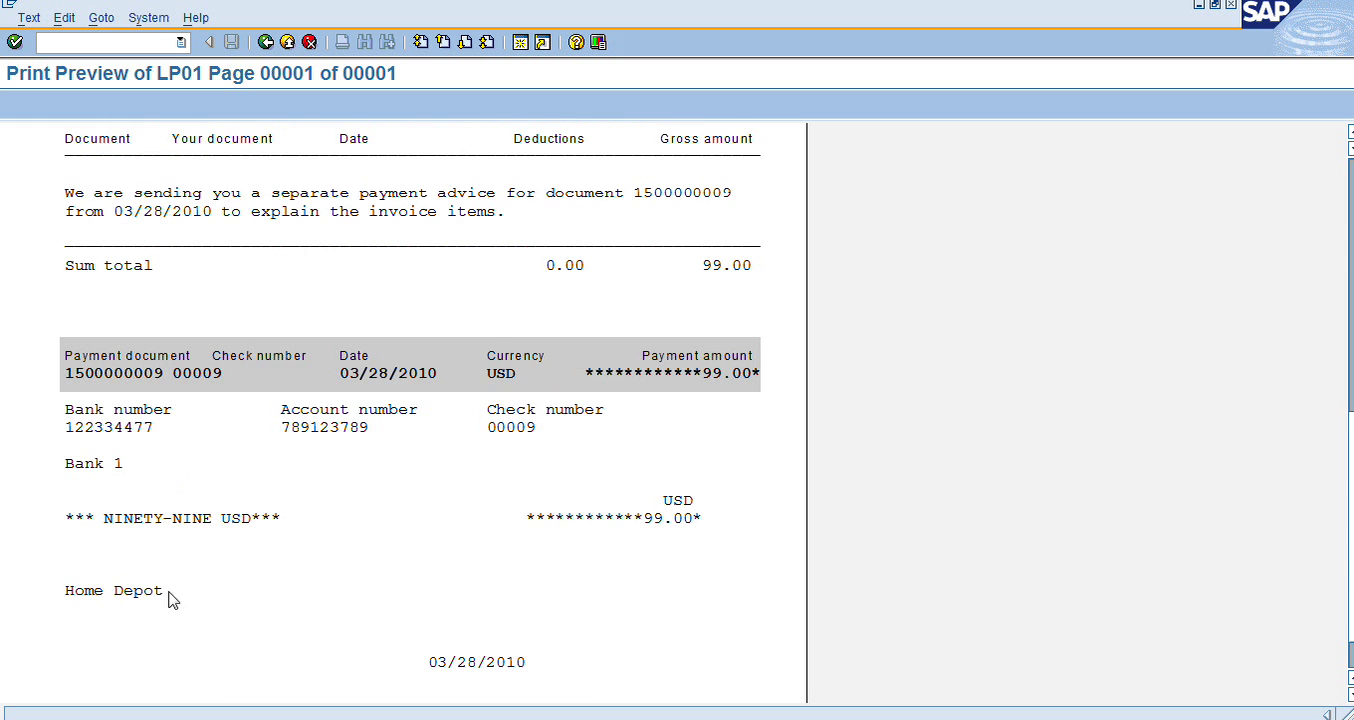
So, let’s say if after printing the check, I realized that we have to reverse the payment and we don’t want to pay this vendor. So, we know that on the GL side we can use FB08 to reverse the payment. But on the check, we have to use FCH8.
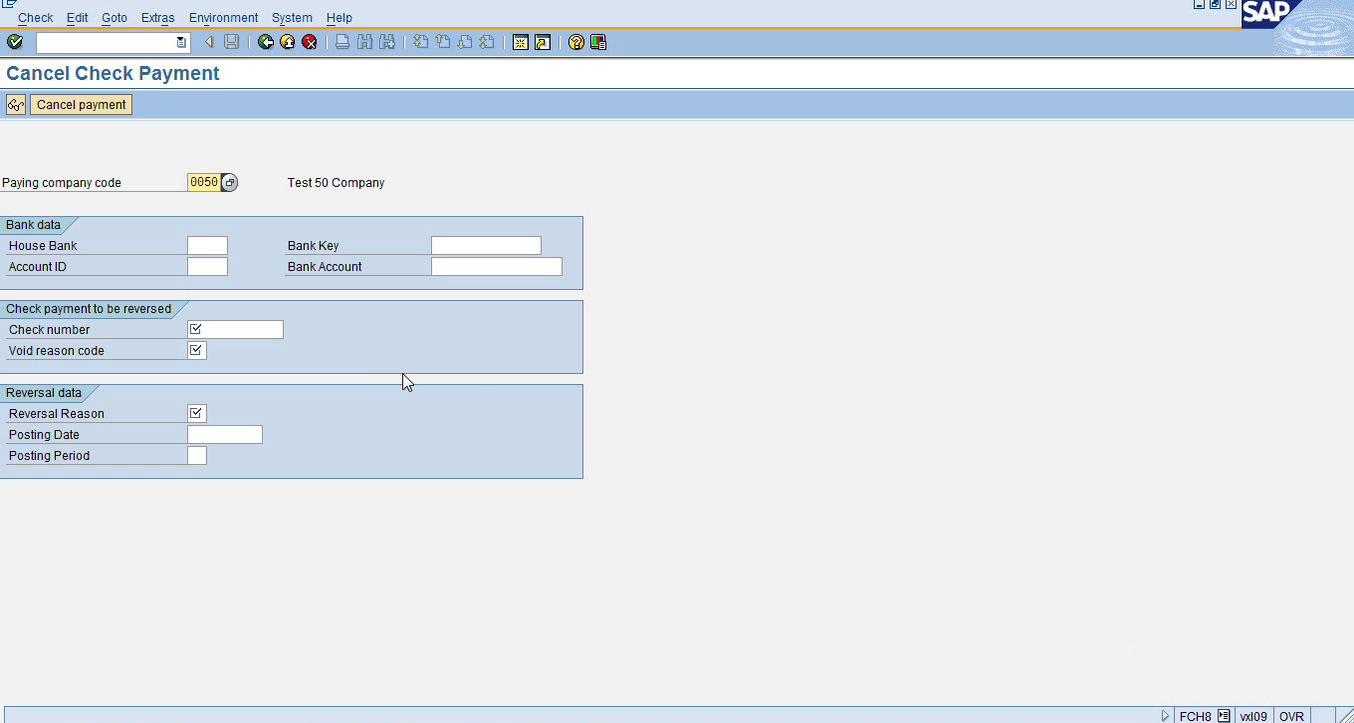
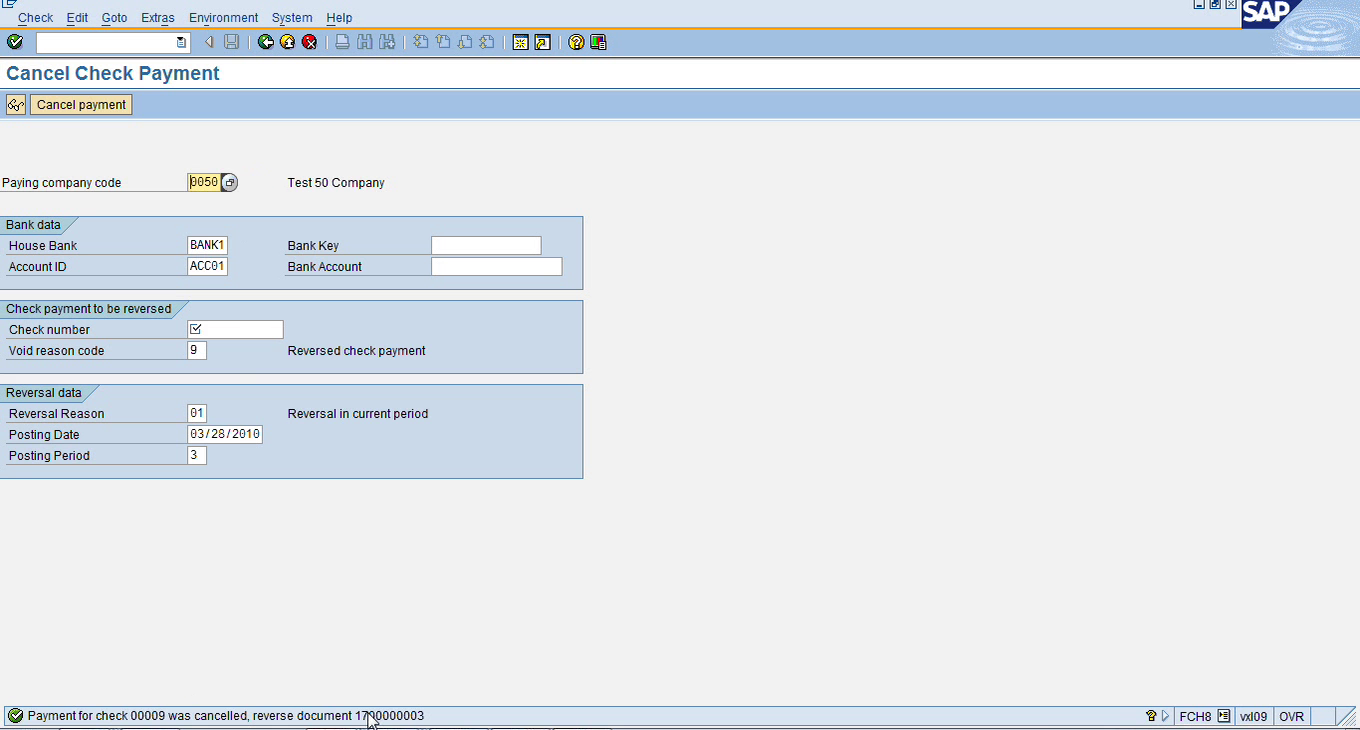
So, this is a canceled check payment transaction, FCH8. You should be able to see it on the bottom right of my screen, FCH 8. If I use this transaction, so let’s say my check number is 9, it gives me the check number also. Check number 9.

And then I can have to choose a void reason. Let’s say reversed check payment. Reversal reason, reversal in current period.

So, if I click on ‘cancel payment’, so now I posted a reverse document and it has canceled the check number also.
So, these transactions we might use, if there’s something wrong with the check or if you don’t want to mail the payment then we can use this transaction to reverse the payment. Let’s see how it looks.
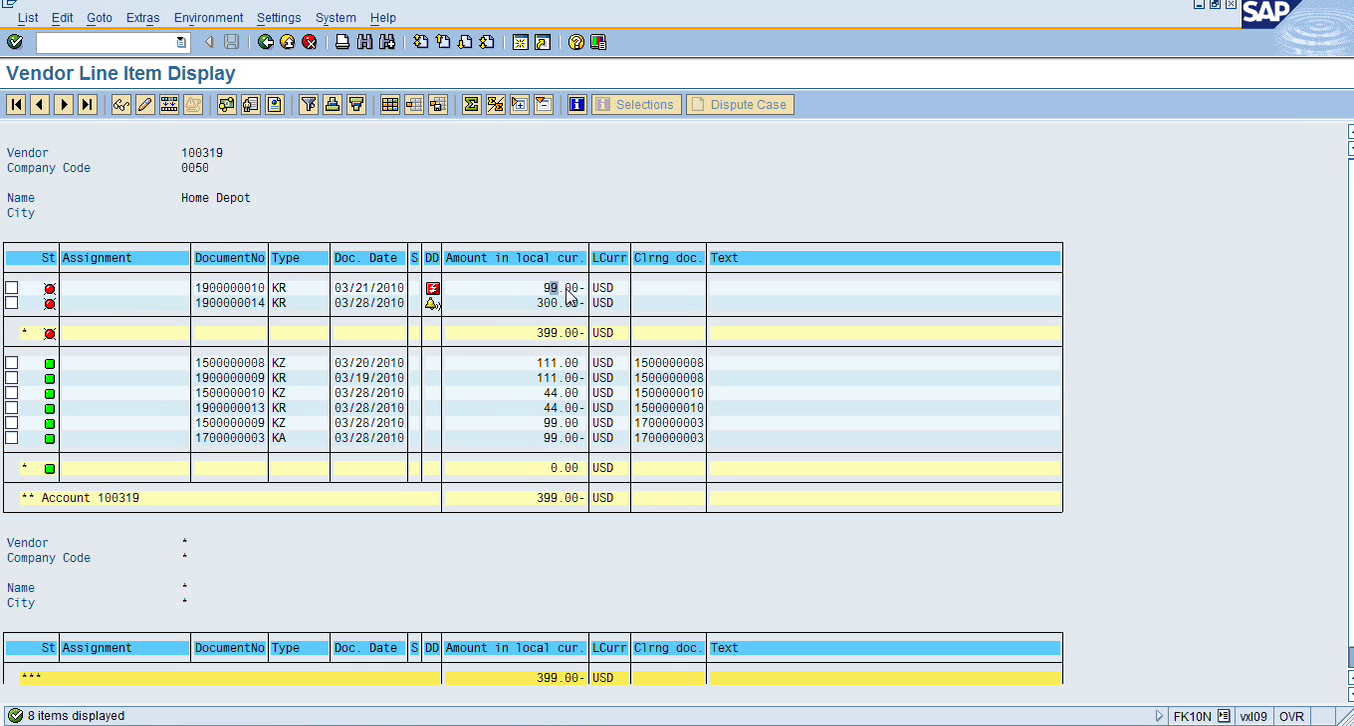
So now I have this $99 invoice open now, because I reversed the payment. So, this invoice was already cleared but when we reversed the payment it put the open invoice back. See this $99 is open again now. And this was the reversal document that is posted.
So, this transaction you might have to use after doing the payment run you realize that, you know, you have to reverse something. So, this is how you can reverse.
For some reason, my payment run didn’t go well. I have to see what happened. Let me do that again.
Let me do this payment run.
So now this should be my 2 checks here at the top for these 2 payments.
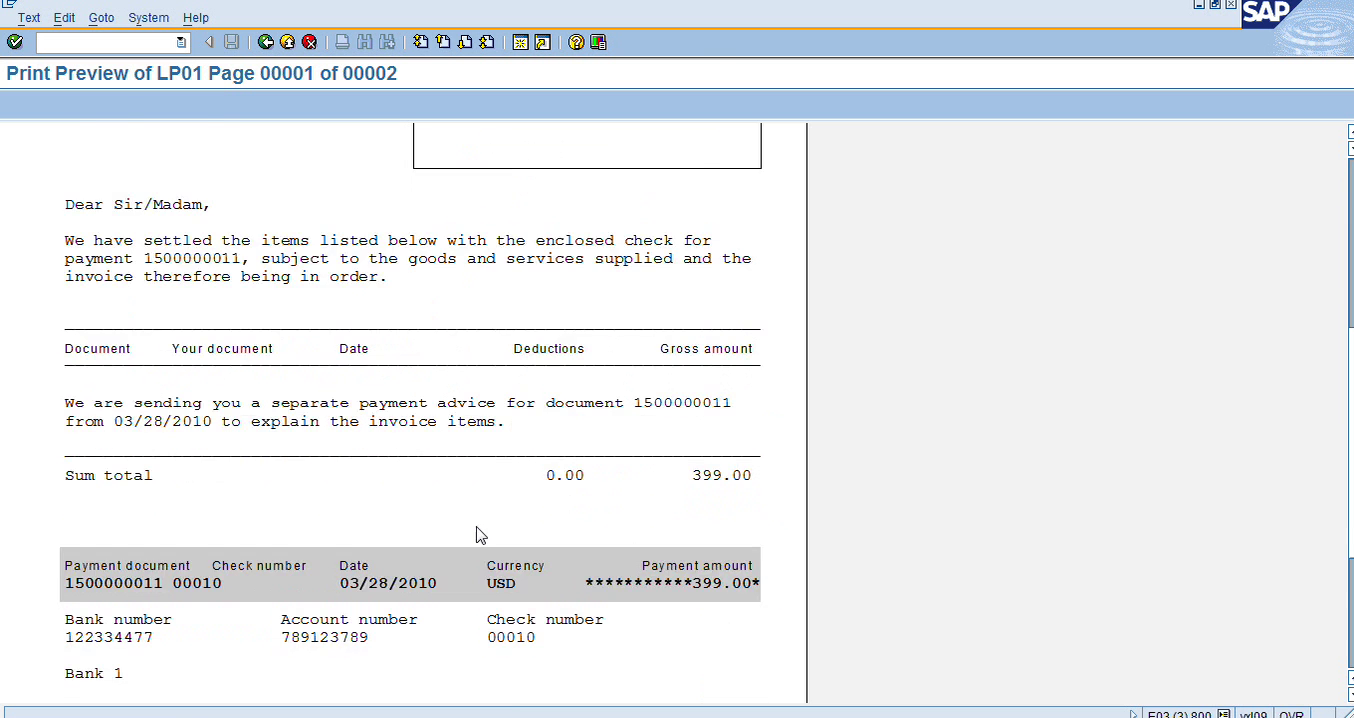
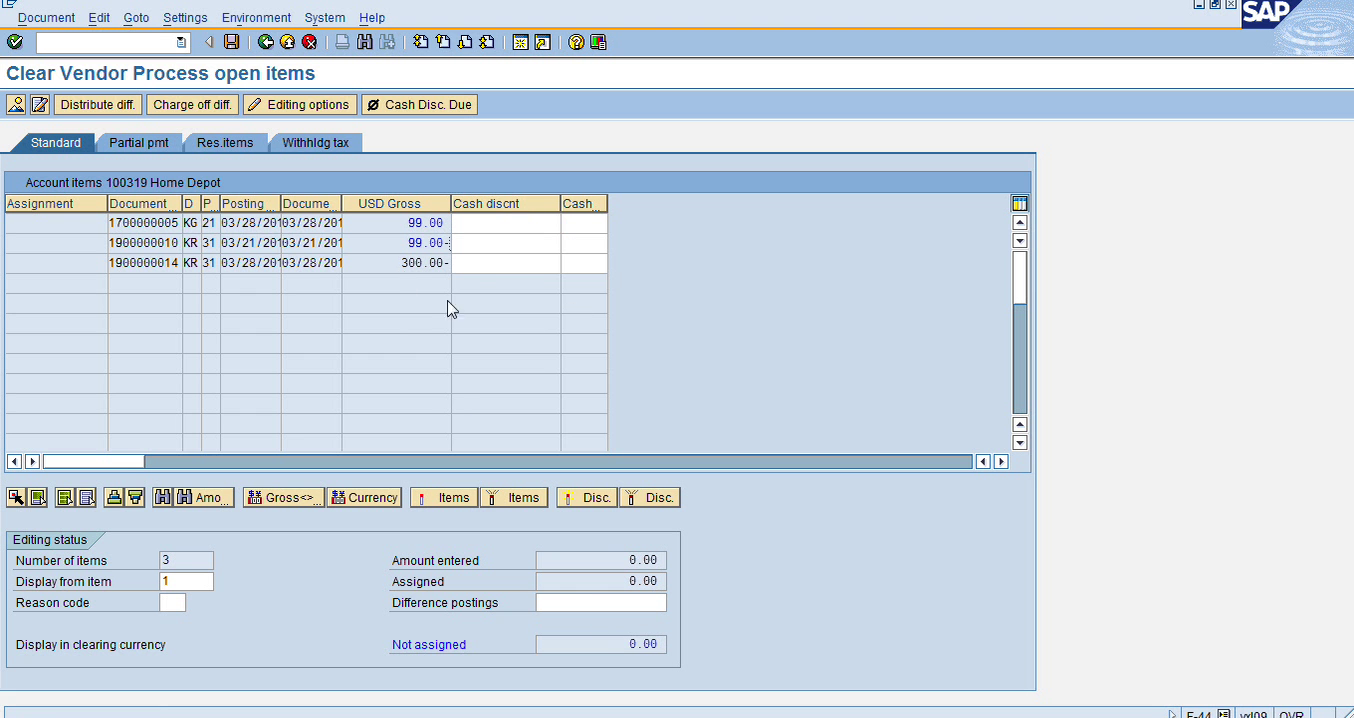
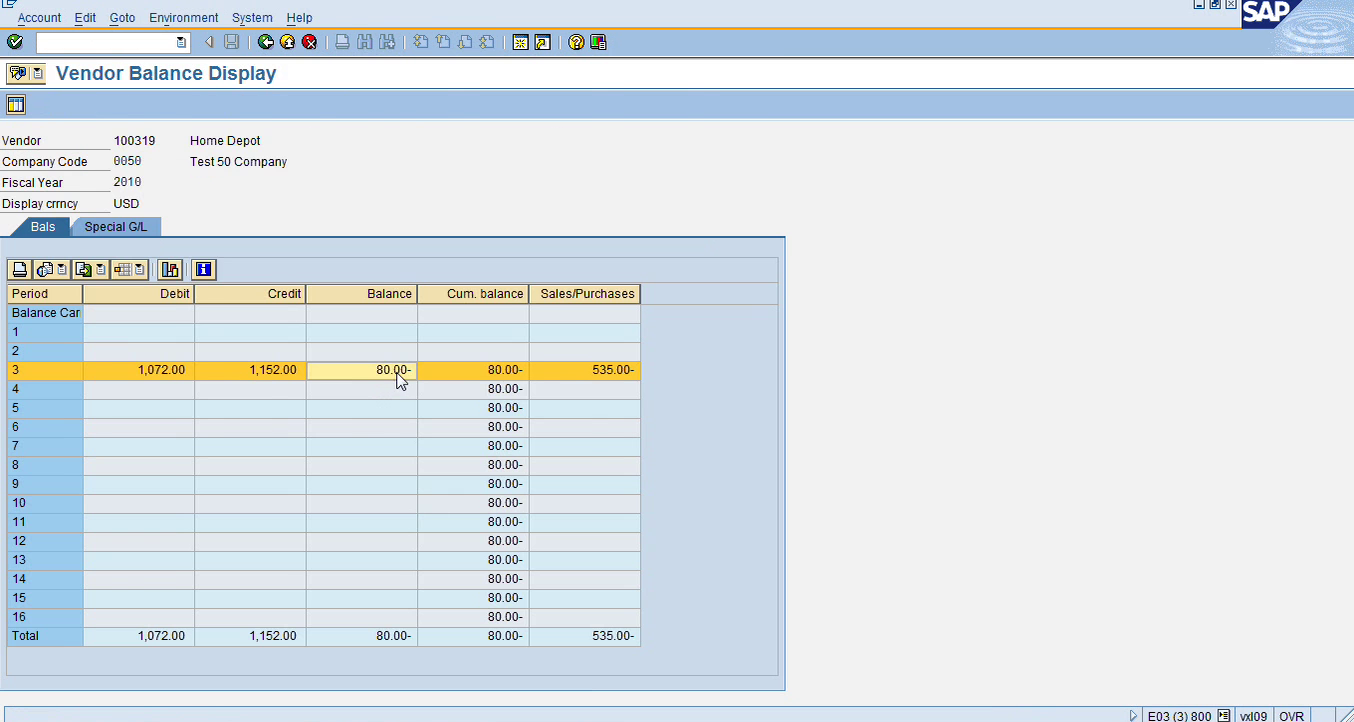
Okay. So 399 to Home Depot and the second one was to VXL for 111. This is how you’ll pay two vendors in one payment run. Let’s see the balance now. If I want to reverse one of them, let’s say if I were to reverse that $300 payment. So let’s say check number 10 was $399, right now my balance is 0, I want to reverse this check payment, check number 10.. So, I’ll go in FCH8, my house bank account ID. So, my check number is 10, that I’ll do in reverse for Home Depot. Reason code, stop payment. Click on Cancel payment. So, it canceled the payment. Now let’s see the balance again.
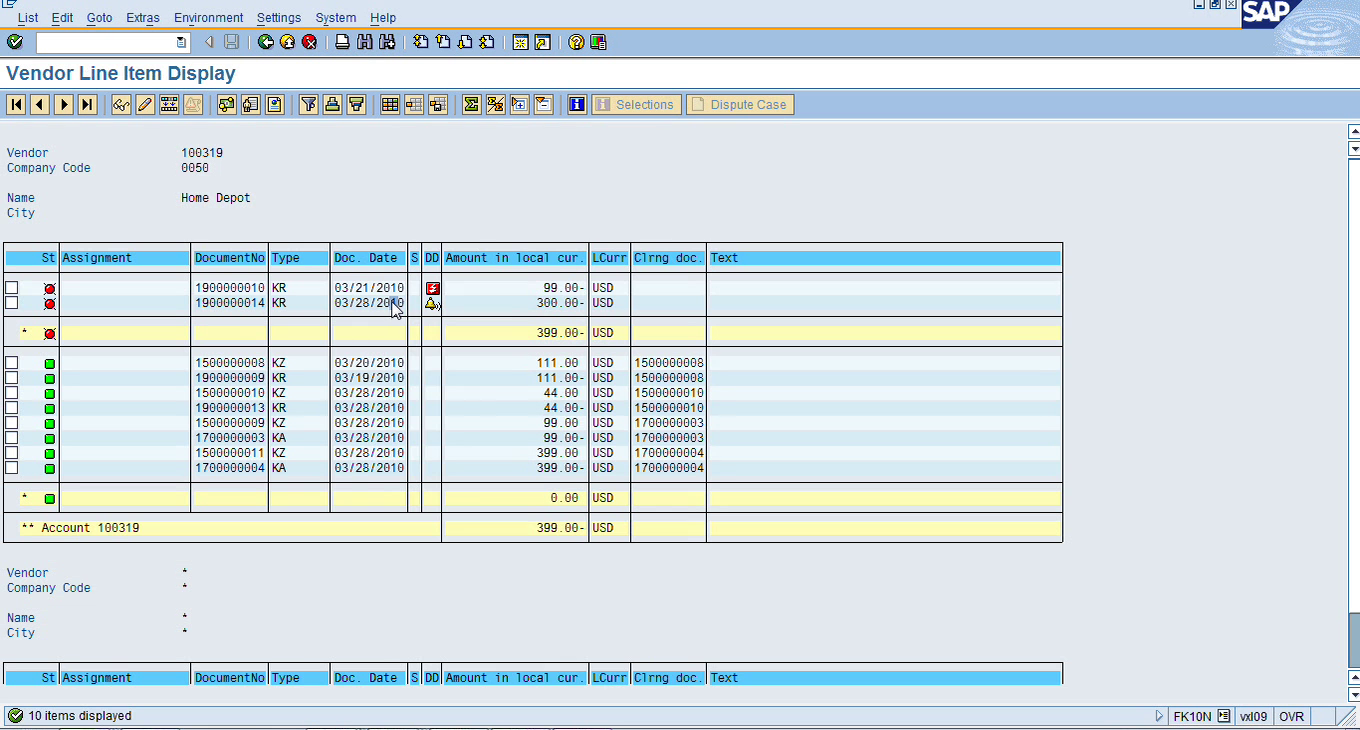
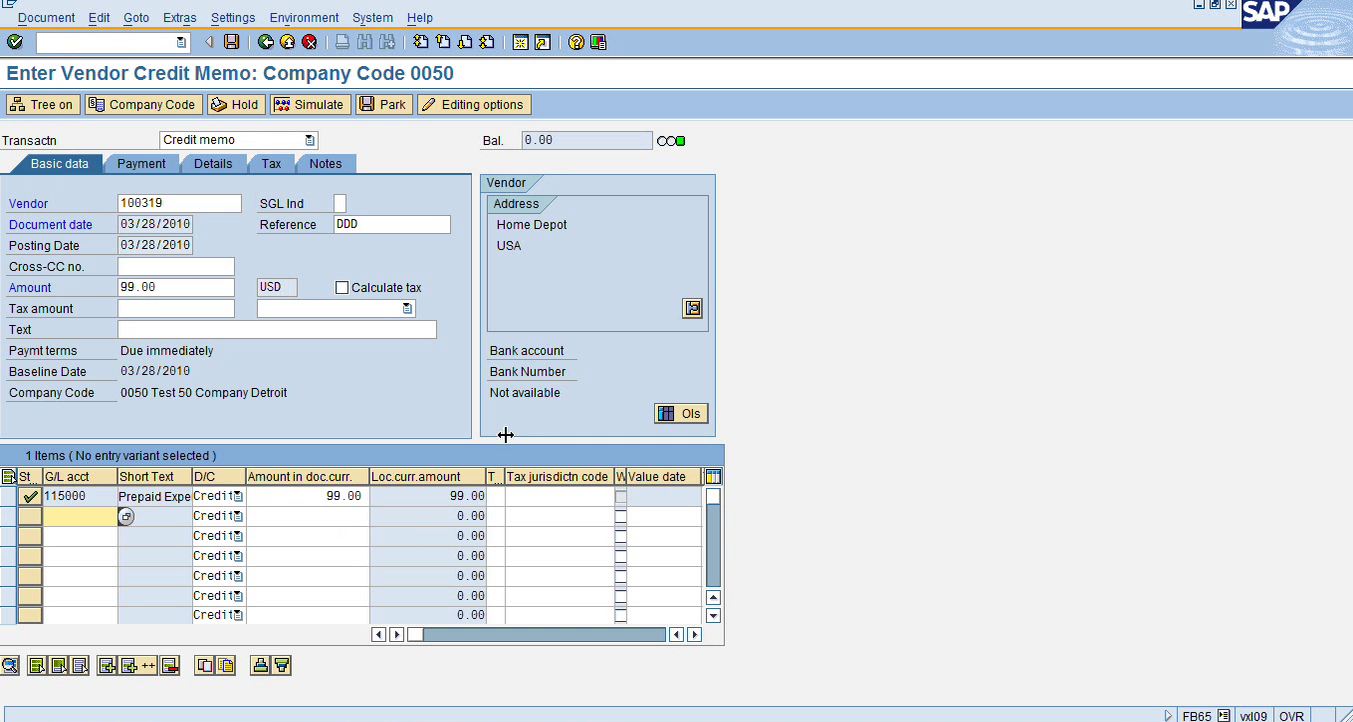
So now I have open balance of 399. So now these 2 invoices are open again. I paid those with this document here, 17004, but now since I reversed that payment, these are back open or back in the account as open items. So, F-44 is to clear open items. It’s just like in each ledger. So, in accounts payable, in accounts, it’s F-44. But on the GL side, it’s something else I remember, it’s F-03. So, these are exactly the same transaction and in accounts receivable we also have some similar transaction, so these are very similar. Let’s say if I enter a credit memo. So, I know in my in my Home Depot account, I have an invoice for 99 and then I have an open invoice for 300. Let’s say we don’t want to pay this invoice. So, we call the vendor, we say okay we don’t want to pay it, we don’t agree with you, so please give us a credit memo. So, let’s say they mail us a credit memo. Now we want to enter that credit memo and clear that credit memo with this open invoice because we don’t want to pay it. In that case, so let me enter a credit memo for $99 and then we will go in F-44 to clear these open documents. The transaction is to enter a vendor credit memo is FB65. FB60 is vendor invoice, FB65 is vendor credit. So, I will choose my Home Depot vendor and I will enter it for $99.
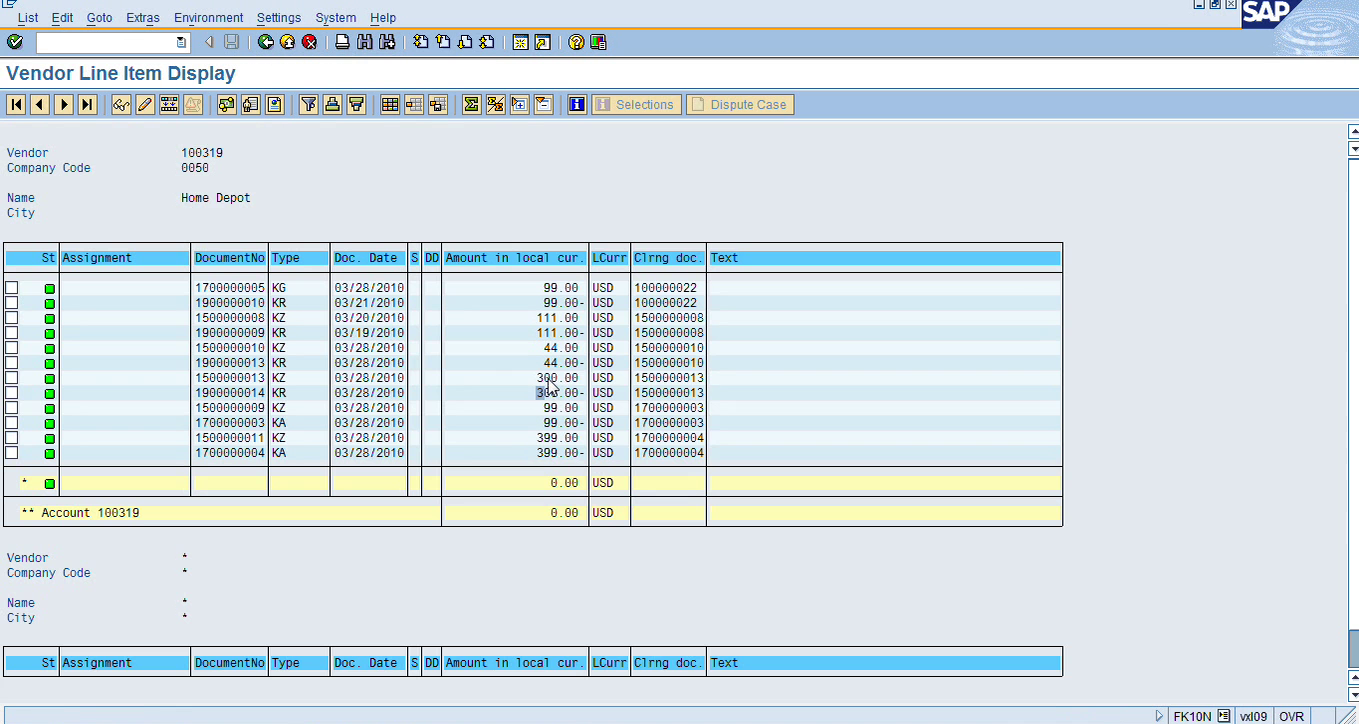
So, I have a green light, I need another credit memo I have entered. Let’s go back in FK10N and see the balance and open item. So, it’s showing me $300, so I have 2 open items $99 positive and $99 negative. So, first item is a credit memo document type KG and second is an invoice document type KR. So now I know that these 2 can be cleared together without a payment. Only this $300 should be open for payment. These 2 should be manually cleared. So how would you do that? We can do that with F-44. With F-44 we can clear these two documents together. So, I will enter my vendor number 100319 for Home Depot and I will do process open items. So, by default all the items will be selected. I don’t want to select all the items. I just want to select the first 2. One option is I can just double click on the third, on 300, it will turn black and then only these 2 will be selected and I will not have anything in my not assigned field. Let me give you this option first.
So now I have not assigned 0 and these 2 are blue so they will be cleared. Let me tell you another way. There’s a button for select all, I click it and then so I have selected all. So, all items are selected and then I want to highlight everything. Click Activate items button. So now everything is blue. So, let’s say if I want to select everything and then in these, so I’m going to select everything and I want to deactivate everything here. So, I will click on the Deactivate items candle. So, everything will turn black now. So now I want to select only the first 2. So, I can manually double click on it also or so if it’s a big list, I can do select all and then I can do activate items. But remember, by default, everything will be selected. So, if you have a big list, so in that case, you might have to do select all and deactivate first and then manually select the item that you want to match and clear.
So, in this case, now I’m fine. My 299s are selected and not assigned is 0. So, I’m all set. I’ll just click on save and it will post a new document and it will clear these 2. The document was posted and these 2 are cleared now. So, let’s go back in FK10N and let’s view that now.
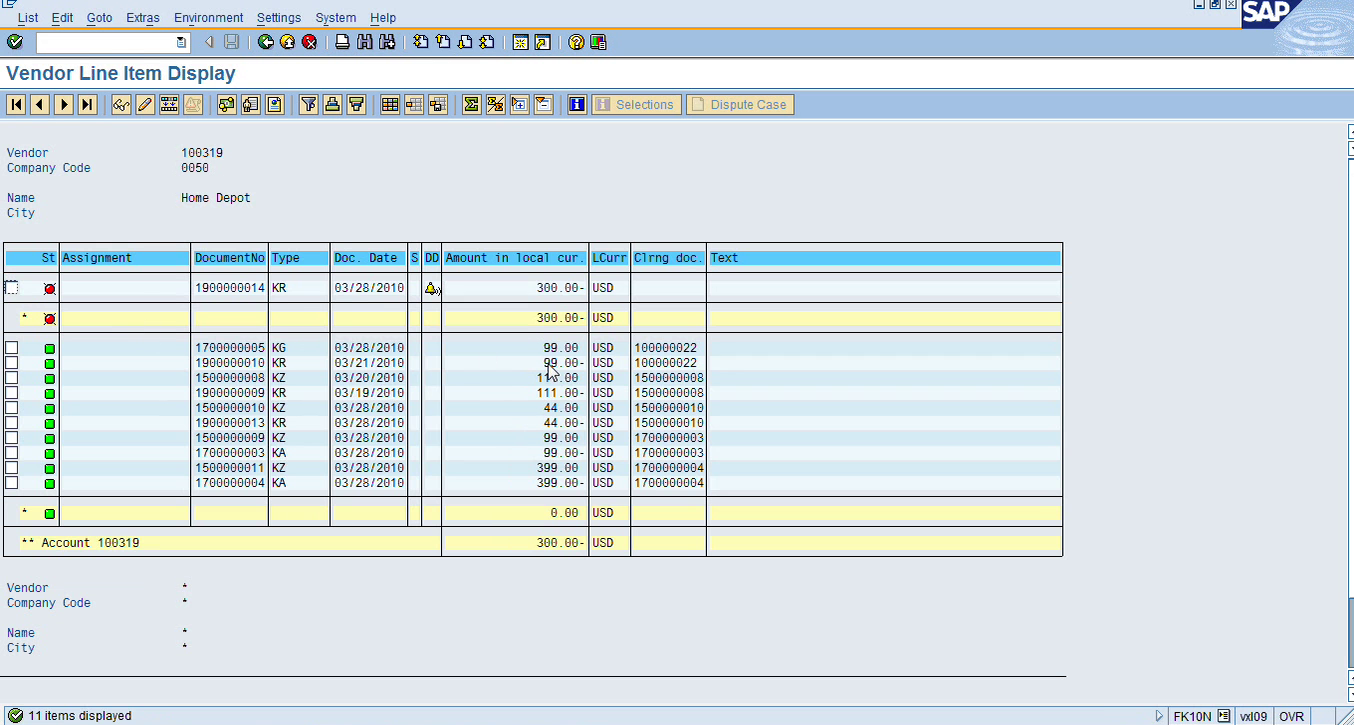
So, the balance is still the same, the balance is still 300, but now these 2 are cleared. See? I only have $300 as open item now.
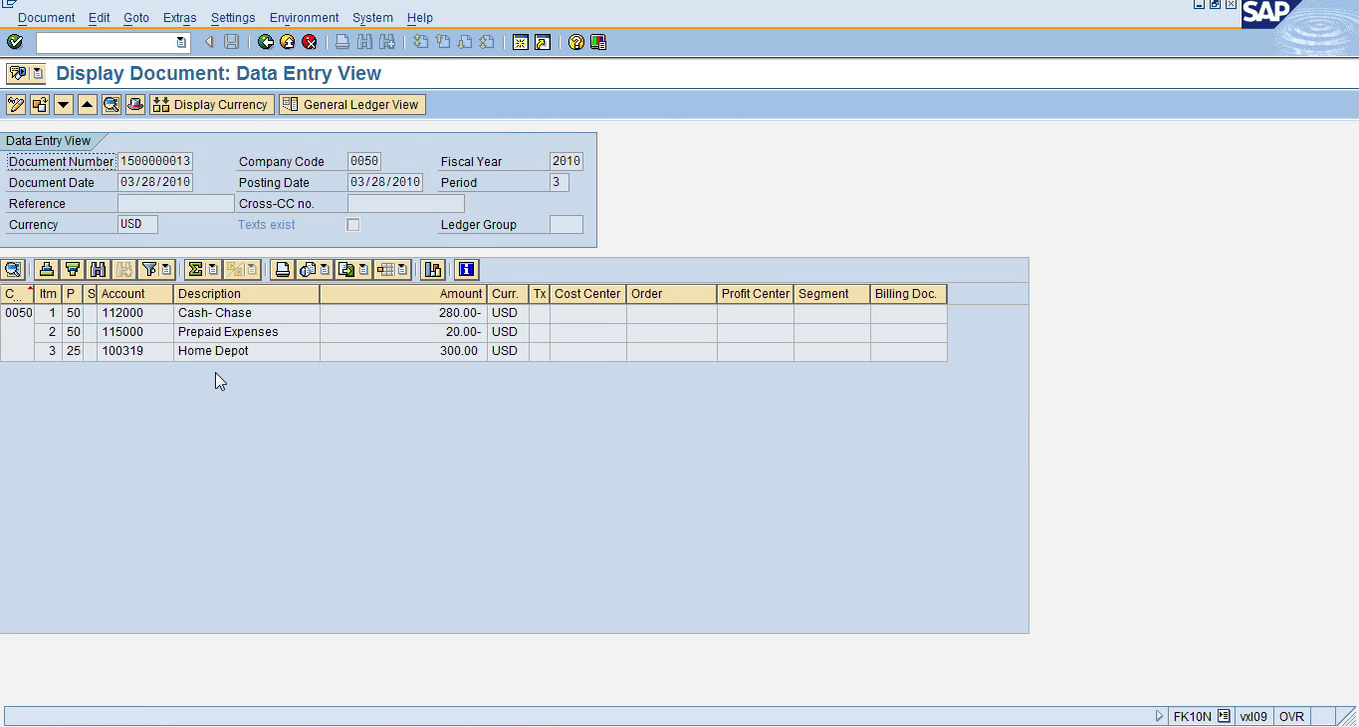
Let me show you one more thing. Let’s say you want to, I guess we can do that in accounts receivable because there is a way to, when we go in F-44 or any other transaction similar to that, where we can post the difference to another account, ‘distribute difference’. We will cover that in accounts receivable where let’s say we have a customer invoice for $100 but the customer actually paid $95. So, what should we do with the $5? We can put the difference to any other like a discount account, sale discount account. So, we will do that in this type of transaction. But we can also do it here. Let’s say we have this invoice. So, you know, we have to pay this invoice for $300.
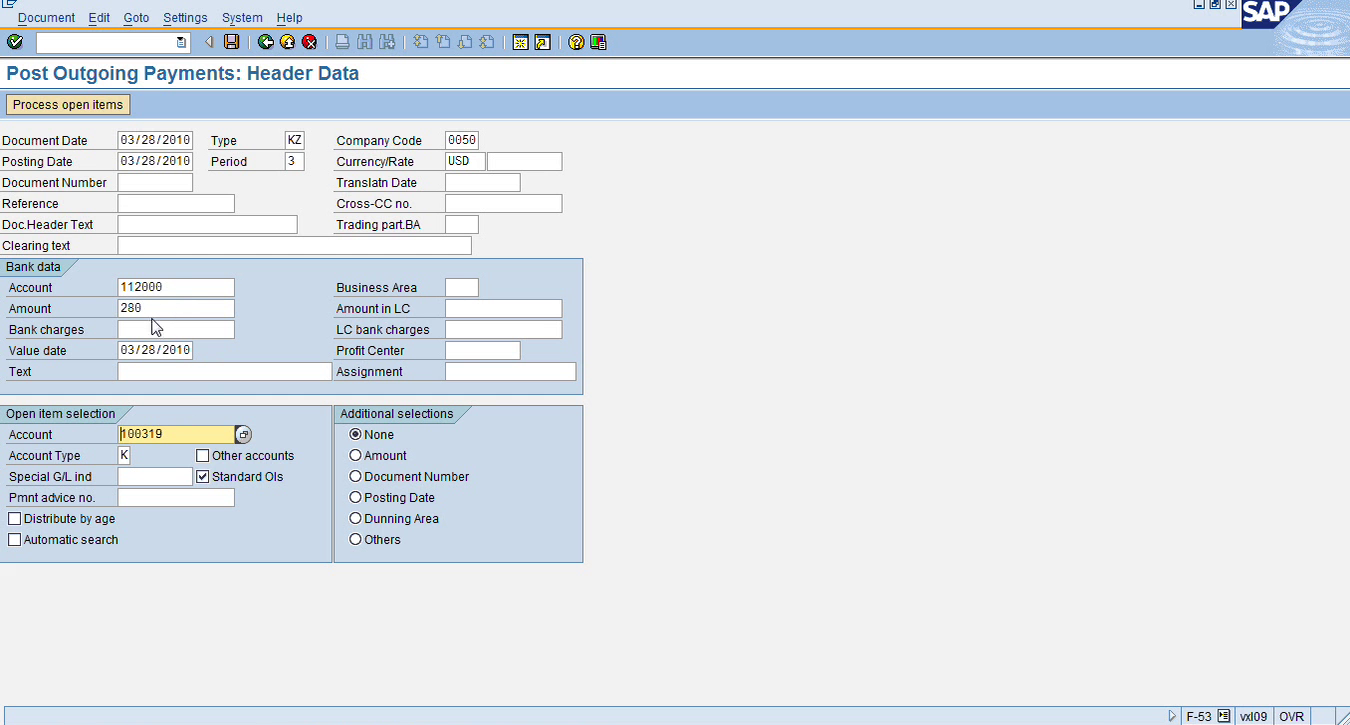
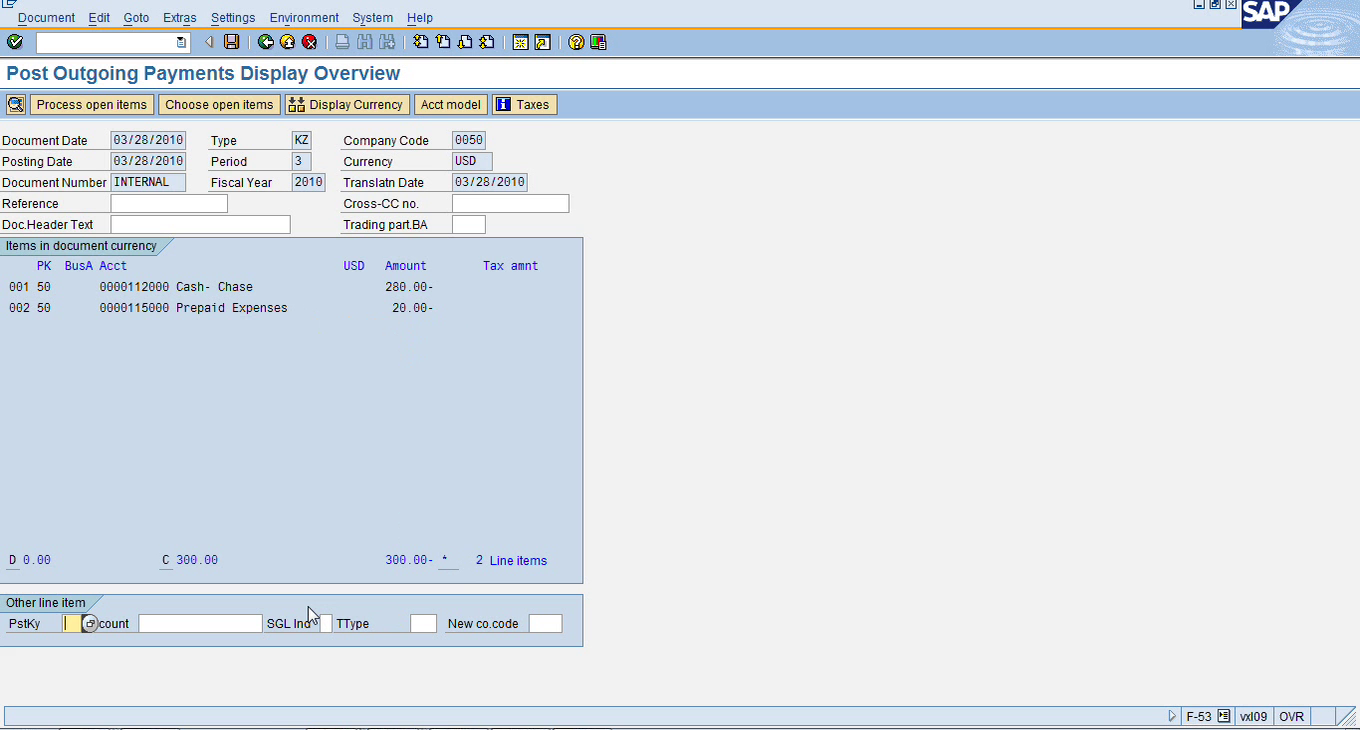
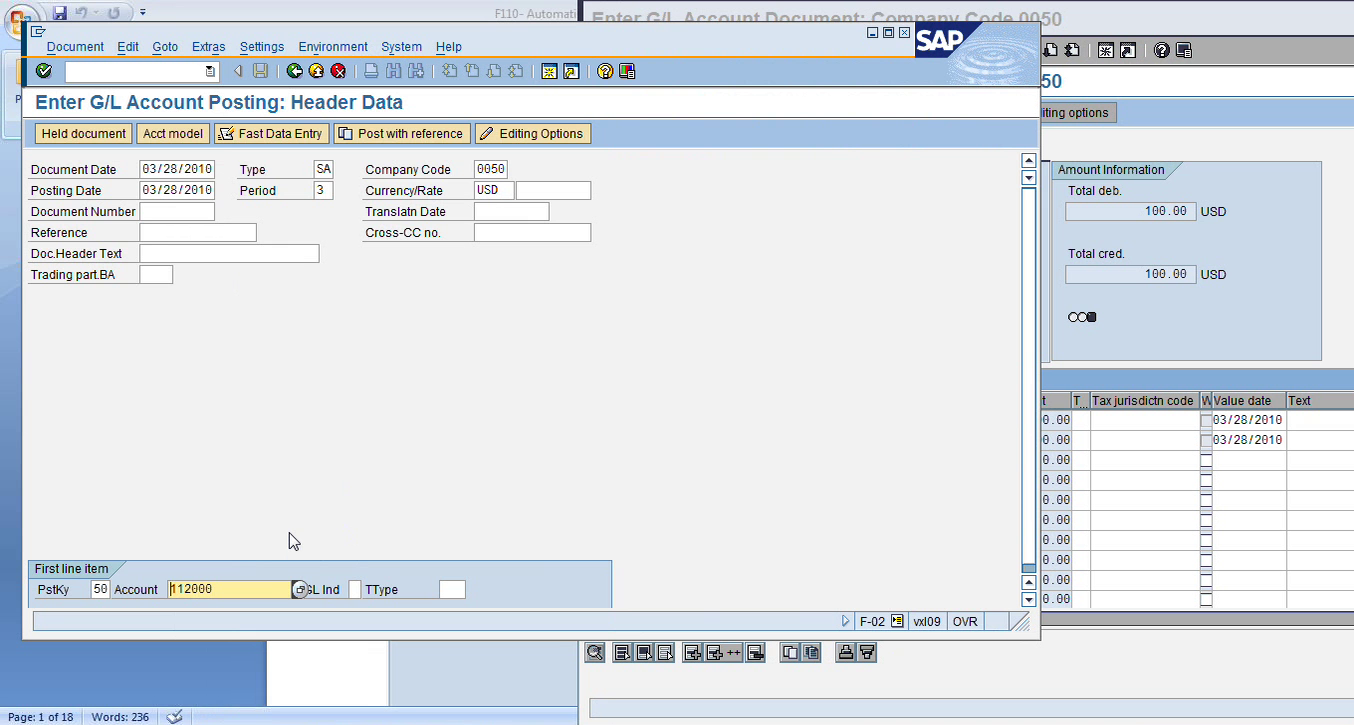
Let’s pay it manually. I believe that we went over manual payment, F-53 last week. Let’s go over it again. Let’s say, if I want to pay this invoice, but I don’t want to pay the whole 300. I want to pay, let’s say, $280. So, I called the vendor up and I said, okay, we’re not paying $300, we want to get a discount and we want to pay $280. So, the vendor said, okay, go ahead and pay 280. But I want to clear this item too, the $300 item. In that case, let me do a manual payment. So manual payment can be done from F-53. It does not require that configuration that we did in FBZP. This is if you have GL account set up for cash, you have your vendor set up, you can perform this transaction. This is manual payment just from crediting cash and debiting vendor and clearing it. So, I know my vendor invoice is $300 but I want to pay $280 and clear also. So, in F-53, so these are the old transaction before those, you know, the automatic payment run and then FP60 and FP50. This is all manual. So, I have to choose my bank account. So let me choose 112000 and the amount that I want to pay is, let’s say, $280, I’m not paying 300. So, this information is for the bank data. Now in the open item selection, I have to choose my vendor account. So, account type is K automatically, K for vendors, I’ll choose my 319. So that’s all I need to enter on the first screen, my date, my bank information, the account that this invoice will be paid from, my cash account, the amount.
So normally I will put the exact amount here, but in this case, I just want to show you how to distribute the difference to a different account. So now I’ll click on process open items.

So, this looks very similar to F-44 but these are old transactions and the screens are very similar. So, see not assigned is $20, so it has picked up my cash payment for $280, my invoice for $300 and the difference is $20. So, it needs to assign this to somewhere else, some other account, Otherwise, you cannot post it. So, I’m going to say, okay, charge off difference, I’m going to click ‘Charge Off Difference’. Now it will ask me to post the difference.
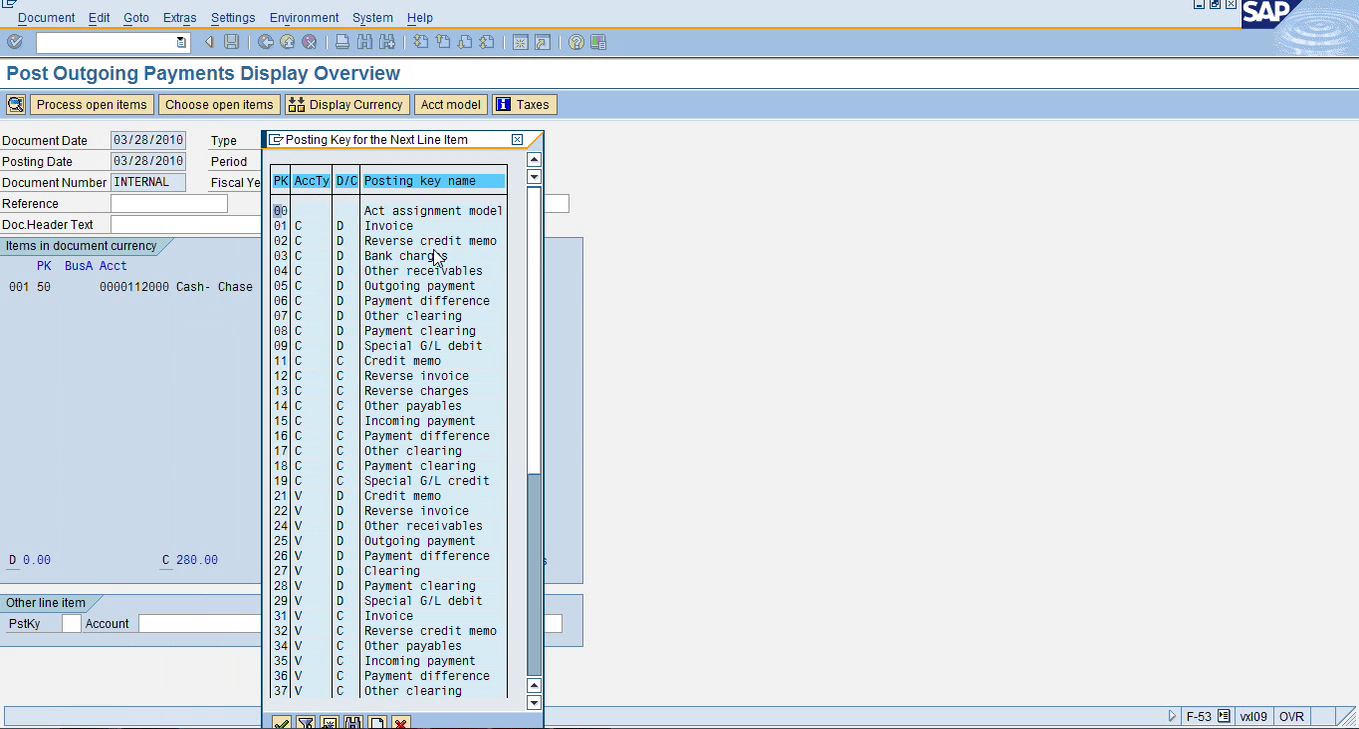
So, these are the posting keys that we use in SAP, in the old transaction. In the new transaction, it is picked up automatically. When you post FB50, FB60, or any FB transaction, it picks the posting key for you. The posting key is basically a debit or credit indicator, and also each ledger has its own range. For example, the GL range start with 40. So, debit is a 40, credit is a 50. It’s pretty straightforward. But in the subledgers, AR, AP, they have the whole range. So, AR range posting key start with 01 to 09 for all the debits. You see a ‘D’ for debit and ‘C’ for customer. So, from posting key 01 to 09, it represents debit to customer. From 11 to 19, it represents credit to customer. And from 21 to 29, it’s debit to vendor. And from 31 to 39 represents credit to vendor. So, when we post the FB60 invoice, behind the scenes it is using posting key 31 to credit the vendor invoice. And then if it’s posting to the expense account, our debit expense will be 40 posting key to a GL account.
And before I post that, let me just show you that posting key, I believe I should be able to show you that. If I go in FK10N, and I go in this $99 invoice.
See this posting key? 31 posting key is to the vendor account and debit expense is posting key 40. See? And then account in this field, when we use posting key 31, it knows that when I use post ticket 31, I’m using AP ledger, so it’ll be a vendor account. When I use posting key 40, it knows it’s a GL account. But in the all-new transaction, it does it automatically for us. But if you use any old transaction then we need to know our posting key. So, in this example, we are crediting, so we’ll use posting key 50, crediting a GL account. Let’s just use this, 115.

So, posting key 50, posting account 115, and my difference was $20. Now I will check it out quick on document overview. This will give me my line items that I’m crediting cash for 280 and crediting this expense for $20.
So now my entry is balancing. I can go ahead and post this manual payment with a difference of $20 that I chose this account. So, I’m doing two things. I’m doing a payment, but my payment is less than my actual invoice, so I’m distributing the difference to a different GL account. So it looks like I’m all set. I’ll click on the post. Now the document was posted in company 50. Let me go back in FK10N and see what’s happening here.
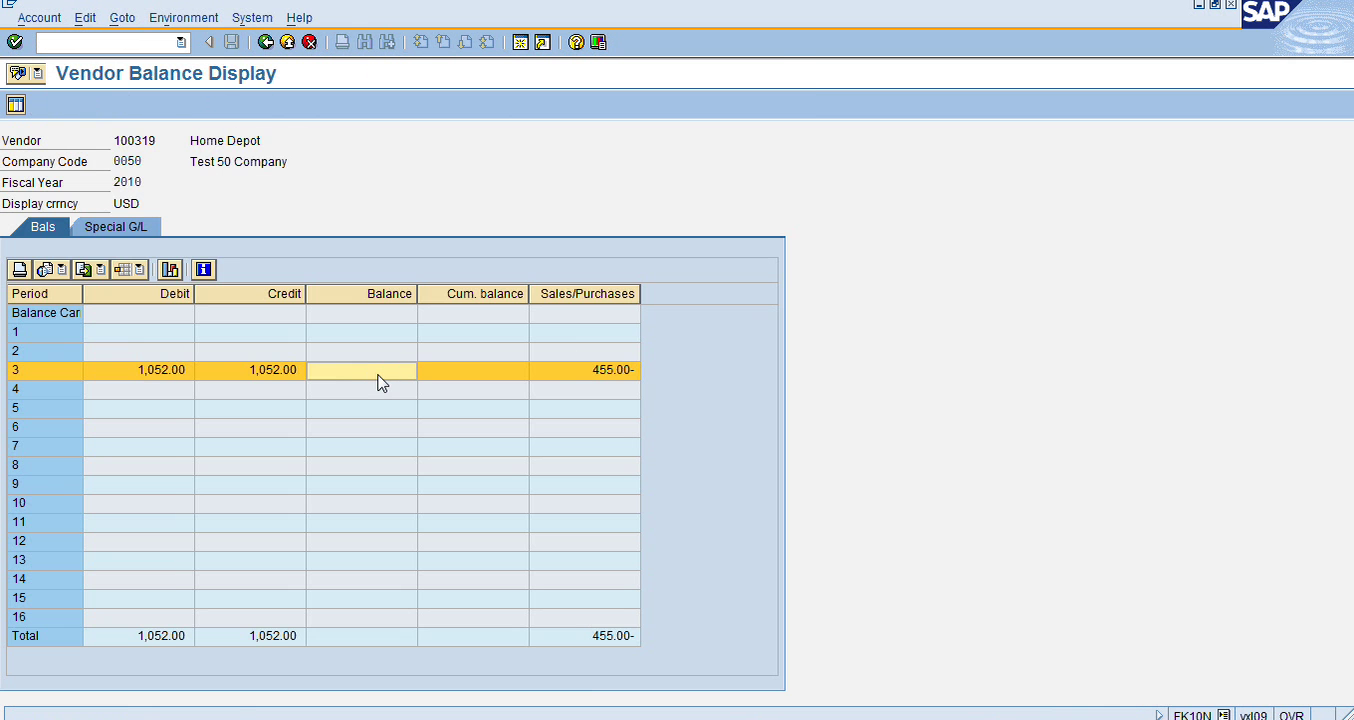
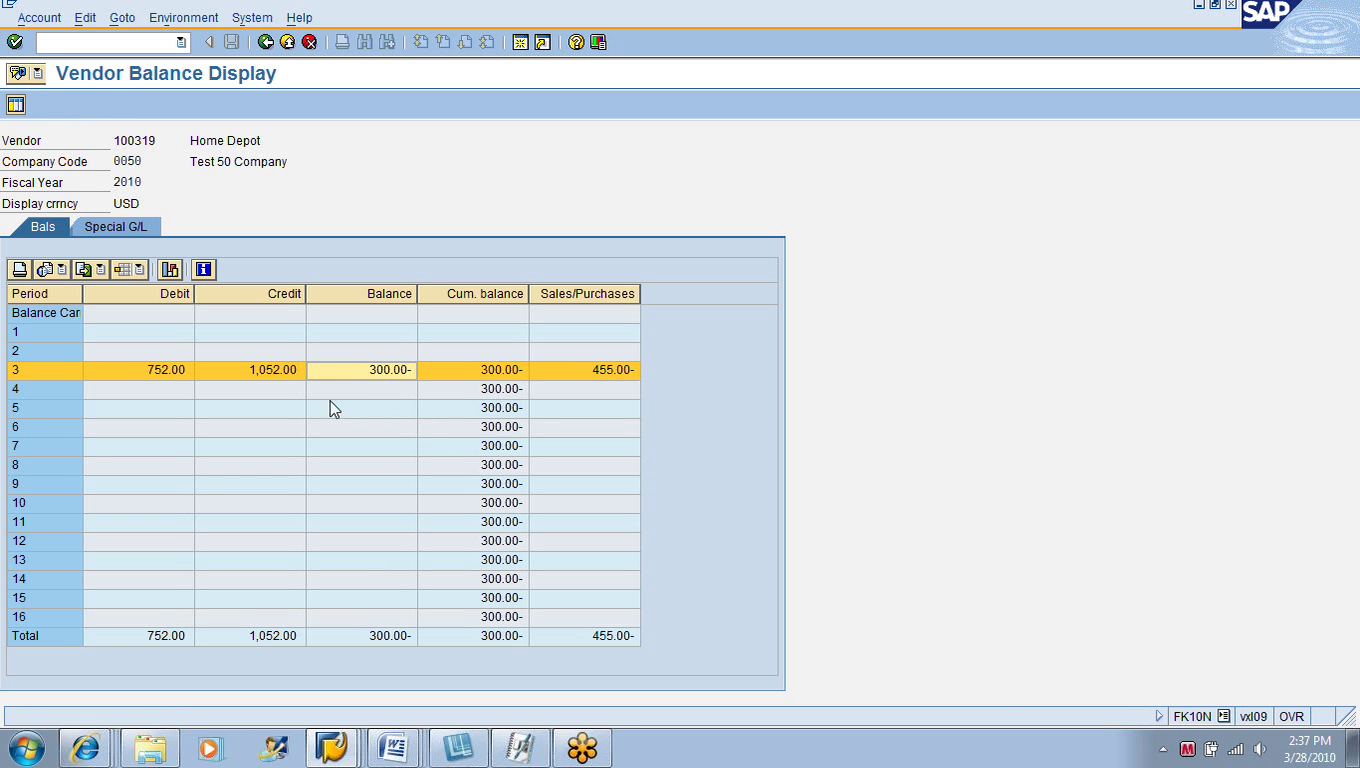
Now I have a zero balance. The balance column for March, I have 0. If I double click on it, everything is green.
And looks like this was the new document that was just posted. If I double click on it, click on the document overview, so it should have 3 lines.
So, one was the cash account that I choose that that paid the $280. Posting key 50, and then posting key 50 again for the prepaid expense credit to that and then debit is going to the vendor account and it is choosing posting key 25. So, we don’t need to know all these posting keys but if we use the old SAP transaction then we need to find out which posting key is the correct posting key to choose for that.
One thing is the entry has to balance. So let me show you one more thing just to make it clear. When I choose, let’s say if I’m choosing, I would use another transaction, F-02. This one’s the old transaction. So, see here, posting key is 40.
So, when I put posting key 40, it knows this is a GL account. So now the option will be, search the GL account. If I change this to 31, now it knows this is not a GL account, this is a vendor. So, in the search option, I’ll get vendor. If I choose 01, it knows it’s a customer, Customer search. If I use 70, it will know it’s an asset. If I do 70, it will search the asset. So, it knows this account; account will depend whatever posting key you choose here. And then it knows what 40 is, so in this, you don’t choose the credit or debit because the posting key will determine.
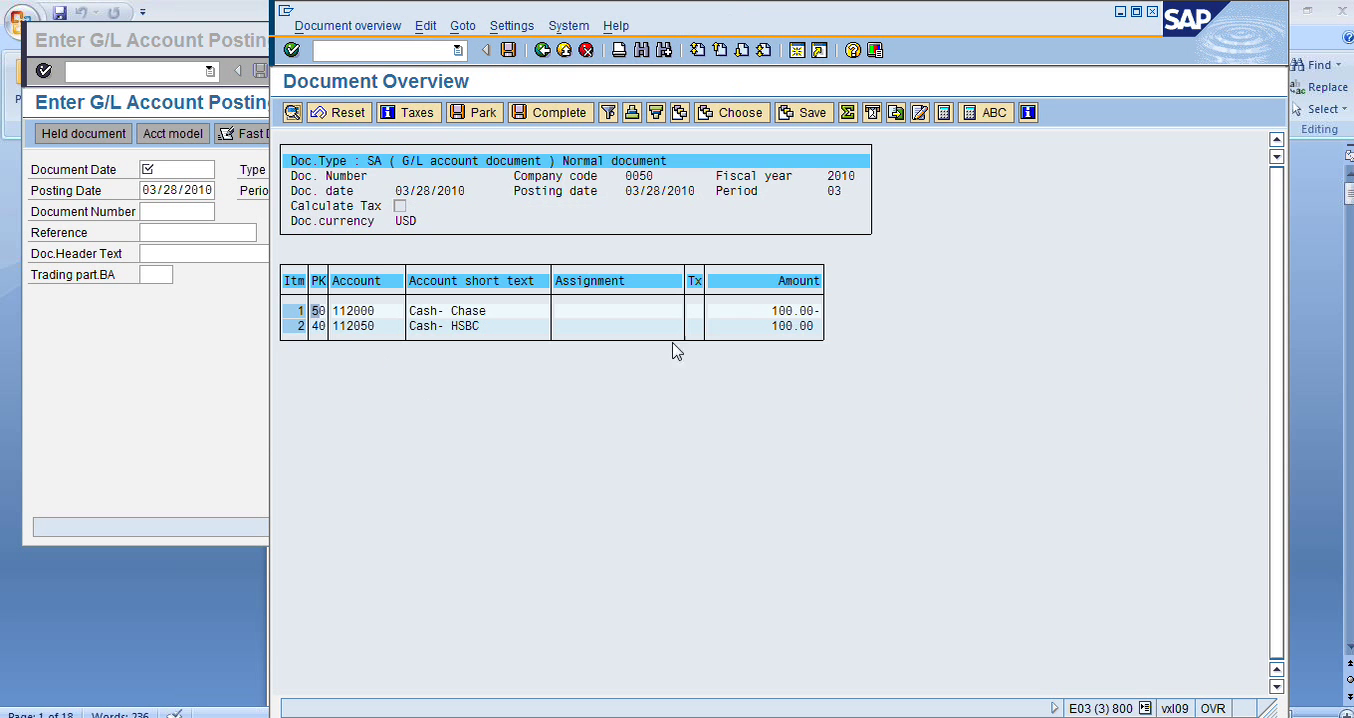
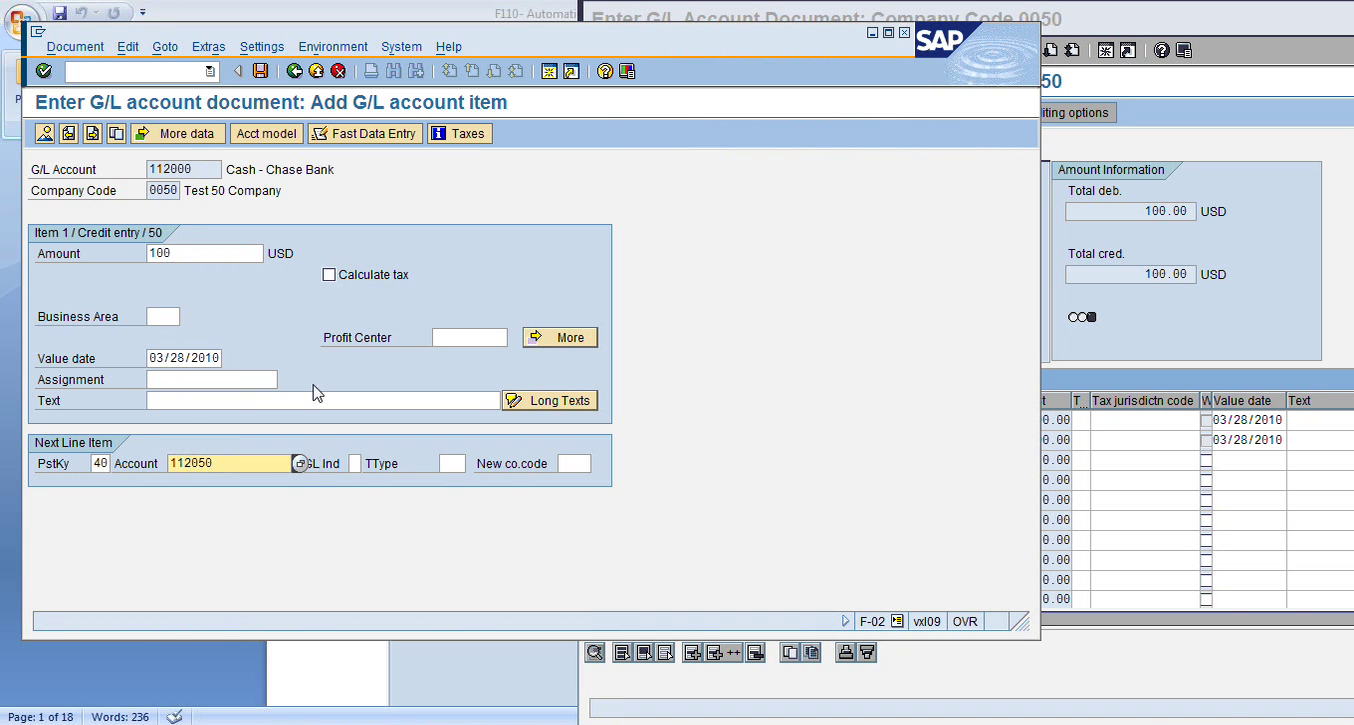
If I’m crediting, I should use 50 but let’s say I forgot I used 40, then I know that my entry won’t balance because it will debit, and the total entry will have a difference so it will never post. All the debits should equal to all the credits only then SAP will post that transaction. So, if by mistake I choose a wrong posting key so it will give me an error before that, you know, my debit does not equal to credit, I have to balance my entry. So, I will know I did something wrong. So, F-02 is a very powerful transaction. You can use this transaction to post to any ledger, GLA or AP. Let’s say, if I want to mimic what I did on FB50, so let me compare these two transactions because I think it’s very important. So, let’s say on the FB50, I’m going to compare FB50 with F-02. So, FB50, let me do it side by side if I can do that. So, if I’m doing FB50, which is just a GL transaction, GL to GL. Let’s say if I want to move cash from one account to the other. I want to use 112000 cash, Credit 100, and let’s do 112050, let’s do a debit for 100.

So this is a new FB50, I don’t choose any posting key. I don’t choose anything. I just choose the GL account, debit, credit. But if I do simulate, it will tell me that posting key is 50 here because I’m crediting, posting key is 40 here because I’m debiting.
Now let’s go back to the main screen. So, behind the scene, it is using the posting keys for us. But if I want to choose F-02, this is the older transaction, like 5, 6 years old, if I want to use that, so the first line I am crediting. So crediting is posting key 50, I’ll choose post in key 50, and then my GL account is 112. I can search for it also. So, 112, I’m crediting.
I’ll press enter. That will take me to the next screen. In this screen, I will enter the amount. Now I’ll go to the next line item, and in the next, I am debiting. So, I will choose posting key 40, and the account I’m choosing is 112050.
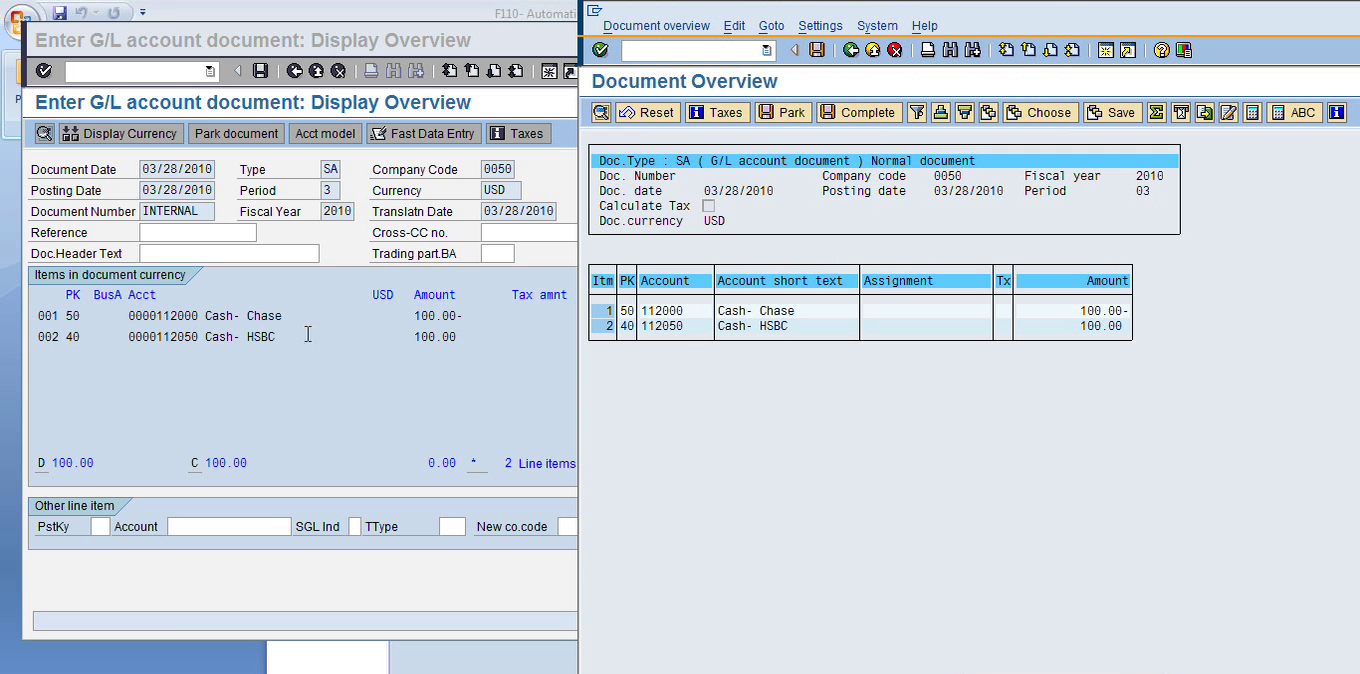
Then I’ll press enter again to enter the amount for the second line, which is $100. Now I have to click/ select the simulate option in the new FB50, in the old one what’s similar is this document overview, this mountain and the sun. So, this will give me the overview, posting key 50 and then posting key 40.

And this, if you compare it exactly like this, posting key 50 for 112000, and posting key 40 to 112050.
So, this is the new FB50 and this is the old F-02. But, you know, if you want to use the old one, you should know all your posting key. Let me do, like a FB60. If I do a vendor invoice in the new system, I just choose my vendor. The credit side is automatically entered here, I’ll just choose the debit, my expense account.
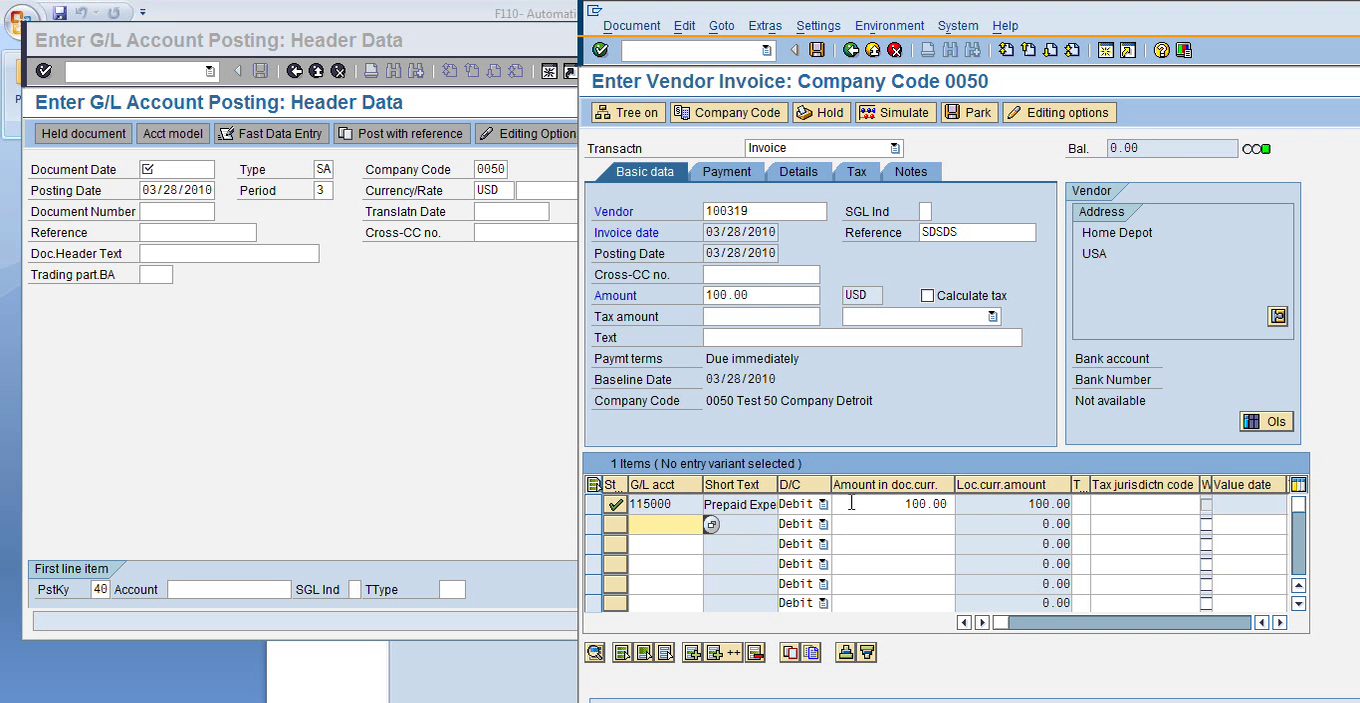
That’s all I have to do in FB60. But if I’m doing the old transaction, I will have to, and in the new if I click on simulate, it’ll tell me posting key 31 for vendor crediting, posting key 40 for debit expense. But in this old transaction, if I’m doing it, I should know the posting key. So, if I’m doing credit to vendor, I’m going to choose posting key 31 and then search for my vendor, 319. Press ‘Enter’, 100, and then debit expenses is posting key 40, and search for my expense account, I’ll be using prepaid expense. Press ‘Enter’. Enter the next line amount, and then click on document overview. So, this will basically do the same thing if I compare these two.
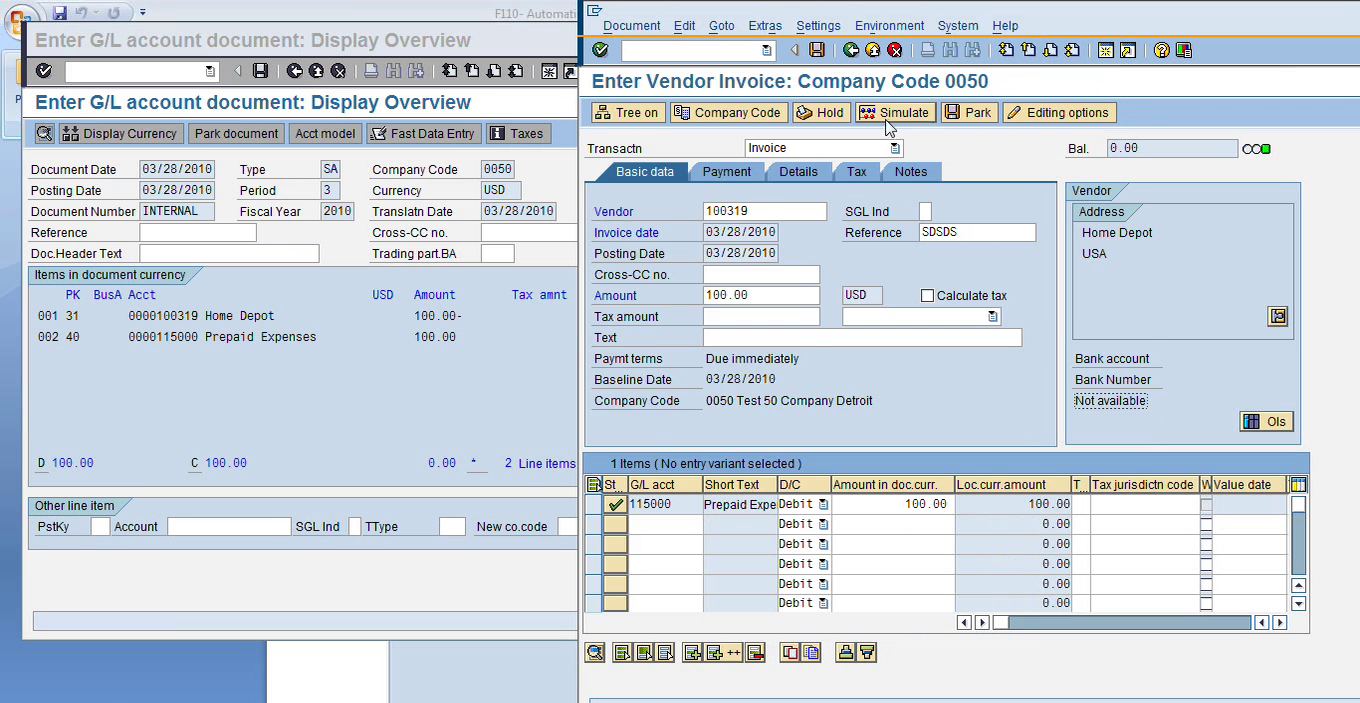
Posting key 31 is a credit vendor for $100 and posting key 40 is a debit GL for $100.
If we have an invoice of $100 and we want to pay $80, yeah, we should enter the credit memo for $20 and then if we do a payment run, it will be for $80. Let’s do that for now. Let’s make sure my balance is 0. So now my invoice is $100.
So now I want to enter a credit memo for $20. Let’s say after I realize, you know, they didn’t bill us correctly, we should get some discount. So, let’s say I’ll enter a credit memo, for $20.
You see my balance is now what? $80. If I click on it will show me one invoice for 100 and then a credit memo for 20.

So now if I do a payment run, my automatic payment run F110, it will pay the $80 and clear these two documents. So, the automatic payment program will pick up both of these and clear these. So with F-53, I’m just showing you a manual way of paying and distributing the difference. I was just showing you the functionality available.