
Enterprise Structure Setup (Part 1)
Let me give you some brief overview of FICO, what FICO is, and then we’ll first start FI and then we will go to CO area. As you already may know that SAP is an ERP, Enterprise Resource Planning system, where you have multiple systems under one umbrella and they are all integrated. FICO, I think is the most important module because it gets data from almost any other system, any other model. Like, its data comes from MM if you are purchasing, it starts in MM and then the data, like, for invoicing and for the payments is transferred to FI. And from SD, if you are selling to your customers, it starts first in SD, but then it ends up in FI for payment for payments and for HR also, for employee information and it starts in HR, but it ends up in FI. So, I think FICO is a very important module and since it gets all the numbers ends up in FI. Let’s talk about the difference between FI and CO, because they are they are related, they are integrated very well. In FI, FI is basically used for external reporting, for your balance sheet, for your income statements and for all your external reporting, FI is used. For CO, CO is only for your internal accounting, like your management reporting, your cost center, your project reporting, it’s mostly for internal accounting, so when your external auditors come, they are only interested in the FI side, because they want to see the external report that you are giving, if you’re a public company, and the financial statement that you’re giving to The Wall Street, they want to see that. And all these are in the FI module. CO is only for your internal reporting; you want to track your department cost, you want to distribute cost among your departments and all your settlements within your departments. So, for these expense reporting purposes, we use the CO module. And FI/CO are tightly integrated; if you do one change in FI, it’s instantly reflected in the in the CO side also. And we will go over that and we will do the transaction.
Thank you for reading this post, don't forget to subscribe!The way that I like to teach is I want to show you how the configuration is done, and I want you to do the configuration on your side too so you are comfortable with doing the configuration and then performing the end user transaction. As you can see, if you can see my screen, if you see this SAP menu is for the end users.
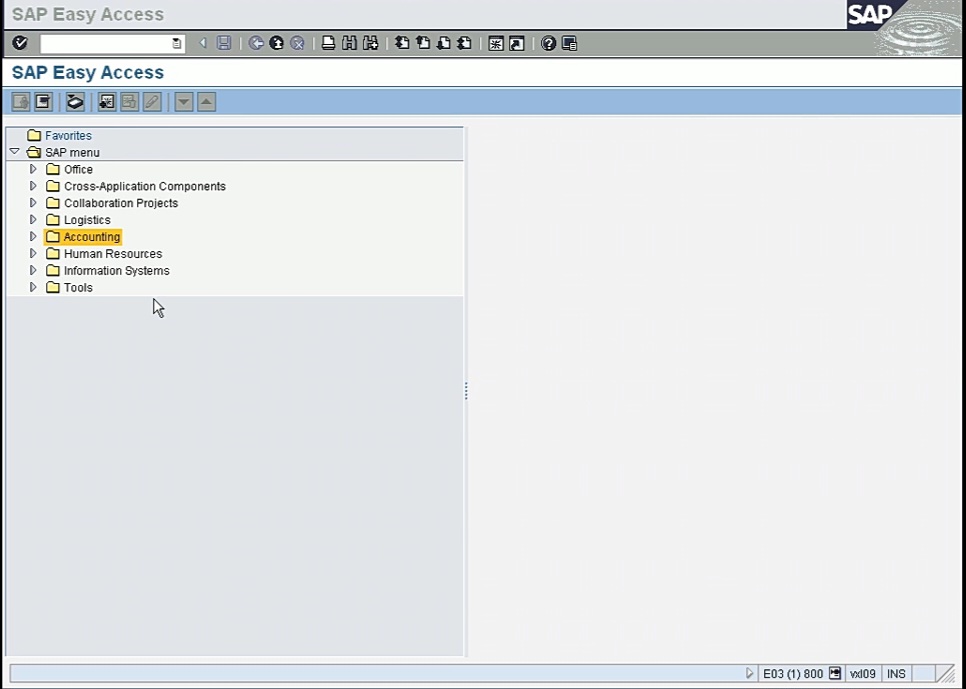
If you are if you work in APAR, you use this menu to perform your transaction. But before you perform any transaction, you know, it has to be configured based on your company needs. And those configurations, you know, they are not done from this menu. They are done from the IMG menu, which I will show you in a minute. So first, we have to do the basic configuration. And then once the configuration is done, then we will come on this screen and then perform the end user transaction. And I’ll show you that in a minute. So, when we do configuration for the FI module, the first thing we need is a company code. So, what is a company code? Company code, you know, is a legal entity. If you have a company in the US, you might have several entities in the US or if you’re a global company then you might have hundreds of legal entities, some in the US, some in Canada, some in Europe, so each legal entity you have to create a company code in SAP because you have to report for that legal entity.
So, the first thing you need to ask if you are configuring FI for a company that you need to ask how many legal entities do you have. So, for each legal entity, we will have to create a company code, and from there we will configure based on that company code. Like I said, this is the end user menu and if you want to do configuration, normally, end users don’t have access to do configuration, but, in this course, we will learn we will learn both. We will learn end user transaction and as and also the configuration transaction. To do the configuration, I have to go in SPRO. I will just type in the command box up there and press ‘enter’ and then click on ‘SAP reference IMG’.
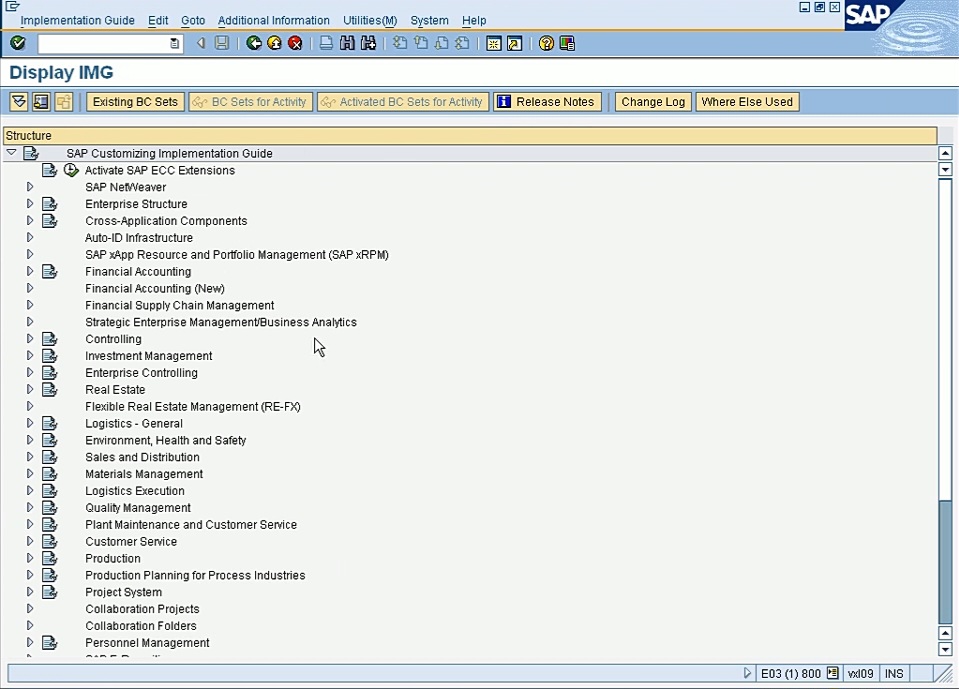
So, this screen that you see is for configuration; if you want to do configuration for MM, SD, FICO, HR, for any module, you will have to come here to do the configuration. So, let’s go back to my notes, in here, you can see that I went in to create a company.
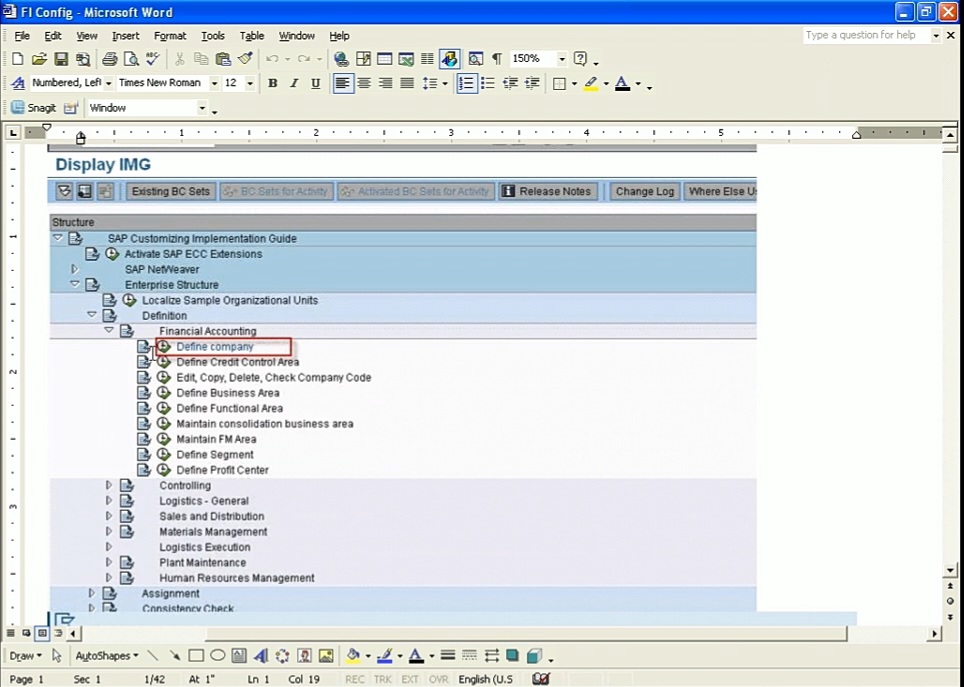
There are two things, one is a company and the other thing is a company code. Company can have multiple company codes under it and it’s basically used for consolidation. Let’s say if you have a US operation and you have ten company codes, so you can create one company for the US and then assign ten company codes to it. And then you can consolidate all those company codes to one company if you want to do consolidation for their financial statements. Basically, the company is used for consolidation. But the transaction that we will perform will be done for the company code. Let’s create a company. So, to do that, I went in ‘Enterprise Structure’, ‘Definition’, ‘Financial Accounting’ and then ‘Define company’. If I click on this, the clock, I will get the companies.
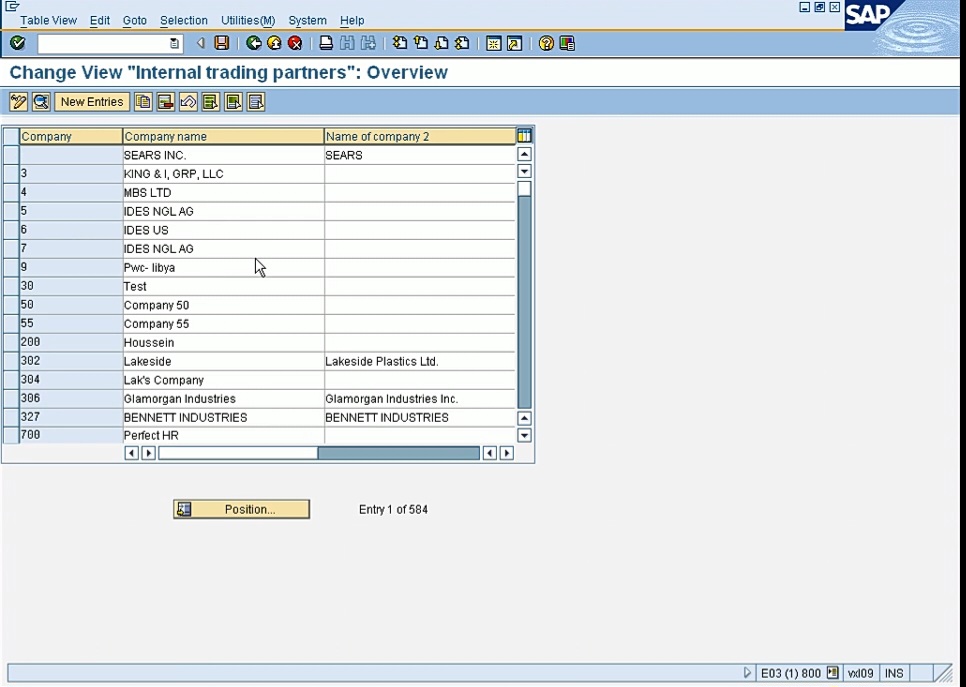
And these are the companies that are already created. If we want to create a new, we will just click on ‘new entries’ and enter the name. For this training, I am using the company that I created; it’s fifty, 50, and that’s what you will see in my instructions. So, I created a company, company 50 and in this screen that’s all I need, just the name of the company. All right. So, after creating the company, we will need to create the company code.
Step number 2, define company code. And it is underneath that ‘edit company code, delete’, the third option here. Let me go there. If I click on this and then if I just go in edit company code, this will give me the list of all the company codes that are already created; and if I want to create a new one, I can create a new; or if I want to copy and then create a new, let’s say if I want to copy my test 50, first, I will select this and then click on this copy,
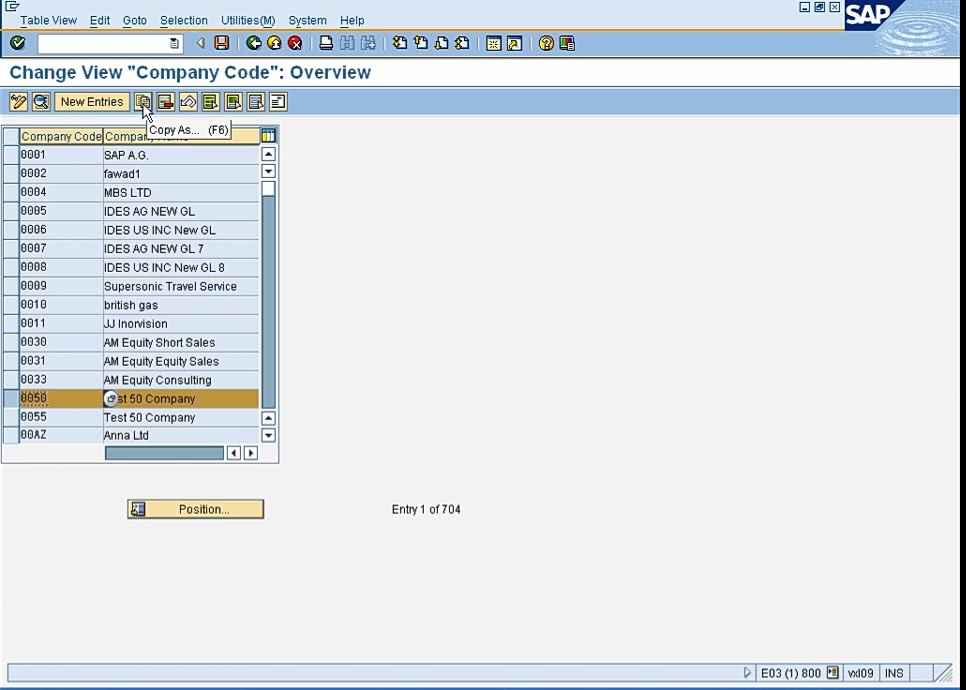
and this will let me copy.
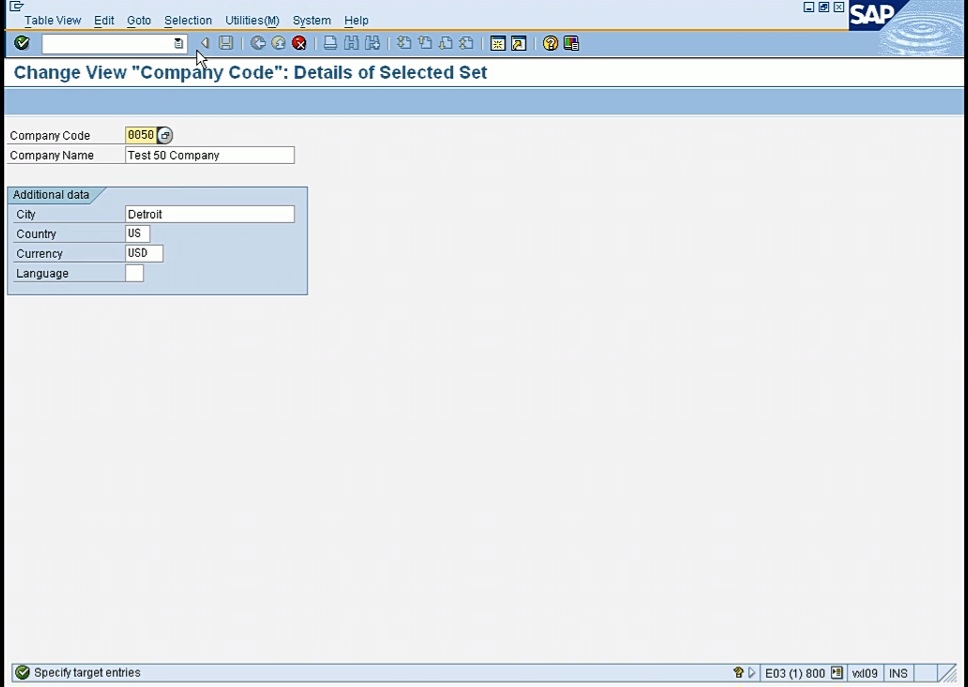
I’ll just name it new. It’s just like, you know, your Microsoft Save As function and you can also do that. But also, you can click on new entries to create a new company. So, the most important thing here is your country and the currency, because that will dictate everything, you know, for that company code. So, it’s very important that you choose, you know, the currency and the country you need. Country will be used for your taxation purposes, if you want to do sales tax. So that will be based on the country that is listed here for that company code. So, it’s very important that you choose the right country and currency for your company code. So that’s the company code configuration. And again, for this, my company code is company 50, so I’m using USD and country US. Okay. So, we are done with creating company code so let’s go to the next step.
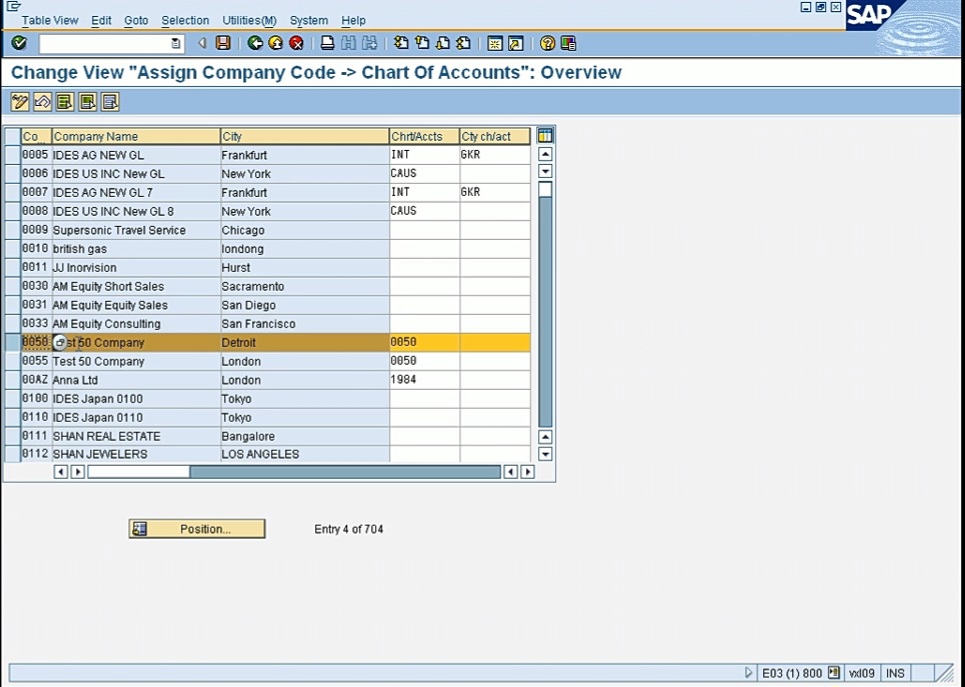
So now we need to assign this company code to the company. And then we will have to go in ‘Assignment’. So under ‘Definition’, I’ll go in ‘Assignment’ and again ‘Financial Accounting’. Now I’m assigning my company code to the company.
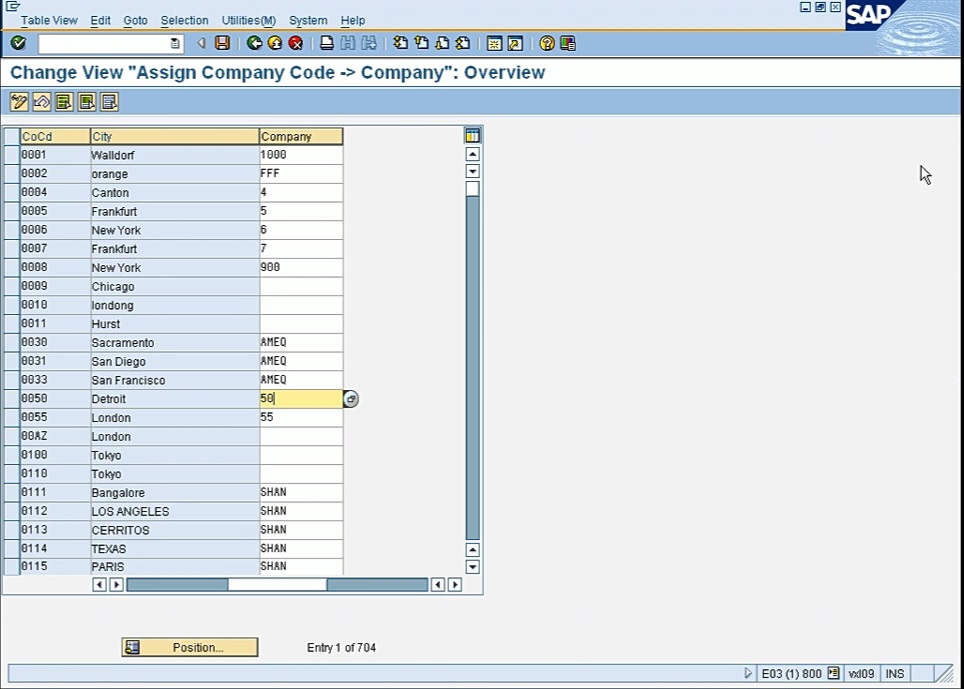
So here I’ll just look for my company code. My company code is 0050 and my company was 50. So basically, I can just type in the company. Alright. So, in this step I have assigned my company code to the company. Now we have a company code, so now we have to do some basic configuration for that company. So that company code will have, like I said, for it will have all the external reporting, it will have your balance sheet, your profit and loss statement. So, to have that, it needs some general ledger accounts, GL accounts. To create GL accounts, first we need is a chart of accounts. And chart of account is basically the skeleton behind your company code. And before you decide on that, you have to think very carefully, are you a global company? Are you a U.S. Company? What type of chart of accounts do you need? Do you need multiple charts of accounts? Do you need one for the U.S, one for Europe and one for your global? So there, SAP has multiple options. It allows you to create, what some global companies do, they create one global chart of accounts, and then each location like the U.S can have their country chart of account, but it’s assigned, it’s linked to the global chart of accounts. So, you have many options of, you know, deciding which way you want to go, but it’s a very important decision before you create your global or your local chart of accounts. So, to create, we will go in Financial Accounting 🡪 General Ledger Accounting 🡪 GL Accounts 🡪 Master Data 🡪 Preparation 🡪 Edit Chart of Account List. So here you will see some chart of accounts that already exist. So, if I click, I have 0050 for my company, and what I did is, here you can also define the language of your chart of accounts, because your chart of account will have all your individual GL accounts, general ledger accounts, so you can define your language.
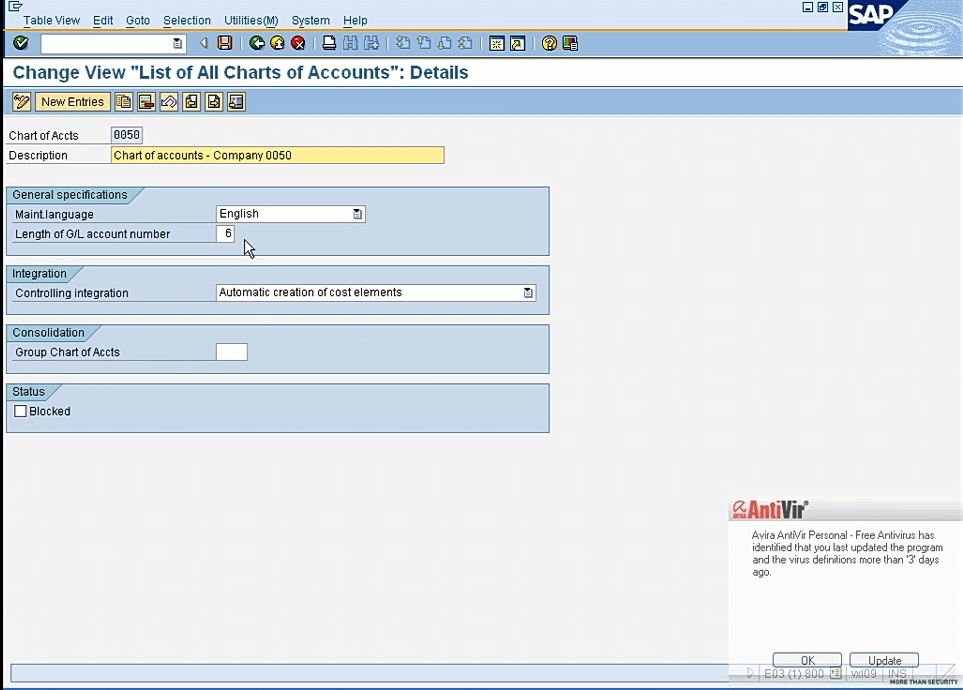
You can define the length of your GL accounts. Normally, I prefer to use 6, and otherwise if you create more than 6, it gets difficult to enter, but 6 is normally what companies use, 6 for the GL account number. And if you are creating, like I said, a group chart of accounts, so this can be your local chart of accounts and then you can create another one for your group chart of accounts and then you can link it here. And that way, what I mean is, let’s say, if your US operations want to have, let’s say, 50 accounts for cash, but your company does not want that. So how do you handle that? So, what you do is you have group chart of accounts where you will have only 1 cash account. And in your local chart of account, you can have 50 cash accounts, but each cash account will be linked to that one cash account on the group chart of accounts. So basically, you can limit the number of GL accounts on your group, but on your individual, you can create as many as you want and you won’t affect the other chart of accounts that other companies are using. So that’s one advantage of using group chart of accounts. In my example, I’m just using one chart of account for my company that’s why I don’t have anything in the group chat accounts. In integration with controlling, when we will do configuration for CO, I’ll go in a little bit more detail what this is. Basically, in FI, we call general ledger accounts, all the individual accounts, we call them GL accounts. And the GL accounts include both balance sheet accounts and your income statement accounts.
For CO, CO like I said is only for management reporting, it only has the expense account like the profit and loss accounts. So, in the CO module, they are called cost elements, instead of the GL accounts. And what this option is saying, if you create Expense GL accounts, do you want to automatically create the same number in the controlling? So, it’s very important you choose this, so your FI and CO accounts are in synced. So, CO only has expense account, FI has both your balance sheet account and your expense account. Basically, FI has all your accounts, but the CEO only has your expense accounts. So, if you check this then your FI and CO accounts will be in sync. You’ll only have to create only an FI. Otherwise, you will have to create separately in FI and separately in CO. So, it’s difficult if you manage that way.
So, this is Chart of Accounts, but at this point, there are no GL accounts associated with this. This is just like a name. Now we will have to create some subgroups in it, and then we will create the individual GL accounts. So, I’ll show you that. So, in my example, I copied the name the chart of account from the chart of accounts North America. I just selected that, click on copy and enter my name, 0050. In SAP, everything you will notice is done in two steps. first, you create and then you assign, and you will see that in many things. So now we have created the chart of accounts, now we want to assign it to our company code. So, to do that, I will have to go here, go back and the second thing you will see is assign company code to chart of accounts.
As you can see here, my company code 0050 is assigned to chart of account 0050.
Let’s go to the next step. Now within this chart of account, I have to create some account groups, and at a minimum, we need at least two (2) account groups. We can create one for the balance sheet and one for your income statement. And we can have any number of accounts we need, but at least we need 2. We can further break it down, let’s say within balance sheet we can do cash, we can do fixed assets. And this is very important that you decide and you discuss with your company how many account groups they need. And it can be used for reporting and it has many other advantages, but you can also restrict your number range. Let’s say for cash, if you create one account for cash, then you can decide, okay, for cash, my range will be from 100,000 to 199,999. So that’s my grouping account for cash, and my receivable is this grouping. So, it will be easier when you look at your trial balance by looking at the GL account number, you can tell what type of GL account it is. So, it’s a very important decision to make, how many account groups you need. And again, this is all before we are creating GL account. This is all, the configuration before we created. We created a chart of account, now we are creating account group within the chart of accounts.
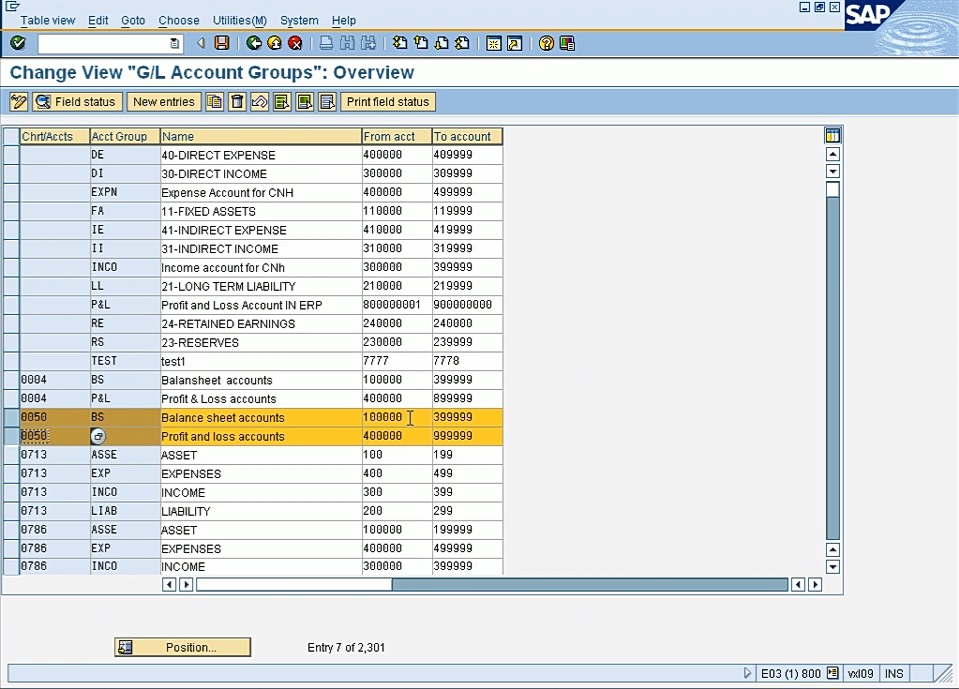
So, for my company I just created 2 groups; first column is your chart of account and then within your chart of account, you can create your groups. And also, you have to assign the number range for that, and this is the number range for your GL accounts. And again, if you remember, I chose 6 digits, so this has to be 6 digit long. So, I have decided so from 100,000 to 399,999 will be my balance sheet accounts and from 400,000 to 999,999 will be my profit and loss accounts. But you can have multiple groupings. This is just the basic at least you need, but you can have multiple like I said. And this range will help you keep your chart of accounts; you can keep it organized based on these number ranges.
So, let’s go to the next step. Alright. So, now we have defined account groups. Now, the next step, let’s define your fiscal year variant. So, what is the fiscal year? Every company has a fiscal year, normally in the U.S, it’s a calendar year, but some other companies it’s not a calendar year. So here you define for each of your company what is your fiscal year. And then first you define it and okay, let’s see. So now this one is under financial accounting global settings 🡪 fiscal year.

So, the first one is maintain. I’m using the standard SAP fiscal year, which is K4. Normally in the U.S, it’s calendar year and K4 is the SAP variant. Let me show you that first, click maintain fiscal year variant. So now in the test system you have hundreds of fiscal year variance. So, let’s scroll down to K4. So, this is K4.
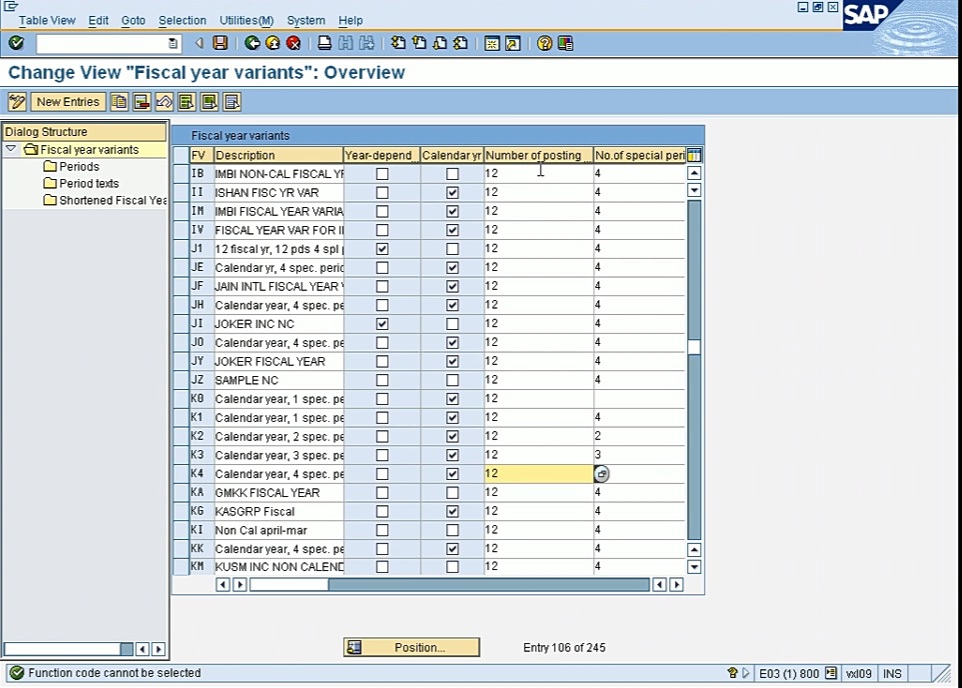
So, as you can see calendar year is checked and it has 12 periods within a year and special periods, it has 4 special periods. Special periods are used, let’s say, we are a calendar year company, let’s say, now we are in 2010 and we are closing the books for 2009. So, we can close December, but we still want to make some adjustments in, let’s say, March or April. So, we can create 4 special periods for those adjusting entries. And even though the 2009 December is closed, we can post adjusting entries in the special periods. And it’s only used for, if we doing an audit, if the auditors want us to make some adjustment, that they think that we did not make. So, it’s, you know, it’s rarely used. It’s not a common thing, but it’s a good idea to have some special periods. So, you don’t have to open your December period to do those adjusting entries. You can keep December closed and then make the adjusting entries in your special periods. But most of the time you won’t use it, you will just use these 12 periods that are in your calendar. So now we can assign this K4 variant to our company code, K4.
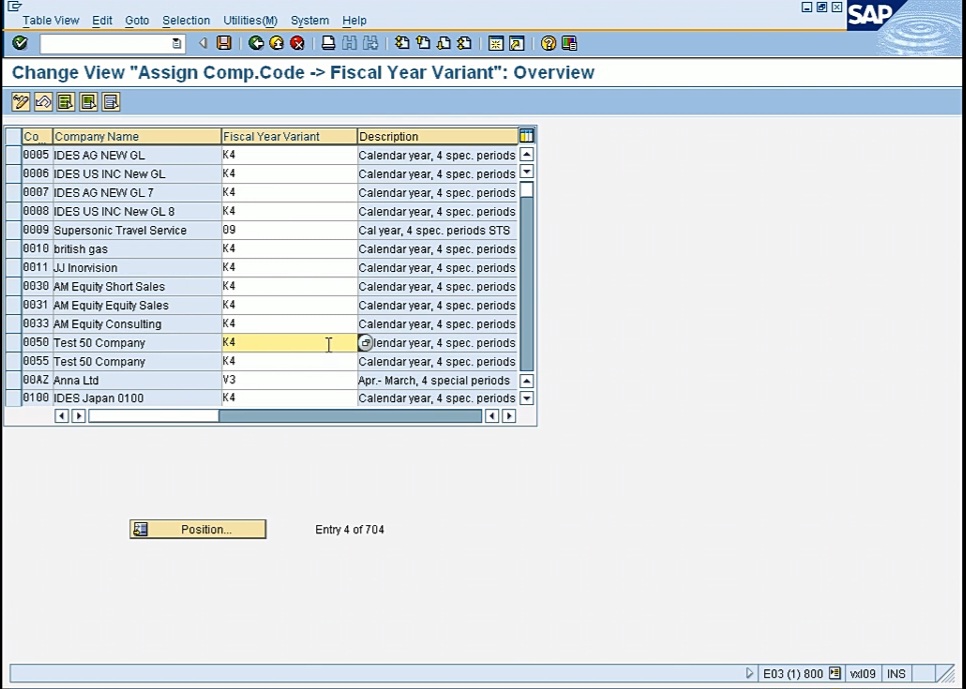
Okay. That’s all we do. You just type in the number and that’s it. We save it. Now we have the fiscal year variant, but now we need the posting period variant. The posting period variant allows us to open and close period for our company code. And this is normally a finance function, like the controller, who will keep this access and we’ll decide when previous month is closed to close that period and open the next period. It’s normally accounting function, but we need to configure it as if we’re doing a configuration, you know, what is our posting period variant and how many companies wants to share. One option is if you have like 10 companies in the U.S, you can create one variant for those companies and you can control it from 1 variant. Other option is, if each company closes at a different schedule and they want their own variant, you can do that. And this can be changed in the future time, there is no factor, you can change it in the future. So, let’s see. It’s ‘Document’, ‘Posting period’. So first, we define the name of the variant, ‘Define Variants for Open Posting Periods’. In this step, it’s just a name.

I just created the same 0050 variant. It’s just a name. And then we go to ‘Open and Close Posting Periods’. So, in this one, R is 0050.
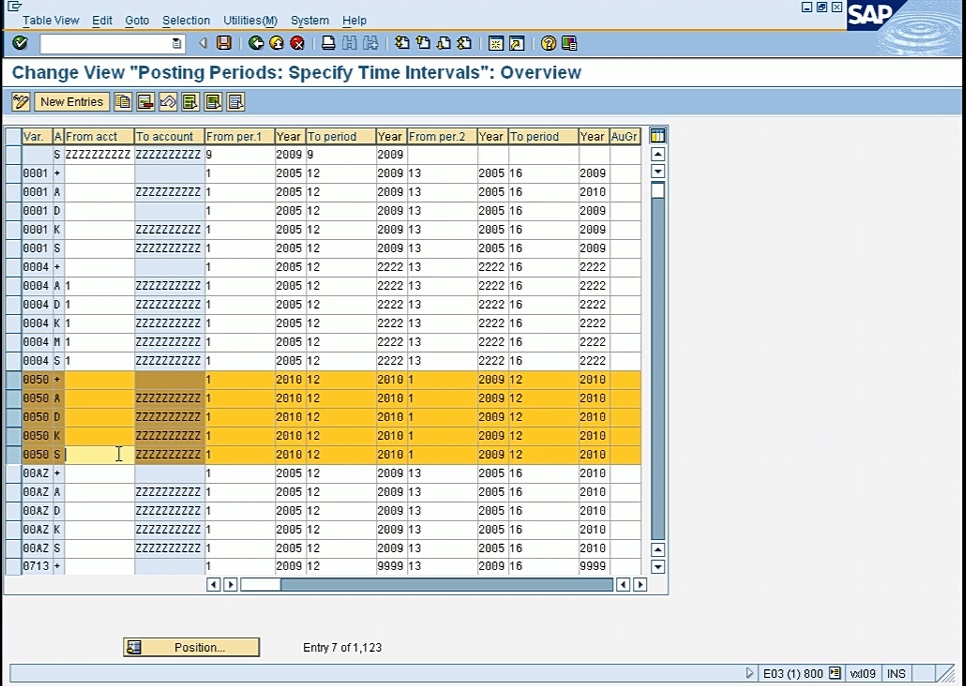
So, it will have 1, 2, 3, 4, 5 lines. And it’s for each subledger. Plus (+) is for everything, A is for assets, D is for accounts receivable, K is for accounts payable, and S is for your general ledger. Sometimes, let’s say, if your accounts payable is closed, you can close your K, and leave rest of the lines open. And when every subledger is closed, like in this example, for this variant we are open from January 2010 to December 2010. So, we are open for the whole year. Normally, it will be open for 1 month or 2 months, if we are closing, let’s say, February. So, February and March will be open, but once February is closed, this will be from 3, 2010 to 3, 2010. So that’s how you control your posting period for each company. So now we can assign this variant to our company code.
So, this is our company code, 0050, and this is my variant, 0050. So now I’ve assigned, and again, I can have many companies and they can all share this variant. So that will allow me to just, from one variant close all the companies. What I’ve seen is like if you’re a global company, then your U.S operation can have 1 variant and Europe can have 1 variant. But this is your company decision how they want to close it. If they want to close it, all the companies at one time, then one variant can do the job. But if you want some flexibility, then you can create several variants for your companies.
So, we created the posting period variant, we open and close the periods, now we are at document number ranges. So, the next step after doing the posting period variant is you assign document number ranges. So, what is document number ranges? Anything that you post in SAP will give you a document number. Whether it’s a customer invoice, vendor invoice, a general ledger entry, an asset posting, like a new asset, or any type of posting that you do in SAP will create a document number. So, what you would want is for each document type, ideally, it is recommended to have separate document number ranges. Let’s say, if you are posting a customer invoice, it should have a different number range if you compare with the vendor invoice. So, what that does is, by just looking at the document number, you can tell whether it’s a customer invoice, vendor invoice or asset document or a GL entry. So, it keeps it cleaner if you are looking from audit perspective or just looking at your documents. Because in the end, your month end, you will have hundreds of documents. And if you’re going through your documents, it gives you more information just by looking at the document number. And when you will post, you will understand. When you will post documents, I will go through that and then you will understand it better what the significance of the document number range. But to do the configuration, we will go in define ‘Document Number Ranges’, under ‘Financial Accounting Global Settings’. Let me go there now. So, under Document 🡪 Document number ranges 🡪 Define document number ranges.
So, each company will have its own document number range. And let me show you the range that I have. I’ll just enter my company code and click on the glasses, the intervals. So, it’ll give me the ranges that I have.
So now this is 01, this is a type that I’ll show you later. So, 01 type of documents will have from 199 to 10, 02 will have 29 to this and starting from this number. So, from 01 type of document has from 1000 to 1999 and 02, 03, and these numbers are linked with document types. So, asset will have one number, GL will have one. So, these are the ranges that you can have up to. So, in my company I have 20 different ranges for my documents. And so, you want to keep it going for number of years, so you want to give a long number range, so they don’t expire. And if you can also copy from another company, just click on Copy and copy from a company to another company, you can also do that. And also in SAP, you will notice in some places you will see glasses and some you will see pencil. So, glasses mean just to display and the pencil means to edit. So, I’m going to edit, I can click on glasses, it will edit the number. And on display, I’ll just click on glasses. So, we have defined the document number ranges and these are our ranges.
Now, let’s go to the next topic which is Field Status Variant.
And this is very important for configuration and let me tell you what this does. And it’s under ‘Line Item’. Line Item 🡪 Controls 🡪 Define Field Status Variants.
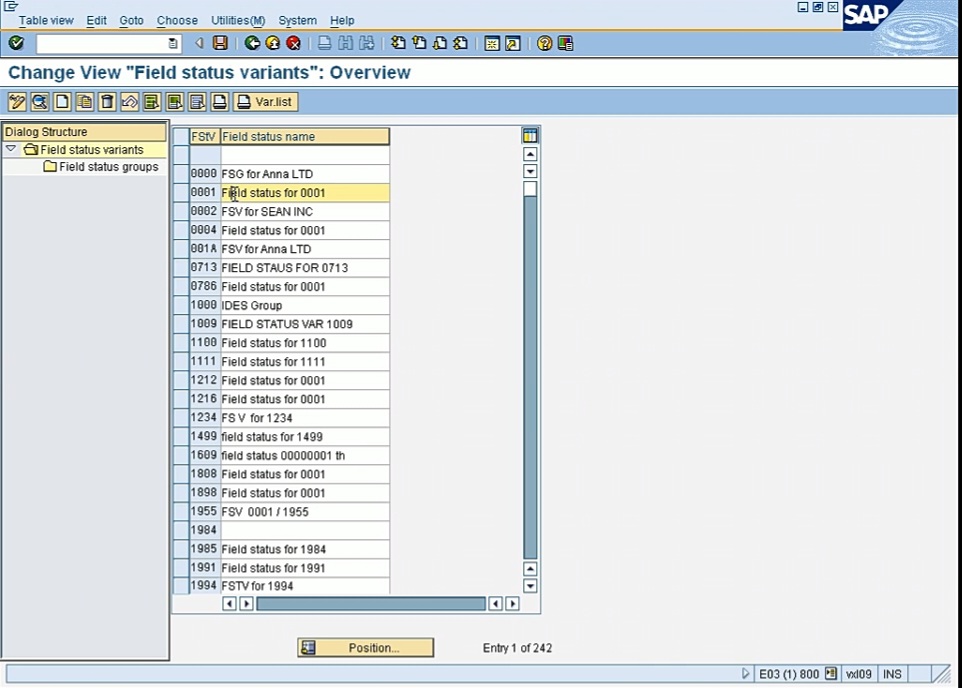
So, the standard that is given by SAP is 0001. So, what that does is, you know, there are number of fields when, let’s say if you’re posting a customer invoice, you will have the date, you will have the GL account, cost center, item, text, document header. So, there are number of fields that are available to you. In the field status variant, what you do, you define which fields are optional, which should be hidden and which should be required. Some of the fields are already defined by SAP that you cannot change like dates, like a posting date is always a required field, but some are that which you have control over, that you can decide. So, field status helps you do that and let’s say for GL accounts, in this example, I’ll show you and I’ll create a new general ledger account, we will have to choose a field status group. So, if I go in G001 under the Field Status Groups, it will have subparts like general data and this will give me some more information.
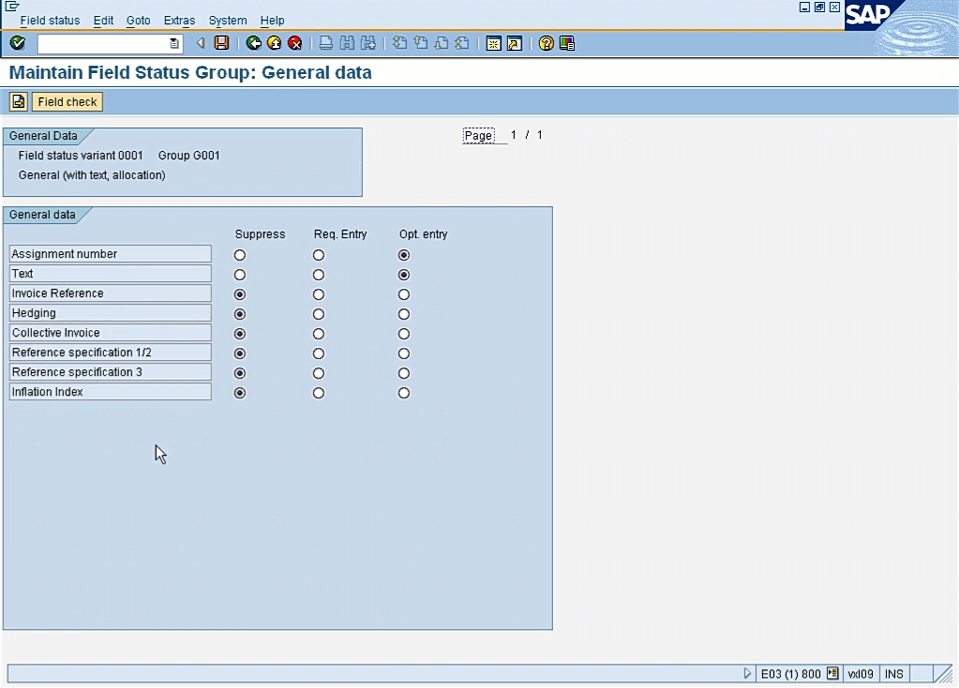
So, we have suppress, required, optional. So, suppress, if somebody choose this then they will not see these fields. So, it’s all up to you how you want to define for your own company or you can use the standard by SAP and then make further changes to it. But this, like the text field if you want, for each line item to be so you enter a text field explaining the type of expense you’re entering, so you can make this a required field if you want; so, the users have to enter this field. And some other fields like the cost center, plan, I mean there’s so many fields you can customize based on your needs. And when we will create the GL account, I’ll show you that we will have to choose one of the field status groups for each GL account. And for my example, I’m using the standard SAP 0001, for my configuration. I’m going to assign this to my company code where it’s assign company code to Field Status Variant. So, my company 50, I have assigned 0001 for my variant.

Now, the last few things, this is I mean not required, but it’s good, we need to enter two (2) tolerance, one’s for the GL account and one for the employees. We will just create one standard. This let you have limits like this person can enter this much amount of an invoice, you can limit that based on the tolerance. But let’s first do for a GL account, so we’re doing clearing differences. Let’s say if you are posting, let’s say customer payment and the customer invoice was for $100 but you receive payment for $99, it’s $1 less. Do you want to keep in some tolerance that, let’s say, if it’s $1 difference, you can still post invoice and post $1 to a gain or loss account or one option is you can have 0 tolerance that you need exactly the same payment to clear a document. So that’s where tolerance comes in. You can define tolerance. I’m just using the default tolerance that we have in SAP. The first tolerance is for the GL accounts

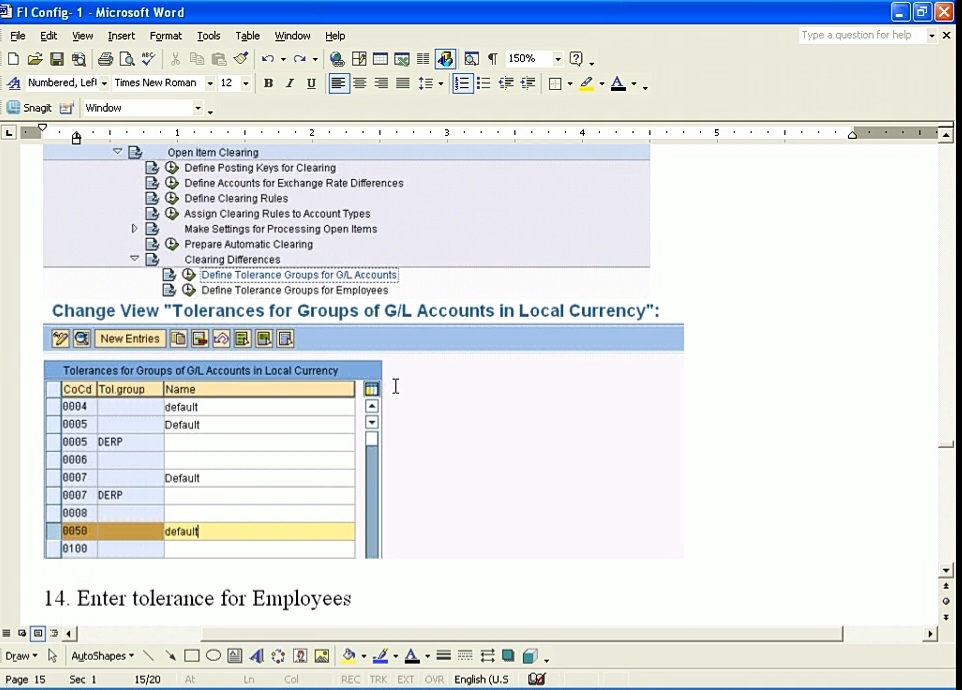
and the second tolerance is for the employees,
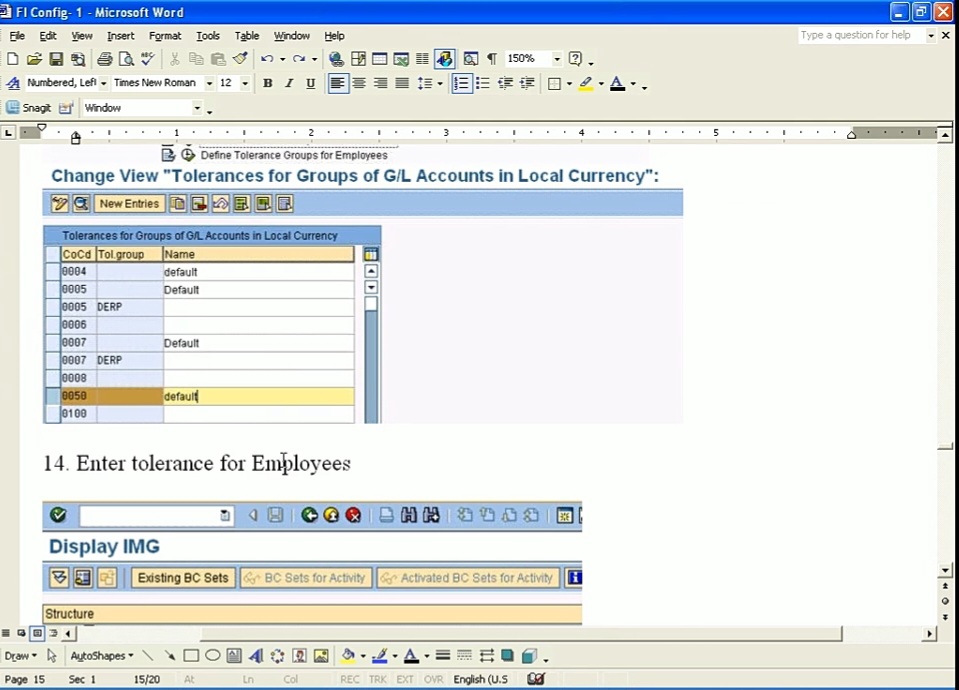
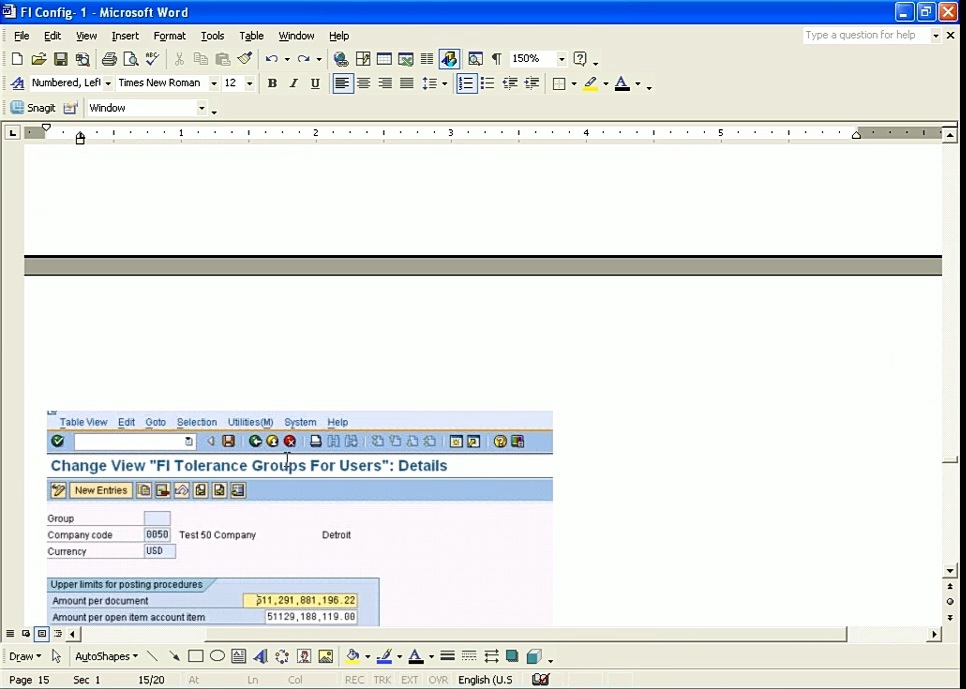
for each employee how you want to give the tolerance. I’m just putting on a high number there because for this we are not creating any tolerance, but we need something there. So, I just put a high number there, otherwise, sometimes we might get an error that there is no tolerance defined for us. So, we just need something there to have some tolerance.
Let’s do the final part, Enter Global Parameters.
So, enter global parameters, it will give us like an overview of our company code setting.

So, if I just double click on 50, this will give me an overview of what I have done so far.

So, this is my company code, my country key is US, my currency is USD. This is my chart of account and this is my company 50, the grouping on the top of my company code. This is my fiscal year variant K4, my field status variant is 001. My posting period variant is 0050. And also, we can change it also here, we don’t have to go to those settings that we were before, we can also change it here. But in this screen, from one screen, we can see several settings that we have done so far. So, it’s a very important screen to just give you an overview of what we have done so far. And this is the basic configuration you need to use FI.
Now, I think one thing that was remaining was the Retained Earnings Account.
So, what is a retained earnings account? It is, you know, on year end, you have your balance sheet, you have your income statement. So, your balance sheet has all your GL accounts, your assets, your liabilities, your equity. Within your equity section of your balance sheet, you have a retained earnings account and that balance comes from your income statement. What is your total income for the year whether it’s a loss or income. So that net income rolls into your retained earnings account. So, what happened on the year end when you enter, let’s say, we closed 2009 and now we are entering into 2010. So, on your January 1, all your income statement numbers start with a 0. But your balance sheet number, your ending balance on December, let’s say your cash, your cash ending balance on December 2009 is your beginning balance on 2010. But what happened to your expense account? Expense account, your ending balance on December 2009 is, I mean, in January 1, you have 0 balances on all your expense account. So, what happened is your total net income on December 2009 has all your income and your expenses. So, it will have a total whether negative or positive. That total will fall into your balance sheet account, retained earnings account. So, on January 1, 2010, the balance sheet account retained earnings will have that number, but your individual P&L account will have 0 beginning balance. So, every year it will start with 0, the income statement will start with 0, but the retained earnings account all the balance will flow into retained earnings account. So, we have to define 1 GL account for retail earnings account.
So, SAP can do that for us the year end and on the beginning of next year. So, what we need to do is just define 1 GL account here that this is our P&L account and this will be on our balance sheet for the retained earnings account.
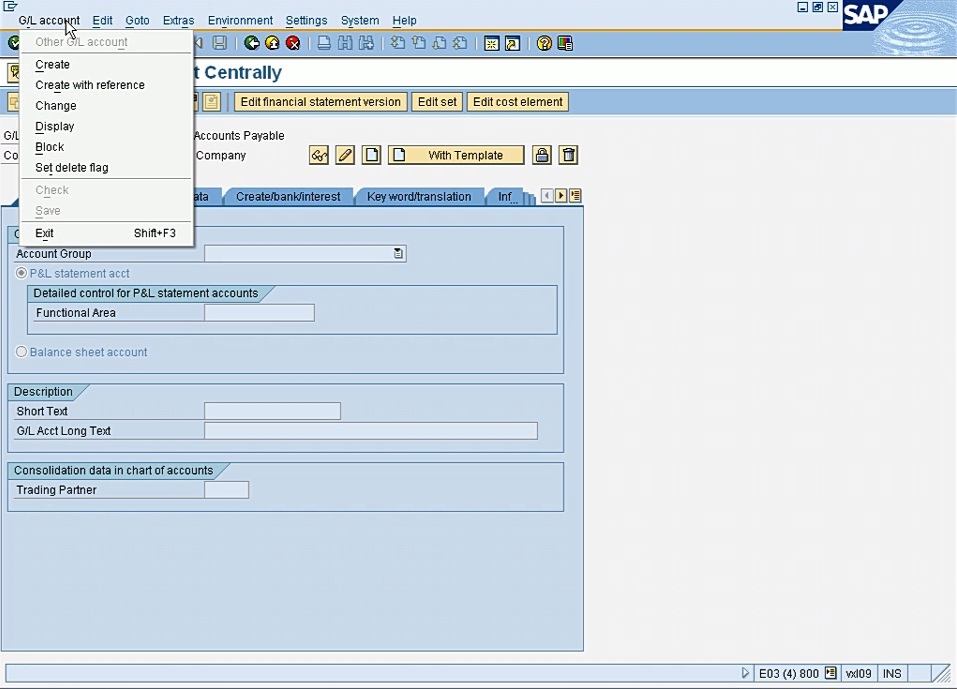
And after doing all these settings, we are ready to create a GL account. And creating a GL account is an end user transaction, it’s not IMG, it’s not a configuration, but it needs all the configuration that we have done so far. After doing all these configurations, we can go in the SAP menu, the end user menu and go and create a GL account. To create, so this was our configuration screen IMG, but like I said, to create a GL account is an end user transaction. So, I’ll just create a new session, click on the button for creating a new session on the toolbar, and I can go from here. Like, in this case I know, the transaction code is FS00. I can either type in FS00, and press ‘enter’ or I can go from the menu. It takes longer from the menu, but, you know, you have this option. I can go in; Accounting 🡪 Financial Accounting 🡪 General Ledger 🡪 Master Records 🡪 GL Account 🡪 Individual Processing, and then I’ll see FS00 to create a GL account. So, I can double click here or enter FS00 on the command screen.
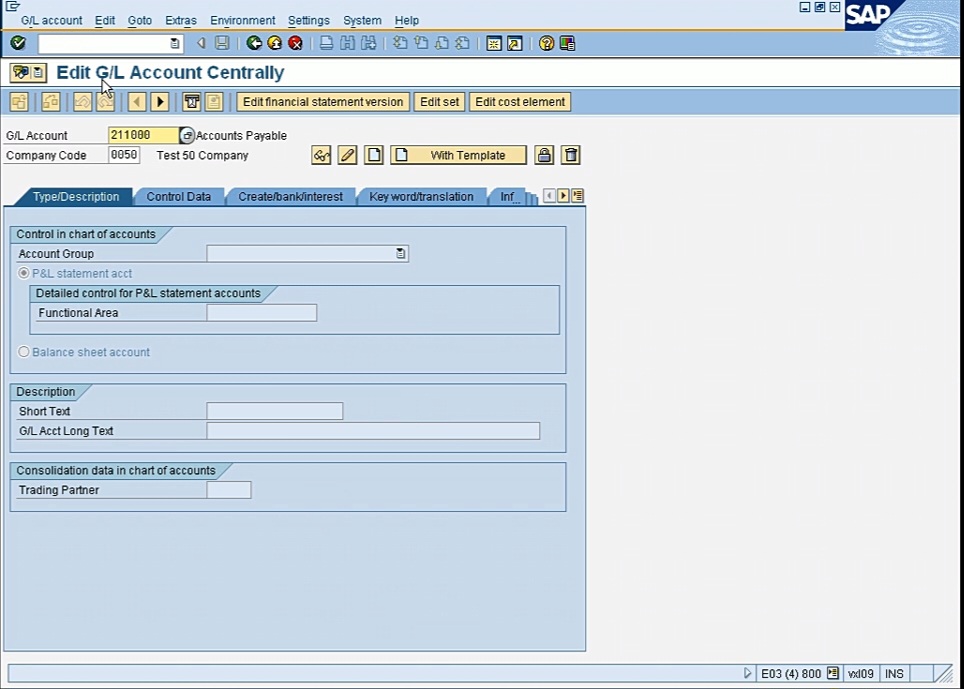
So, this is a screen to create a GL account. Right now, it’s in the edit mode. So, let me just choose the account that I want to create, let’s just say, 113030 and I’ll click on GL Account 🡪 Create.
So now I’m on the create screen. The first thing you will see is the account group and this is the account group that we have created earlier. If you remember, I had only 2 account groups. I had the balance sheet and the profit & loss. I can have multiple, like I said, but I only have 2 for this. So, if you’re creating for balance sheet, I’ll just choose balance sheet. And then we have to choose, if I’m creating a balance sheet, I’ll do balance sheet. So, this is not SAP given, this is the account groups that we have created, but this is SAP standard, whether it’s a balance sheet or the P&L. But this, we can create however we want. And after doing this, now we have to name our GL accounts. We need a short text and long text. And again, keep in mind that this is within the range that we have created. For balance sheet, if you remember, our range was from 1000 to 3999. If I change this to P&L, I should get an error that account group P&L is from this number 4000 to 9999. So, I get this error, which is a good thing that it will stop me from using a different range for the P&L, so I have to use this range for balance sheet. So, let’s say, and the short text cash, let’s say Bank of America is all the fields I have. And this is the long field.
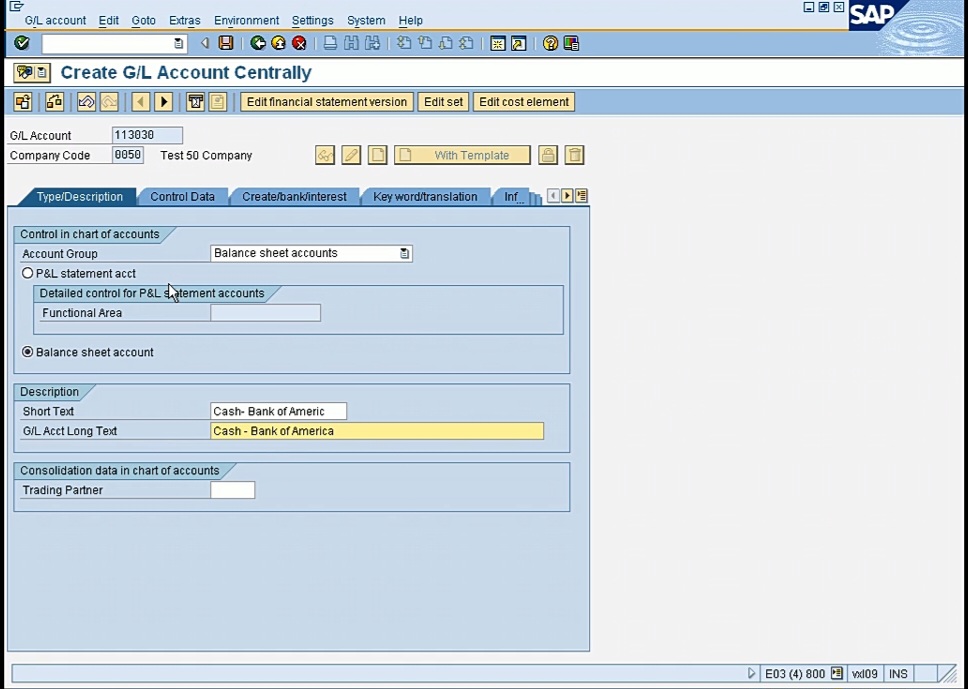
And let’s go to the next tab. Here I choose by default, it will have the company code currency for my company which is USD. I will have this. Another important thing on this screen is this line item display and it’s very important to check this. This will allow us to, if you want to see all the transactions that are in a GL account, if we have line item display checked then we can see it. Otherwise, it’s not very hard to drill down on a balance for a GL account, so it’s very important that you check line item display for all GL accounts that you create. Open item management, I’ll go through later when we will do vendors and customers, but for all the GL accounts that we will create, we will check line item display, so we can drill down on the individual line items that we have posted for this GL accounts.
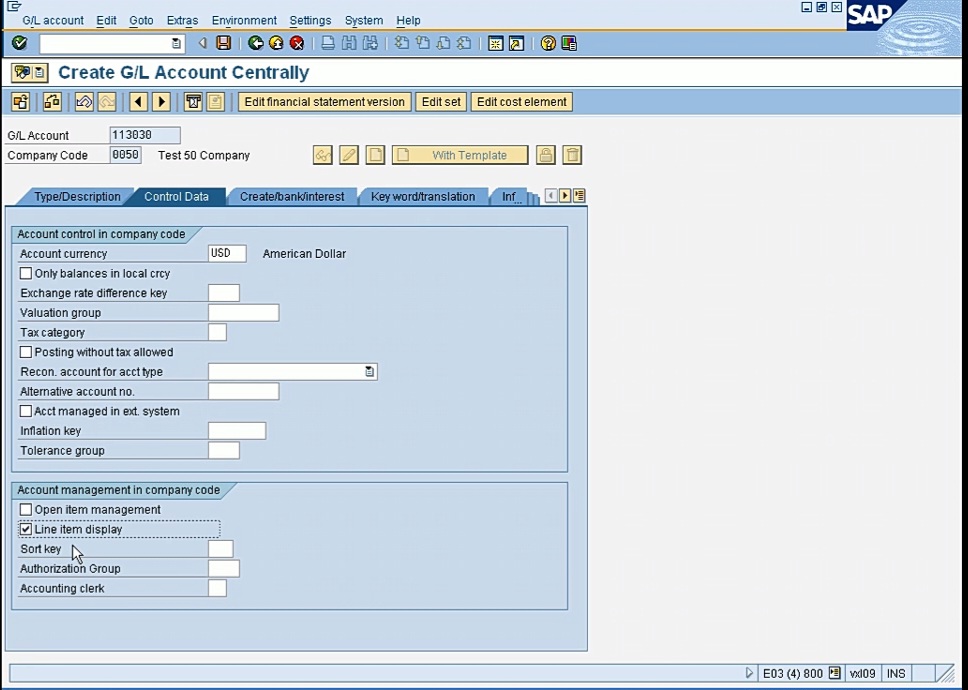
For some accounts, we don’t need to check it. Let’s say for the accounts payable, the main account for accounts payable, because accounts payable will have like hundreds of vendors, we will see the individual transaction on the AP in the individual vendor account, we don’t want to see them at the GL account level. Otherwise, we will just take a lot of space. For those, we know that for the AR, we can see the transaction in the individual customer account and for AP, we can see the transaction in the individual vendor accounts, we don’t need to see it again at the GL account level. So, for those accounts, we can uncheck it, but for all other accounts, we need to check I mean, it’s important to check this line item display. And I’ll go through that line item display function later also after posting several transactions, we can see how, then you can understand the importance of this. And also, when you create assets or customer and vendors, for those GL accounts, we will choose the reconciliation account also. And we will go through that when we will do ARAP and assets. But for other GL accounts, you know, we don’t need to check this.
Let’s go to the next tab. Here we will choose the field status. We have discussed earlier the field status variant.

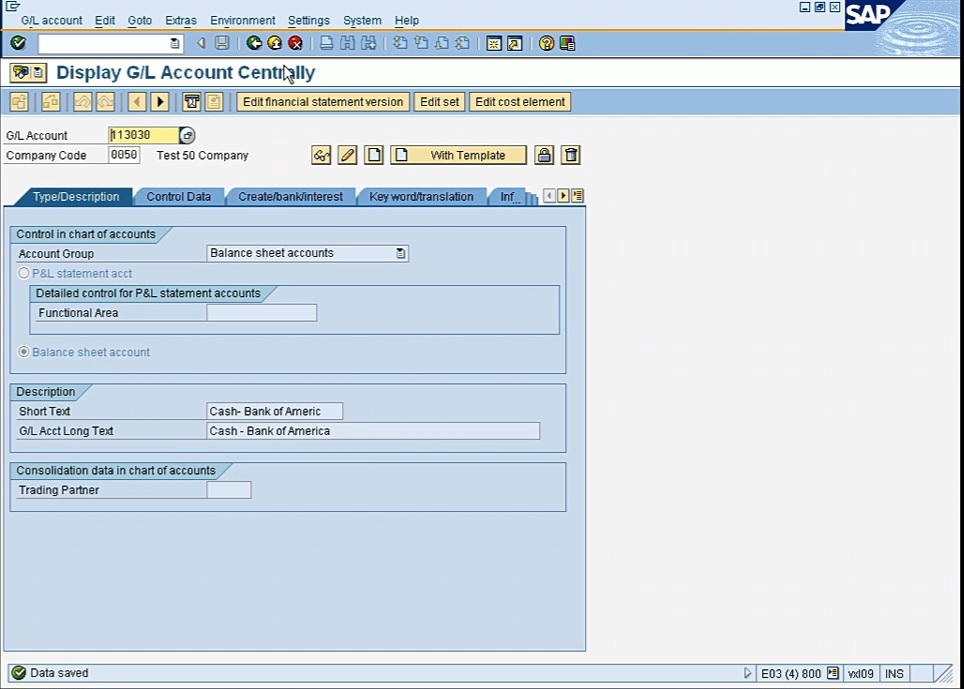
So, I’ll just choose G004. And this is the basic settings you need for creating a GL account, these three tabs. You choose your account group. You decide whether it’s a P&L or balance sheet, you name it a short text and a long text. In some reports, you get the short text, but in some you do get a long text, so you need both. You need to enter both the fields. And then in Control Data, line and display, the currency comes automatically and your field status group. So basically, that’s all we need these 3 tabs to create a GL account for our company code. So, this is our company code, this is our GL account and like I said, it’s within the range that we have assigned for balance sheet. And now if I click on save, it will just give me some warnings and green light and data is saved. This GL account is now created.
At this point, I’m ready to post a GL entry.