House bank and Payment Program Configuration
So basically, I’m starting the FI config-2 documents which is a very short document. Basically, it goes over how to set up your AP so you can create your vendors. So those things are already set to do anything. I will go over it.
Thank you for reading this post, don't forget to subscribe!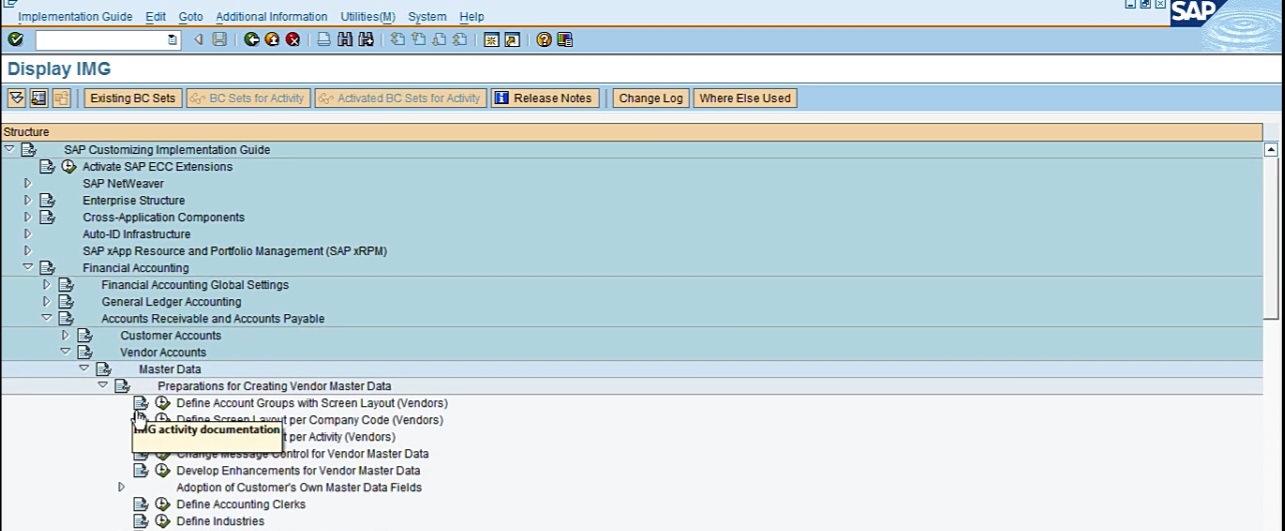
Basically, we go into Financial Accounting and then Accounts Receivable And Accounts Payable, then Vendor Accounts, then Master Data and then Preparations For Creating Vendor Master Data. And in the first one we have the Account Groups. And they are just similar to the G/L account growth. Basically, if we want to separate out our local vendors, national vendors, our employees, we can and then assign separate number ranges to them. So, they are in a separate number range. So just by looking at the number we can tell, okay, yeah, this is international, this is employee, this is my local or however you want to classify your vendors. So, let’s go over that. Normally for our work practice, we are using 0001.
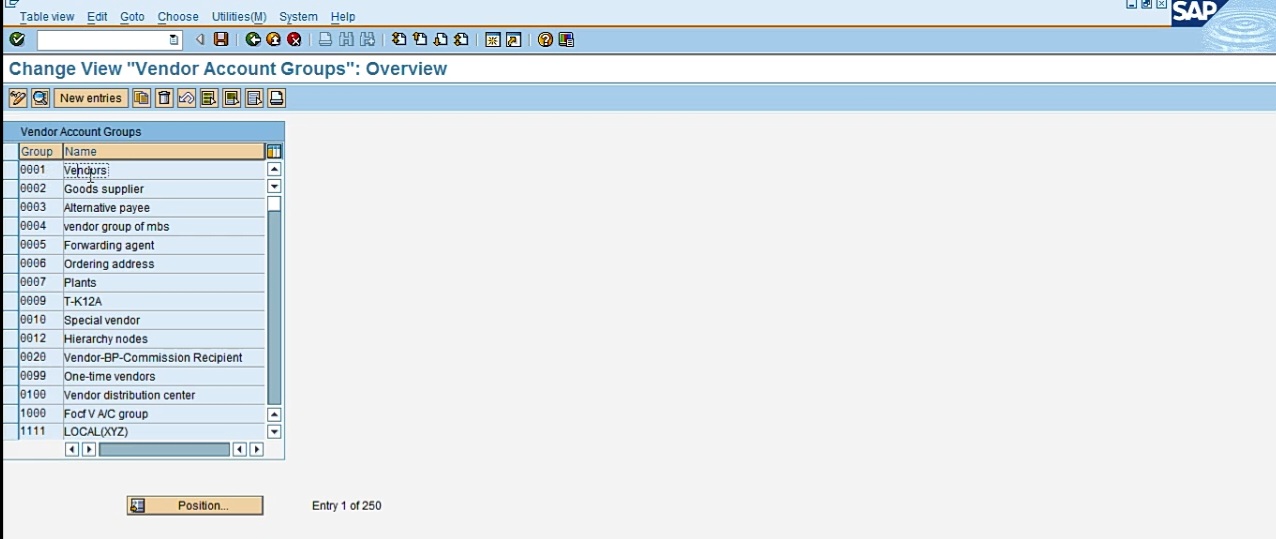
This is a standard SAP group number. But you can create your own, but, you know, you don’t have to. But if you want, you can use the 001 vendor. And within that also, it has field status group, like, which fields are required. So, if I go in address, you see the name is required, the search term is required.
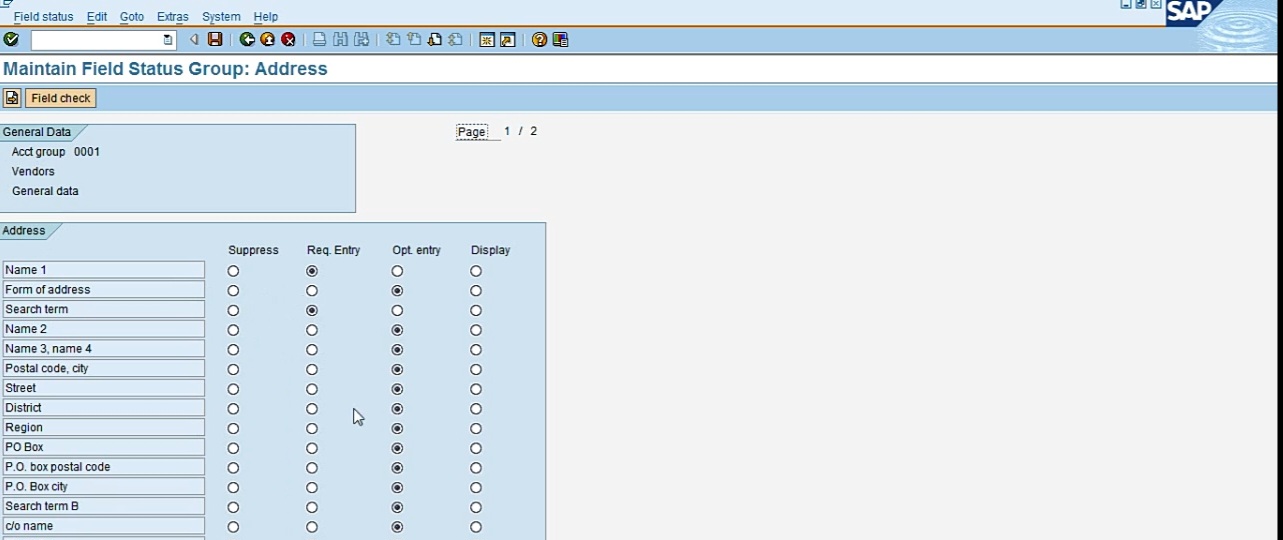
And we will notice that when we will create a vendor, exactly these fields will be required because they are inside account group. They have a field status variant. And for that, these fields are required. Cash management group all is required for this so that’s why you will see that when you create a vendor. So, for our test, we will use account group 001. Then the next step is to assign it a number range. Let’s go back and create number range. So, there are some number ranges here. If I go in ‘Create Number Ranges For Vendor Accounts’, Intervals, so, there are some number ranges that exist, and these are the number ranges that you can see.
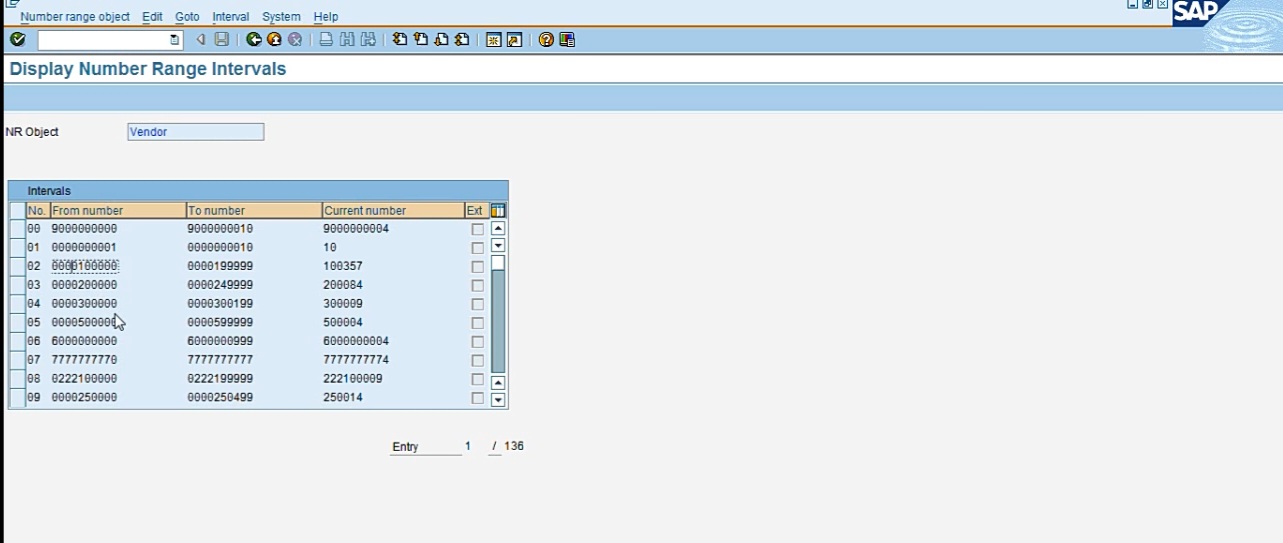
These are all screwed up because it’s a test system and, you know, everybody played with the number ranges. But these are the number ranges we have. So, I believe for our account group, 02 is assigned. So that’s why you will see your vendor numbers in this range, and I’ll show you where they are assigned. So basically, just like, for document number ranges we did for the finance documents, it’s just like that. And if I go in assign number ranges, you see the 001 that we are using, 02 number range is assigned.
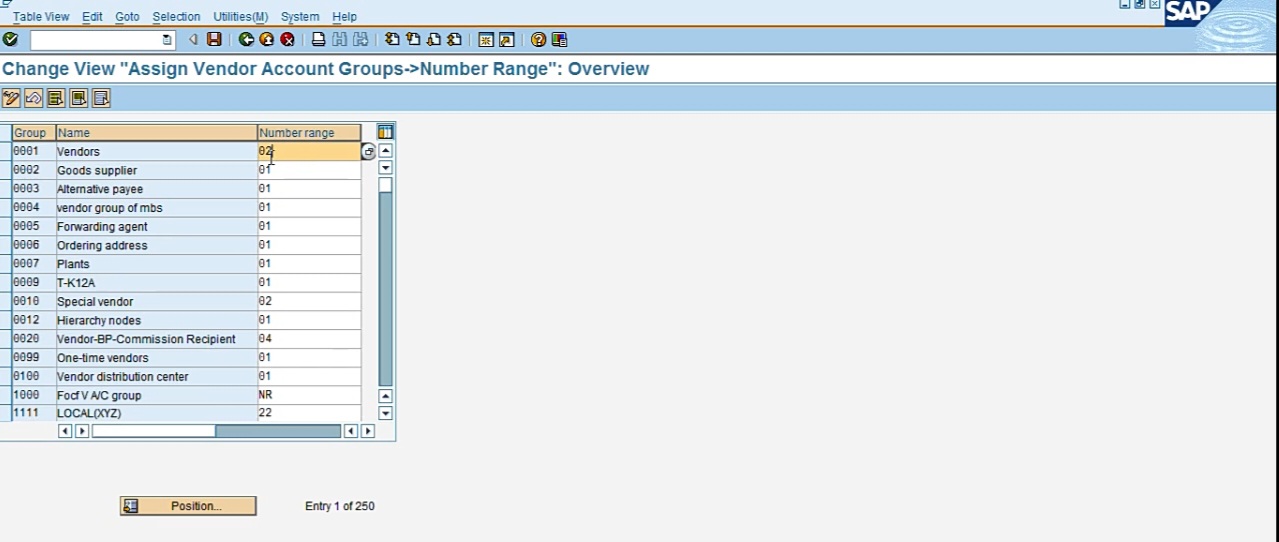
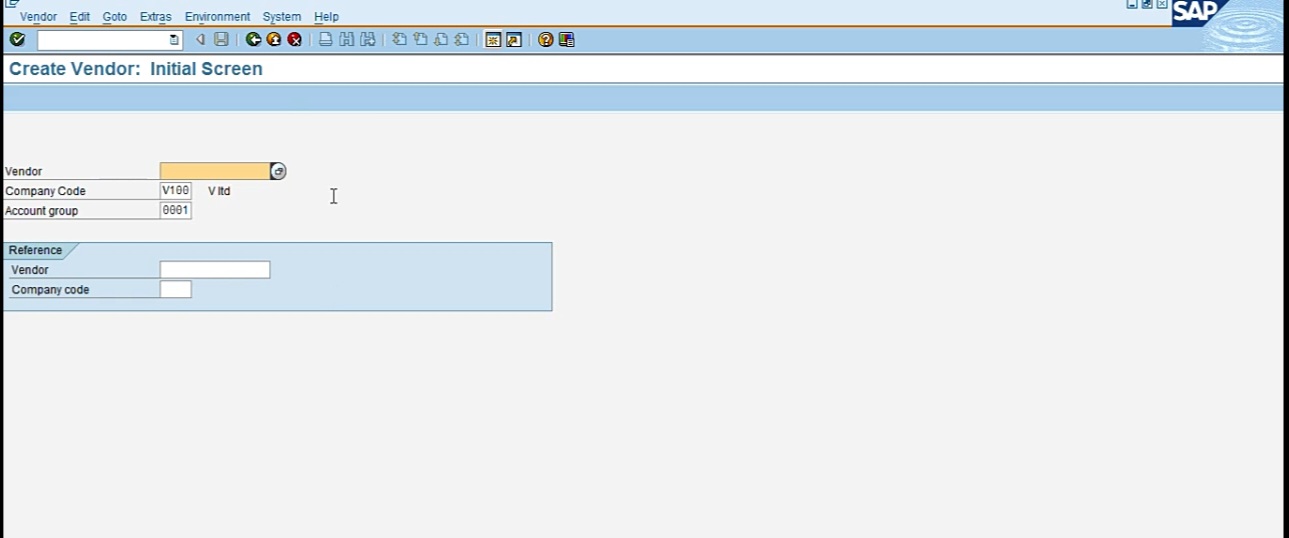
So, this is all done and this is at the client level. So, all the company code will share this. So, you don’t have to do something special for your company. It’s already done for all the companies in this system. So, number range 02 is assigned to group number 001. And what was 002? 002 is number ranging starting with a 1-series number range. So, I guess if you create a new vendor now, you will get this number or the next number, 100358. This will be your vendor number if you create it now in account group 001. So, after number ranges, we’re all set to create a vendor in our company code with all the settings because these settings are, like I said, at the client level. So, all the companies will share this setting. So, to create a vendor, it’s FK01. FK01 will create a vendor, so we will leave the vendor field blank because it will be given by SAP.
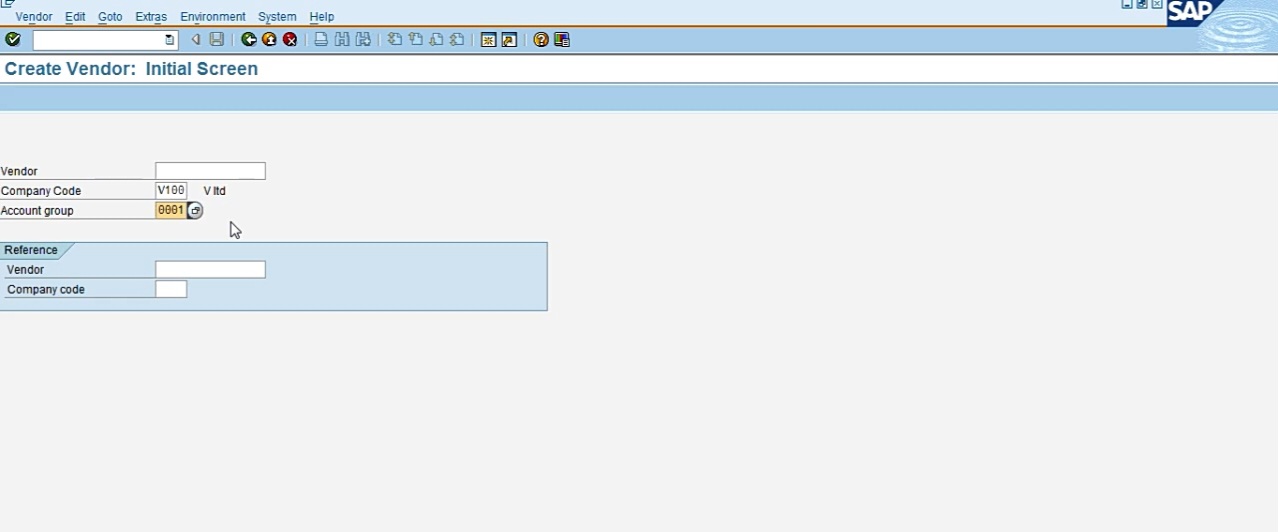
We will enter our company code. We’ll enter account group, which is 001. So, basically, I will go in FK01. I will choose my company code account group, and I’ll press enter.
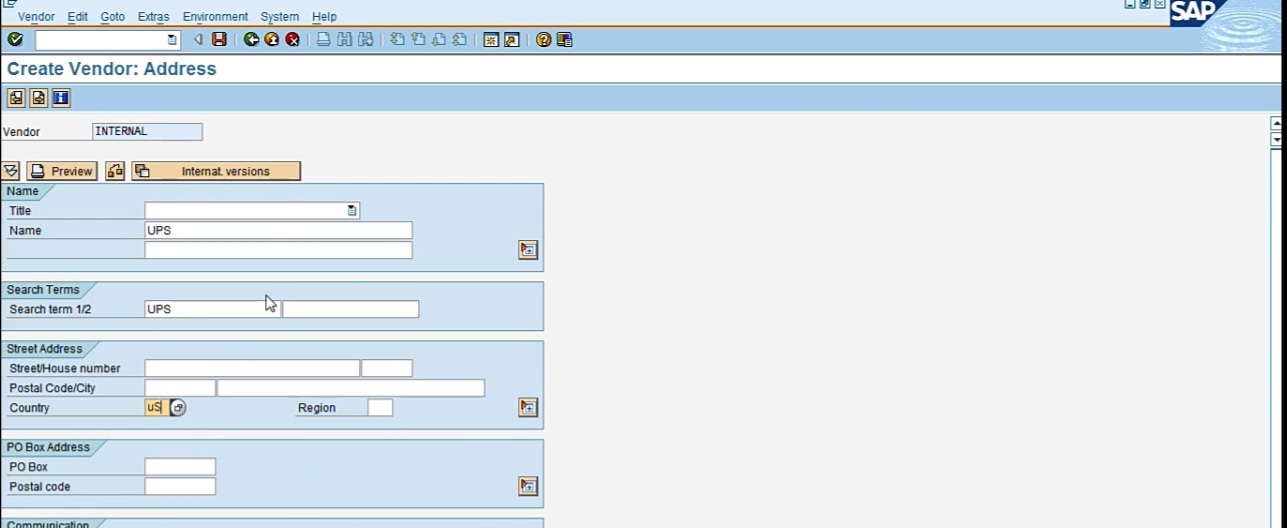
Now this is the required field, name, search terms. That’s because it’s coming from the account group field setup setting. So, I’ll just choose, let’s say ‘UPS’. In search terms I’ll use ‘UPS’. Country, I’ll say ‘US’. So, there are many levels to it. This is the first screen. When I press enter, we’ll go to the second screen. In the second screen, we don’t have to enter anything. So, and then I press enter again.
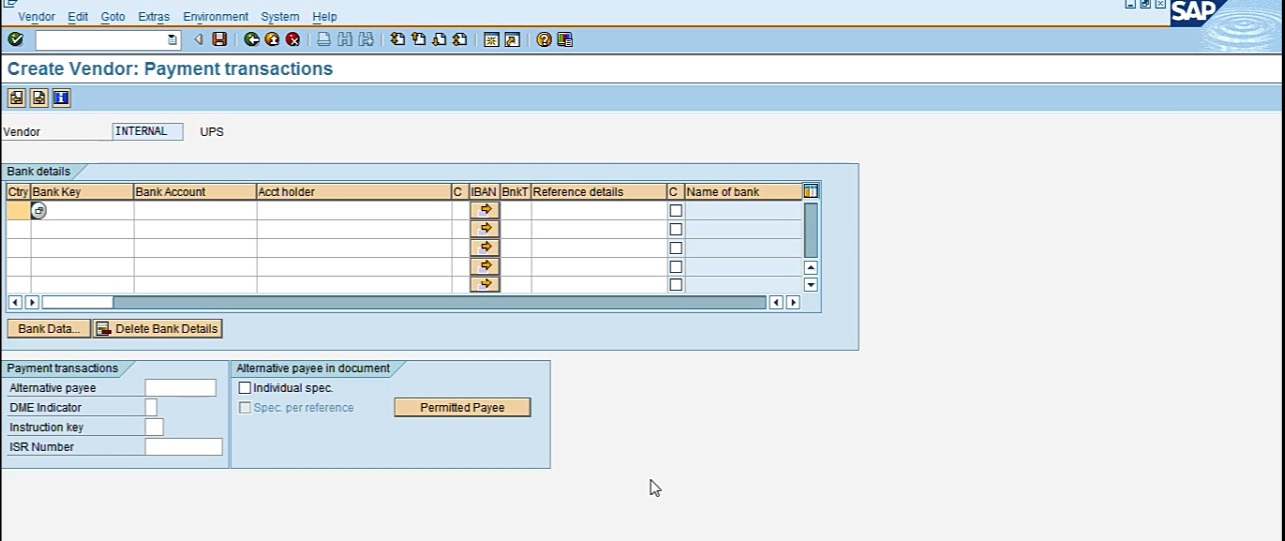
This is for information if I want to, if somebody is doing a wire payment, then they can enter the vendor banking information here. So, the wire can be done automatically from SAP. But we will do check, so we won’t be entering anything here in the banking information. Enter, again.

So now this is a reconciliation account. Basically, this is a link to your G/L. Basically, your subledger AP will be linked to your G/L. So let me go ahead and create it for you because we didn’t create it yet. So, I’ll go in FS00, GL account 211000, we will use it for AP. Click ‘G/L account’, ‘create’,
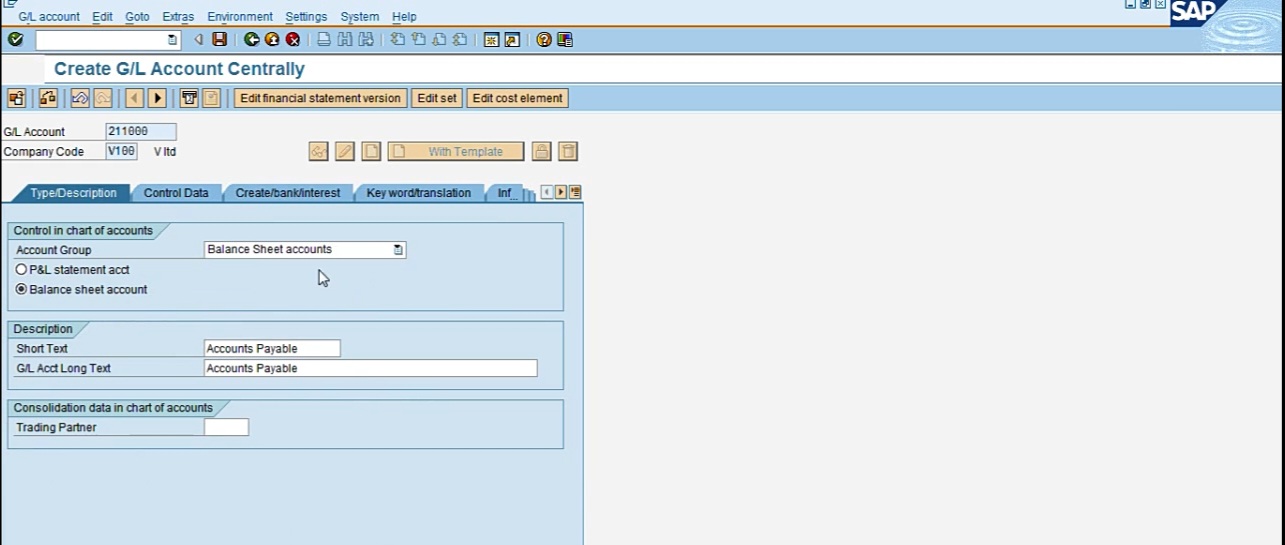
And this is just a one-time setting, you don’t have to do it. That account will be there for you. Control data.

So here, this is the difference now with the reconciliation account, we cannot directly post to it in the G/L side. All the data transactions come from the sub ledger AP, so that’s why it’s a reconciliation account. So here I have to choose it’s a vendor account. That’s the only difference with the other G/L accounts. So, this will have the total of your all AP transactions. And the individual transaction will be in the AP ledger, but the total will be in this G/L account, 211000. And for the field status group, I’ll just use G012, receivables/payables clearing. Then save. So now if I go in my reconciliation, so now when you will create your second vendor, you will just do a search and you will see this account, 211000 accounts payable. That’s all you need. Just click that and it will be here.
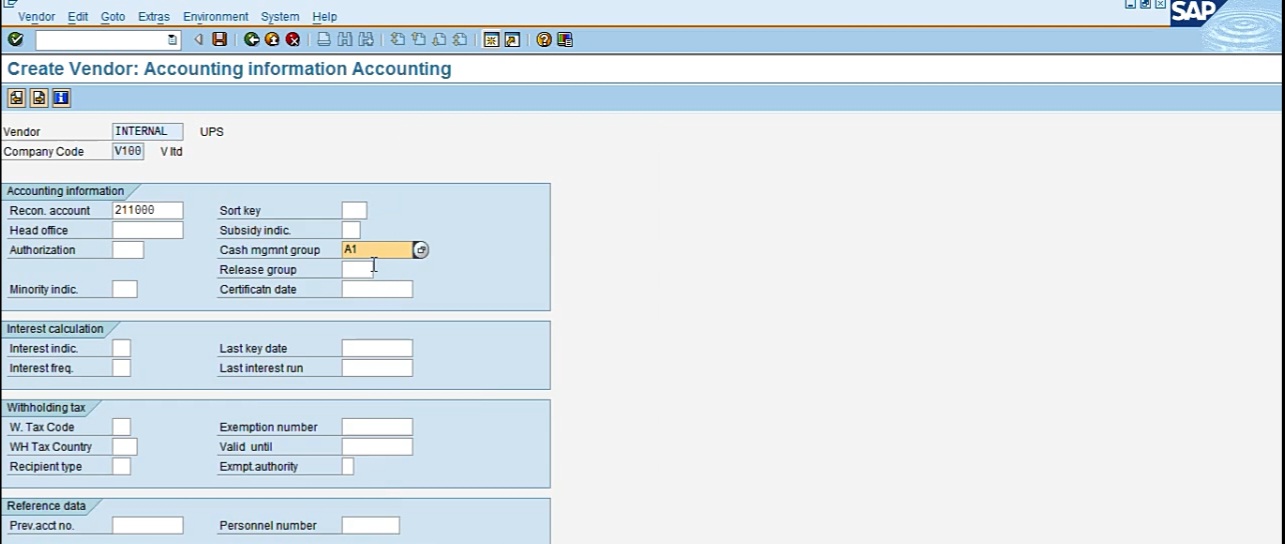
Cash management, I’ll just use any of the options because it was a required field. Enter again.
So now payment term is when, you know, is it net 30 or what? So we will just use immediately because we will want to do the payment run just after entering the invoice. So, for our example, for our test, we would choose immediately payment terms, 0001.
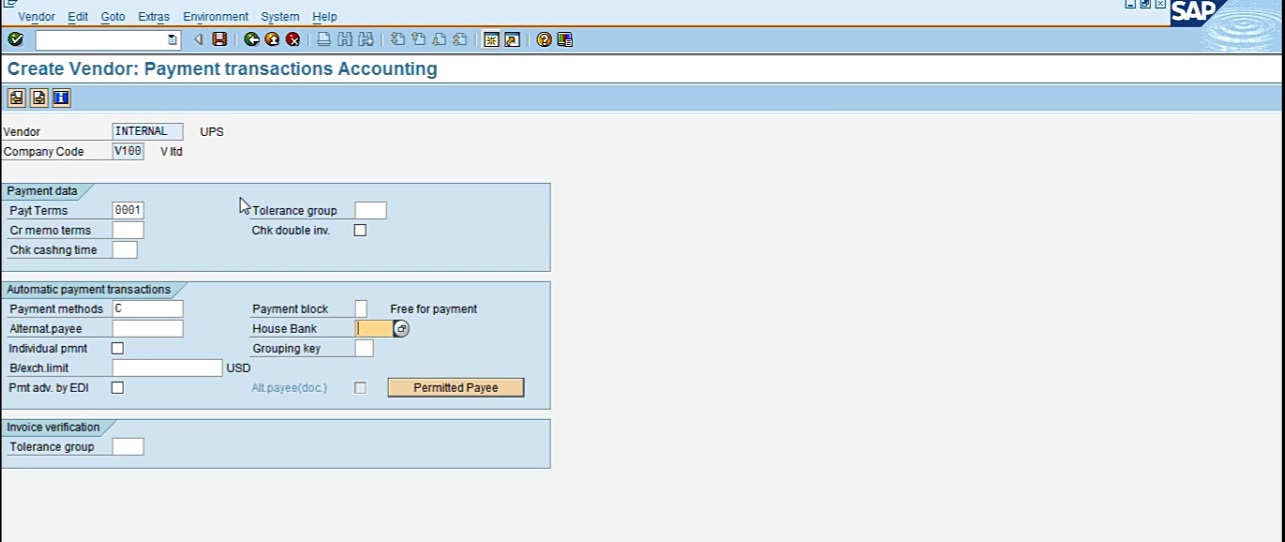
And we will come back to vendor master when we have our payment method configured. But let’s enter checks ‘C’ here just in advance. We’ll come back and, when we will complete our payment method, then we will enter the house bank here. And this is in the config-3. We’ll come back to this vendor master. Okay. Payment terms are done. And that’s all we need.
So 100358 is your first vendor in your company. And then you can create many more. So, yeah, for payment, it will be better if you have multiple vendors and then you can pay all of them in 1 payment run. So that’s all for the config-2. Basically, you create your vendor. So, the most important config is in config-3 where we will configure the payment program.
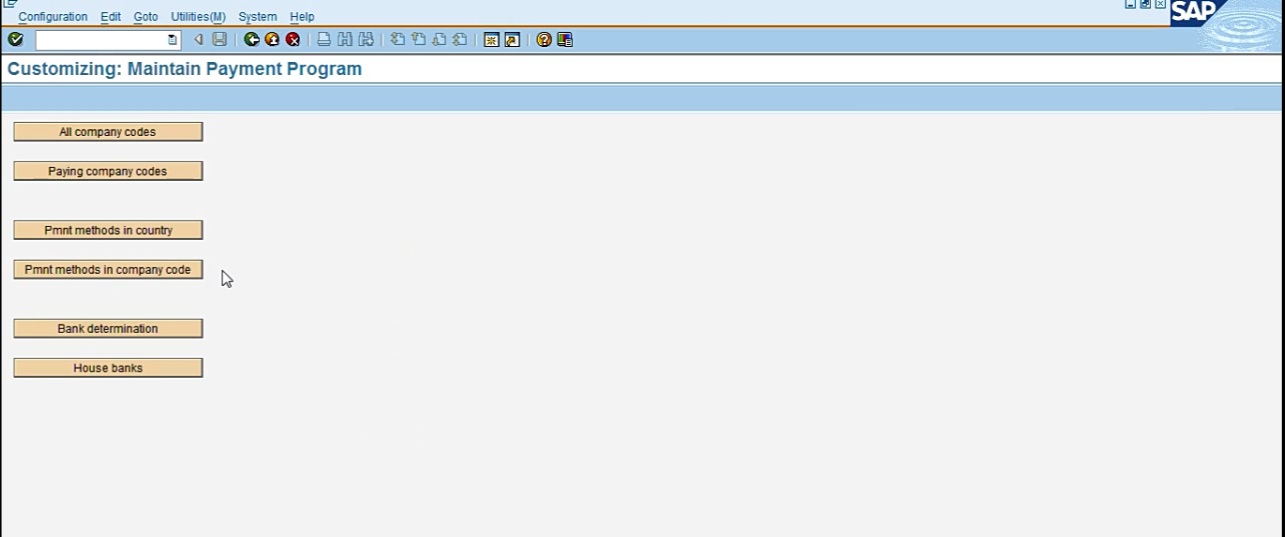
So, what is a payment program? Basically, you run one program and it picks up all the open invoices that you have, and it’s called a proposal. So, you can view your proposal and edit it and remove some invoices. You can add some more. And then when you’re done, then you process it, and with one transaction, you can pay all your vendors, all your open invoices for all your vendors. If you are doing it by check, then it will print checks. You can just put checks in the printer and then click print. And then all the checks will be printed. This config, basically, we are doing it for checks. And by completing this config-3, you should be able to print checks for your vendor. Basically, what we’ll do is we’ll be setting up payment methods in our company and then setting our bank account, what is our bank name, bank account, bank routing number, and then assigning it to a cash G/L account, and that’s it. And then after that, we will go in F110 transaction to do the payment run. So let me go over the config-3 document. So, config-3 will take us to transaction FBZP. So, if you type in transaction FBZP, you will go to the screen.
So, first thing we are doing is we are checking all company code and then you can create a new entry for your company or you can copy it from 0050. It’s up to you. If you want to copy, you will just select it and click on copy. If you want to create a new one, you will click on new entry and type in all the information. So, basically, you have to do settings in all of these buttons. So first, you have to do all company codes. You can see what I have in company 50, paying company code and AFP here.
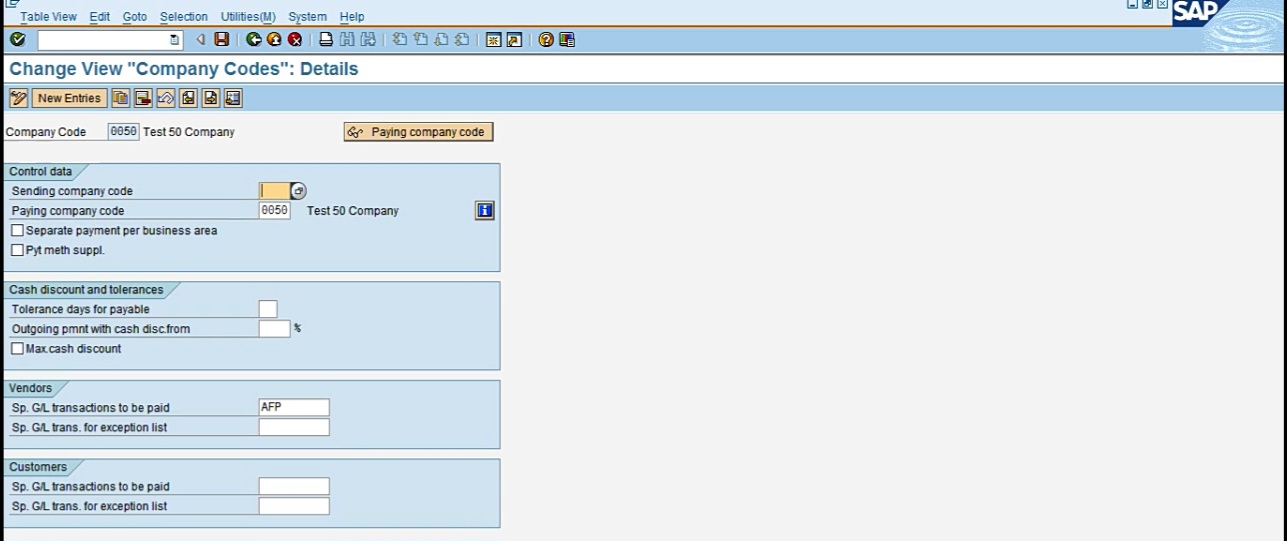
That’s all you need. You can copy from mine or you can create a new one. That’s up to you. So that’s in all companies, and the second is paying companies. And this also you can copy or create. Most important is the form.
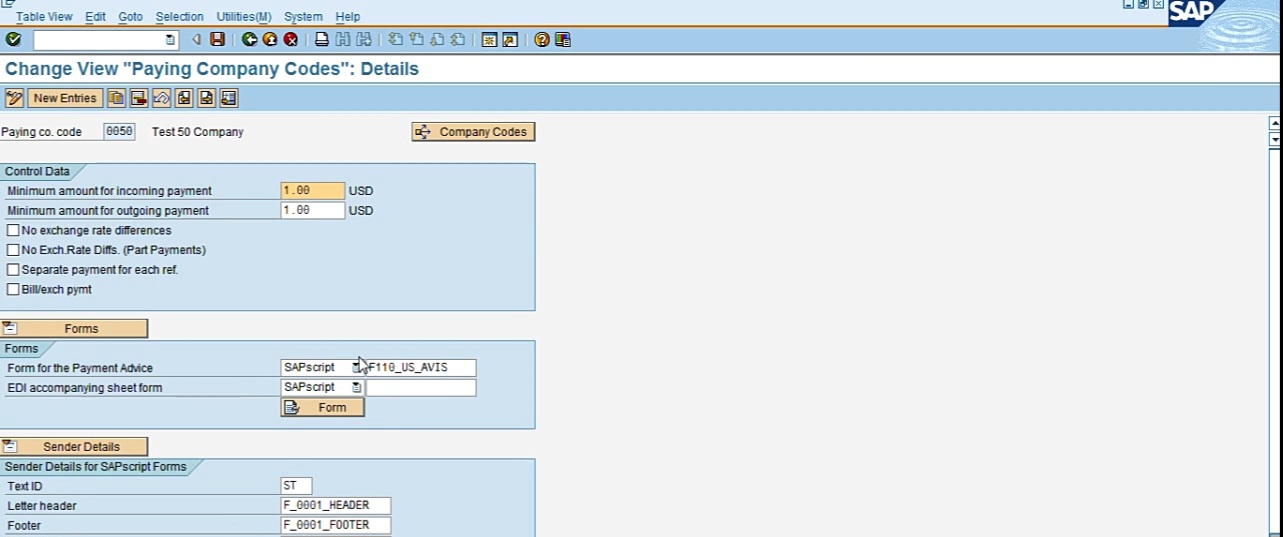
So, if you copy, you will be sure that you have all the information. But if you create a new entry, make sure that all the information is the same that I have in my company 50, like the form name. This is the second. And the third is payment methods in country.
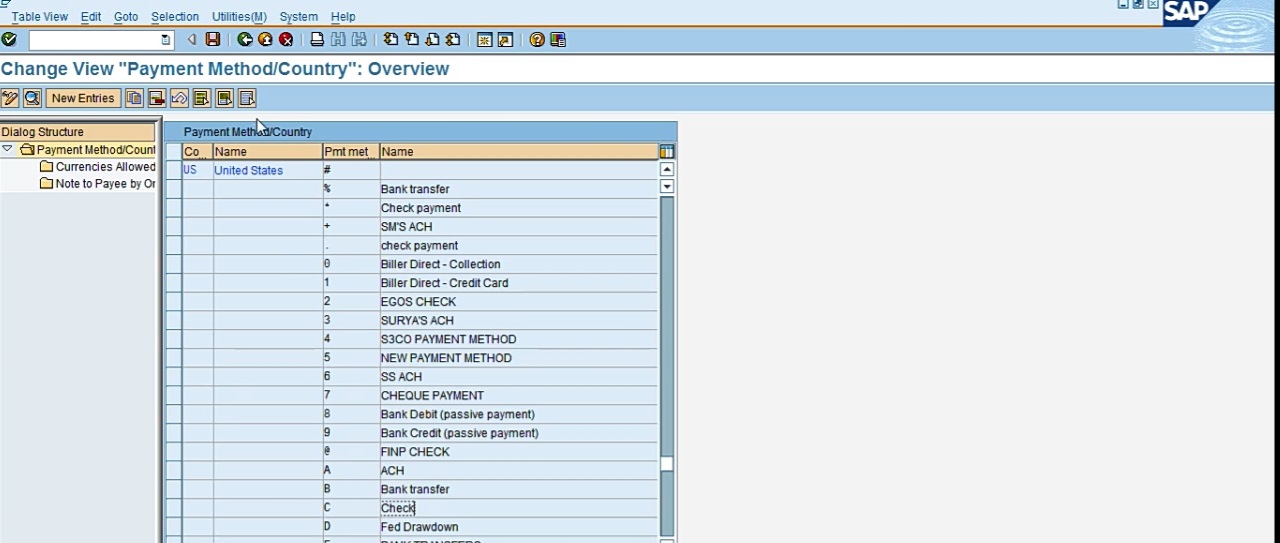
So, we don’t have to add anything for US, C should be there, C check. So, we’re not doing anything for this part, we’re just displaying it. Then we will do payment methods in company code. Here, we will have to add payment method C in our company code. So, you have to go in and add or you can copy this and just change to your company. So basically, you need this information and make sure in the form data you have this number.
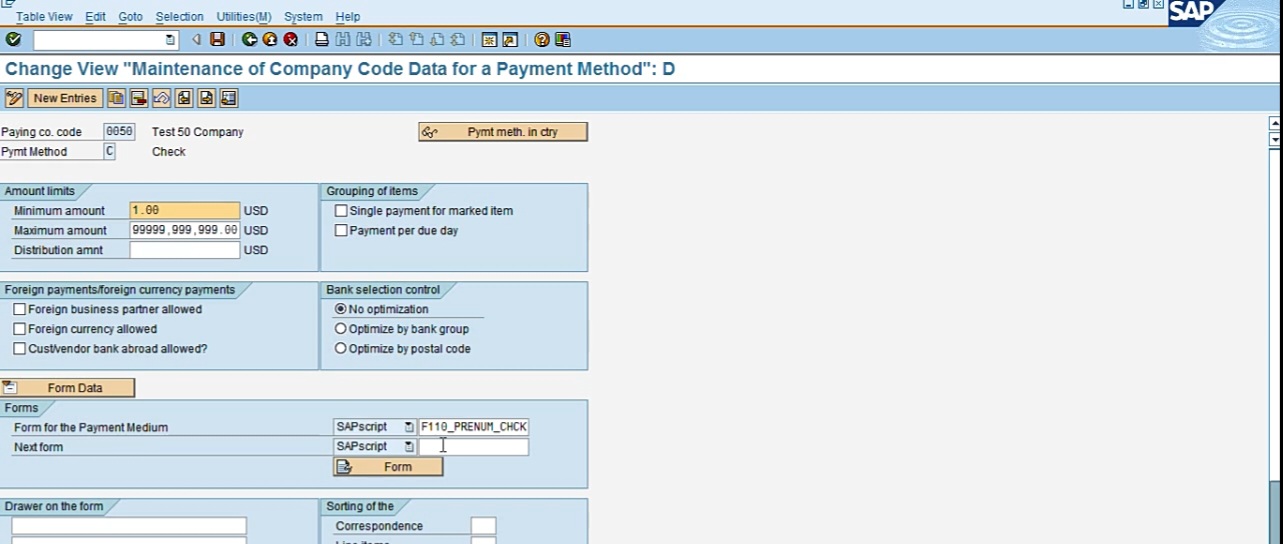
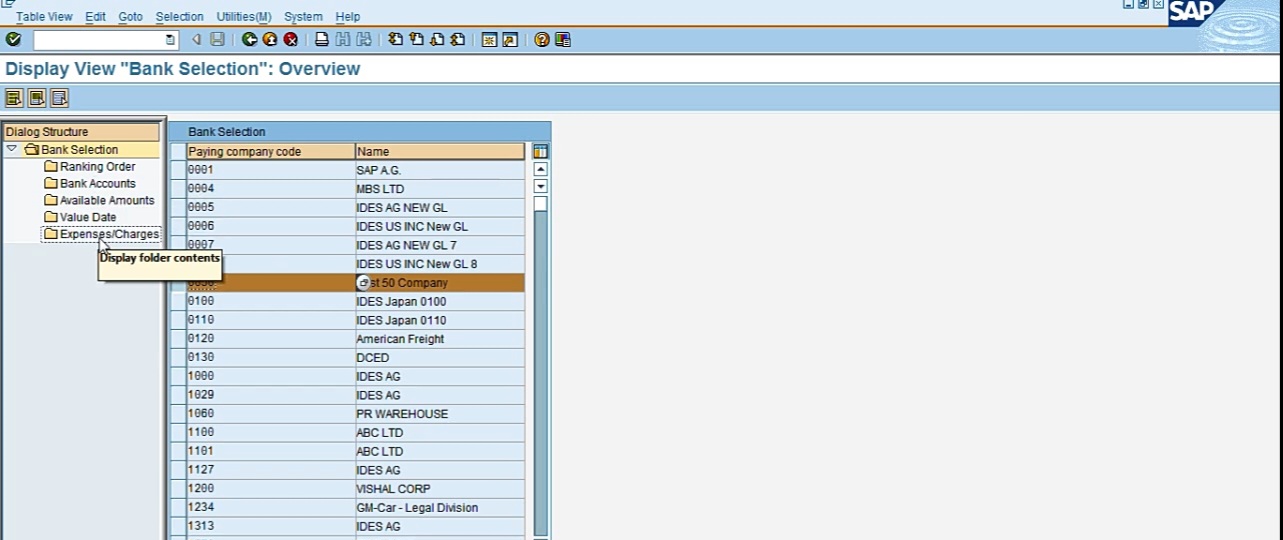
So, make sure you have all the information that I have in company 50, payment with the company 50, payment with C. So, make sure you have all this information. Then comes the little bit difficult part. Now instead of going in bank determination, first, we have to create a house bank, so click on house bank. So basically, house bank is, let’s say, you might have 10 accounts at Bank of America, I mean, your company might have 10 accounts at Bank of America. So, the house bank will be Bank of America, and then the individual account, like the 10 accounts that you have will be your account IDs. So, if I go in my company, see here in the bank account, so my house bank is Bank 1.
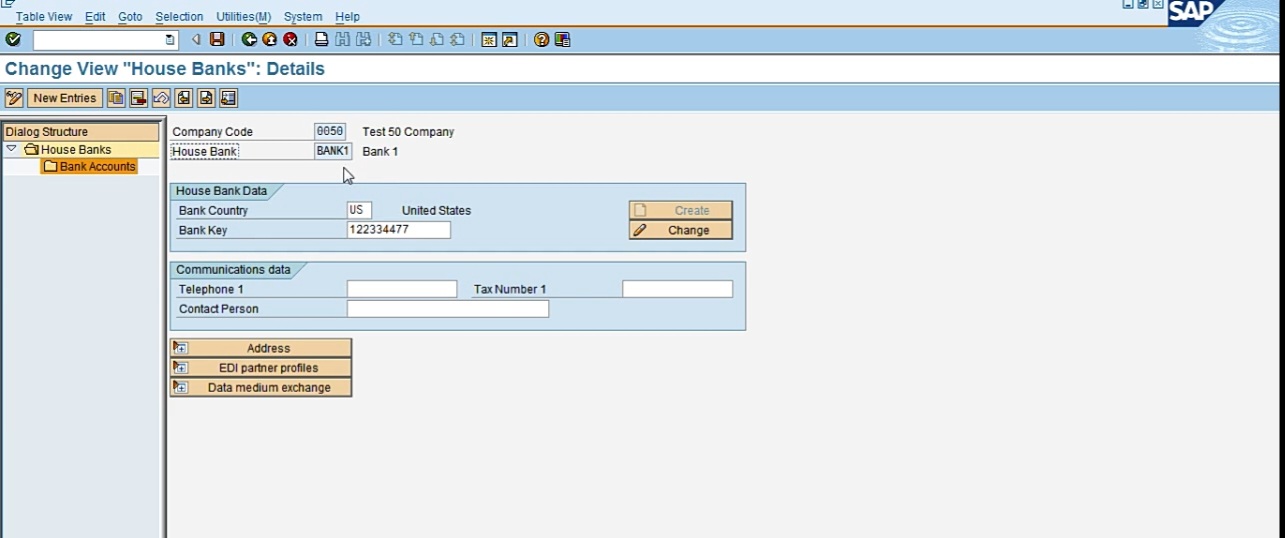
So, you can name it any name you like. This name might already exist so make sure you choose something that does not exist so that will help you. Otherwise, it will copy all the information from that already existing bank. So, basically, in house bank, you will enter the bank routing number. So, each bank will have a routing number. So, basically, you will choose your country, US, and then enter a routing number for your house bank. And then you will also have to name it. So, it’s 5 characters long, you have to name your bank. So that’ll be first part, creating one house bank. And under that house bank, you will have account ID, which will be your, like, checking account or savings account. So, in my case, I only have one account and I name it ACC01.
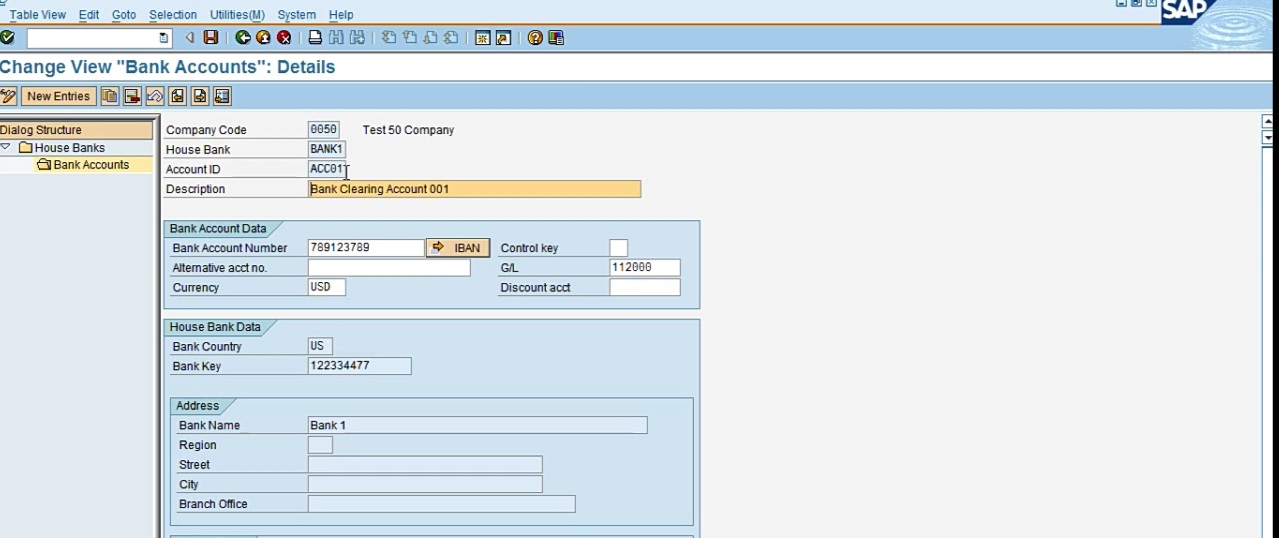
And then this will have the account number. So, the house bank will have the routing number and the account IDs will have the account number. And then the bank key, which is the routing number, will be copied from the house bank. So, this is the complete information for this account. There is the account number, and there is the bank key which is coming from the house bank, Bank 1. And then you will assign one G/L account and you can choose the G/L account that you have for cash 113, I guess, in your case, you can use that G/L account here. So, basically, this is an account that it will credit when it will do the payment run. Basically, it will clear the open invoice, debit the vendor and credit the cash account because it’s coming from cash. So, this is the G/L account that it will credit on the G/L side. So that’s all you need on the house bank, basically. These are all the steps. House bank, you choose your company code, you click on new entries, and then you click on create and enter your bank name and the routing number, which is bank key in SAP. And after you do that, then you click on bank accounts, new entries, and then you enter individual accounts, that’s their account number and account ID, and the shared account. After doing that, then we will go in bank determination. And in bank determination, we have several screens. So, in bank determination, first, I’ll choose my company code, 0050, and then we have to fill out all these steps starting with the ranking order.
So, if I go in ranking order and then now, I have to enter my payment method, C, USD, ranking order, 1 and then my house bank.
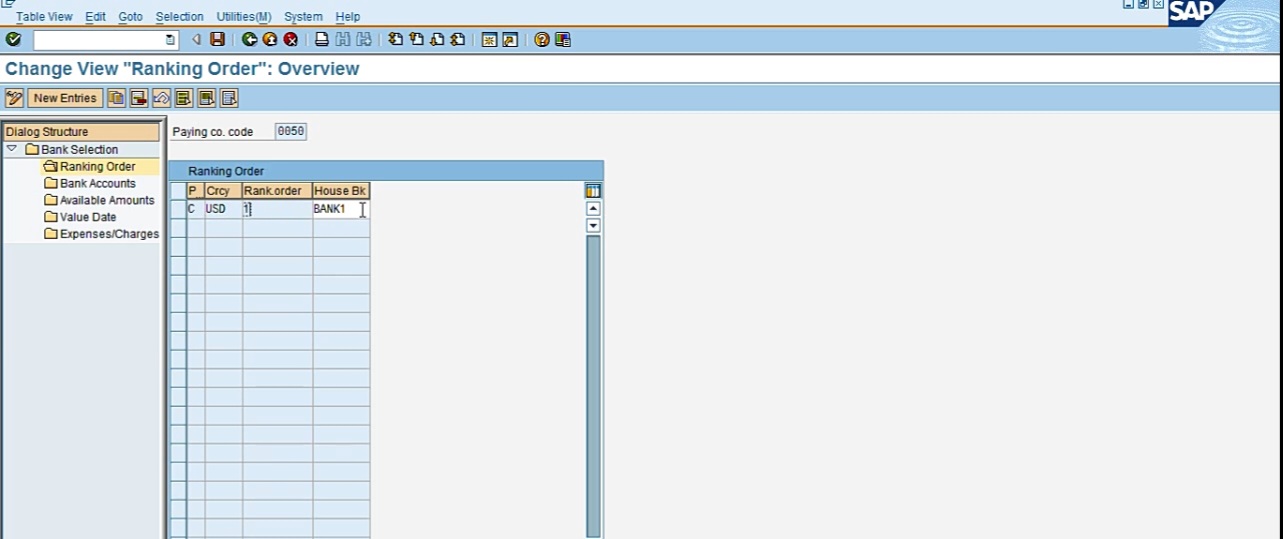
And then if I search for it, it will be exactly whatever I have in my company code. So, you don’t have to remember it. Just do a search based on all the config we have done. It’ll pick up that line and just double click on it. And then bank accounts,
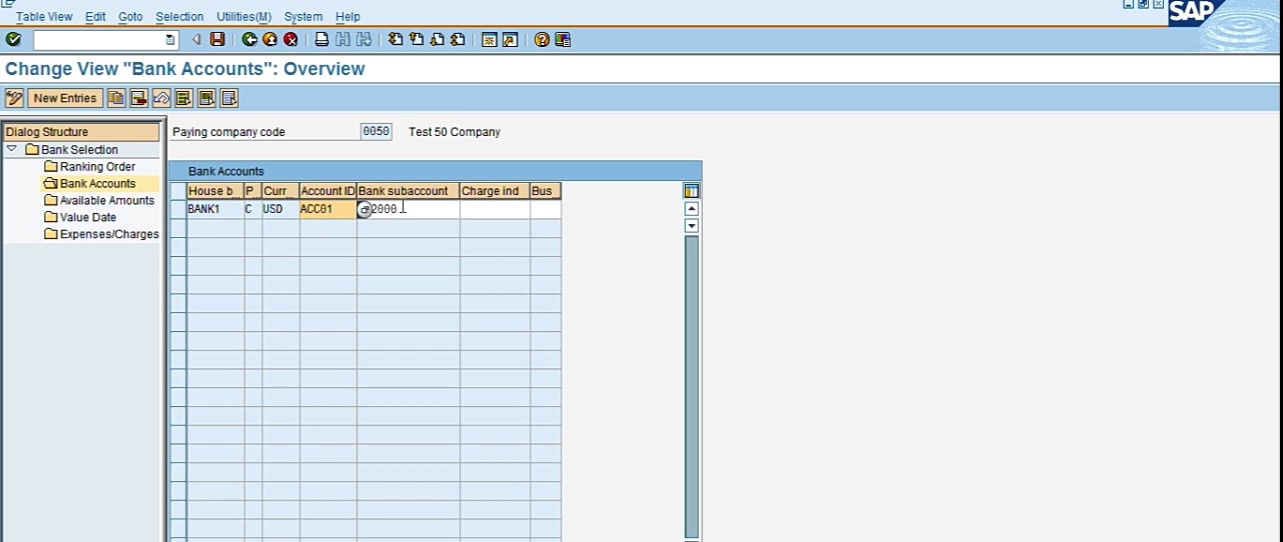
the house bank, the payment method, currency, the account ID, and again, the bank G/L number.
Available amounts,
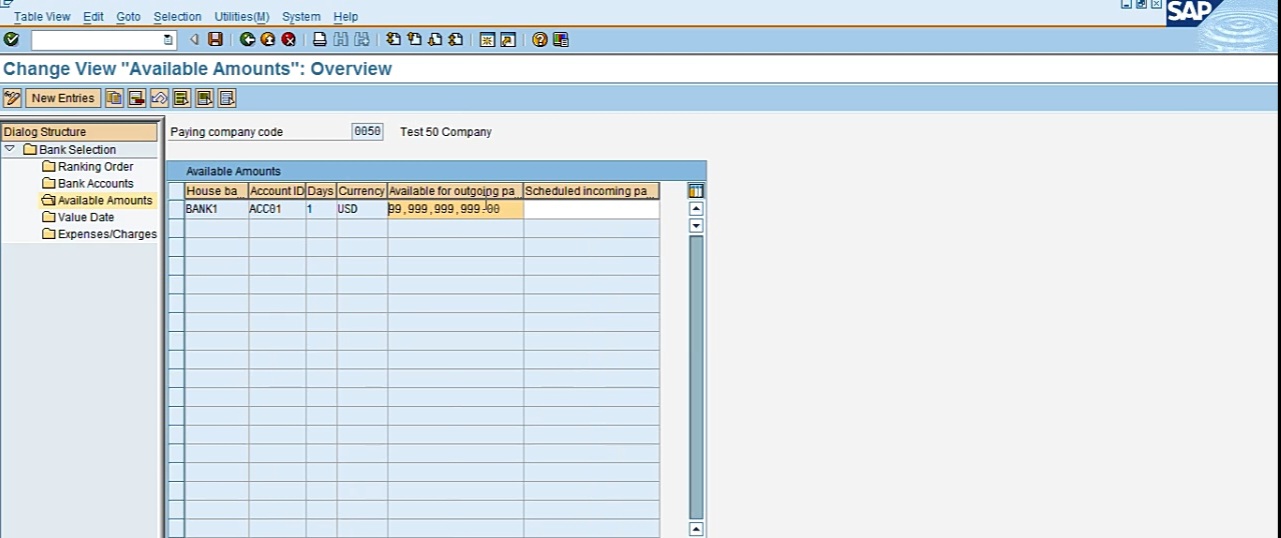
you can enter a big amount there just in millions, it won’t stop you from doing the payment.
Value date,
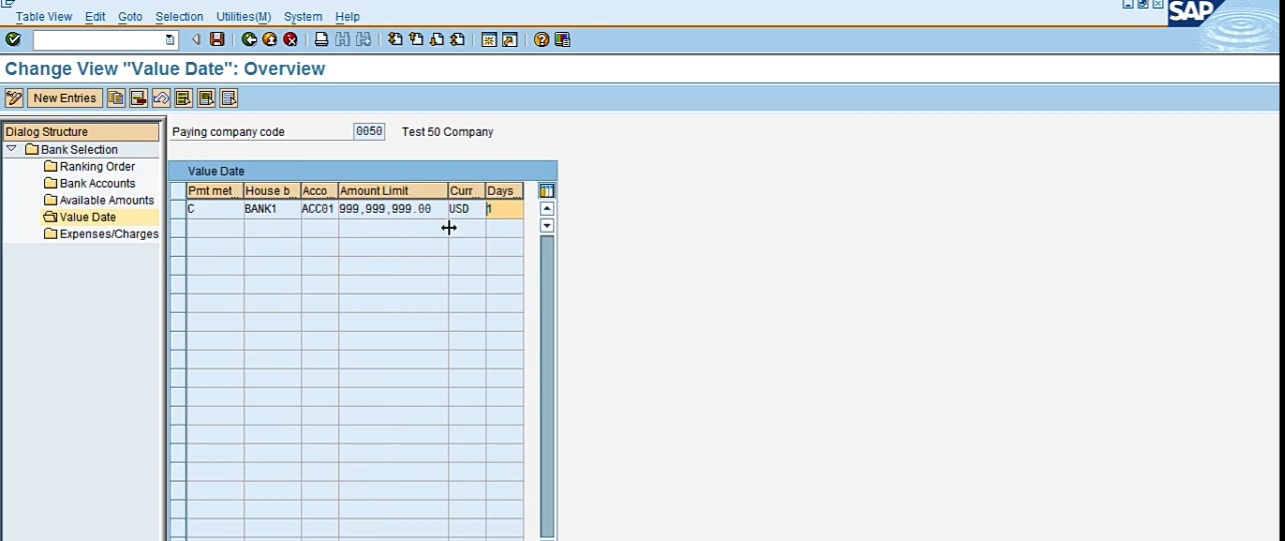
just enter the same thing, same values here. And you don’t have to do any expense charges. So just ranking order, bank accounts, available amounts, value date. So, at this point, after doing this, we are done with the payment program. We are almost about 90% done with it. There are some more things that we have to create and let me go over that. So, the next thing we have to do is the check lots. Basically, what check number you are using, you know, all that information will be saved in your check lots. So, for that, you will go in FCHI, and enter your company code, your house bank, your account ID that you that you just created, and then click on ‘Change’. This will take you to this screen.
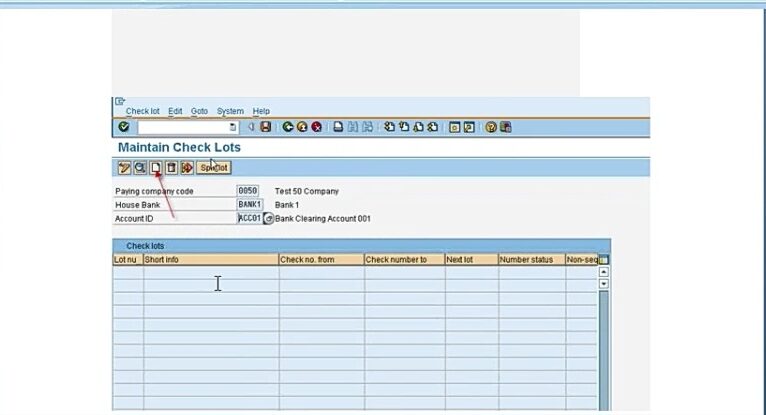
And again, when you will do it for the first time, you won’t have any information here, so you will click on create. And then it will ask you, okay, what is your lot number? So, you can assign it 1. And then what is your beginning check number and what is your ending check number? Check number to and from. To, I guess, for starting and ending. So, you can enter that check range here and then name your check lot.
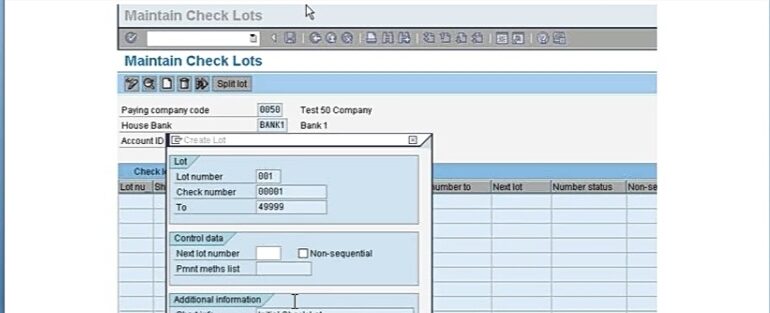
That’s all you have to do. Click on the green check and then just save it. So, after doing this, you are all set to start your payment program. So, to do that, you will have to enter a vendor invoice, FB60, which is just like FB50, just some minor changes to it. So, in FB60, you go in, you choose your vendor, basically, you do a search. So, the difference between this screen and FB50 is just the vendor field and the amount field. So, basically, in the line items, you will just enter the expense side, the debit side. The credit to the vendor will be posted automatically. So, you don’t have to do double line, just you enter the expense items here. And the credit vendor will be done automatically by SAP. So FB60 is just is very similar to FB50. So, in FB60, we will choose the vendor, the date, and we will enter the total amount here, and then we will go in the line item. And in this example, we will choose the prepaid expense account that we created, and we will debit that. So, in this example, we are doing it for $99.

So, vendor number, date, and amount $99, and then I’ll go in the line item. So, I’m choosing my prepaid expense yield account and 99, and then I’ll click on simulate, and then click on save to post it.
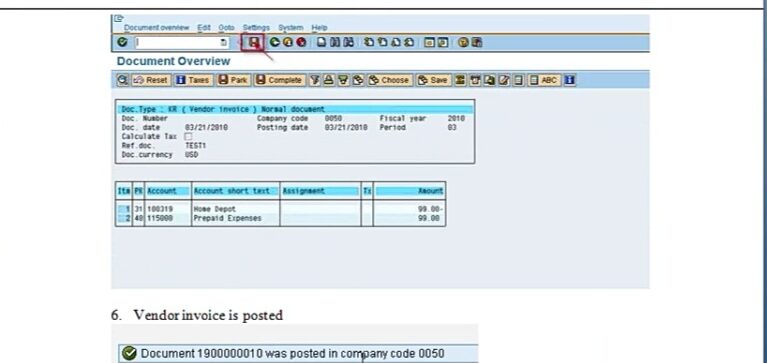
Now my vendor invoice is posted. That’s all I have to do. So, after that, then we are ready to do the payment program, basically, to pay this vendor invoice. For this, we will go in transaction F110, and then, you can type in today’s date, and then you can use, normally, what I prefer is your initial and then 01.
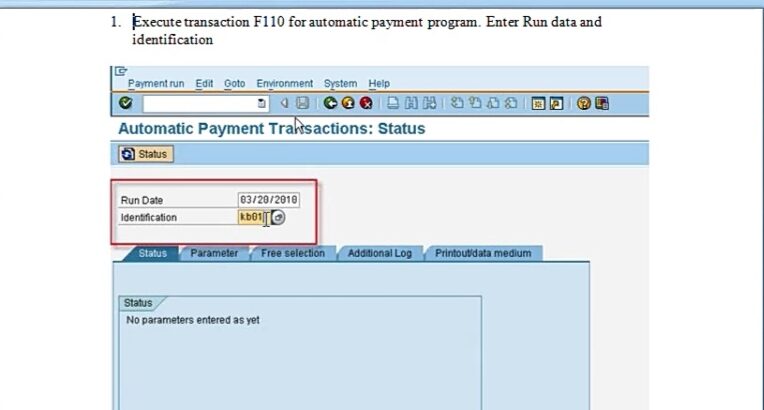
So, your first payment run will be 01 and then 02 for that date. So, enter today’s date, 03/28, if it is I’m not sure what date is 03/28. And then maybe use your initials and then 01 and press enter. And then you will go in the next tab, which is parameters.
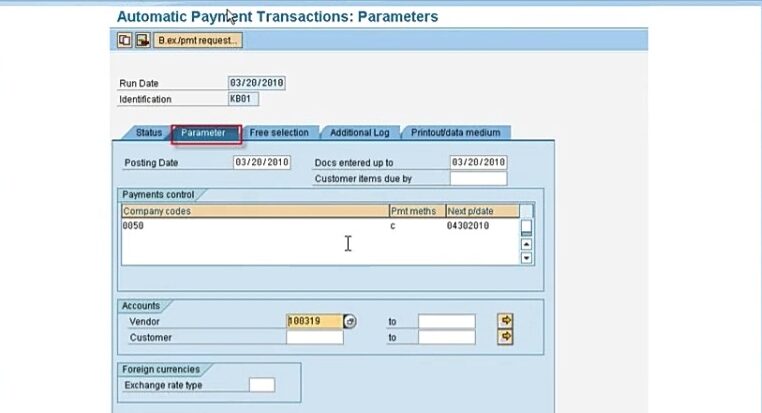
In the parameters tab, you will type in your company code here, your payment method, C in this case, and the next payment date. Next date should be at least a month ahead, because otherwise, if the invoice is not due yet and it will think that it can be paid in the next payment run, so it might not include it in this payment run. So just put next month’s date here. And then in the vendor account, enter your vendor number. You can do a search here also if you don’t remember it. So, basically, this is the vendor you want to pay, and you can use multiple vendors also. In real life, we use, like all the vendors that we have, because we want to see in the proposal how many open invoices we have to pay, and then we can modify it. So that’s all you need in the parameter tab, basically. The date will be copied from your run date. So, you’ll enter your company code payment method, next payment date, and the vendor number. Then we will go in the additional log tab.
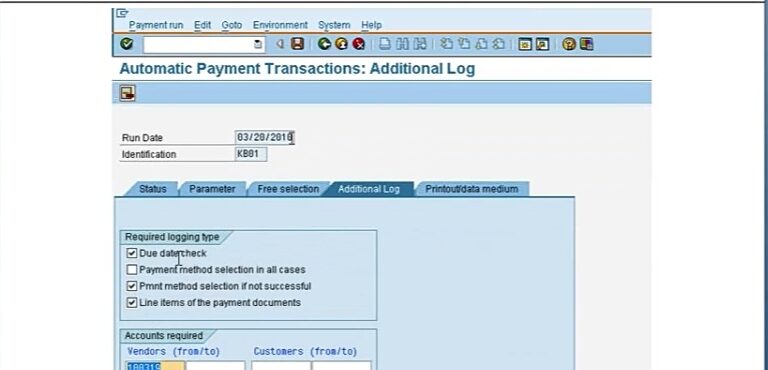
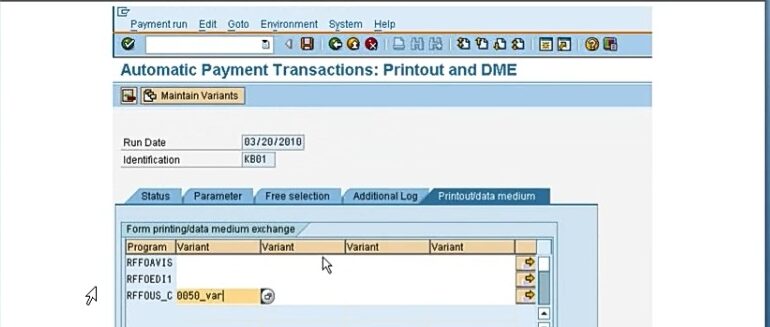
In the additional log, you’ll click on due date, payment method, and line item, and we’ll enter our vendor number again here in this tab. Then we will go in the last step, Print Out/ Data Medium tab. You click on this tab and you will see this program RFFOUS_C.
So, what we have to do, this is one remaining config part that we have to do one time only. This is creating a variant. Once we create this variant in our first payment run and the next time you don’t have to, we will just choose the variant that we created. And just name it starting with your company code so you remember. Otherwise, you know, there are hundreds of variants out there you might forget. So, start with your company code, and do underscore and then do VAR. That I mean, you don’t you don’t have to, but it will help to remember what was your variant. So, basically, you we are creating a variant and as I said, this is just a one-time config next time you don’t have to do it, but in the first time you will have to configure. So, you type in your variant name and then click on maintain variants. Then in this screen,
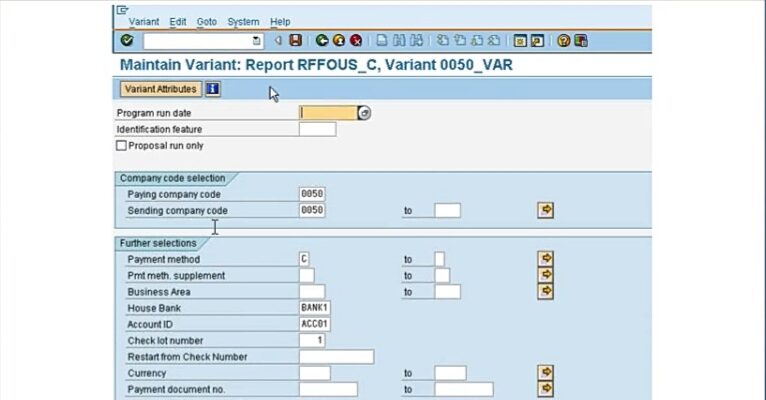
it’s a very important screen, make sure you have exactly the same information except your house bank will be your house bank number and account ID will be your company account ID. So, these two will differ and also a check lot number if you have a different number. But basically, what you need is your paying company code, sending company code will be your company code. Your payment method which should be C, and then your house bank, and your account ID and your check lot number. And then make sure print check is checked here. And then, sample, by default, you will have something here in sample. Make sure you delete that in sample printout. And your settings should look exactly like this, and then click on save and name your variant. And then this variant will be in the variant field. So now what we do, we are ready to run our proposal and see how many invoices are coming up in the payment log. So, we will go back to the status tab.
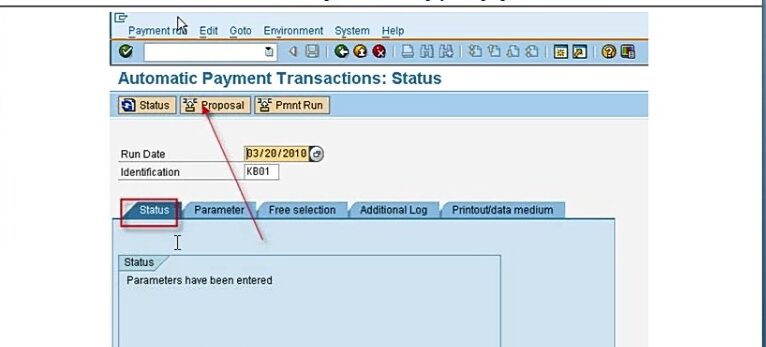
This is status tab. And in this process, it might ask you to save it. You will just say yes, save my parameters. And then when you’re in the status tab, then you will see this proposal. So, click on the proposal, and then you will click on start immediately. Make sure you check that, and then click on the green continue. Then it will run for a few seconds. You can press the status to refresh the status. And then when you press the refresh status, then you will see these additional items.

So, you want to click on the pencil proposal so you can edit it. So, this proposal will give you a list of your invoices that are picked up in the payment run. So, when you click on proposal, you’ll get this window.
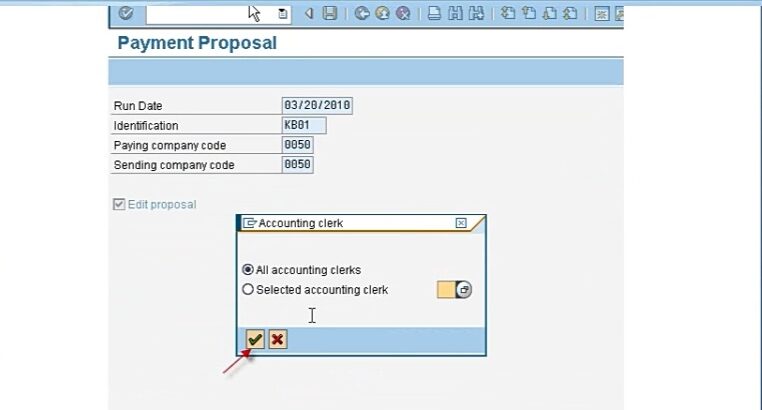
You will say, yeah. All account, of course. Green check to continue. And then your invoice that you entered should be here with a green light.
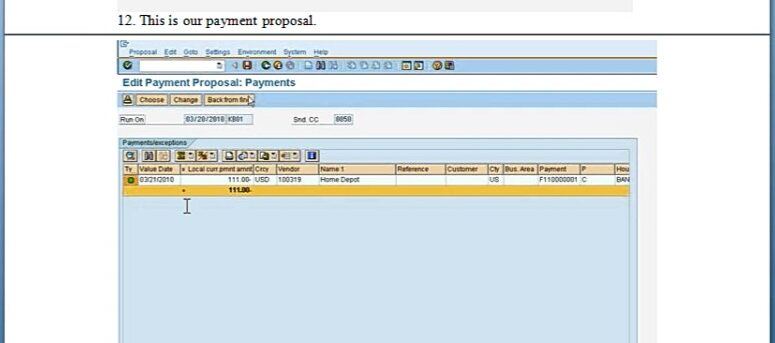
If you have multiple invoices and you want to block one of them for payment, you can do that, by just double clicking on it and it will give you an option to block it. Once you can do in your test, you can like include 5 or 10 invoices and then stop 2 or 3 for payments. You can do that, and that’ll be good for the test, just to see how you can block them for payment. So, in this case, we’re just paying this one invoice. So, we will say, okay. We are fine with it. Basically, what happened in this proposal, the AP staff will run the proposal and give the proposal to their manager, and their manager will decide, okay, I want to pay this, I don’t want to pay this. So, after that, then the AP staff will come back and edit it. And any changes, any payment that we don’t want to pay, the AP staff will go and block this.
So, after it’s all approved, the AP staff is ready to go ahead of the payment run, then you can click on the payment run here,
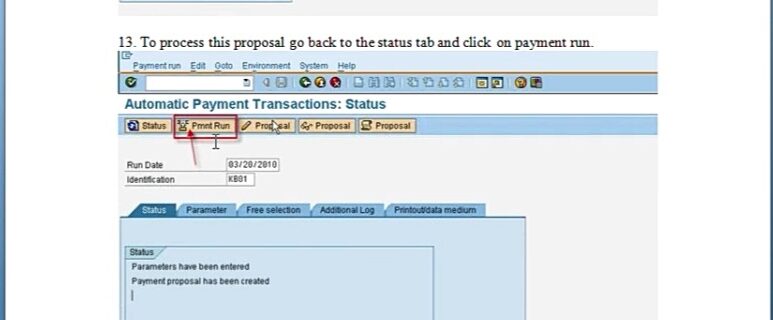
And then same thing, you will have to do refresh. Click on status to refresh it, and then, you will get this window,
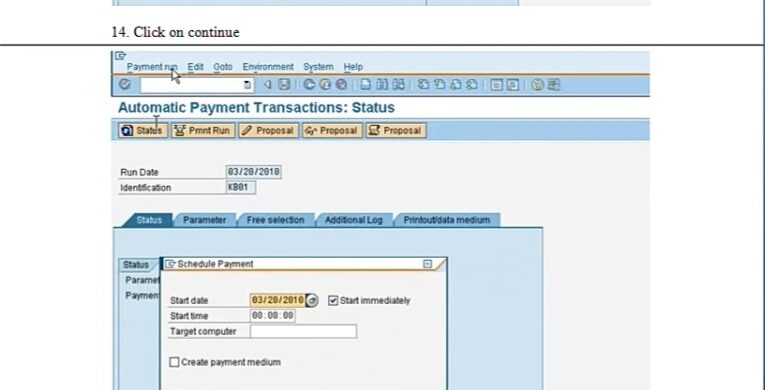
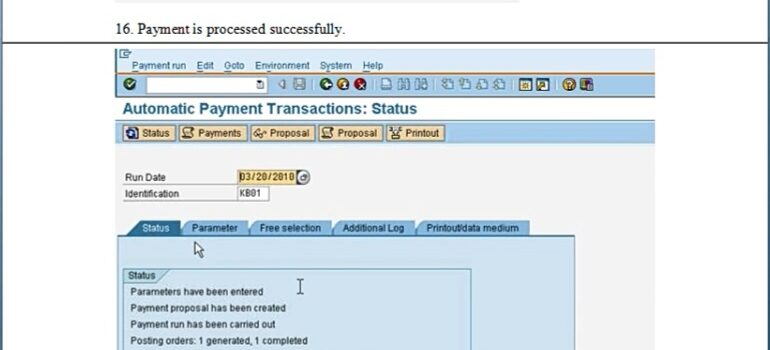
you will say yes start immediately, then you refresh it, then you will see posting orders completed, which means everything is fine, the payment was completed.
Now you want to print checks after this, then you will click on printout. When you click on printout, you will get this window and just change the question mark to any other number. I’ll just do 1.
Insert 1:02:35 image 43
So, the job name, just change the question mark to a 1, and then click on the green ‘continue’. And then it will say print job has been scheduled. So, which means checks are printed, but we are not connected to a printer. It will stay in our spool and that’s fine. We can go in our print spool and view the checks. For that, you will click on your system from the menu and then ‘own spool request’. So, when you click on that, you will get this window.

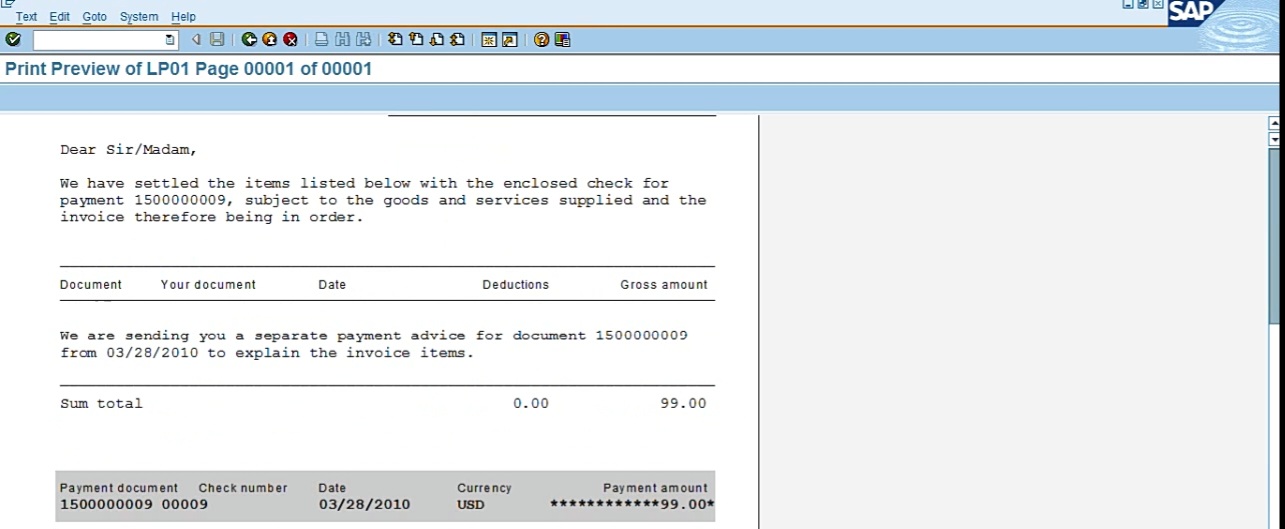
And remember, this is a new session. It will create a new window for that. Each time you click on system, spool request, it will create a new window. And maximum, you can have 6 windows. After 6, you will get a message you have maximum number of screens open. So, you will have to close some of them to view your other payment proposals. So, you will get the screen. You will click on that box, and you can preview your check, and it should look something like this.
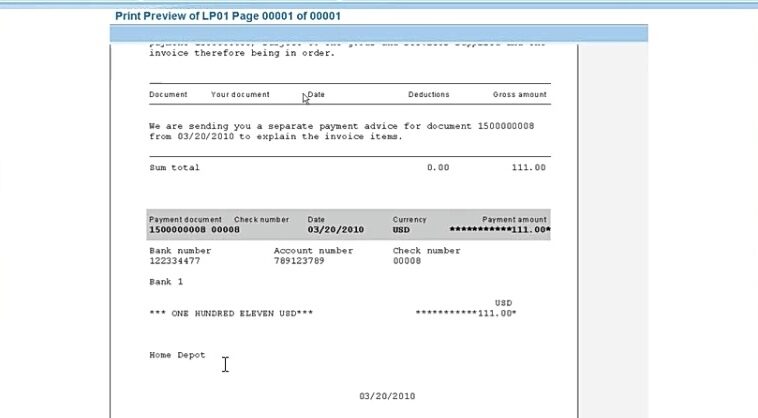
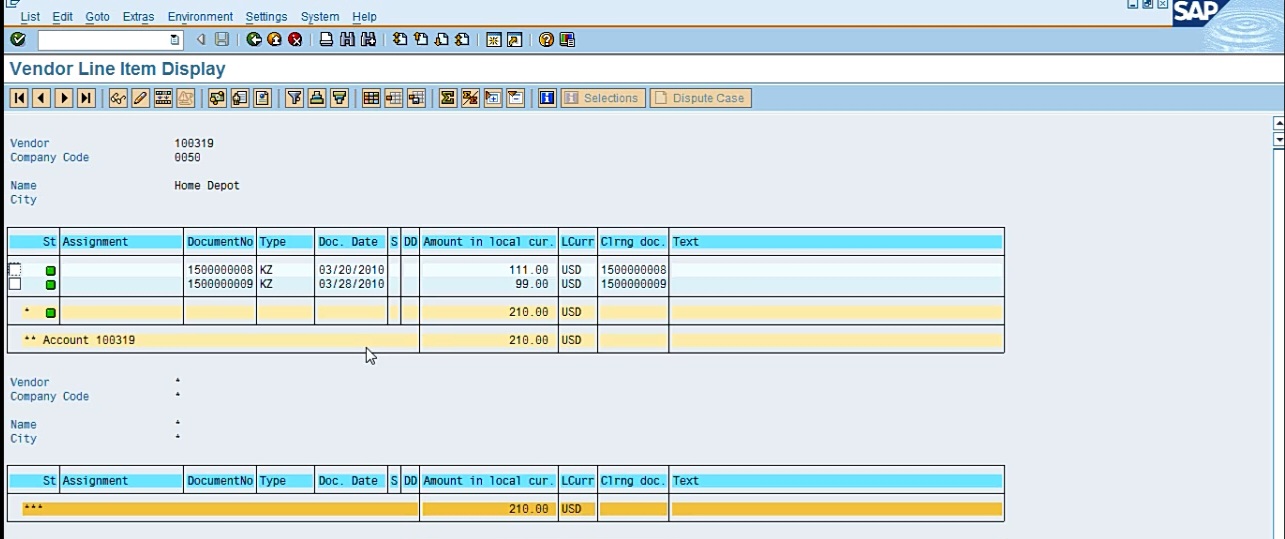
It should have the amount and the vendor’s name and the information. And this form needs to be configured by your developer to fit it on your checks and add some signatures to it or not. But this is the standard SAP check. So, by this, you make sure you close the session. Otherwise, you will keep on adding new sessions. So, once you view it, you can go ahead and close this session for this spool. So this should pay your vendor. And then just like for G/L, we went in FS10N. For vendor analysis, you can go in FK10N. And then if you search your vendor, let me do one of them. So, if I do for my Home Depot vendor, so FK10N will just look like FS10N where we enter the G/L account company code in fiscal year. In this case in FK10N, we will enter the vendor number, company code, and the fiscal year. So, this will give us our vendor balance.
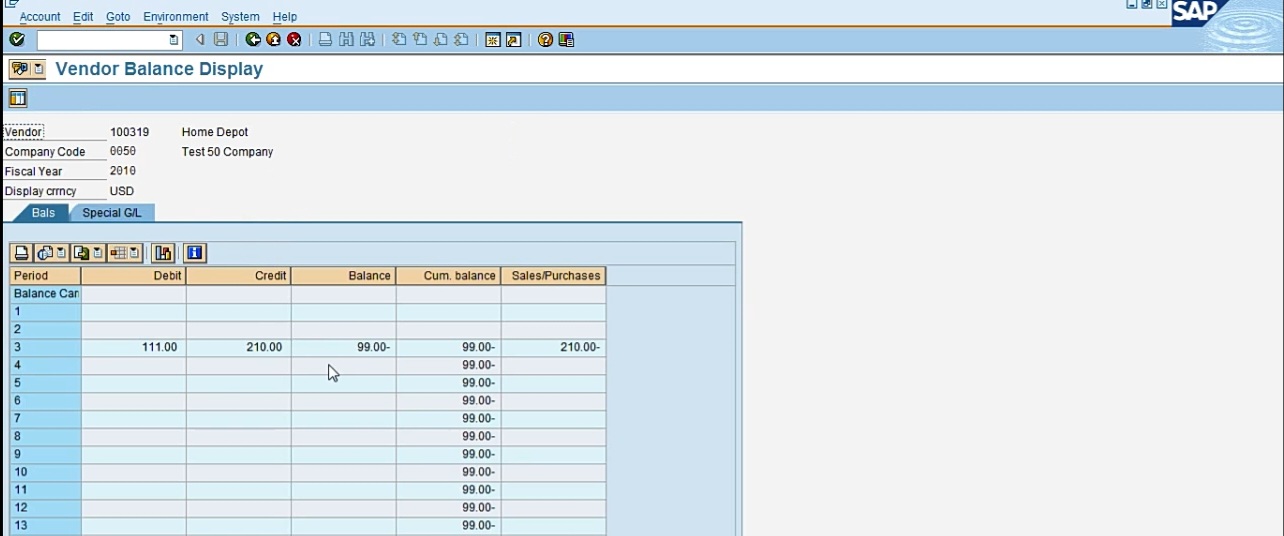
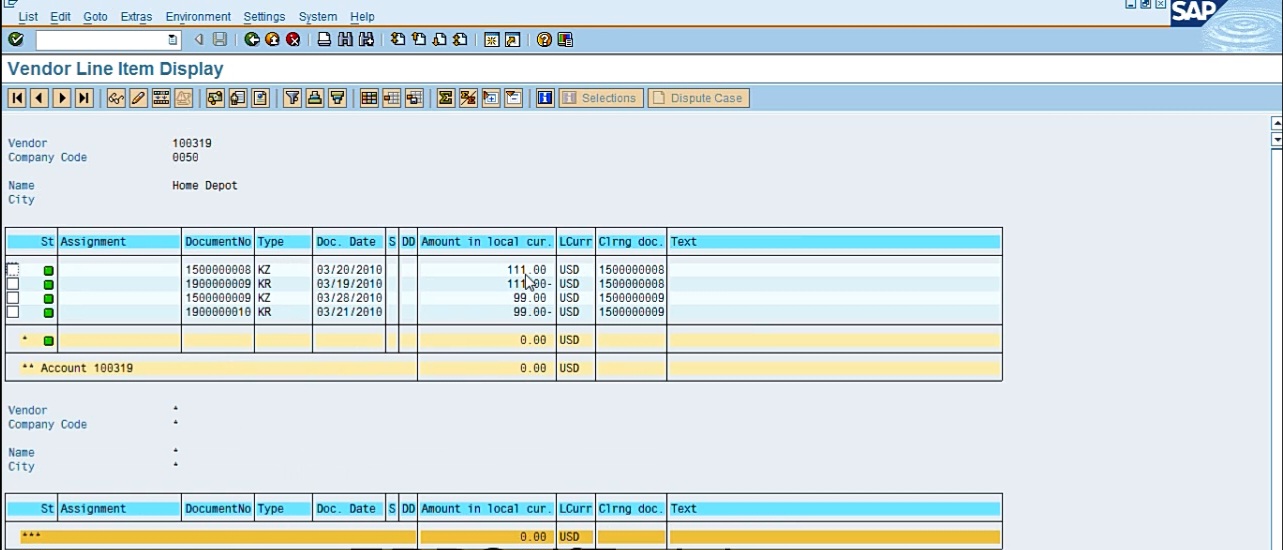
So now if I double click on the balance column, it will give me my documents.

And if it’s a red light, it means it’s an open item, it has not been paid yet, but the green ones are the documents that are cleared. So, 111 with a minus sign document type KR is a vendor invoice and KZ is a vendor payment. So, these two match and see clearing document 15008. So, this document cleared this document. Now these two are cleared documents, but the first one is an open invoice so this has to be paid. When it’s paid, then it will turn from red to green. So let me I guess, for this test, let me go ahead and do that. So, let’s say if I want to pay this invoice for this vendor. So let me do an F110 for that. So, I’ll go in F110, I want to name it my own so I’ll do KB01. And I’ll go in parameters tab, enter my company, payment method, next payment is a future date, and my vendor number.

So that’s all I need on the parameters tab, Company code, payment method, next payment date, and the vendor number. Then go in additional log, check due date check, payment method selection if not successful, line items of the payment document, enter the vendor number. Go in the printout tab. Here, I have this program, RFFOUS_C.
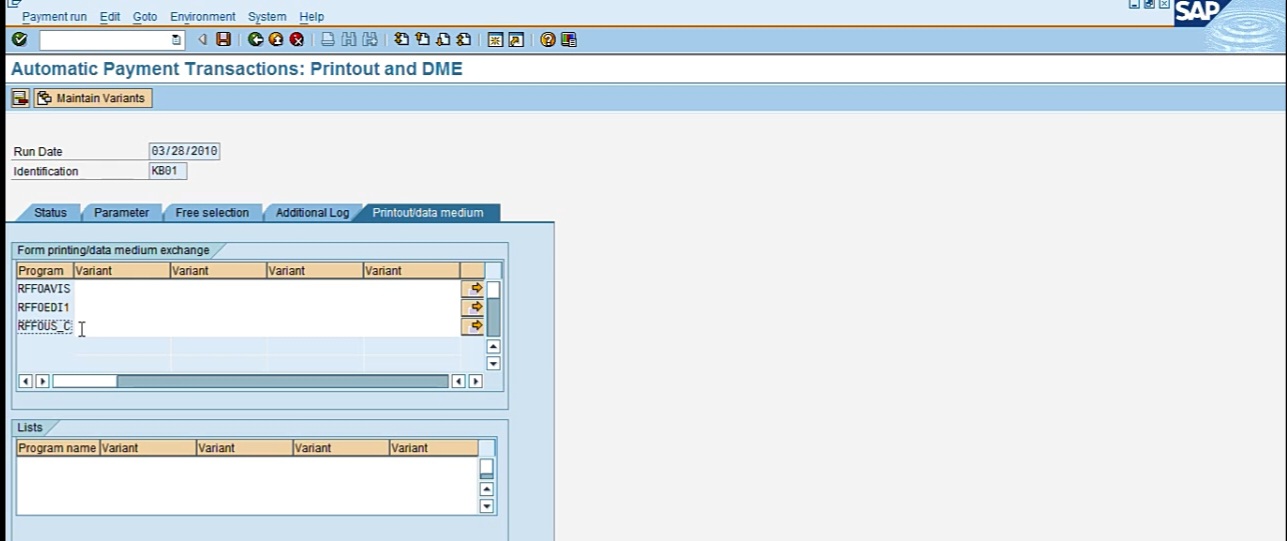
For this, I have to assign my variant. I already created my variant. I know this is 0050_VAR, I’ll just select that. And that’s all I need. I’ll click on save. So, parameters have been saved. I’ll go in the status, run a proposal, start immediately, and refresh it. Now I have this, I’ll check my proposal, all accounting clerks, and I have a green light for a $99 invoice.
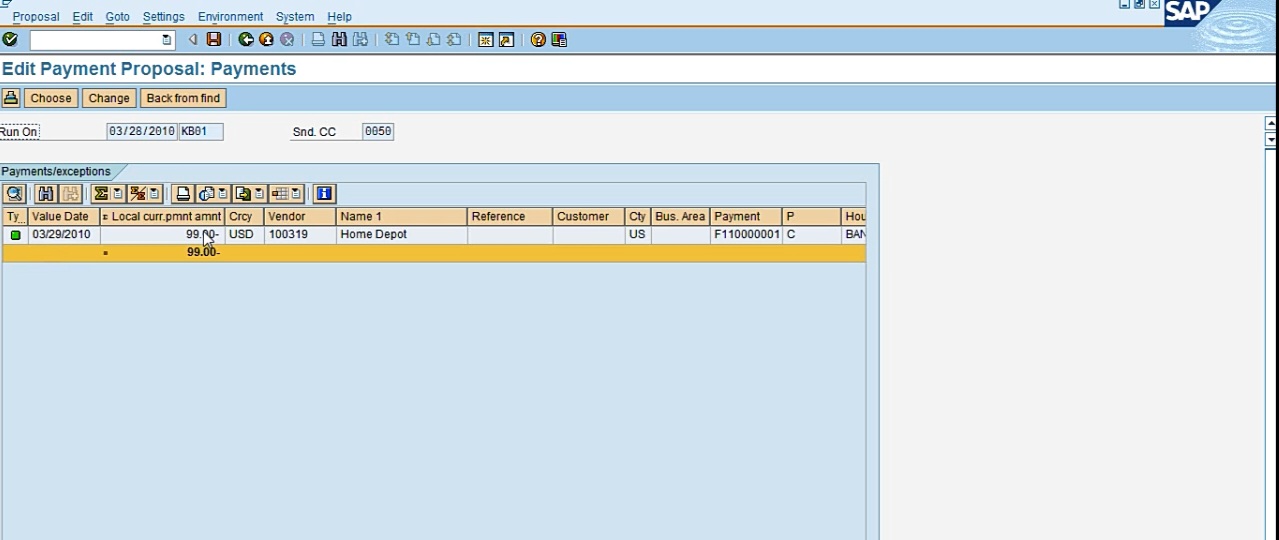
So, this invoice is ready to be paid. So, I will go ahead and pay it. Payment run, schedule. Now payment run is completed. Now I want to print checks. I’ll click on printout, change the question mark to a 1, and continue. Now it’s done. Let me go ahead and view my checks. I’ll click on system, own spool request, and this should be my check.

Let me click on that… And this is my check for $99 to Home Depot.
That’s how you will do that. Now if I go back in FK10N, now I should have a green light for everything. So FK10N, enter my vendor, company code, fiscal year.
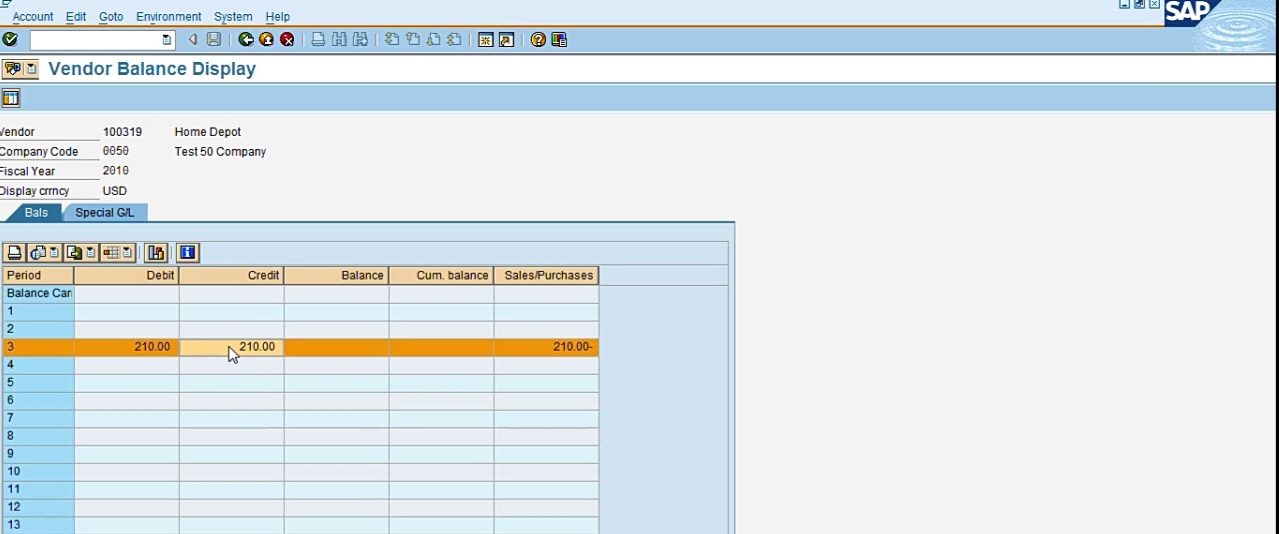
So, the balance column is zero now. So, I have invoices for 210, I have payments for 210 now that my balance is 0. So let me double click on the balance.
So now I have all green, one for 111 and one for 99. This was a new document KZ type, which was created, which cleared my open invoice. So now I have two invoices and both of them are cleared. If I click on the credit side, it will just give me my invoices for 210,
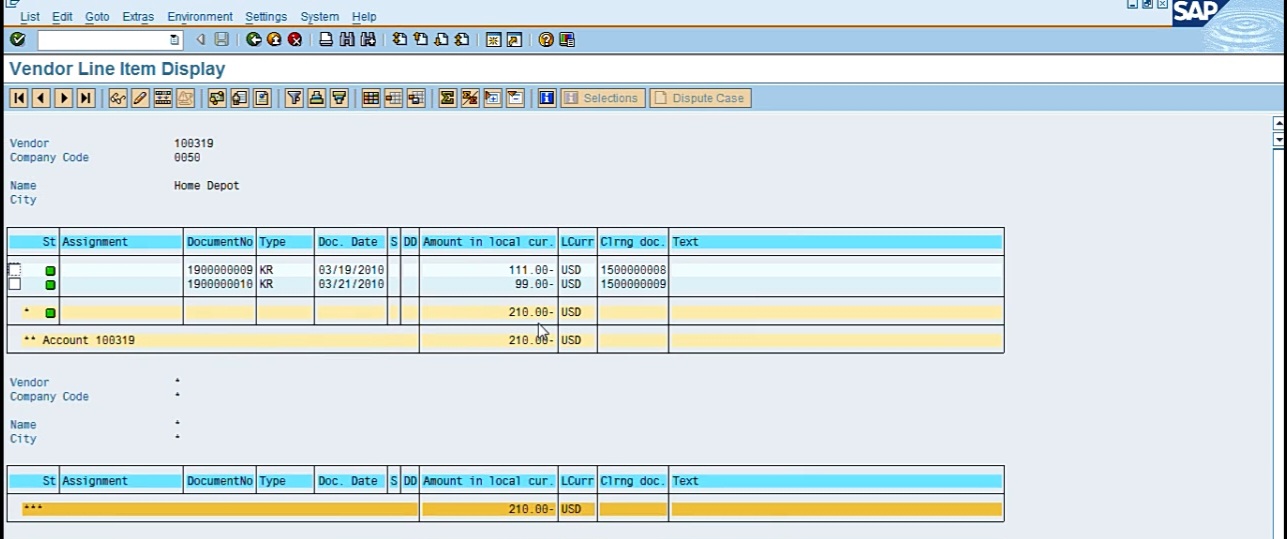
and if I click on the debit, it will give me my payment documents.