
Accounts Payable Configuration 3
So we’ve configured the vendor master record, credit the vendor master posted invoices, credit memos and cleared open items. So maybe we can do the payment. What I can do is, I can show you the config for the automatic payment program. And I’ll tell you it is the most important config in AP because almost every company has it configured for their payment process whether it’s wire, check, or any type of payment, and it’s a very important configuration. I did it for my company code and I documented all the steps. So I will go over these steps and then maybe you can go and do the config in your system and then we can see if it’s working or not. And, you know, after doing this config, we can enter an invoice and pay it via a check And SAP will print a check and then clear the open vendor invoice for you.
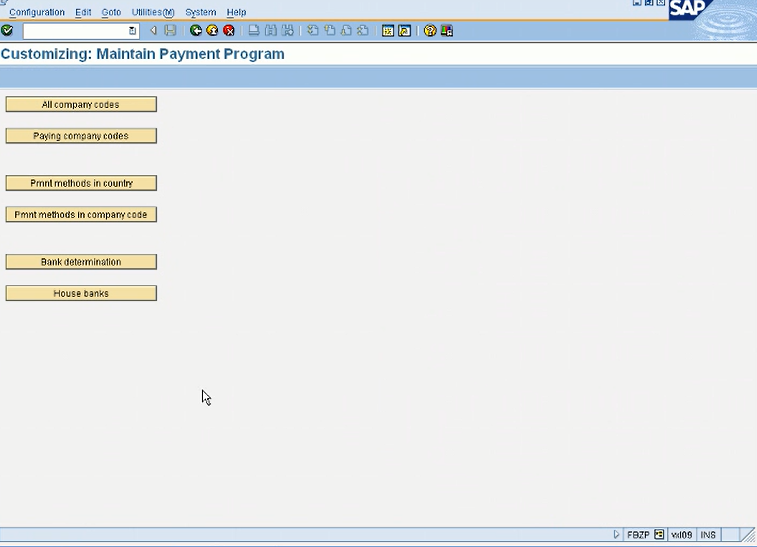
Thank you for reading this post, don't forget to subscribe!So for payment program, you can go from IMG or I prefer to use this transaction FBZP. In FBZP, you have all the configuration, almost 90 percent that you need to do for your automatic payment. You have company code. All the stuff that you need, you know, is listed on this screen.
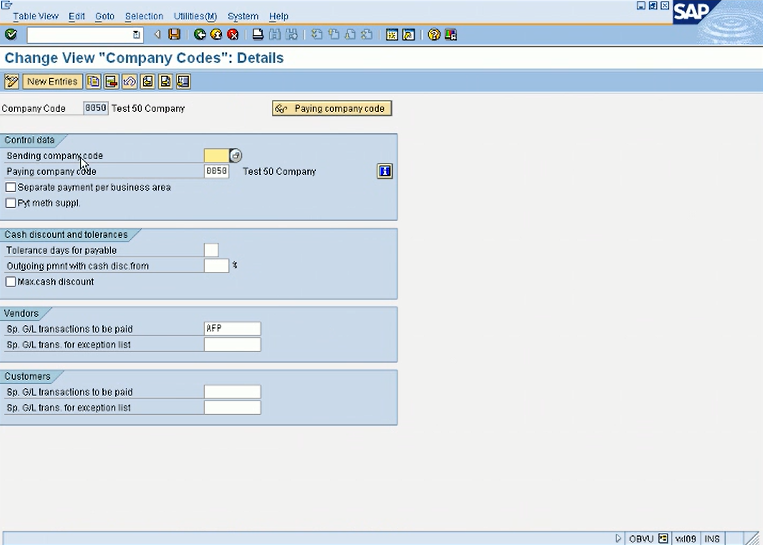
So first you go in all company codes, and then you need to create an entry for your company code. So in this case you can go in new entries, click on new entries, and enter your company code. So in this case I entered my company code, paying company code, sending can be blank at this point and in vendor’s GL transaction is entered as fee is for down payment, down payment request, and payment request.
So just use whatever you screenshot and that’s it for the first level, all company codes. And then you go and paste company codes, and then you’re getting new entries and enter your company code and enter this minimum amount, you know, going you just need to enter something there.

Like, if it’s less than a dollar, then you don’t want to cut a check, you know. And use this app script and enter this number: F10_us_avif.
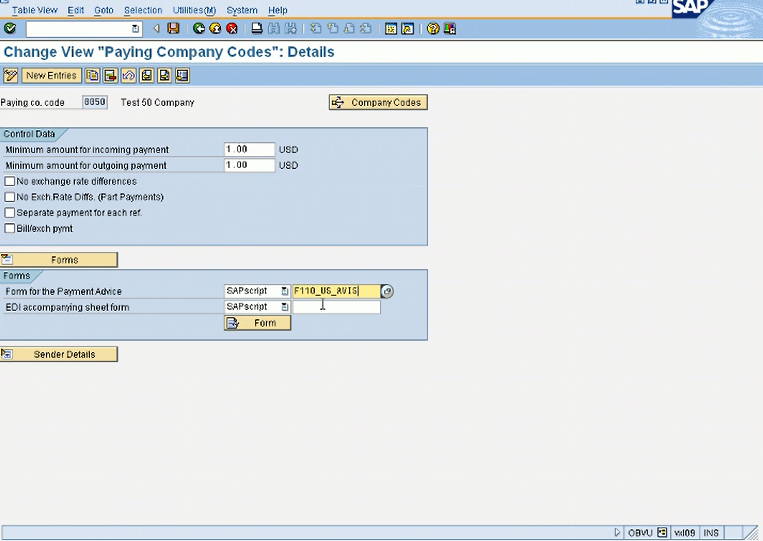
So this is a standard SAP form for payments. Normally what companies do is they copy this form and create their own, you can do that. But for our test we will just use the standard SAP that is for the US. So we will use this form. And then we will go in the third step, payment methods and country. Our country is US for our company codes So we can go over the settings that we have.
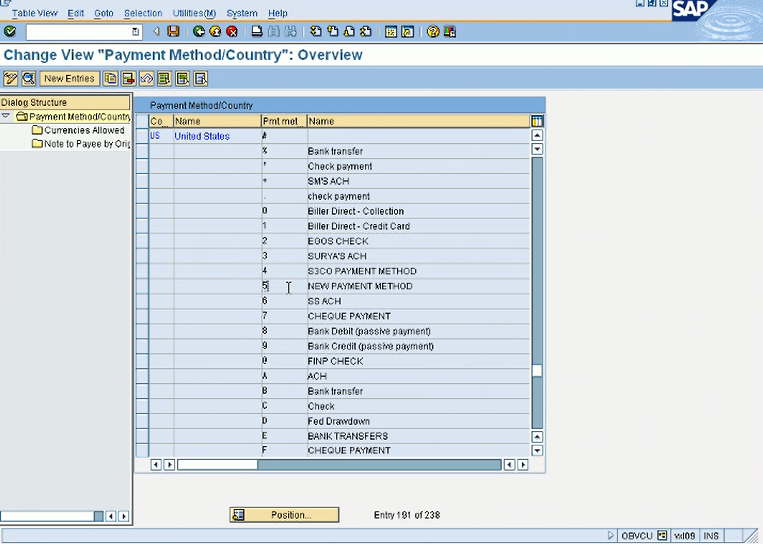
So the US, as you can see, you know, there’s, like, a test system. People have created so many payment methods. But normally, for our example, we will use c. That’s already there. C for Check. Okay. We will use this. And if I double click on it, it will give me some more information, like what type of documents, what pay, and the most important thing is what payment medium. So we are using the classic payment medium rffous_c. This is a standard payment program for checks for the US. So we will use that for checks. And again, this is a standard method that we will use. And then we’ll use payment methods in company code, so that’s where the country comes into play. Remember when we created our company code, we entered the country. Based on that, whatever your company’s country is, you can only add those payment methods in your company. That’s why country that is assigned in your company code is very important. For my company, I went in my company new entries and I added c. And in the form data, I entered this form, this form is for checks.
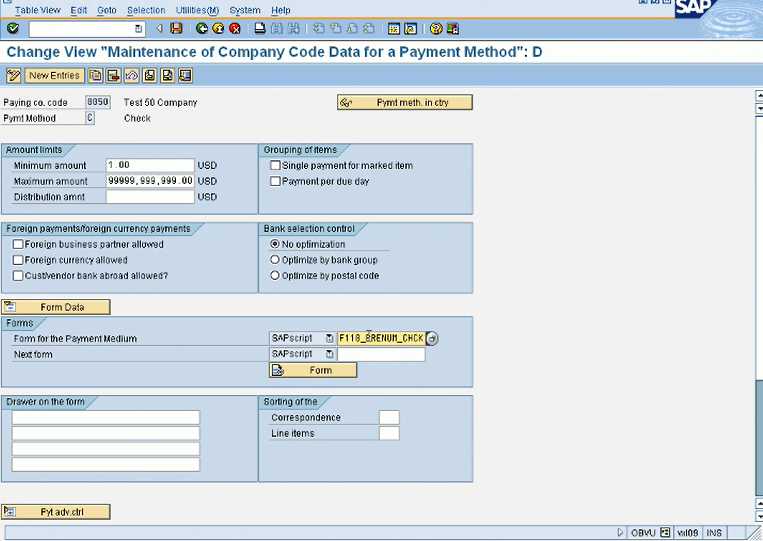
So we want this check number here and again a minimum amount, maximum amount, just use,, whatever amount you want. Just enter it here.
And then a very important configuration of house banks. So what is a house bank? Normally, what companies do, let’s say if you have an account, let’s say, at Bank of America, you have 5 accounts at Bank of America. So what will happen, your Bank of America account will have a routing number and account number. So House Bank what you can do is your House Bank can be Bank of America and then your individual accounts can be your account ID, which I will show you in a minute. So when you are creating for the first time, you will click on House Bank, you’ll click on company code.
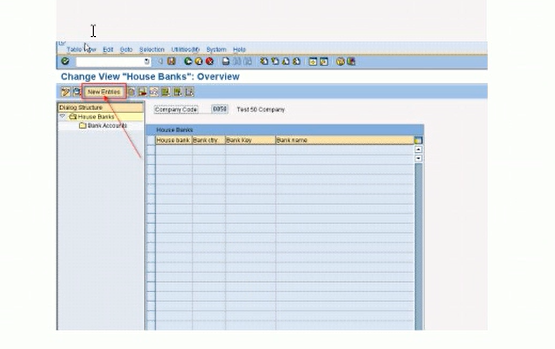
So, like, this is blank. This is when I was reading for the first time and it will look exactly the same way for your company codes. So when you enter your company code, it will have a blank house bank and nothing here. So you will click on new entries, then it will ask you what is the name of the bank.
So you’ll enter the bank name and the House Bank name. And House Bank name will be the name for your, let’s say, in my case, if I’m using Bank of America. So my House Bank will be Bank of America. Under my house bank, I will have account IDs, which will be the individual bank accounts that I have in Bank of America.
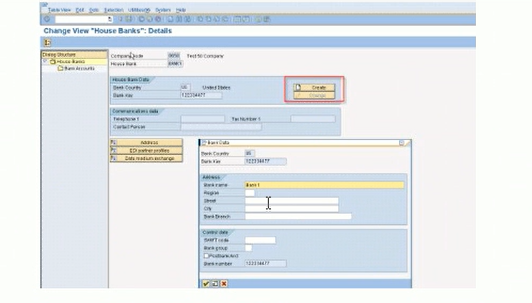
So on the top, I have the house bank and underneath that, I have my bank accounts. So if I deal with 3 banks, then I need to create 3 house banks. And under those 3 house banks, I will need the individual bank accounts. So in that case, I created bank 1. So and the bank country is very important. So you’ll be US. So bank key is the routing number, and it should be 9 digits. So it’ll ask you because in the US, bank key should be at least 9 digits. So this is the routing number for the bank. So we haven’t done the individual bank accounts yet. So when we do the account IDs, then we will enter the individual bank account number. So we have the house bank, bank 1, and the country, and the bank key.
Now we have the house bank set up. Now we will click on the bank account, and then it will ask us to create new entries, and then you will see a field for account ID. So account ID, you will assign account ID to each of your bank accounts. Can be your checking 1, checking 2, savings 1, savings 2, whatever name you wanna give. So in my case, if I click on bank accounts, I’ll get my individual bank account. So if I have multiple, it will be listed here.
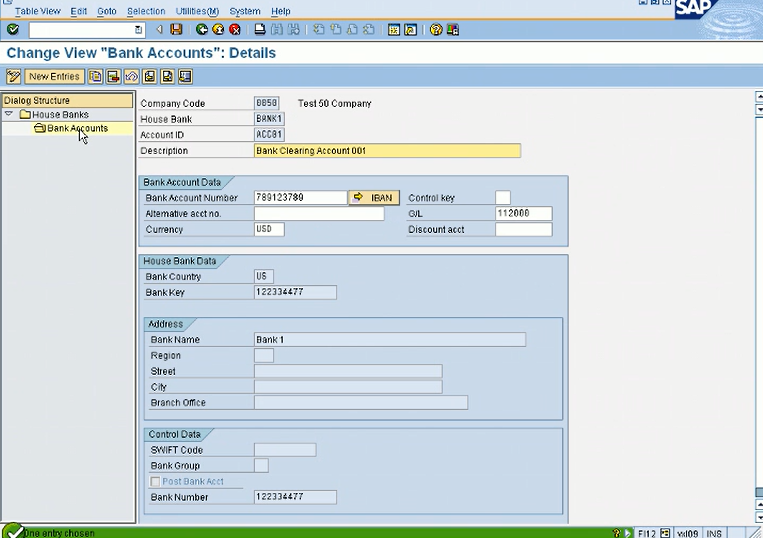
So I only have one account in this bank house bank, so I named it acc01, bank clearing 1. And this bank account number field is the actual account number. And as you can see from the house bank, the routing number is copied. Because it knows it’s under house bank bank 1, so it copies the routing information here. And then you need the currency here and then you also need a GL account. So this GL account will be credited during a payment run. During a payment run, vendor account will be debited to clear the open invoice and this GL account will be credited.
After doing this, now you can go in bank determination. So in bank determination, you will go in ranking order.
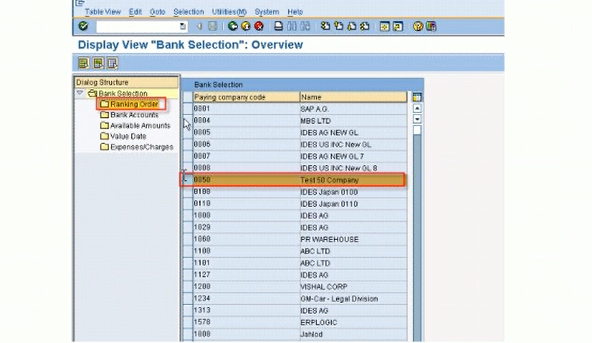
So there are some things that you have to do. Just follow the instructions. You select your company code. So what you do, you first select your company code like seen here, and then double click on ranking order. Sometimes it’s confusing, you know, how to do it. So first select and then see. And now you need to fill out all this information as I have listed here.
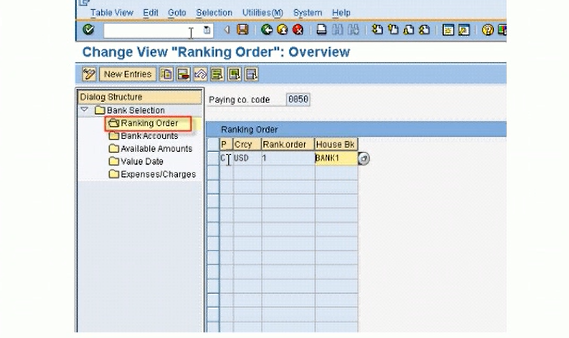
So first select 50 and then ranking order and then what you need to do is fill this information. Initially it will be blank. So you have to select your payment method, which is check, see, currency, USD, ranking or let’s just use 1, and then house bank name. So by this time, you will have all this information.

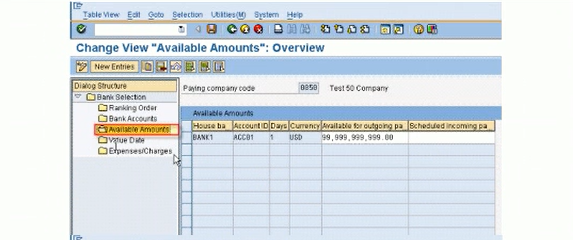
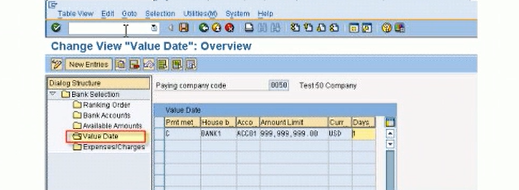
And then on the second tab, you enter your house bank, your payment method, your currency, your account ID, and also you don’t have to remember, when you do a search, it will give you the available one. Just double click on it, and it will populate it, and your bank subaccount, and this will be your main cash account. And available amounts, just enter the same from Bank 1 account ID, days 1, currency USD and put up a big amount there available for outgoing payment. Value date, just use the same information. So I have the screenshot for each step. Ranking order, bank accounts,
available amounts,
value date,
and that’s all you need to do.
And this is a very important configuration. If you know all this, you know, you can call yourself an AP expert if you can configure this and you can complete the AP process. You can do the check run then, you know, this is a very important configuration. And after doing this, the remaining remaining part is to maintain your check lots. So, you know, we have check numbers, like, you know, if you have your personal bank account number, you get a printed checkbook and have a pre numbered check. So the same way, you will do the same thing for your bank accounts. So you’ll check with your normally, you already have the bank stationary, you already have the blank check. So from that, you can copy the information that is your check lock. What is your starting check number and what is your ending check number. So basically, when SAP prints checks, so it has the same check number to print on your check number that you’ll put on the printer when you’re printing checks from SAP. So it will maintain your check numbers. Because as you know check numbers are very important. If you need to block a payment, you need a check number. If you have mailed a check and then you realize you want to block it, you need a check number, and that check number should match whatever is in SAP and whatever the check with the number that you sent to the vendor. So they need to be matched. So that’s where you will maintain your check logs.
So you go in transaction FCHI. Let me go there.
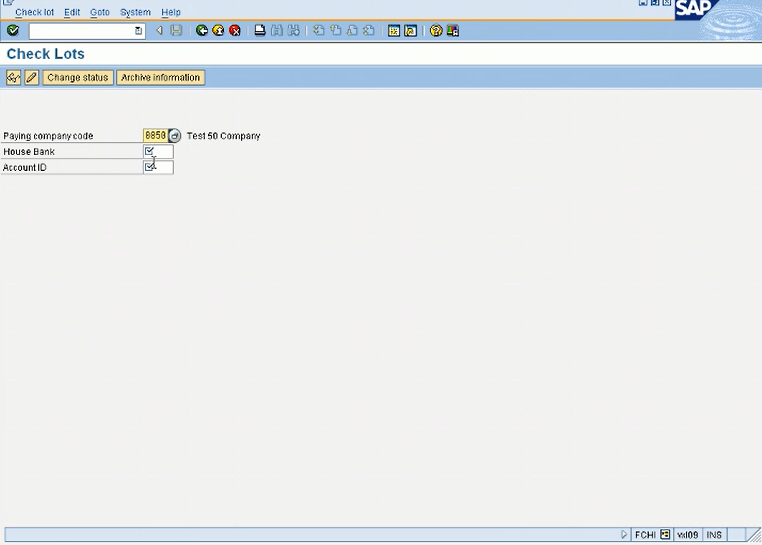
You will enter your company code, your house bank. I’ll just search my house bank. Your account ID. So in this case, when you’re creating for the first time, you will click on the pencil. I can click on the pencil, but I already have a lot. So when you do it for the first time, it will be blank. So you will click on create. And then you will get this window.

You can put a lot number, you can name it 1, and then you will give the beginning check number and the ending check number for that lot. So this check will be your first check and ending check. And then you name it. I’ll just name it initial check lot. And then it will list it here like this, initial check lot, starting one, and ending this one.
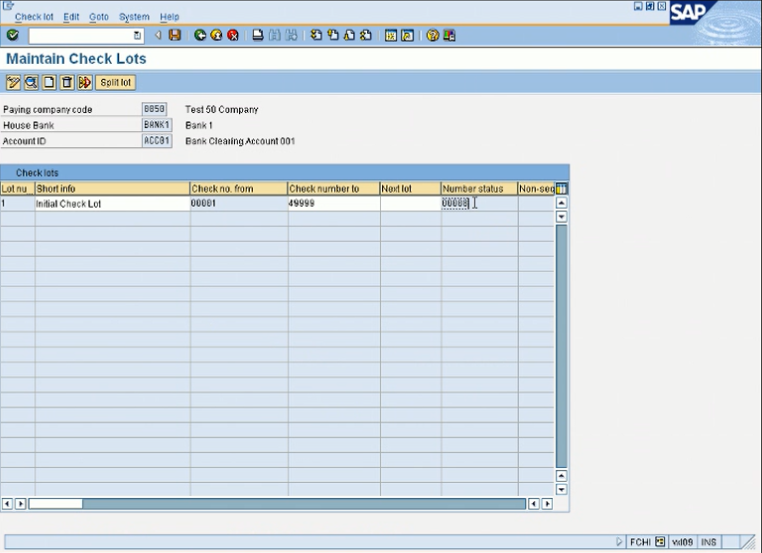
So far, I have used 8 checks. So it’ll also give you status. And we are done with the payment configuration. So this configuration is required before we do a payment run. So, basically, we’ll do this config, enter in a vendor invoice, and then we will go to this document in AP, the F110 transaction. And this is also a very intense transaction. You will need some practice to do that. And in F110, basically, we will run the payment program and select our vendors, like in this case, 10319, and it will pick up the open invoices for this vendor, but we will do this once we are configured with the payment program. And during this process, we will also have to maintain a variant. This is a one time setting that we have to do and it’s very important. And I’ll show you what you need to do, I have a screenshot of my variant, but you need a similar variant like this in the last tab, and you can name it whatever you want. But the information it needs is your payment method, your house bank, your account ID, your check lot number, and some more settings here. So this we will do once you have completed the config 3.
Let’s go ahead and do a payment run. So what we will do is let me quickly post the invoice and then we will process that. So, to complete a payment process, you have to go in F110. There are several steps, so the first step is you go in F110.
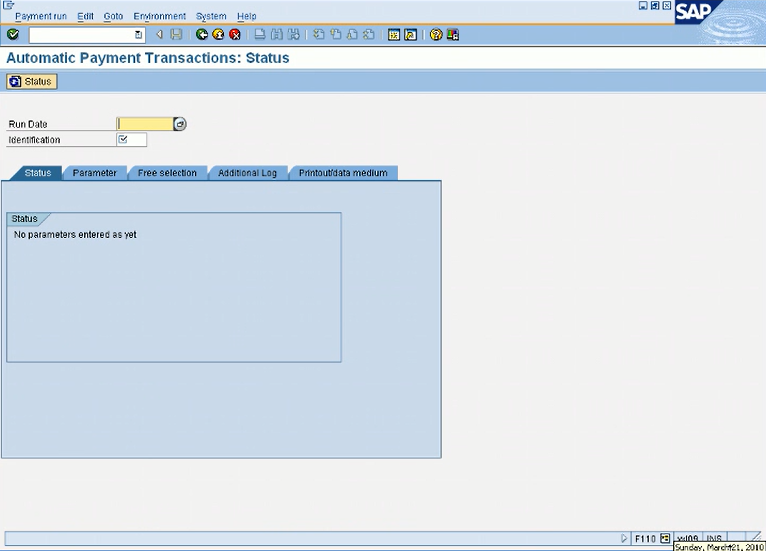
You choose a payment run date, which is normally today’s date. So I will do 03 /21/2010. And you can use any identification, I’ll use my initial and KB01. A 4 digit or 5 digit, whatever you want, you can create identification. You press enter. That’s your first step.
Click on parameters.
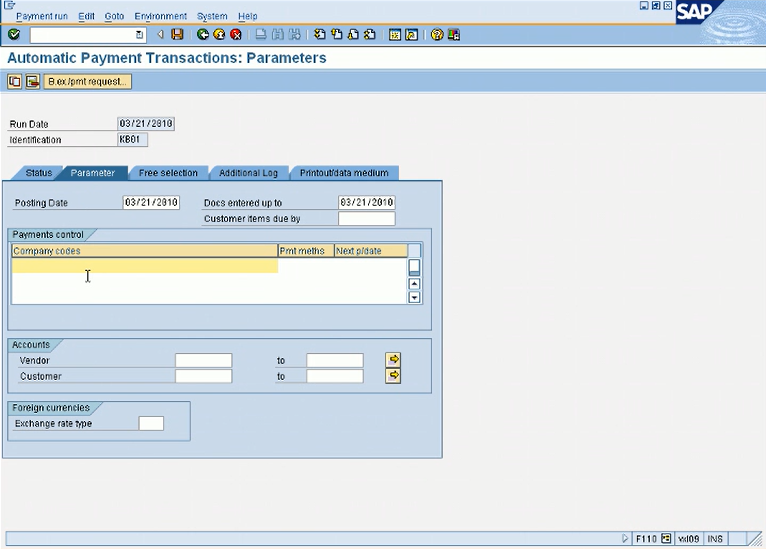
In this tab, you will enter your company code. I’ll enter mine. I’ll enter my payment method with a c. I’ll enter the next payment date, which is normally, we will enter end of next month. This date is important because of next due date. So if we are running, let’s assume we are running a payment method next week, and there’s an invoice that is not due right now, but it’ll be due next week. So it will not be included in this payment run. So this date is important. So it will take into account. So we are putting next month’s date. Now it will want to include the vendors. So I will search for my vendor, I wanna include my Comcast. I will include Comcast, I just wanna do it for 1 vendor, but we can do it for all the vendors too if you want. So in this screen, company code, payment method, next payment date, and the vendor number that we want to include in the run. Now we’ll go in the additional log.
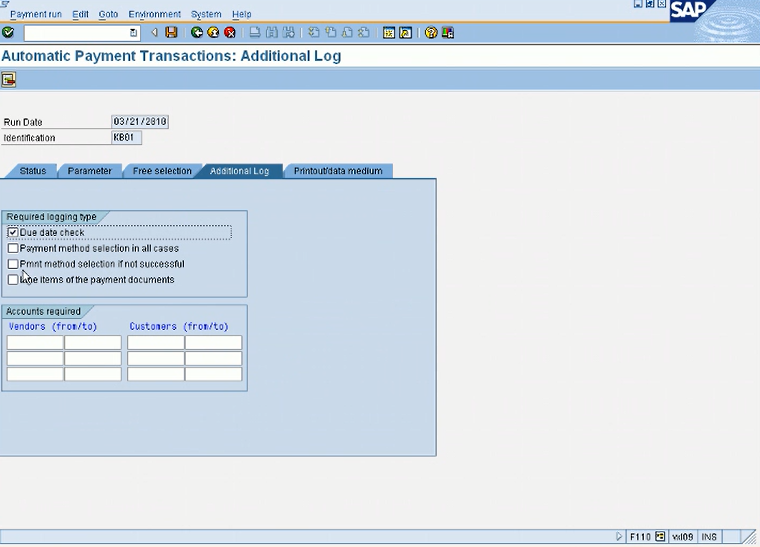
This log will help us find an error if we have any. So due date, payment method, selection if not successful, line item. And now we will just copy and paste the same vendor that we have here in the vendor field.
Now we go in the last tab.
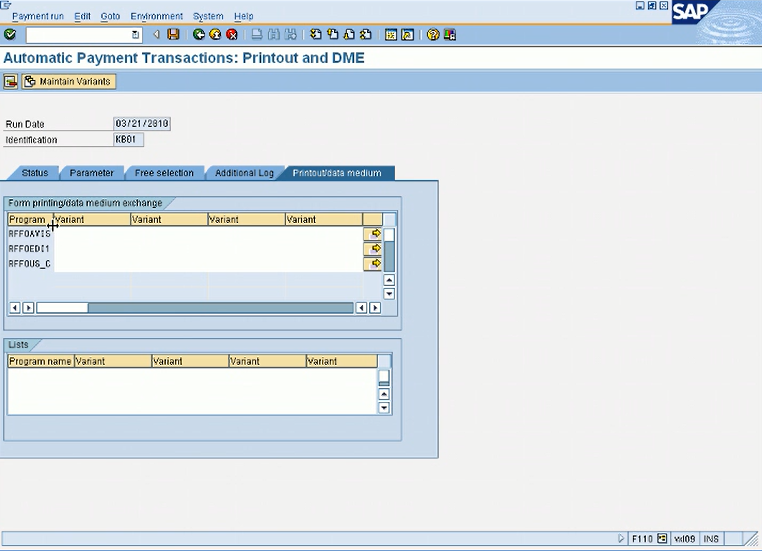
And in this one, we should see this, rffous_c. Everybody should see this program. This is a program for checks, and this should only come in this screen when we have selected c in the payment method. And this is a one time setting that we need to do. I have already done my setting. I will just choose my variant.
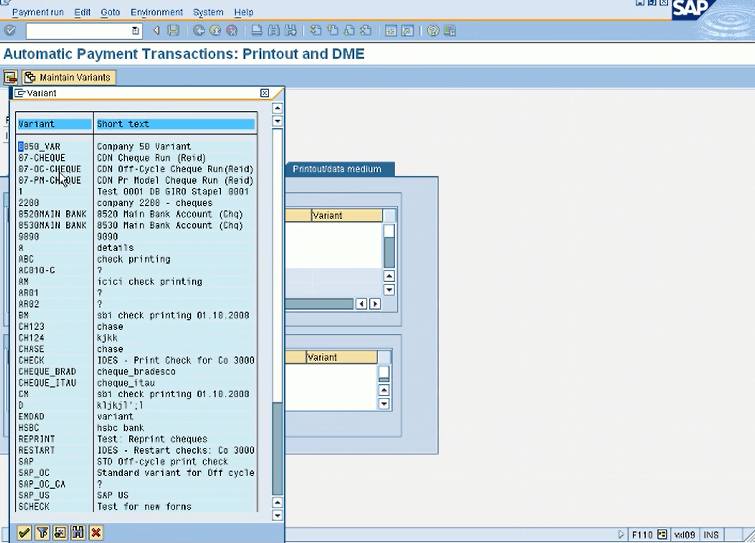
But in your case, you will have to do your setting. So type in a variant name. I guess the easiest option is to start with the company code, so you will remember just in case, because there are so many variants as you can see, so many variants it will be hard to look for it. So start with your company code, do an underscore and var. Just, you know, I did that so you don’t have to but just so you can remember which variant is your variant. So type in this variant, a variant name, and then click on maintain variant. Again, this is a one time setting. Once you have done this setting, you will just go and choose your variant in this field. But since you don’t have a variant, you will have to click on maintain variants to enter your parameters. Once you click on Maintain, it might ask you create a new one or something like that. Basically, what you need is this information, your company code, your payment method, your house bank, your account ID, your check lot number. And in this one, I need you to do the settings. Print checks, don’t check any of these. And, some more information, don’t check VOD. Do not void any checks, so it, you know, won’t create extra checks for you. So we need this setting in the variant. And then once you’re done with it, you will, you will save your parameters. Details have been saved. So that’s my first step.
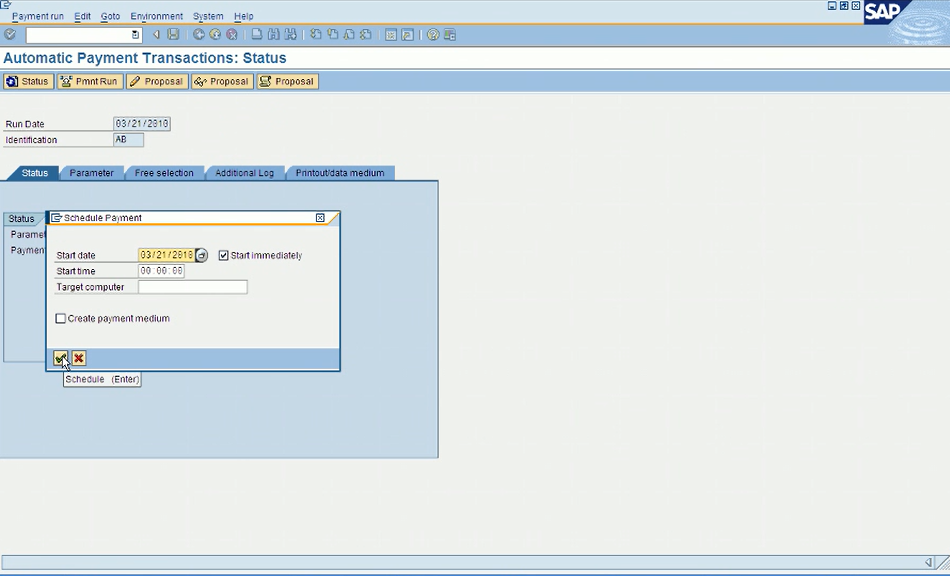
So let’s assume for this test we are okay with this proposal. So we will go to the next step, which is we will click on payment run.
So start immediately is fine. Click on the green check to continue.
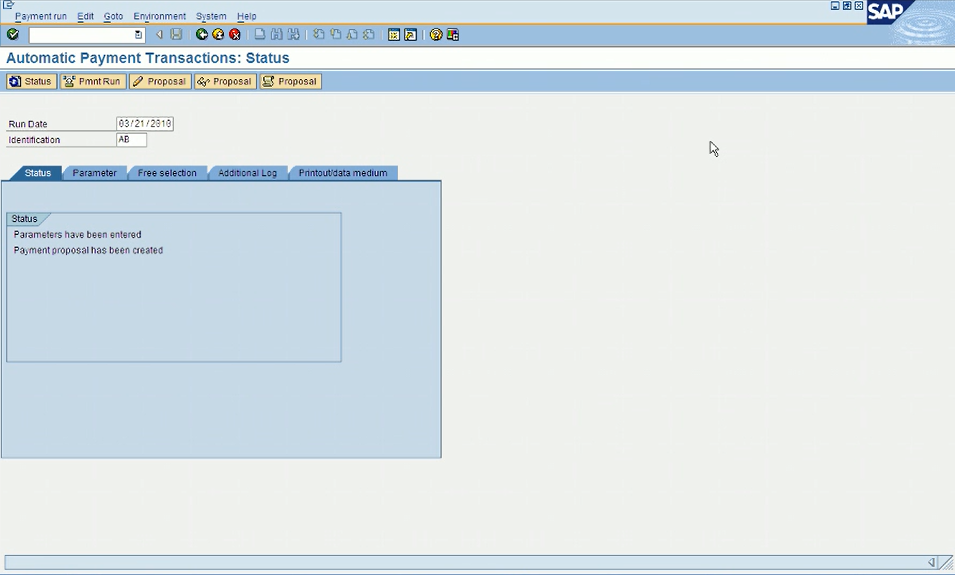
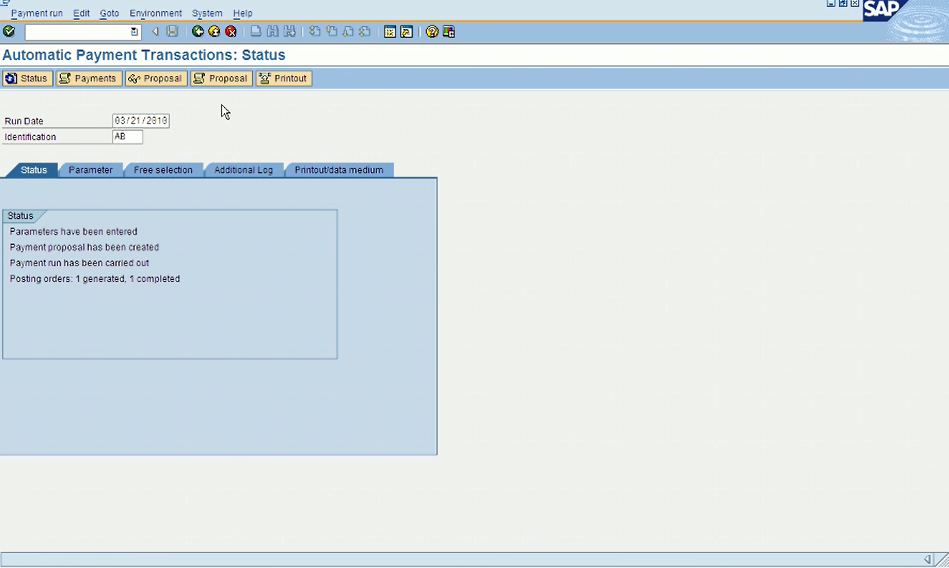
Click on the refresh status. Payment is posted.
Now the last step is we want to print checks. For that, you will click on the printout on your top right.
And change the question mark to 1.
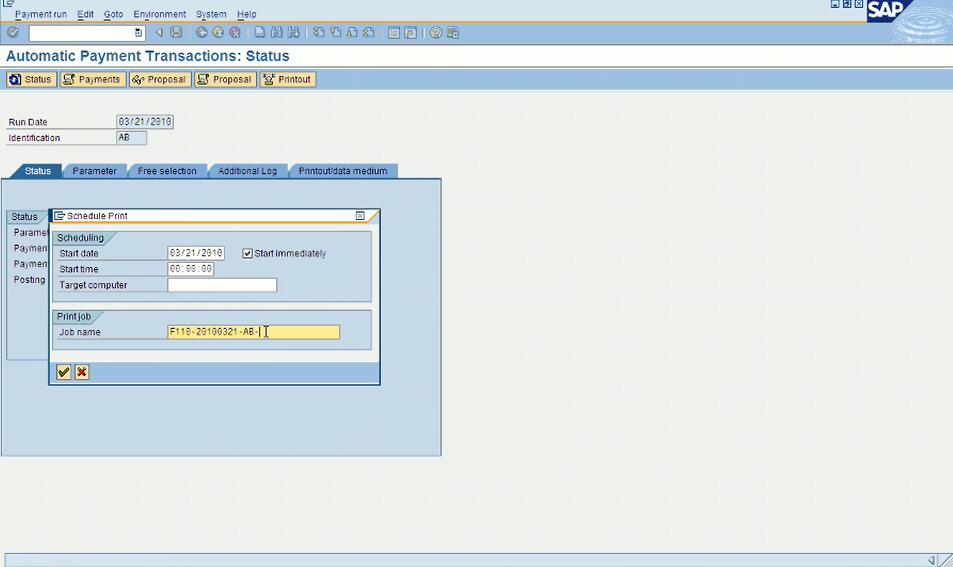
See the question mark In the job name? Just delete it and enter 1 there. Click on the green check.

Perfect. It has been scheduled.
To view the check, click on systems on the menu on the top and then own spool request.
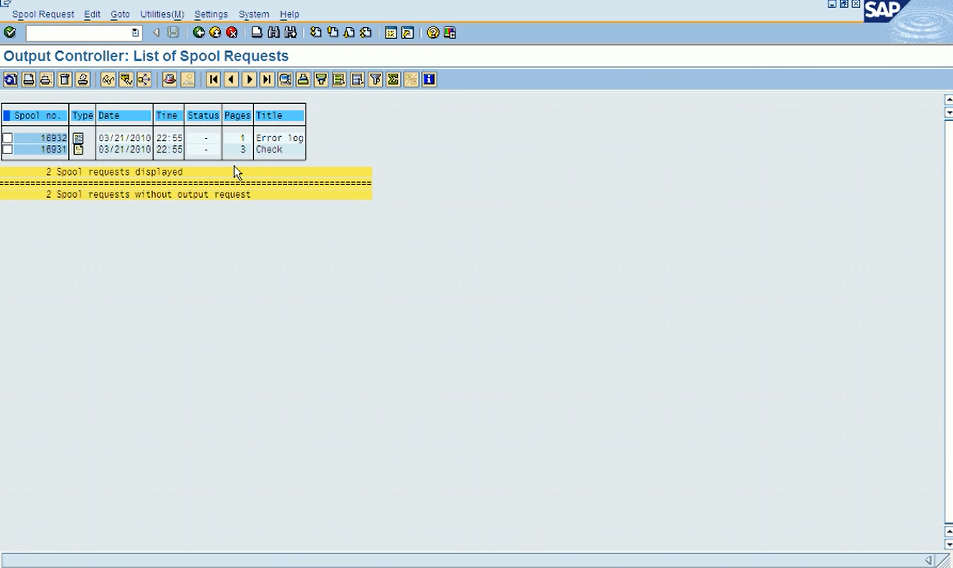
Click on the type column on the line you want to see, then you’ll see your check. But this is basically how you print check. Since we are not connected to a printer that’s why it will just add up in your spool. So, basically you put the stationery in the printer before you hit print and then it prints on the company check.